
Popular categories
Looking for a yarn?


Comments / Questions (191)
![]() Véronique wrote:
Véronique wrote:
Bonjour, RR du Devant Droit : - Faut-il faire aussi des RR comme avant sur les 71 premières et dernière mailles des devants jusqu'à 78 cm de haut. totale ? "Tricoter (sur l'endroit) 2 rangs sur les 9 premières m..." - 2 rangs = 1 rang endroit et 1 rang envers ou 2 rangs endroit (=4 au total), rangs retour inclus ?
27.05.2026 - 17:46DROPS Design answered:
Bonjour Véronique, lorsque vous tricotez les 18 dernières mailles pour le col, vous ne tricotez que les rangs raccourcis indiqués ici pour former le col (plus les précédents car on ne tricote maintenant que le col), autrement dit vous tricotez 2 rangs sur 9 m e 2 rangs sur les 18 m. Bon tricot!
28.05.2026 - 08:41
![]() Véronique wrote:
Véronique wrote:
Bonjour, Je suis arrivée sur la partie "augmentations". D'après ce que j'ai compris, il n'y en aura que 2 x 14 augmentations (sections envers). La première à 41 cm, l'autre à 52 cm de haut. totale (grossièrement 10 cm donc entre les deux). - Pouvez-vous confirmer ? - Quand doit-on arrêter avec les rangs raccourcis (à 52 cm de haut. total), lors de la division de l'ouvrage ? Merci d'avance pour vos explications et vos conseils.
13.05.2026 - 19:30DROPS Design answered:
Bonjour Véronique, confirmé :) vous avez effectivement 11 cm entre les 2 séries d'augmentations. Les rangs raccourcis se tricotent tout du long jusqu'à la fin des devants, où on va alors tricoter d'autres rangs raccourcis sur les 8 mailles du col. Bon tricot!
15.05.2026 - 08:00
![]() Vert-Eau wrote:
Vert-Eau wrote:
Hallo, ik heb problemen met het voorpand (met de minderingen en meerderingen) en de verkorte rijen. Begint de eerste verkorte rij met of zonder de vier ribbelsteekrijen aan het begin van het project? Alvast bedankt.
01.04.2026 - 16:12
![]() Véronique wrote:
Véronique wrote:
Bonjour, je pensais en avoir fini, mais le paragraphe "devant" et les rangs raccourcis me donnent des soucis. - Le 1er rang raccourci commence-t-il avec ou sans les 4 rangs mousse en début d'ouvrage ? - Les diagrammes correspondent-ils aux "sections" (8 x A.1, 4 x A.2, 1 x A.3) ? Si oui, je n'en ai que 13, comment procédez-vous pour les 14 diminutions et augmentations ? Merci d'avance.
31.03.2026 - 17:43DROPS Design answered:
Bonjour Véronique, les rangs raccourcis ne se tricotent que sur les mailles de la bordure devant, autrement dit seulement les mailles point mousse. Le 1er de ces rangs se tricote sur l'endroit pour le devant droit/sur l'envers pour le devant gauche. Vous allez diminuer là où vous tricotez 8 m env (au début et à la fin = 2 x) + là où vous tricotez 10 m env (après A.1 ou A.2 soit 12 x au total). Bon tricot!
07.04.2026 - 15:39
![]() Véronique wrote:
Véronique wrote:
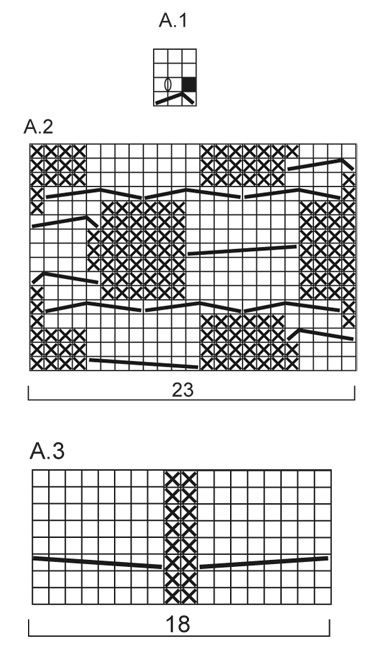
Merci pour tous vos conseils. J'ai encore une dernière question concernant le diagramme A.1. Il se compose de 4 rangs, les rangs 3 et 4 doivent donc être tricotés sur les mêmes rangs 3 et 4 des diagrammes A.2 et A.3, je suppose ? D'avance merci.
28.03.2026 - 13:05DROPS Design answered:
Bonjour Véronique, le diagramme A.1 se tricote effectivement sur 4 rangs, quand ces 4 rangs sont terminés, on reprend le diagramme au 1er rang, et, en même temps, on continue les autres diagrammes qui se tricotent sur un rythme différent en hauteur. Bon tricot!
07.04.2026 - 09:25
![]() Véronique wrote:
Véronique wrote:
Bonjour, Merci pour vos conseils. C'est en effet plus clair maintenant. Toutefois, j'ai toujours un souci avec le diagramme A.3 (18 mailles / 8 rangs ?) : - Est-ce que la torsade commence bien au rang numéro 3 ? - Les deux premiers rangs se tricotent donc avec 8 mailles endroit, 2 mailles envers, 8 mailles endroit ? D'avance merci.
27.03.2026 - 10:17DROPS Design answered:
Bonjour Véronique, oui c'est tout à fait ça pour A.3, on commence le diagramme au 1er rang = sur l'endroit, donc la torsade se fait au 3ème rang puis, quand on répète le diagramme en hauteur, on doit avoir 7 rangs entre chaque torsade. Bon tricot!
27.03.2026 - 15:48
![]() Véronique wrote:
Véronique wrote:
Bonjour, Je suis en train de faire la partie DOS et DEVANT en taille M/L (330 mailles augmentations incluses). Selon vos instructions et si je calcule toutes les mailles du 1er rang, le nombre de mailles dépasse de très loin les 330 mailles. De plus, le diagramme A3 ne correspond pas à la "tresse" située au dos. Vos explications me seraient d'un grand secours. D'avance merci.
27.03.2026 - 00:25DROPS Design answered:
Bonjour Véronique, tricotez ainsi: 18 m point mousse, 8 m env, puis A.1 (= 3 m), 12 env , puis A.2 (= 23 m), 12 m env, * A.1, 12 m env*, répéter de *-* 2 fois au total (soit (3+12)x2=30 m), A.2 (23 m), 12 m env, A.1 (3 m), 12 m env, A.3 (= 18 m), 12 m env, A.1, 12 m env, A.2 (23 m), 12 m env, *A.1, 12 m env *, répéter de *-* 2 fois au total (soit (3+12)x2 = 30 m), A.2 (23 m), 12 m env, A.1 (3m)*, 8 m env, 18 m au point mousse = 18+8+3+12+23+12+30+23+12+3+12+18+12+3+12+23+12+30+23+12+3+8+18=330 mailles. A.3 est juste ainsi: on met 4 m derrière et on tricote 4 m, puis 2 m envers et on met 4 m devant et on tricote 4 m - la torsade forme une sorte d'épi. Bon tricot!
27.03.2026 - 07:50
![]() Marie Boyd wrote:
Marie Boyd wrote:
I am 2 rows into this, and wonder about the A1 directions. Line 1, I decreased 2 (sl 1, k2tog, psso), then coming back, found that YO P1 gives only 2 stitches. Rows 3 and 4 indicate 3 stitches in this small sequence. What am I missing? It will be a lovely cardigan, now that I have finally worked out the pattern sequences!
11.01.2025 - 01:38DROPS Design answered:
Dear Marie, there is only 1 decrease in the first line of A.1. You have: slip 1 st as if to K, K 2, psso the 2 K sts. You knit 2 stitches, not knit 2 together (which would be K2TOG instead of K 2). So you decrease 1 stitch, then increase 1 in the yarn over, so you get the decreased stitch back and you work 3 stitches in each row in rows 3 and 4. Happy knitting!
12.01.2025 - 15:58
![]() Vanessa LASSERRE wrote:
Vanessa LASSERRE wrote:
Bonjour, Quand vous indiquez env. je tricote tous les rangs à l'envers, et me retrouve donc avec du point mousse, ce qui ne me semble pas du tout cohérent. Ne s'agit-il pas plutôt de jersey envers? Cela me semble plus logique par rapport au travail des torsades alentour. Merci. Vanessa
05.12.2024 - 15:53DROPS Design answered:
Bonjour Vanessa, sur l'envers, vous allez tricoter soit au point mousse (à l'endroit donc) soit comme indiqué dans les diagrammes "sur l'envers" autrement dit, les cases blanches se tricotent à l'envers sur l'envers (jersey endroit) et celles avec une croix à l'endroit sur l'envers (jersey envers). Bon tricot!
06.12.2024 - 07:47
![]() Laura wrote:
Laura wrote:
Onko mallipiirroksiin merkitty pelkästään oikean puolen kerrokset? Esim. Onko A1 kuvan kierros kun langankierto tehdään kierros 2 (np) vai kierros 3 (op) ?
17.08.2022 - 12:54DROPS Design answered:
Piirroksiin on merkitty sekä oikean että nurjan puolen kerrokset. Eli piirroksen A.1 langankierrot tehdään nurjan puolen kerroksella.
22.08.2022 - 17:25
|
||||||||||||||||||||||||||||||||||
Gwendolen#gwendolencardigan |
||||||||||||||||||||||||||||||||||
 |
 |
|||||||||||||||||||||||||||||||||
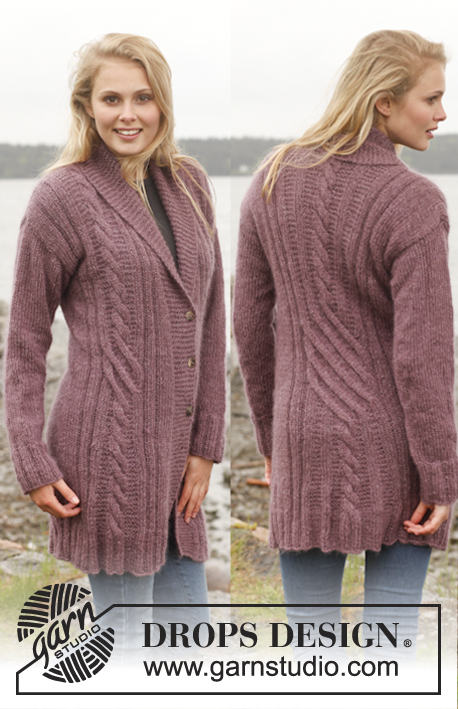
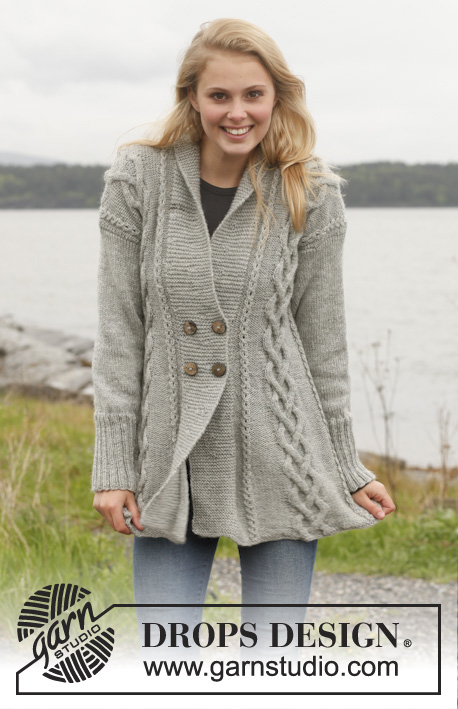
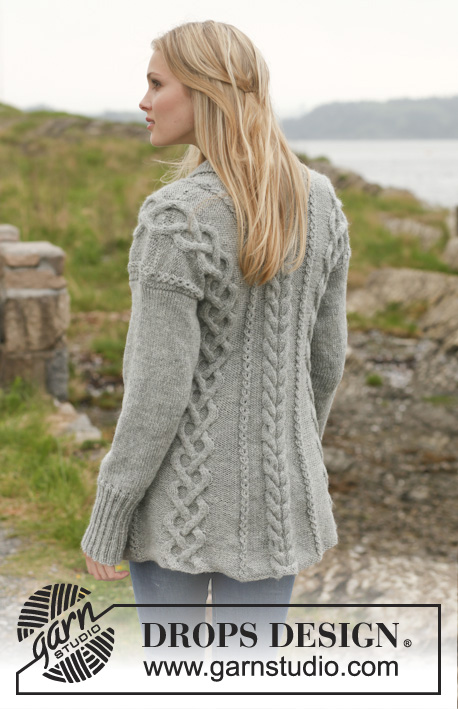
Knitted DROPS jacket with cables and shawl collar in ”Karisma”. Size: S - XXXL.
DROPS 151-1 |
||||||||||||||||||||||||||||||||||
|
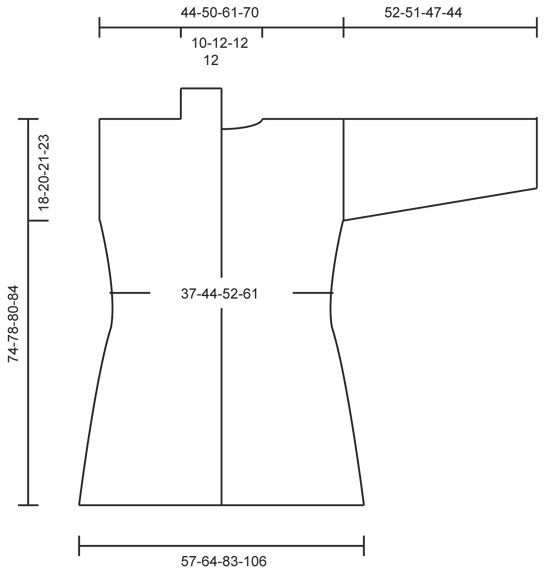
GARTER ST (back and forth on needle): K all rows. 1 ridge = 2 rows K. PATTERN: See diagrams A.1 to A.3. Diagrams show all rows in pattern from RS. SHORT ROWS IN BAND: Work short rows over sts in band to avoid it contracting vertically. Work like this every 10th row – from RS: Work 18 sts (= right band), turn and work back. Work 1 row over all sts as before. Turn and work 18 sts (= left band), turn and work back. Turn and work 1 row over all sts as before. BUTTONHOLES: Dec for buttonholes on right band. 1 buttonhole = K tog 3rd and 4th st from mid front, make 1 YO, K 8, K tog 13th and 14th st from mid front, make 1 YO (= 2 buttonholes). Dec for buttonholes when piece measures: SIZE S: 29 and 37 cm. SIZE M/L: 30 and 38 cm. SIZE XL: 31 and 39 cm. SIZE XXL/XXXL: 33 and 41 cm. ---------------------------------------------------------- BODY: Worked back and forth on circular needle to make room for all the sts. Cast on 266-290-350-386 sts (incl 18 band sts in each side towards mid front) on circular needle size 4 mm with Karisma. Work 2 RIDGES in garter st - see explanation above AT THE SAME TIME on last row inc 40 sts evenly = 306-330-390-426 sts. Then work as follows from RS: 18 sts in garter st (= band), P 8-8-8-10, * A.1 (= 3 sts), P 10-12-12-14 *, repeat from *-* 1-1-2-2 times in total, A.2 (= 23 sts), P 10-12-12-14, * A.1, P 10-12-12-14 *, repeat from *-* 2-2-2-2 times in total, A.2, * P 10-12-12-14, A.1 *, repeat from *-* 1-1-2-2 times in total, P 10-12-12-14, A.3 (= 18 sts), P 10-12-12-14, * A.1, P 10-12-12-14 *, repeat from *-* 1-1-2-2 times in total, A.2, P 10-12-12-14, * A.1, P 10-12-12-14 *, repeat from *-* 2 times in total, A.2, * P 10-12-12-14, A.1 *, repeat from *-* 1-1-2-2 times in total, P 8-8-8-10, 18 sts in garter st (= band). Continue this pattern AT THE SAME TIME work short rows over sts in band – see explanation above. AT THE SAME TIME when piece measures 8 cm, dec 1 st at beg of every P-section, P the first 2 sts tog (= 14-14-18-18 dec sts). Repeat dec every 5-5½-5½-6 cm, dec alternately at beg and end of all P-sections 5 more times (= 6 dec in total) = 222-246-282-318 sts. Remember to dec for BUTTONHOLES on right band - see explanation above. When piece measures 40-41-42-44 cm, on next RS row inc 1 st at beg of every P-section, inc with a YO and K yo twisted on next row from WS (= 14-14-18-18 inc sts). Repeat inc but at the end of every P-section when piece measures 50-52-53-55 cm = 250-274-318-354 sts. When piece measures 56-58-59-61 cm, divide the piece, finish front and back piece separately as follows: Slip the first and last 66-71-82-91 sts on a stitch holder for front piece, cut the yarn, then work only over the middle 118-132-154-172 sts (= back piece). BACK PIECE: = 118-132-154-172 sts. Continue pattern as before. When piece measures 72-76-78-82 cm, cast off the middle 22-26-26-26 sts for neck = 48-53-64-73 sts remain on each shoulder. Finish each part separately. Continue with pattern until piece measures 74-78-80-84 cm, cast off. RIGHT FRONT PIECE: Slip the first 66-71-82-91 sts back on needle. Continue pattern as before. When piece measures 74-78-80-84 cm, cast off the first 48-53-64-73 sts from WS for shoulder = 18 sts remain on needle. Work the rest of row. Then work short rows over the 18 sts as follows - beg from RS: * Work 2 rows back and forth over the first 9 sts, work 2 rows over all sts *, repeat from *-* until neck edge measures 7-8-8-8 cm at the shortest. Cast off. LEFT FRONT PIECE: Work as right but reversed. Cast off for shoulder from RS and beg short rows from WS. SLEEVE: Worked in the round on double pointed needles. Cast on 56-60-64-68 sts on double pointed needles size 3.5 mm with Karisma. Work rib = K 2/P 2. When piece measures 16-16-16-14 cm, switch to double pointed needles size 4 mm, continue in stocking st AT THE SAME TIME on 1st round dec 8-8-10-10 sts evenly = 48-52-54-58 sts. Insert 1 marker at the beg of round. AT THE SAME TIME inc 1 st on each side of marker, repeat inc every 2½-2-1½-1½ cm 13-15-16-18 more times (14-16-17-19 inc in total) = 76-84-88-96 sts. When piece measures 52-51-47-44 cm (shorter measurements in the larger sizes because of wider shoulders), cast off all sts. Knit another sleeve. ASSEMBLY: Sew the shoulder seams. Sew in sleeves. Sew the collar tog mid back and sew it to the neckline. Sew the buttons on to left band. |
||||||||||||||||||||||||||||||||||
Diagram explanations |
||||||||||||||||||||||||||||||||||
|
||||||||||||||||||||||||||||||||||
 |
||||||||||||||||||||||||||||||||||
 |
||||||||||||||||||||||||||||||||||
Have you finished this pattern?Tag your pictures with #dropspattern #gwendolencardigan or submit them to the #dropsfan gallery. Do you need help with this pattern?You'll find 25 tutorial videos, a Comments/Questions area and more by visiting the pattern on garnstudio.com. © 1982-2026 DROPS Design A/S. We reserve all rights. This document, including all its sub-sections, has copyrights. Read more about what you can do with our patterns at the bottom of each pattern on our site. |
||||||||||||||||||||||||||||||||||


With over 40 years in knitting and crochet design, DROPS Design offers one of the most extensive collections of free patterns on the internet - translated to 17 languages. As of today we count 325 catalogues and 12298 patterns translated into English (UK/cm).
We work hard to bring you the best knitting and crochet have to offer, inspiration and advice as well as great quality yarns at incredible prices! Would you like to use our patterns for other than personal use? You can read what you are allowed to do in the Copyright text at the bottom of all our patterns. Happy crafting!
Post a comment to pattern DROPS 151-1
We would love to hear what you have to say about this pattern!
If you want to leave a question, please make sure you select the correct category in the form below, to speed up the answering process. Required fields are marked *.