DROPS Kid-Silk
DROPS Kid-Silk
75% Mohair, 25% Silk
from 4.60 £ /25g
DROPS BabyAlpaca Silk
70% Alpaca, 30% Silk
Discontinued
find alternatives
DROPS Super Sale

Summer skies

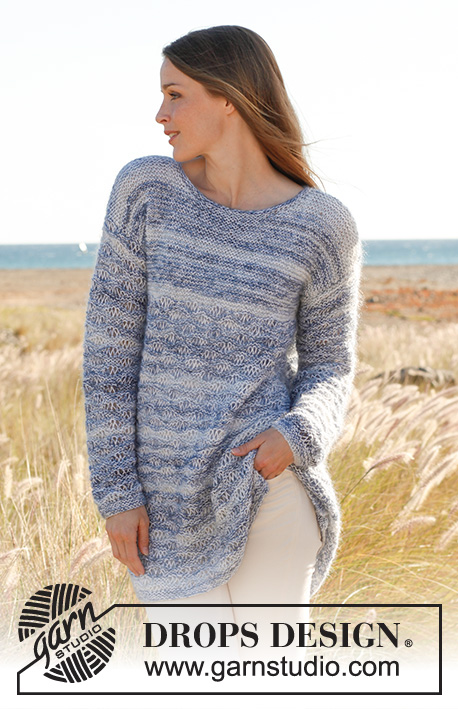
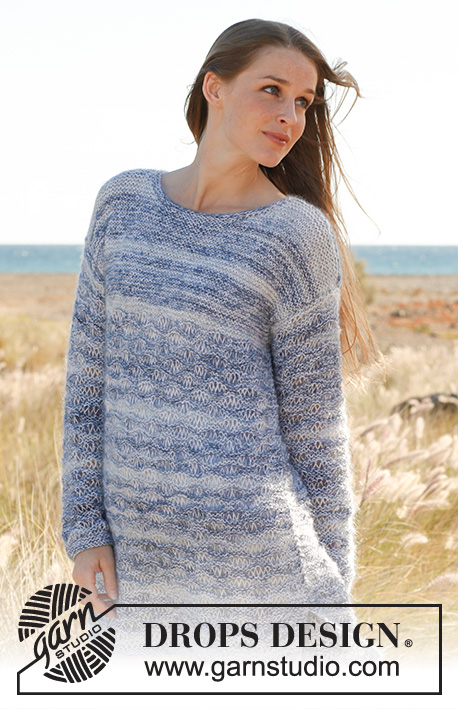
Knitted DROPS jumper in garter st with dropped sts in ”Kid-Silk” and “BabyAlpaca Silk”. Size S - XXXL

DROPS 145-11
DROPS design: Pattern no ks-076
Yarn group A + A
-----------------------------------------------------------
Size: S - M - L - XL - XXL - XXXL
Materials:
DROPS KID-SILK from Garnstudio
125-125-150-150-175-175 g colour no 26, sea mist

And use:
DROPS BABYALPACA SILK from Garnstudio
300-300-350-400-450-450 g colour no 1101, white

DROPS STRAIGHT NEEDLES SIZE 5 mm - or size needed to get 14 sts x 20 rows in pattern according to A.1 with 1 thread of each yarn = 10 x 10 cm. And 17 sts x 33 rows in garter st with 1 thread of each yarn = 10 x 10 cm.
DROPS CIRCULAR NEEDLE (40 cm) SIZE 4.5 mm – for neck edge.

-------------------------------------------------------

Alternative Yarn – See how to change yarns here
Yarn Groups A to F – Use the same pattern and change the yarn here
Yarn usage using an alternative yarn – Use our yarn converter here

-------------------------------------------------------

DROPS Kid-Silk
DROPS Kid-Silk
75% Mohair, 25% Silk
from 4.60 £ /25g
DROPS BabyAlpaca Silk
70% Alpaca, 30% Silk
Discontinued
find alternatives

DROPS Super Sale

SAVE 30% on 6 cotton favourites!
Valid until 12.04.2024

Pattern instructions

NOTE: This pattern is written in British English. All measurements in charts are in cm. For conversion from cm to inches - click here. There are different terms for crocheting in British and American English. If this pattern includes crochet, click for "crochet terms" here. For this pattern in American English, please click here.
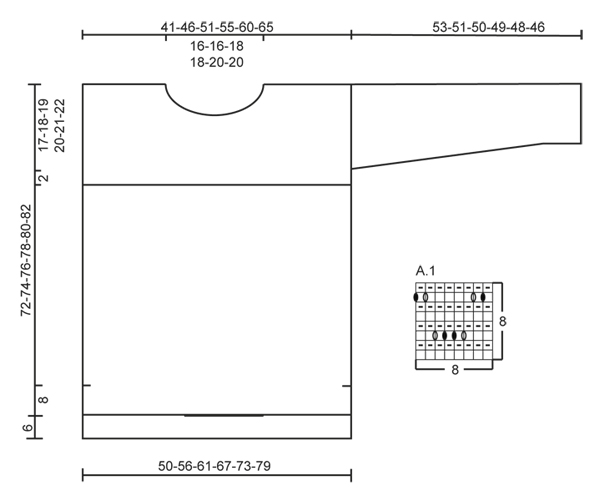
GARTER ST (back and forth on needle):
K all rows. 1 ridge = 2 rows K.

PATTERN:
See diagram A.1. Diagram shows all rows in pattern seen from RS.
----------------------------------------------------------

FRONT PIECE:
Cast on 80-89-98-107-116-125 sts on needle size 5 mm with 1 thread Kid-Silk and 1 thread Baby Alpaca Silk (= 2 threads). K 3 rows. Then K 1 row while AT THE SAME TIME dec 10-11-12-13-14-15 sts evenly (K approx. every 7th and 8th st tog) = 70-78-86-94-102-110 sts. Work next row as follows (= RS): 3 sts in GARTER ST – see explanation above, work pattern according to diagram A.1 until 3 sts remain and finish with 3 sts in GARTER ST. Continue pattern like this. REMEMBER THE KNITTING TENSION! When piece measures 8 cm, insert 1 marker in each side (marks height of vent). Continue pattern as before. When piece measures 53-54-55-56-57-58 cm - adjust after one whole repetition vertically, work in garter st back and forth over all sts. When piece measures 55-56-57-58-59-60 cm, insert 1 new marker in each side (marks where armhole beg). Continue to work until piece measures 66-68-70-70-72-74 cm. Now slip the middle 14-14-16-16-20-20 sts on 1 stitch holder for neck and finish each shoulder separately. Then cast off at beg of every row from neck: 2 sts 2 times and 1 st 3 times = 21-25-28-32-34-38 sts remain on shoulder. Continue to work until piece measures 72-74-76-78-80-82 cm and loosely cast off. Repeat on the other shoulder.

BACK PIECE:
Cast on and work as front piece but when piece measures 14 cm (instead of 8 cm), insert 1 marker in each side to mark the height of vent (back piece is 6 cm longer than front piece). When piece measures 59-60-61-62-63-64 cm - adjust after one whole repetition vertically, work in garter st back and forth over all sts. When piece measures 61-62-63-64-65-66 cm, insert 1 marker in each side to mark where armhole beg. Continue to work until piece measures 76-78-80-82-84-86 cm. Now cast off the middle 24-24-26-26-30-30 sts for neck and finish each shoulder separately. Continue to cast off 2 sts at beg of next row from neck = 21-25-28-32-34-38 sts. Continue to work until piece measures 78-80-82-84-86-88 cm and loosely cast off. Repeat on the other shoulder.

SLEEVE:
Cast on 38-38-38-38-40-40 sts on needle size 5 mm with 1 thread Kid-Silk and 1 thread Baby Alpaca Silk. Work 4 ridges in garter st while AT THE SAME TIME on last row dec 4 sts evenly = 34-34-34-34-36-36 sts. Work next row as follows from RS: Work 1-1-1-1-2-2 sts in garter st, work pattern according to diagram A.1 until 1-1-1-1-2-2 sts remain and work last st in garter st. Continue pattern like this. When piece measures 7-7-7-7-6-6 cm, inc 1 st in each side. Repeat inc in each side every 7-6-4½-4-4-3 cm 6-7-9-10-10-12 more times = 48-50-54-56-58-62 sts – NOTE: Work inc sts in pattern but work them in garter st until they fit the pattern. When piece measures 53-51-50-49-48-46 cm, loosely cast off all sts.

ASSEMBLY:
Sew the shoulder seams. Sew in sleeves between the markers on front and back piece. Sew underarm and side seams in one in front loop of outermost st to make the seam flat – sew down to marker which marks the height of vent (i.e. that back piece is 6 cm longer than front piece).

NECK EDGE:
Beg mid back and knit up approx. 70 to 90 sts around the neck (incl sts on stitch holder at the front) on circular needle size 4.5 mm with 1 thread Kid-Silk + 1 thread Baby Alpaca Silk. P 1 round, K 1 round and P 1 round, then loosely cast off with K.


Diagram

symbols = K from RS
symbols = K from WS
symbols = 2 YOs (slip YOs off the needle on next row)
symbols = 3 YOs (slip YOs off the needle on next row)
diagram
Do you have a question? See a list of frequently asked questions (FAQ)

Knitting tension is what determines the final measurements of your work, and is usually measured per 10 x 10 cm. It is provided like so: number of stitches in width x number of rows in height - eg: 19 stitches x 26 rows = 10 x 10 cm.

The knitting tension is very individual; some people knit/crochet loosely while others work tightly. You adjust the knitting tension with the needle size, which is why the suggested needle size is only meant as a guide! You need to adjust this (up or down) to ensure that YOUR knitting tension matches the knitting tension provided in the pattern. If you work with a different knitting tension than provided you will have a different yarn consumption, and your work will have different measurements than what the pattern suggests.

The knitting tension also determines which yarns can replace each other. As long as you achieve the same knitting tension you can replace one yarn with another.

See DROPS lesson: How to measure your tension/gauge

See DROPS video: How to make a gauge tension swatch

The required amount of yarn is provided in grams, eg: 450 g. To calculate how many balls you’ll need you first need to know how many grams are in 1 ball (25g, 50g or 100g). This information is available if you click on the individual yarn quality on our pages. Divide the amount required with the amount of each ball. For example, if each ball is 50g (the most common amount), the calculation will be as follows: 450 / 50 = 9 balls.

The important thing when changing from one yarn to another is that the knitting/crochet tension remains the same. This is so that the measurements of the finished piece will be the same as on the sketch provided. It is easier to achieve the same knitting tension using yarns from the same yarn group. It is also possible to work with multiple strands of a thinner yarn to achieve the knitting tension of a thicker one. Please try our yarn converter. We recommend you to always work a test swatch.

Please NOTE: when changing yarn the garment might have a different look and feel to the garment in the photo, due to individual properties and qualities of each yarn.

See DROPS lesson: Can I use a different yarn than the one mentioned in the pattern?

All our yarns are categorised into yarn groups (from A to F) according to thickness and knitting tension – group A contains the thinnest yarns and group F the thickest. This makes it easier for you to find alternative yarns to our patterns, should you wish to switch yarn. All yarns within the same group have a similar knitting tension and can easily replace each other. However, different yarn qualities have different structures and properties which will give the finished work a unique look and feel.

Click here for an overview of the yarns in each yarn group

At the top of all our patterns you’ll find a link to our yarn calculator, which is a helpful tool should you wish to use a different yarn than suggested. By filling in the yarn quality you wish to replace, the amount (in your size) and number of strands, the calculator will present good alternative yarns with the same knitting tension. Additionally it will tell you how much you’ll require in the new qualities and whether you’ll need to work with multiple strands. Most skeins are 50g (some are 25g or 100g).

If the pattern is worked with multiple colours, every colour will have to be calculated separately. Similarly, if the pattern is worked with several strands of different yarns (for example 1 strand Alpaca and 1 strand Kid-Silk) you will have to find alternatives for each, individually.

Click here to see our yarn calculator

Since different yarns have different qualities and textures we have chosen to keep the original yarn in our patterns. However, you can easily find options among our available qualities by using our yarn calculator, or simply pick a yarn from the same yarn group.

It is possible that some retailers still have discontinued yarns in stock, or that someone has a few skeins at home that they would like to find patterns for.

The yarn calculator will provide both alternative yarn as well as required amount in the new quality.

If you think it's hard to decide what size to make, it can be a good idea to measure a garment you own already and like the size of. Then you can pick the size by comparing those measures with the ones available in the pattern's size chart.

You'll find the size chart at the bottom of the pattern.

See DROPS lesson: How to read size chart

The needle size provided in the pattern serves only as a guide, the important thing is to follow the knitting tension. And since knitting tension is very individual, you will have to adjust the needle size to ensure that YOUR tension is the same as in the pattern – maybe you’ll have to adjust 1, or even 2 needle sizes, up or down to achieve the correct tension. For this, we recommend that you work test swatches.

Should you work with a different knitting tension than the one provided, the measurements of the finished garment might deviate from the measurement sketch.

See DROPS lesson: How to measure your tension/gauge

See DROPS video: How to make a tension/gauge swatch

Working a garment top-down provides more flexibility and room for personal adjustment. For example it is easier to try the garment on while working, as well as making adjustments to length of yoke and shoulder caps.

The instructions are carefully explaining every step, in the correct order. Diagrams are adjusted to the knitting direction and are worked as usual.

The diagram depicts all rows/rounds, and every stitch seen from the right side. It is read from bottom to top, from right to left. 1 square = 1 stitch.

When working back and forth, every other row is worked from the right side and every other row is worked from the wrong side. When working from the wrong side, the diagram will have to be worked reversed: from left to right, knit stitches are purled, purl stitches are knit etc.

When working in the round every round is worked from the right side and the diagram are worked from right to left on all rounds.

See DROPS lesson: How to read knitting diagrams

The diagram depicts all rows/rounds, and every stitch seen from the right side. It is worked from bottom to top, from right to left.

When working back and forth every other row is worked from the right side: from right to left and every other row is worked from the wrong side: from left to right.

When working in the round, every row in the diagram are worked from the right side, from right to left.

When working a circular diagram you start in the middle and work your way outwards, counter clockwise, row by row.

The rows usually start with a given number of chain stitches (equivalent to the height of the following stitch), this will either be depicted in the diagram or explained in the pattern.

See DROPS lesson: How to read crochet diagrams

Instructions for working several diagrams after each other on the same row/round, will often be written like so: “work A.1, A.2, A.3 a total of 0-0-2-3-4 times". This means you work A.1 once, then A.2 is worked once, and A.3 is repeated (in width) the number of times provided for your size – in this case like so: S = 0 times, M = 0 times, L=2 times, XL= 3 times and XXL = 4 times.

The diagrams are worked as usual: begin with the first row in A.1, then work the first row in A.2 etc.

See DROPS lesson: How to read knitting diagrams

See DROPS lesson: How to read crochet diagrams

The total width of the garment (from wrist-to-wrist) will be larger in the larger sizes, despite the actual sleeves being shorter. The larger sizes have longer sleeve caps and wider shoulders, so there will be a good fit in all sizes.

The measurement sketch/schematic drawing provides information regarding the full length of the garment. If it’s a jumper or a jacket the length is measured from the highest point on the shoulder closest to the neckline, and straight down to the bottom of the garment. It is NOT measured from the tip of shoulder. Similarly, the length of yoke is measured from the highest point on the shoulder and down to where yoke is split into body and sleeves.

On a jacket measures are never taken along bands, unless specifically stated. Always measure inside band stitches when measuring the length.

See DROPS lesson: How to read a schematic drawing

Diagrams are often repeated on the round or in height. 1 repeat is the diagram the way it appears in the pattern. If it says to work 5 repeats of A.1 in the round, then you work A.1 a total of 5 times after/next to each other in the round. If it says to work 2 repeats of A.1 vertically/in height you work the entire diagram once, then begin again at the start and work the entire diagram one more time.

Chain stitches are slightly narrower than other stitches and to avoid working the cast-on edge too tight, we simply chain more stitches to begin with. The stitch count will be adjusted on the following row to fit the pattern and measurement sketch.

The rib edge is more elastic and will contract slightly compared to, for example, stocking stitch. By increasing before the rib edge, you avoid a visible difference in width between the rib edge and the rest of the body.

It’s very easy to cast off too tightly, and by making yarn overs while casting off (and simultaneously casting these off) you avoid a too tight cast off edge.

See DROPS video: How to bind off with yarn overs (yo)

To achieve an even increase (or decrease) you can increase on, for example: every 3rd and 4th row alternately, like so: work 2 rows and increase on the 3rd row, work 3 rows and increase on the 4th. Repeat this until the increase is complete.

See DROPS lesson: Increase or decrease 1 st on every 3rd and 4th row alternately

Should you prefer to work in the round instead of back and forth, you may of course adjust the pattern. You’ll need to add steeks mid-front (usually 5 stitches), and follow the instructions. When you would normally turn and work from the wrong side, simply work across the steek and continue in the round. At the end you’ll cut the piece open, pick up stitches to work bands, and cover the cut edges.

See DROPS video: How to knit steeks and cut open

Should you prefer to work back and forth instead of in the round, you may of course adjust the pattern so you work the pieces separately and then assemble them at the end. Divide the stitches for the body in 2, add 1 edge stitch in each side (for sewing) and work the front and back pieces separately.

See DROPS lesson: Can I adapt a pattern for circular needles into straight needles?

Pattern repeats can vary slightly in the different sizes, in order to get the correct proportions. If you’re not working the exact same size as the garment in the photo, yours might deviate slightly. This has been carefully developed and adjusted so that the complete impression of the garment is the same in all sizes.

Make sure to follow instructions and diagrams for your size!

If you have found a pattern you like which is available in women’s size it’s not very difficult to convert it to men’s size. The biggest difference will be the length of sleeves and body. Start working on the women size that you think would fit across the chest. The additional length will be worked right before you cast off for the armhole/sleeve cap. If the pattern is worked top-down you can add the length right after the armhole or before the first decrease on sleeve.

Regarding additional yarn amount, this will depend on how much length you add, but it is better with a skein too many than too few.

All yarns will have excess fibres (from production) that might come off as lint or shedding. Brushed yarns (ie hairier yarns) have more of these loose, excess fibres, causing more shedding.

Shedding also depends on what is worn under or over the garment, and whether this pulls at the yarn fibres. It’s therefore not possible to guarantee that there will be no shedding

Below are some tips on how to get the best result when working with hairier yarns:

1. When the garment is finished (before you wash it) shake it vigorously so the looser hairs come off. NOTE: do NOT use a lint roller, brush or any method that pulls at the yarn.

2. Place the garment in a plastic bag and put it in your freezer - the temperature will cause the fibres to become less attached to each other, and excess fibres will come off easier.

3. Leave in the freezer for a few hours before taking it out and shaking it again.

4. Wash the garment according to the instructions on the yarn label.

Pilling is a natural process that happens to even the most exclusive of fibers. It's a natural sign of wear and tear that is hard to avoid, and that is most visible in high friction areas of your garment like a sweater's arms and cuffs.

You can make your garment look as new by removing the pilling, using a fabric comb or a pill/lint remover.

Still can't find the answer you need? Then scroll down and leave your question so one of our experts can try to help you. This will be done normally within 5 to 10 working days.
In the meantime, you can read the questions and answers that others have left to this pattern or join the DROPS Workshop on Facebook to get help from fellow knitters/crocheters!

Post a comment to pattern DROPS 145-11

We would love to hear what you have to say about this pattern!

If you want to leave a question, please make sure you select the correct category in the form below, to speed up the answering process. Required fields are marked *.

Comments / Questions (39)

country flag Hilda Sørum wrote:

Ermelengden i str S er lengst. Kan dette være riktig? det er 53 cm i str small, og i str xxxl er det 46 cm, Hva er riktig?

14.04.2017 - 21:23

DROPS Design answered:

Hei Hilda. Det er riktig slik det står i oppskriften. Ettersom bolen er mindre i de minste størrelsen trenger man lengre ermer, mens det i de største størrelsene er bolen større og da skal man ikke ha så lange ermer. Man har ikke lengre ermer selv om man må ha en større vidde på genseren.

19.04.2017 - 08:13

country flag Ludmilla wrote:

Bonjour, j'ai du mal à comprendre le point. Sur le premier rang du point fantaisie, il faut faire 3 m. points mousse au début et à la fin. Faut-il répéter les 3 m au point mousse ou seulement 1m. lisiere et le point fantaisie lorsqu'on fait les rangs de jetés? Merci

27.01.2016 - 03:10

DROPS Design answered:

Bonjour Ludmilla, on tricote 3 m point mousse, on répète ensuite les 8 m de A.1 et on termine par 3 m point mousse, c'est-à-dire que l'on garde ces 3 m point mousse au début et à la fin de chaque rang jusqu'à la fin. Bon tricot!

27.01.2016 - 10:28

country flag Hannelore Liselotte wrote:

Kann ich irgendwie vermeiden, dass ich ein Garn nutzen muss, in dem (so viel) Mohair ist? Ich möchte den Pullover gerne verschenken und weiß, dass die zu Beschenkende dieses "fusselige" nicht mag. Danke für Ihre Mühe!:)

30.09.2015 - 08:56

DROPS Design answered:

Sie können statt Kid-Silk auch ein anderes Garn der Garngruppe A verwenden. Dazu müssen Sie beachten, dass Sie die benötigte Garnmenge anhand der Lauflänge neu berechnen müssen. Kid-Silk ist ein sehr leichtes Garn, der Pullover wird mit einem anderen Garn etwas schwerer werden und sich dadurch, aufgrund des Musters mit den Fallmaschen, evtl. geringfügig anders aushängen, aber grundsätzlich ist es möglich, Kid-Silk zu tauschen.

02.10.2015 - 11:31

country flag Carina wrote:

Bei beiden Garnen wird als Garnalternative das "Cotton Viscose uni colour" genannt. Kann ich den Pullover auch nur mit dem Garn Cotton Viscose uni colour stricken oder sollten es zwei unterschiedliche Garnqualitäten sein?

27.09.2015 - 15:14

DROPS Design answered:

Theoretisch ist es möglich, ihn mit 2 Fäden Cotton Viscose zu stricken, da Cotton Viscose auch in Garngruppe A gehört und der Pulli mit 2 Garnen der Gruppe A gestrickt wird. Allerdings ist das Muster durch die Fallmaschen etwas dehnbarer, wenn Sie den Pulli nur mit Cotton Vicose stricken, wird er schwerer und könnte sich in der Länge noch merkbar aushängen. Ich würde daher empfehlen, Cotton Viscose + Kid-Silk zu verwenden. Beachten Sie, dass Sie den Garnverbrauch für Cotton Viscose anhand der Lauflänge neu berechnen und die Maschenprobe einhalten müssen.

27.09.2015 - 20:54

country flag Lis Scheel Elsberg wrote:

Jeg betrager mig selv som en erfaren strikker, men jeg måtte opgive dette mønster. det ser helt forkert ud. Savner en video instruktionsvideo.

22.08.2013 - 19:33

DROPS Design answered:

Hej Lis. Der kommer snart en video paa dette mönster. Vi er igang med den ;-)

05.09.2013 - 17:46

country flag Tina Pedersen wrote:

I laver nogle kanongode instruktionsvideoer, kunne I ikke også lave en til opskrift 145-11 på mønstret, jeg er nemlig ikke sikker på at jeg gør det rigtigt, og jeg er nybegynder

25.05.2013 - 22:26

DROPS Design answered:

Hej Tina. Vi har sat det paa listen og laver en video hurtigst muligt.

28.05.2013 - 11:35

country flag Majvor wrote:

Precis vad jag behöver till alla mina jeans.

14.01.2013 - 19:06

country flag Anneke wrote:

Zeebries. met dit mooie garen wordt een eenvoudig model iets bijzonders. Erg mooi!! :-)

14.01.2013 - 17:19

country flag Maisonneuve Annick wrote:

Nuage bleu

08.01.2013 - 01:13

FILIO wrote:

AYTO UA ITHELA NA TO FTIAXO

07.01.2013 - 09:02