
Popular categories
Looking for a yarn?


Comments / Questions (46)
![]() Sh wrote:
Sh wrote:
Hej jeg ville vide hvis man strikker huen uden halestykket hvor meget garn skal der bruges til strl 2 ?
23.08.2025 - 19:52DROPS Design answered:
Hej. Det har vi dessvärre ingen uppgift om. Mvh DROPS Design
26.08.2025 - 13:53
![]() Sh wrote:
Sh wrote:
Hej jeg vil gerne strikke huen, men uden halestykket, hvordan skal man så lukke det af?
13.01.2025 - 21:42DROPS Design answered:
Hej, da syr du bare de 2 stykker sammen istedet for at sætte maskerne fra Halestykket på strømpepinde :)
14.01.2025 - 11:58
![]() Sabrina wrote:
Sabrina wrote:
Hallo liebes Team, ich stricke die Mütze und bin nun beim "Schwanzteil" angekommen. Ich verstehe leider nicht, wie die Abnahmen da funktionieren sollen. Soll ich die M vor und die nach der re M auf der Hilfsnadel zusammenstricken, und wenn ja, was bedeutet dann "die M auf der Hilfsnadel über die zusammengestrickten M legen?" Wie viele M werden da auf einmal abgenommen? Bitte um eine klare Schritt für Schritt Beschreibung! Lieben Gruß, Sabrina
11.12.2024 - 20:28DROPS Design answered:
Liebe Sabrina, in diesem Video zeigen wir, wie man so abnimmt: die mittlere Masche im Video ist diejenige die bei der Mütze hier krausrechts gestrickt wird, die Masche davor + die nächste werden zusammengestrickt und die krausrechte Masche darüber gezogen. So nehmen Sie 1 der Masche von hinten + 1 der neuen Maschen jeweils ab - diese Abnahmen an beiden Seiten (= an beiden "Übergang" zwischen die Maschen der Mütze und die neuen Maschen wiederholen. Viel Spaß beim Stricken!
12.12.2024 - 09:53
![]() Marjorie Magrath wrote:
Marjorie Magrath wrote:
Please explain cast off 6 stitches mid underarm is this at the beginning of the round . Do I continue on double pointed to shape sleeve cap or use straight needles.
27.10.2024 - 15:47DROPS Design answered:
Dear Marjorie, the mid under the sleeve should be the beginning of the row. So when you cast off 6 stitches you should cast off 3 at the start and 3 at the end (at each side of the mid under the sleeve or starting point. You can continue with circular needles, to work back and forth. Happy knitting!
27.10.2024 - 22:33
![]() Marjorie Magrath wrote:
Marjorie Magrath wrote:
I am knitting the right front is it the first 9 stitches I slip onto a thread before shaping the neckline. Also can I use circular needles instead double pointed for the sleeves. When you say mid under arm is this the start of the row.
20.10.2024 - 10:13DROPS Design answered:
Dear Marjorie, you should slip the stitches to shape the neckline at the front middle, wich is for the right front is the fiest few stitches on the right side. (it will be the first few stitches on the wrong side row of the left front). Yes, you can use circular needles, if that is what more comfortable for you. Happy Knitting!
20.10.2024 - 11:09
![]() Marjorie wrote:
Marjorie wrote:
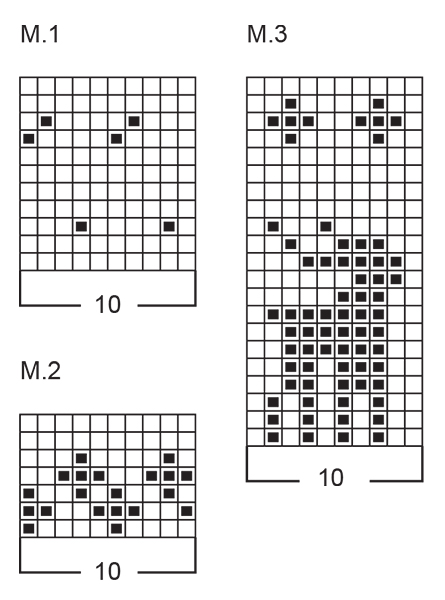
I am confused I am knitting on circular needles knitting the cardigan so using charts m1 m2 m3 m4 m5 .are these charts read from the right every time for every row. Also there are 11 rows in the pattern are these 11 rows repeated to the required length.
15.10.2024 - 10:15DROPS Design answered:
Hi Marjorie, When you work back from the wrong side, you read the charts from left to right. M.1 is repeated in height to the correct length, the other charts are worked just the once. Happy knitting!
15.10.2024 - 10:31
![]() Marjorie Magrath wrote:
Marjorie Magrath wrote:
I am knitting the cardigan little dancer I don't understand the instruction in brackets incl 1 edge stitch both sides towards mid front. Is this a knit stitch? And how many stitches in?
13.10.2024 - 17:24DROPS Design answered:
Dear Marjorie, you cast on the number of stitches indicated. In this number of stitches you already include the edge stitches in garter stitch (you don't need to add stitches for it). These edge stitches in garter stitch are always knitted (both from the right side and the wrong side). The edge stitches are located at the edge/side of the piece you are working, so they will be the first and last stitch in the row. You can click on the word "edge stitch" in the pattern for more information. Happy knitting!
13.10.2024 - 22:24
![]() Margarita wrote:
Margarita wrote:
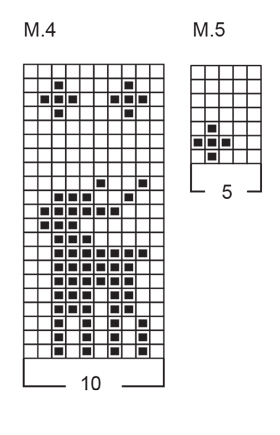
No entiendo el patrón de la manta. ¿Los centímetros que aparecen son los de las filas o los de los puntos de cada muestra? ¿Para qué sirven los diagramas A1,A2,A3 y A4?. No veo que aparezcan en ningún patrón . ¿Podríais enviarme una foto de la manta tejida? En la web los 3 enlaces enseñan la misma foto.
09.06.2024 - 09:00DROPS Design answered:
Hola Margarita, los cm son en vertical. Trabajas el patrón sobre todos los 120 pts centrales. Hay una errata en el patrón; en la manta se trabajan los diagramas A; los M son para el jersey. Entonces, trabajas todas las filas de A.3 y repites hasta tener 8 cm en vertical del patrón A.3. Después trabajar una repetición en vertical de A.4. Después trabajar aprox. 10 cm de A.1, asegurándose de acabar con una repetición completa en vertical. Continuar como se indica en el patrón. No disponemos de más fotos del patrón que las mostradas en la página online.
09.06.2024 - 20:52
![]() May wrote:
May wrote:
Bonjour, je fais la cagoule, je ne comprends pas le patron quand on commence à tricoter la pointe. Le patron dit qu'il faut continuer "1 m lis au point mousse de chaque côté" et diminuer tous les deux rangs. Combien de diminutions et de rangs faut-il faire avant de commencer à tricoter en rond pour faire les diminutions tous les 4 tours?? Ou faut il tricoter en rond tout de suite??
03.10.2023 - 08:53DROPS Design answered:
Bonjour May, la pointe se tricote en rond et on doit diminuer tous les 4-4-5 (4-5) tours jusqu'à ce qu'il reste 10 mailles (correction faite, merci). Autrement dit, on va diminuer de chaque côté de la partie centrale et en même temps les mailles de chaque côté. Bon tricot!
04.10.2023 - 07:33
![]() Christine Barrington wrote:
Christine Barrington wrote:
How do I work the button bands for Little Dancer? Do I knit the bands as I am knitting the garment, or at the end? How many stitches is the band worked on? Thank you.
16.09.2021 - 02:37DROPS Design answered:
Dear Mrs Barrington, front band edges are worked separately at the end, they are explained under the section called Assembly. Happy knitting!
16.09.2021 - 07:35
|
|||||||||||||
Little Dancer#littledancerjacket |
|||||||||||||
 |
 |
||||||||||||
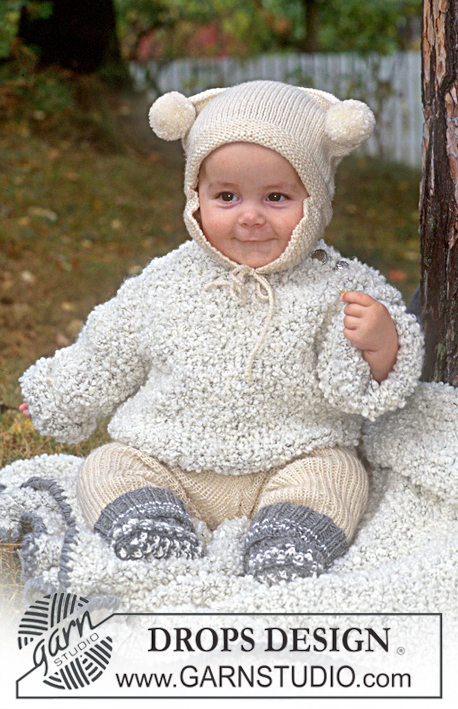
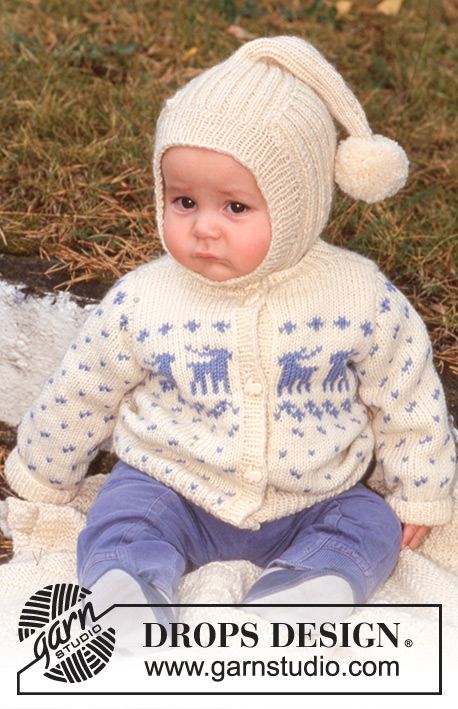
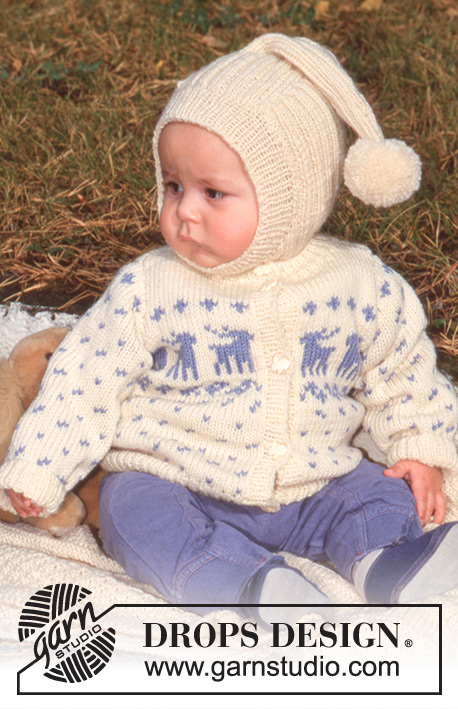
Sweater with deer motif, hat / balaclava with ‘tail’ and blanket in Karisma Superwash. Theme: Baby blanket
DROPS Children 9-20 |
|||||||||||||
|
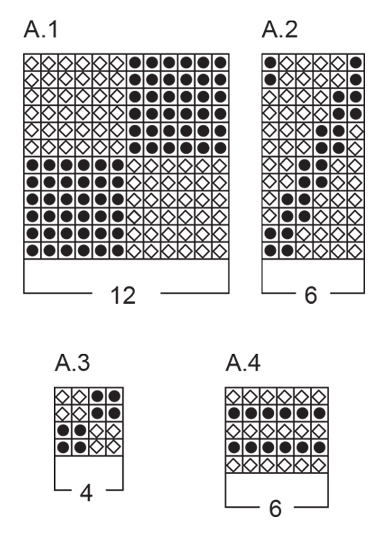
Knitting tension: 22 sts x 30 rows with Karisma on needle size 3.5 mm and stocking st = 10 x 10 cm. Rib: * K1, P1 *, repeat from *-*. Garter st (back and forth): knit all rows. Pattern: See diagram. Stocking st entire pattern. Back and front piece: Knitted back and forth on circular needle from mid front. Cast on 122-132-142 (162-182) sts (incl 1 edge st each side towards mid front) on circular needle size 2.5 mm in off-white and knit Rib. After 3-3-3 (4-4) cm change to circular needle size 3.5 mm and continue in M.1 over all sts (garter st edge st throughout). Remember knitting tension! When piece measures 15-17-20 (20-22) cm knit M.2. After M.2 knit next row as follows: 1 edge st, 30-30-30 (40-40) sts of M.3, 0-5-10 (0-10) sts in off- white (= under sleeve), 30-30-30 (40-40) sts of M.3, 30-30-30 (40-40) sts of M.4, 0-5-10 (0-10) sts with off-white (=under sleeve), 30-30-30 (40-40) sts of M.4, 1 edge st. Continue in pattern, at the same time when piece measures 19-20-23 (23-25) cm cast off for armhole as follows: Knit 29-31-33 (38-43) sts = front piece, cast off 4-5-6 (6-6) sts for armhole, knit 56-60-64 (74-84) sts = back , cast off 4-5-6 (6-6) sts for armhole, knit 29-31-33 (38-43) sts = front piece. Complete each piece separately. Right front piece: = 29-31-33 (38-43) sts. Cast off for arm hole on every other row: 2 sts 2-2-0 (2-2) times, 1 st 3-2-4 (2-4) times = 22-25-29 (32-35) sts. After M.3 and M.4 complete piece in off-white. When piece measures 28-29-33 (34-36) cm slip 7-8-9 (11-12) sts on a thread mid front for neck and dec to shape the neckline on every other row: 2 sts 3 times = 9-11-14 (15-17) sts left on shoulder. Cast off when piece measures 30-32-36 (37-40) cm. Left front piece: Knit like right piece, but reversed. Back: = 56-60-64 (74-84) sts. Cast off for armhole as described for front piece = 42-48-56 (62-68) sts. When piece measures 29-31-35 (36-39) cm cast off the middle 20-22-24 (28-30) sts for neck and cast off 2 sts on next row towards neckline = 9-11-14 (15-17) sts left on each shoulder. Cast off when piece measures 30-32-36 (37-40) cm. Sleeve: Cast on 40-40-40 (44-44) sts on double needles size 2.5 mm with off-white. Knit 3-3-3 (4-4) cm Rib. Change to double pointed needles size 3.5 mm and continue in M.1, at the same time inc 0-0-0 (1-1) st = 40-40-40 (45-45) sts on first round. At the same time inc 2 sts mid under arm: 2-4-6 (6-8) times on every 23-12-9 (10-9) rows = 44-48-52 (57-61) sts. When piece measures 18-20-22 (25-29) cm cast off 6 sts mid under arm and complete sleeve back and forth on needle. Cast off for sleeve cap each side on every other row: 2 sts 1-2-2 (3-3) times, 1 st 5-3-2 (2-1) times, 2 sts 1-2-3 (3-3) times, 3 sts 1-1-1 (1-2) times. At the same time when approx 7 rows left of the decreases knit M.5 but adjust to M.1 – there should be 4 rows of off -white between the spots in M.1 and M.5. After all sleeve cap decreases are complete there are 14-14-16 (17-17) sts left on row, cast off, sleeve measures approx 24-26-28 (32-36) cm. Assembly: Gather approx 70 - 90 sts up on needle size 2.5 mm with off-white along left front piece (gather sts within edge st). Knit 2 cm Rib and cast off. Repeat along right front band, but after 0.5 cm cast off for 5 - 6 buttonholes evenly distributed on row – top and bottom buttonhole = 1 cm from edge. 1 buttonhole = cast off 2 sts, cast on 2 new sts over the cast off sts on next row. Sew shoulder seams. Gather approx 70-100 sts round neckline and over front bands (incl sts on threads) on needle size 2.5 mm in off-white. Knit Rib, after 0.5-0.5-0.5 (1-1) cm cast off for 1 buttonhole on right side in line with buttonholes on front band. Knit until neck measures 2-2-2 (3-3) cm, cast off. Set in sleeves and sew on buttons. ___________________________________________________________________ HAT / BALACLAVA Size, months: 1/3 -6/9 - 12/18 Size, years: (2 - 3/4). Circumference of hat: 42-44-46 (48-50) cm. Materials: DROPS Karisma Superwash from Garnstudio 150-150-150 (150-200) g colour no 01, off-white. DROPS double pointed needles size 2.5 mm and 3 mm. Knitting tension: 23 sts x 32 rows on needle size 3 mm and stocking st = 10 x 10 cm. 10 cm Rib-2, not stretched, on needle size 3 mm = width approx 34 sts. Garter st (back and forth): 1st row: K, 2nd row: K. Rib-1: * K1, P1 *, repeat from *-*. Rib-2: * K2, P2 *, repeat from *-*. Front piece: Cast on 23-25-27 (29-31) sts on needle size 3 mm in off-white and knit 4 rows garter st. Then knit stocking st with 3 sts garter st each side – at the same time inc 1 st each side within 3 garter sts on every other row: 4-5-5 (5-7) times = 31-35-37 (39-45) sts. When piece measures 7-8-9 (10-11) cm leave to one side. Back piece: Knit piece like front piece. Hat: Slip all sts onto double pointed needles size 2.5 mm = 62-70-74 (78-90) sts (= split on each side). Continue in the round. Knit 3 cm Rib-1, at the same time inc 10 sts evenly on 1st round = 72-80-84 (88-100) sts. Measure piece from this point! Change to double pointed needles size 3 mm and knit Rib-2, at the same time inc 12-16-16 (20-20) sts evenly on 1st round = 84-96-100 (108-120) sts. When piece measures 2-2-3 (3-3) cm cast off 6-6-6 (10-10) sts mid front – on 3 smallest sizes cast off 2P, 2K, 2P, on the 2 largest sizes cast off 2P, 2K, 2P, 2K, 2P = 78-90-94 (98-110) sts on row. Continue back and fort on needle and cast off 1 st each side towards front on every other row: 3-5-7 (5-7) times = 72-80-80 (88-96) sts. Continue in Rib with 1 st each side towards front in garter st. When piece measures 18,5-20-22 (24-24,5) cm cast off 23-27-27 (27-31) sts each side. Slip remaining 26-26-26 (34-34) sts mid back on cable needle, leave piece to one side. Top piece: Cast on 28-28-28 (36-36) sts on needle size 3 mm and knit first row as follows: 1 garter st, 26-26-26 (34-34) sts in Rib-2, 1 garter st. Continue until piece measures approx 6.5-8-8 (8-9) cm. "Tail" piece: Slip the 26-26-26 (34-34) sts from mid back and the 28-28-28 (36-36) sts from top piece on double pointed needles = 54-54-54 (70-70) sts. Continue in Rib with 1 st each side on top piece in garter sts. At the same time dec each side of the garter st as follows: Slip the garter st onto cable needle in front of piece, K st before and after tog then psso garter st. Repeat this dec on every 4-4-5 (4-5) rounds until 10 sts left. The tale is now approx 14-14-17 (19-19) cm long. Pull a double thread through these sts and fasten. Sew sides of top piece onto hat. Make a pompon with a diameter of approx 5 cm and attach to the end of the tale. Gather approx 80-100 sts round face opening on double pointed needles size 2.5 mm and P 1 round (seen from RS) then 2 cm Rib-1, or 5 cm if you want a rib edge to turn double towards WS afterwards. Cast off loosely and, if appropriate, fold rib edge towards WS and sew on. _____________________________________________________________________ BLANKET Measurement: approx 60 x 75 cm. Materials: DROPS Karisma Superwash from Garnstudio 350 g colour no 01, off white. DROPS needle size 3.5 mm. Knitting tension: 21 sts on needle size 3.5 and pattern = width 10 cm. Remember needle sizes are guidelines only! Pattern: See diagram (1 diagram = 1 repeat). Pattern is seen from RS. Garter st (back and forth): knit all rows. Blanket: Cast on 128 sts with off-white on needle size 3.5 mm and knit 1 cm garter st. Now, knit pattern over middle 120 sts (garter st outer most 4 sts each side) as follows: 8 cm of M.3, M.4, 10 cm of M.1 (adjust to pattern), M.4, 8 cm of M.2, M.4, 16 cm of M.3, M.4, 10 cm of M.1 (adjust to pattern), M.4, 8 cm of M.2, M.4, 8 cm of M.3, 1 cm garter st. Cast off. |
|||||||||||||
Diagram explanations |
|||||||||||||
|
|||||||||||||
 |
|||||||||||||
 |
|||||||||||||
 |
|||||||||||||
 |
|||||||||||||
Have you finished this pattern?Tag your pictures with #dropspattern #littledancerjacket or submit them to the #dropsfan gallery. Do you need help with this pattern?You'll find 21 tutorial videos, a Comments/Questions area and more by visiting the pattern on garnstudio.com. © 1982-2026 DROPS Design A/S. We reserve all rights. This document, including all its sub-sections, has copyrights. Read more about what you can do with our patterns at the bottom of each pattern on our site. |
|||||||||||||


With over 40 years in knitting and crochet design, DROPS Design offers one of the most extensive collections of free patterns on the internet - translated to 17 languages. As of today we count 324 catalogues and 12272 patterns translated into English (UK/cm).
We work hard to bring you the best knitting and crochet have to offer, inspiration and advice as well as great quality yarns at incredible prices! Would you like to use our patterns for other than personal use? You can read what you are allowed to do in the Copyright text at the bottom of all our patterns. Happy crafting!
Post a comment to pattern DROPS Children 9-20
We would love to hear what you have to say about this pattern!
If you want to leave a question, please make sure you select the correct category in the form below, to speed up the answering process. Required fields are marked *.