
Popular categories
Looking for a yarn?


Comments / Questions (30)
![]() Robi wrote:
Robi wrote:
I’m sorry but I’m confused on “pattern” instructions and the “ bag” instructions!! Do I combine these two and in what order?? I’ve never had a pattern like this before!! Looking forward to making this beautiful bag!! Thanks so much for your help.
15.05.2024 - 02:39DROPS Design answered:
Hi Robi, The Pattern Instructions at the top of the pattern are for working the pattern, after you have reached 120 stitches on the round using the Bag Instructions. Hope this helps and happy crocheting!
15.05.2024 - 06:38
![]() Julia wrote:
Julia wrote:
I don’t understand where I’m supposed to measure the height of the bag from. I understand the instructions to mean 32 cm from the center of the ring that started the bag, but I’ve reached that height already after 34 rounds (= building up to 128 stitches + 3 x the pattern) and in the pictures the bag clearly has more rounds. My crocheting is spot on, 17 dc = 10 cm wide, circumference ca. 80 cm. Writing from Sweden, but using American instructions because I learned crochet from YouTube.
10.06.2023 - 12:24DROPS Design answered:
Dear Julia, measure the bag from the center down (from 1st round) and stop when it measures 32 cm (even if the pattern is not done, adjust after a round with dc). The number of rounds might depend on your tension, do you have the correct tension for the square? Happy crocheting!
12.06.2023 - 09:37
![]() Annick wrote:
Annick wrote:
Ik begrijp het volgende niet bij de uitleg over de tas : Ga verder met 1 stokje meer tussen het meerderen iedere toer tot er 120 stokjes op de toer zijn ? Moet ik van 50 stokjes naar 120 stokjes gaan ? Elke toer 1 stokje meerderen ?
13.02.2022 - 12:25DROPS Design answered:
Dag Annick,
De manier van meerderen zoals dat gedaan wordt in toer 4 en 5 zet je voort, dus je meerdert in de 6e toer 2 stokjes in iedere 5e steek, in de 6e toer meerder je 2 stokjes in iedere 6e steek, enzovoorts.
17.02.2022 - 11:45
![]() Claudia wrote:
Claudia wrote:
Die Anleitung für die Träger verstehe ich leider nicht. Kann mir jemand helfen? Danke
08.09.2019 - 08:01DROPS Design answered:
Liebe Claudia, schlagen Sie 5 Luftmaschen und schliessen Sie mit 1 Kettmasche zu einem Ring; dann häkeln Sie 1 feste Masche in jede Luftmasche (= 5 fM), am Ende der 1. Runde häkeln Sie keine Kettm, sondern 1 feste Masche in die 1. feste Masche der 1. Runde, und immer so weiterhäkeln: 1 feste Masche in jede Masche bis die Träger ca 75 cm misst. Viel Spaß beim häkeln!
09.09.2019 - 08:38
![]() Rebecca wrote:
Rebecca wrote:
Bei den Vierecken steht dass man einen Luftmasche machen soll und dann um den Ring (welcher Ring?) feste Maschen häkeln soll?! Muss man diese 1. runde mit einem magic Ring beginnen???
20.07.2019 - 22:42DROPS Design answered:
Liebe Rebecca, leider fehlte am Anfang der Anleitung für die Vierecke (vor der 1. Runde), dass 4 Luftmaschen angeschlagen werden und diese mit 1 Kett-Masche in die 1. Luftmasche zum Ring geschlossen werden. Dies wurde nun ergänzt. Um diesen Luftmaschenring häkeln Sie dann die 1. Runde. Viel Spaß beim Weiterhäkeln!
20.07.2019 - 23:51
![]() Rosemarie Andrews wrote:
Rosemarie Andrews wrote:
You make it hard to order yarn I ordered a set of yarn for the Sicily bag 139-13 You sent me the wrong colors I would like to try again With the set of colors on the photo Red orange white pink raspberry yellow But you make it too hard to order
31.12.2017 - 10:58
![]() Dorien Middelkoop wrote:
Dorien Middelkoop wrote:
Bij de gehaakte vierkantjes; welke kleur bedoelen jullie bij vierkantje D met abrikoos? Bij materiaal staat die kleur niet bij.... wel naturel, koraal, oranje, geel en roze.
16.03.2016 - 19:09DROPS Design answered:
Hoi Dorien. Dat is een foutje en moet roze zijn. Het patroon is aangepast. Bedankt voor het melden.
23.03.2016 - 14:42
![]() Annet wrote:
Annet wrote:
De tas is bijna af.Ik moet alleen de schouderband nog. Ik snap de uitleg alleen niet :-( In de rondte gehaakt???
19.02.2014 - 22:43DROPS Design answered:
Hoi Annet. De schouderband is een buisje. Dus je haakt inderdaad in de rondte: Haak 5 l met koraal en vorm een ring met 1 hv in de 1e l. Haak 1 v in iedere st in de rondte tot het werk ongeveer 75 cm meet.
20.02.2014 - 09:56
![]() Stine wrote:
Stine wrote:
Hvor mange garnnøgler af hver farve skal man bruge, sådan ca?
15.05.2012 - 13:17DROPS Design answered:
Det er en fejl at der ikke står det. Det bliver lagt ud med det samme :)
25.05.2012 - 10:50
![]() Gunvor B wrote:
Gunvor B wrote:
Mycket fin sommarväska, som kan varieras i oändlighet.
01.03.2012 - 15:02
|
|
Sicily#sicilybag |
|
 |
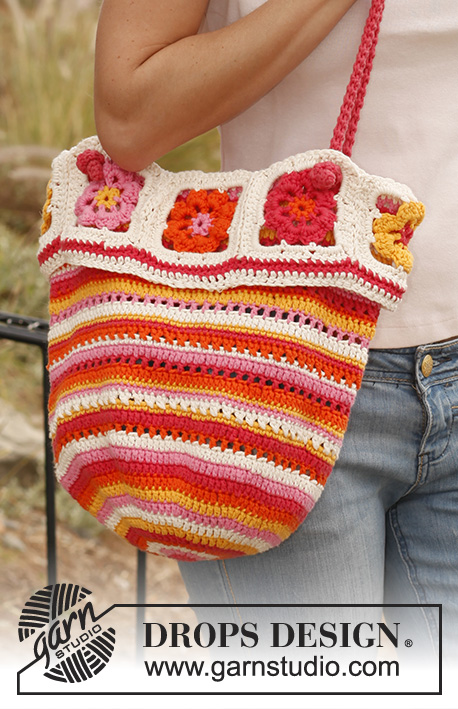 |
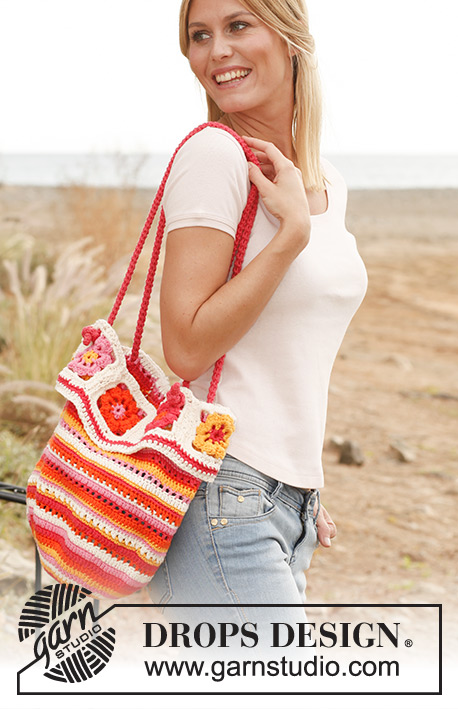
Crochet DROPS bag with stripes and squares in ”Paris”.
DROPS 139-13 |
|
|
CROCHET TIP: Replace first tr on every round with 3 ch. Replace first dc on every round with 1 ch. Finish every tr round with 1 sl st in 3rd ch from beg of round. Finish every dc round with 1 sl st in 1st ch from beg of round. STRIPES: Work stripes with 1 round in each colour as follows: * raspberry, pink, off white, orange, raspberry, strong yellow, off white, pink, strong yellow, orange *, repeat from *-*. NOTE: Do not cut the threads but pull them upwards on WS of piece when working. PATTERN: ROUND 1: 3 ch, * 1 ch, skip 1 st, 1 tr in next st *, repeat from *-* the entire round and finish with 1 ch, skip last st and work 1 sl st in 3rd ch from beg of round. ROUND 2: 1 tr in every tr and 1 tr in every ch. ROUND 3: 1 dc in every tr. ROUND 4: 3 ch, then work cross tr, this is done as follows: * Skip 1 st, 1 tr in next st, then 1 tr in st that was skipped *, repeat from *-* the entire round, finish with 1 tr in last tr and 1 sl st in 3rd ch from beg of round. ROUND 5: 1 dc in every tr. ROUND 6: 1 dc in every dc. ROUND 7: 1 tr in every dc. Repeat rounds 1 to 7. -------------------------------------------------------- BAG: Worked from bottom up. READ CROCHET TIP! Work 5 ch with raspberry and form a ring with 1 sl st in first ch. Work STRIPES – see explanation above – as follows: ROUND 1: Work 10 tr in ch-ring, finish with 1 sl st in first tr. ROUND 2: Work 2 tr in every tr = 20 tr. ROUND 3: Work 1 tr and 2 tr alternately in every tr the entire round = 30 tr. ROUND 4: Work 1 tr in every tr but work 2 tr in every 3rd tr = 40 tr. ROUND 5: Work 1 tr in every tr but work 2 tr in every 4th tr = 50 tr. Continue working 1 tr more between inc every round until there are 120 tr on round. Then work 1 round with tr while at the same time inc 8 tr evenly = 128 tr. Continue with stripes while at the same time working PATTERN - see explanation above! When piece measures approx. 32 cm (measured from the middle of circle and upwards), finish after 1 round with tr, cut the thread. CROCHET SQUARE: There are 4 different colour combinations on the squares. SQUARE 1: Colour 1 = raspberry, colour 2 = strong yellow. SQUARE 2: Colour 1 = orange, colour 2 = raspberry. SQUARE 3: Colour 1 = medium pink, colour 2 = orange. SQUARE 4: Colour 1 = strong yellow, colour 2 = medium pink. Crochet 4 ch with colour 1 and form a ring with 1 sl st in 1st ch. ROUND 1: 1 ch, 8 dc in ch-ring, finish with 1 sl st in first dc. ROUND 2 (switch to colour 2): Work 5 ch (= 1 dc + 4 ch), * 1 dc in next dc, 4 ch *, repeat from *-* a total of 7 times and finish with 1 sl st in 1st ch from beg of round = 8 dc with 4 ch between each. ROUND 3: 1 ch, continue to crochet as follows in every ch-loop: 1 dc, 1 htr, 2 tr, 1 htr and 1 dc, finish round with 1 sl st in ch from beg of round = 8 leaves. Cut the thread. ROUND 4 (switch to off white): Work 1 dc at the top of first leaf, * 8 ch, 1 dc at the top of next leaf, 3 ch, 1 dc at the top of next leaf *, repeat from *-* the entire round but finish with 1 sl st in dc from beg of round. ROUND 5: * In ch-loop in the corner work: 5 tr + 2 ch + 5 tr, 4 tr in next ch-loop *, repeat from *-* a total of 4 times, finish with 1 sl st in first tr from beg of round, cut the thread. 1 square = approx. 10 x 10 cm. Work 2 squares in every colour combination. Sew them tog edge to edge with 1 stitch in every st in the following order: Square 1, square 2, square 3, square 4, square 1, square 2, square 3 and square 4 - then sew square 4 against square 1 to make a circle. SHOULDER STRAP: Crochet 5 ch on hook size 3.5 mm with raspberry and form a ring with 1 sl st in first ch. Then work 1 dc in every st in the round until piece measures approx. 75 cm. Cut and fasten the thread. Crochet another shoulder strap the same way. ASSEMBLY: Fasten the circle of crochet squares at the top of bag – sew edge to edge with 1 stitch in every st – sew with WS on squares outwards (they are to be folded down over the bag afterwards). Work 1 round with raspberry and tr at the top around the squares – there should be 1 tr in every tr and 1 tr in every ch = 16 tr per square = 128 tr in total. Switch to off white and work 1 round with 1 tr in every tr. Cut and fasten the threads. Fold the crochet squares over the bag. Fasten one shoulder strap on each side of the bag as follows (also see picture): Thread the end of strap in from WS and out through upper corner to the left of one of the squares, make a knot at the end of strap to keep it in place. Skip one square and thread the other end of strap in from WS and out through upper corner to the right of the next square, make a knot. Fasten the other strap the same way in the other side of bag. |
|
Have you finished this pattern?Tag your pictures with #dropspattern #sicilybag or submit them to the #dropsfan gallery. Do you need help with this pattern?You'll find 11 tutorial videos, a Comments/Questions area and more by visiting the pattern on garnstudio.com. © 1982-2026 DROPS Design A/S. We reserve all rights. This document, including all its sub-sections, has copyrights. Read more about what you can do with our patterns at the bottom of each pattern on our site. |
|


With over 40 years in knitting and crochet design, DROPS Design offers one of the most extensive collections of free patterns on the internet - translated to 17 languages. As of today we count 324 catalogues and 12291 patterns translated into English (UK/cm).
We work hard to bring you the best knitting and crochet have to offer, inspiration and advice as well as great quality yarns at incredible prices! Would you like to use our patterns for other than personal use? You can read what you are allowed to do in the Copyright text at the bottom of all our patterns. Happy crafting!
Post a comment to pattern DROPS 139-13
We would love to hear what you have to say about this pattern!
If you want to leave a question, please make sure you select the correct category in the form below, to speed up the answering process. Required fields are marked *.