
Popular categories
Looking for a yarn?


Comments / Questions (44)
![]() Marie wrote:
Marie wrote:
Bonjour, Il a été mentionné dans les commentaires que le tour de cou pour la taille 1/3mois était trop petit. Le patron ne semble pas avoir été modifié depuis. Qu'en est il ? En effet avec 49 mailles en côtes 1/1, les 12 cm de l'encolure ne sont pas atteint. Merci
21.01.2026 - 16:08DROPS Design answered:
Bonjour Marie, si votre tension est juste en largeur, l'encolure devrait mesurer 12 cm de large en 1/3 mois, comme dans le schéma - veillez juste à monter les mailles suffisamment souplement pour éviter que le montage ne soit trop serré et que le col ne soit donc trop serré. Bon tricot!
23.01.2026 - 09:17
![]() Eva wrote:
Eva wrote:
Er denne body åben i bunden med knapper? Og kan det let integreres, hvis ikke? Min mormor vil gerne strikke til vores kommende baby.
22.08.2023 - 22:37DROPS Design answered:
Hei Eva. Ja, den har knapper. Om du leser på forstykket står det hvordan det felles til 3 knapphull nederst på avsnittet og under Montering står det: Sy i knappene på vrangborden nederst på bakstykket. mvh DROPS Design
28.08.2023 - 11:34
![]() Sabine wrote:
Sabine wrote:
Bonjour. Je pense qu'il y a un problème de tailles. J'ai tricoté la taille 6 mois et me retrouve avec une taille pour naissance. Pourtant, mon échantillon correspond absolument. Habituellement, pour un tricot de la taille 1 à 3 mois avec des aiguilles 2,5 et le même échantillon, il faut compter 80 mailles pour obtenir les bonnes dimensions.
22.02.2023 - 08:15DROPS Design answered:
Bonjour Sabine, si je compare le nombre de mailles (128) en taille 6/9 mois pour la partie DOS & DEVANT ou bien les 64 mailles après la division, je trouve bien 25 cm (24.6 exactement) pour la largeur du body - pensez à bien conserver la même tension que pour votre échantillon (26 m pour 10 cm) pour bien obtenir les mesures indiquées par le schéma. Bon tricot!
22.02.2023 - 09:09
![]() Susan Andersen wrote:
Susan Andersen wrote:
Hej, jeg har lidt svært ved at får diagram M4 = 16 op i antal masker på ærmet 46 masker, Hvad gør jeg? Mvh. Susan
05.05.2022 - 22:15DROPS Design answered:
Hej Susan, mønsteret vil ikke gå op midt under ærmet :)
06.05.2022 - 14:02
![]() Sara wrote:
Sara wrote:
Hej 1. Under nøgleord står der “nedefra og op”, men efter lige at have skimmet opskriften, læser jeg det som at den strikkes oppefra og ned? 2. Jeg har tænkt mig at strikke den som bluse i stedet for body - hvor meget garn går til det nederste stykke med benåbning? På forhånd tak 😊
20.02.2022 - 16:47DROPS Design answered:
Hei Sara. Denne strikkes oppefra og ned (Nøgleord: bluser, body, flerfarvet, hentesæt, lange ærmer, nordisk, oppefra og ned, overalls, raglan, rundhalset). Vi har dessverre ingen oversikt over hvor mye mindre garn det går når det skal strikkes som en genser, men det er ikke mye mindre når man ser på målskissen. Mulig du trenger samme antall, men du kan finne en lignende genser og se hva som er blir brukt da, og da i den str. du ønsker å strikke. mvh DROPS Design
21.02.2022 - 14:13
![]() Torill Nystuen wrote:
Torill Nystuen wrote:
Hei! Skal begynne på denne nå. Ser at det står pinne 2.5 i mønsteret, mens på garnet er strikkefastheten oppgitt med pinne 3. Stemmer det at jeg skal bruke pinne nr 2.5? (Nr 2 på halskanten) Mvh Torill
14.02.2022 - 08:43DROPS Design answered:
Hei Torill. Pinne str. er kun veiledende. Du må bruke den pinne str. der du får den strikkefastheten som er oppgitt i den oppskriften du skal strikke. Så selv om det står en pinnestr. på en etikett, så kan det brukes en annen pinne str på en bestemt oppskrift. mvh DROPS Design
14.02.2022 - 14:43
![]() Dorrit Nielsen wrote:
Dorrit Nielsen wrote:
Tak for svaret og undskyld jeg lige spørger igen. Jeg har godt forstået det med omslaget, der skal strikkes drejet på næste pind. Men i beskrivelsen med INSTRUKTIONER står der: M STRIKKES DREJET - det er det jeg ikke helt er med på. Men hvis det kun er omslaget er det jo nemt nok :-)
27.01.2022 - 17:12DROPS Design answered:
Hej igen Dorrit, jo det er kun omslaget :)
28.01.2022 - 09:24
![]() Dorrit Nielsen wrote:
Dorrit Nielsen wrote:
Der står “M strikkes drejet” - Betyder det at det er mønsterfarven, der strikkes drejet eller er det begge farver i hele mønsterområdet. Tænker at retmasken som følger raglanudtagningen ikke skal strikkes drejet. Og hvad er grunden til at strikke drejet, det føles meget besværligt
25.01.2022 - 21:44DROPS Design answered:
Hej Dorrit, det er selve omslaget du strikker drejet på næste pind for at der ikke skal blive for store huller i udtagningerne :)
27.01.2022 - 10:49
![]() Janneke wrote:
Janneke wrote:
Ik snap niet zo goed vanaf welk punt er in het rond gebreid moet worden, kan iemand mij helpen?
28.09.2021 - 13:32DROPS Design answered:
Dag Janneke,
In het patroon staat steeds aangegeven wanneer je heen en weer moet breien of wanneer je in de rondte moet breien. Na het opzetten brei je eerst heen en weer. Ergens in de tweede paragraaf staat aangegeven dat je verder moet breien in de rondte. Er ontstaat een opening bij de hals doordat je eerste heen en weer breit. Hierdoor past het hoofd er makkelijker door.
30.09.2021 - 11:01
![]() Nicole Rod wrote:
Nicole Rod wrote:
Voilà un bien joli modèle à tricoter pour que nos bébés soient bien au chaud. Merci
07.09.2021 - 09:54
|
|||||||
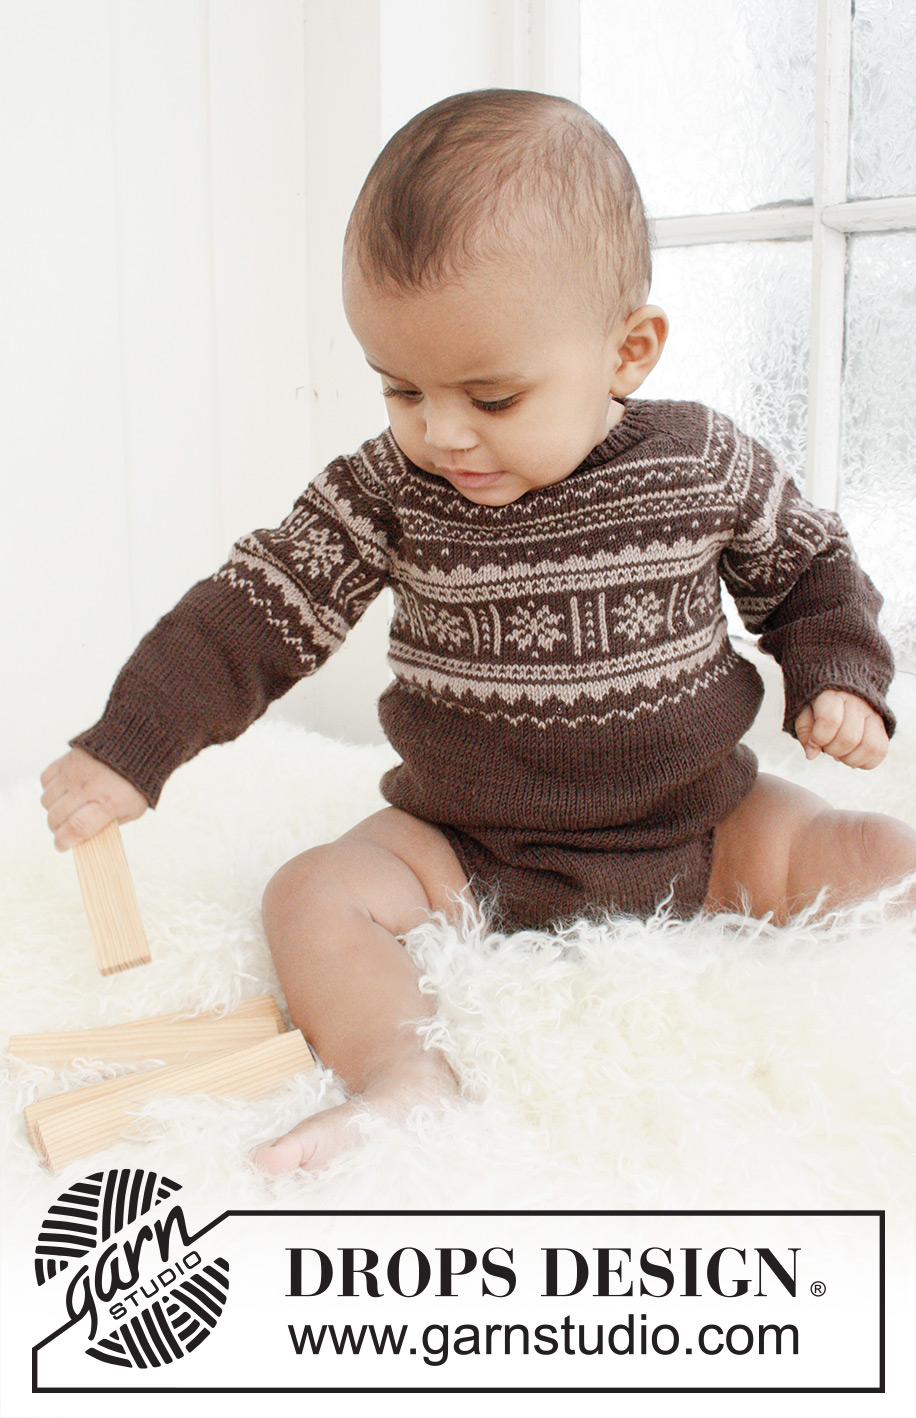
Litte William`s Body#littewilliamsbody |
|||||||
|
|
|||||||
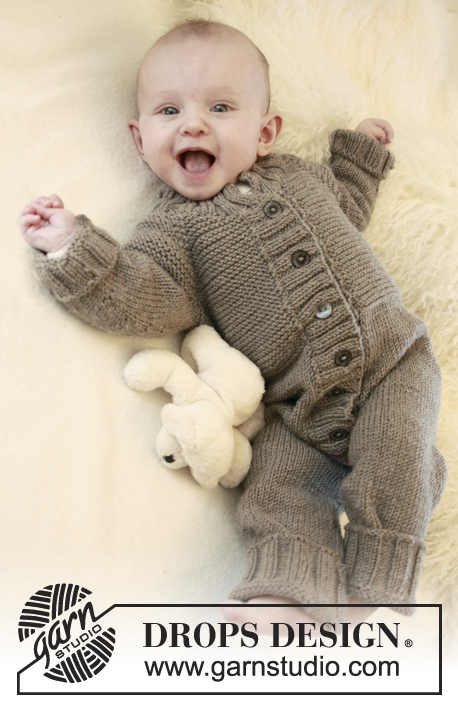
Knitted body with raglan and Nordic pattern for baby and children in DROPS BabyMerino or DROPS BabyAlpaca Silk
DROPS Baby 21-32 |
|||||||
|
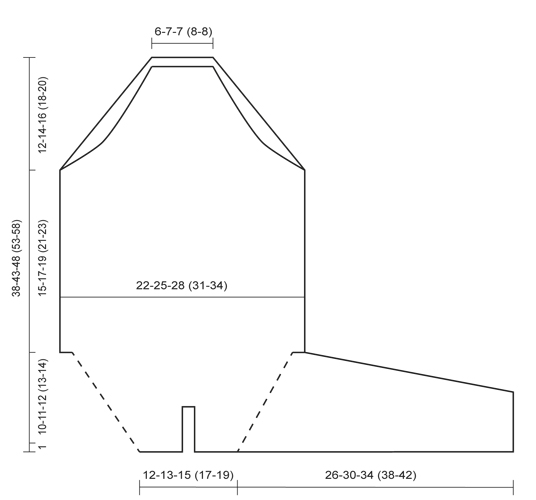
ST WORKED TWISTED: Work in back loop of st instead of front. INCREASE TIP: Inc 1 st before and after st with marker by making 1 YO. On next row work YO twisted to avoid holes. DECREASE TIP 1 (applies to front and back piece): Dec from RS 1 st after and before 1 edge st in each side as follows: After 1 edge st: Slip 1 st as if to K, K 1, psso. Before 1 edge st: K 2 tog. Dec from WS 1 st after and before 1 edge st in each side as follows: After 1 edge st: P 2 twisted tog. Before 1 edge st: P 2 tog. DECREASE TIP 2 (applies to sleeve): Dec 1 st on each side of marker as follows: Work until 2 sts remain before marker, slip 1 st as if to K, K 1, psso, (marker), K tog the next 2 sts. PATTERN ON YOKE: See diagrams M.1 - M.3. Firstly work diagrams M.1, M.2, and M.3 1 time vertically, then diagram M.2 0-0-0 (1-1) time = 25-25-25 (30-30) rows in total. PATTERN ON BODY/SLEEVE: See diagrams M.4 and M.5. First work diagram M.4 and then diagram M.5 1 time vertically. -------------------------------------------------------- YOKE: The piece is first worked back and forth and then in the round. Worked top down from the neck. Cast on 49-57-65 (73-81) sts on circular needle size 2 mm with brown. Work rib back and forth (1st row = RS) as follows: * K 1, P 1 *, repeat from *-*, K last st on row. When rib measures approx. 1 cm, K next row from WS - While at the same time inc 7-9-11 (13-15) sts evenly on row = 56-66-76 (86-96) sts. On next row (= RS) switch to circular needle size 2.5 mm and work as follows: K 1 (= mid back), K 7-9-12 (14-16) (= right back piece), K 1, insert a marker in this st, K 8-9-8 (9-10) (= right sleeve), K 1, insert a marker in this st, K 20-24-30 (34-38) (= front piece), K 1, insert a marker in this st, K 8-9-8 (9-10) (= left sleeve), K 1, insert a marker in this st, K 7-9-12 (14-16) (= left back piece), K 1 (= mid back) = 4 sts with markers in total before increase for raglan. REMEMBER THE KNITTING TENSION. READ ALL OF THE FOLLOWING SECTION BEFORE CONTINUING! Continue in stocking st - While at the same time inc on next row from RS 1 st on each side of every st with marker = 8 new sts per inc. Repeat inc from RS on every other row a total of 12-12-12 (13-15) times, then on every 4th row a total of 2-3-4 (4-4) times. At the same time when piece measures 3-4-5 (5-6) cm from cast on edge, work PATTERN ON YOKE - Read explanation above. NOTE: Work the new sts gradually in the pattern. When piece measures 8-9-9 (10-10) cm from cast on edge, cast on 4 sts at the end of next row from WS (= sts at the bottom of neck opening, worked into the pattern) - Now work the piece in the round on circular needle from here. When PATTERN ON YOKE has been worked (all inc are now done), there are 172-190-208 (226-252) sts on needle. Front piece = back piece = 48-54-62 (68-76) sts. Slip sts on sleeves and sts with markers (38-41-42 (45-50) sts for each sleeve) on a stitch holder. Now divide the piece, front/back piece and sleeves are finished separately. BODY: Front piece + back piece = 96-108-124 (136-152) sts. Continue in the round on circular needle (round beg in the side). On the next round, work 1st round in diagram M.4 as follows: Cast on 4 sts for armhole, work 48-54-62 (68-76) sts (= front piece), cast on 8 sts for armhole, work 48-54-62 (68-76) sts (= back piece), cast on 4 sts for armhole = a total of 112-124-140 (152-168) sts on needle. On next round (= 2nd round in diagram M.4), inc 0-4-4 (8-8) sts evenly = 112-128-144 (160-176) sts. Continue with diagram M.4 and then diagram M.5 1 time vertically. Then work in stocking st with brown until piece measures 15-17-19 (21-23) cm from armhole (piece measures approx. 26-29-32 (35-38) cm in total). Now divide the piece and front and back piece are finished separately. BACK PIECE: = 56-64-72 (80-88) sts. Then work back and forth (1st row = RS) in stocking st and dec for leg opening as follows: K 1 (= edge st), dec 1 st - Read DECREASE TIP 1 above, work until 3 sts remain, dec 1 st - Read DECREASE TIP 1 above, K 1 (= edge st). Continue in stocking st, repeat dec on every row from RS (= on every other row) inside 1 edge st in each side a total of 20-23-27 (30-34) times = 16-18-18 (20-20) sts remain. Then switch to circular needle size 2 mm and work rib (K 1/P 1) for 1½ cm, loosely cast off all sts. FRONT PIECE: = 56-64-72 (80-88) sts. Then work back and forth (1st row = RS) in stocking st and dec for leg opening as follows: K 1, dec 1 st - Read DECREASE TIP 1 above, work until 3 sts remain, dec 1 st - Read DECREASE TIP 1 above, K 1. Continue in stocking st and repeat dec on every row inside 1 edge st in each side a total of 6-6-8 (8-10) times, then on every row from RS (= on every other row) a total of 14-17-19 (22-24) times = 16-18-18 (20-20) sts remain. Then switch to circular needle size 2 mm and work rib (K 1/P 1). On next row from RS, cast off for 3 button holes as follows: Work 1 st, * 1 YO, K the next 2 sts tog, work 4-5-5 (6-6) sts *, repeat from *-* 1 more time, 1 YO, K the next 2 sts tog, work the last st. On next row work the YOs twisted. When rib measures approx. 1½ cm, loosely cast off all sts. SLEEVE: Worked in the round on double pointed needles, top down. Slip sts from stitch holder on to double pointed needles size 2.5 mm = 38-41-42 (45-50) sts, and cast on 8 sts mid under sleeve = 46-49-50 (53-58) sts. Insert a marker before 1st st on round and move the marker upwards (round beg mid under sleeve). Continue with diagram M.4 and then diagram M.5 (beg with 1st st in the repetition on 1st round in diagram M.4). When sleeve measures 2-3-3 (3-3) cm, dec 1 st before and after marker - Read DECREASE TIP 2 above. Repeat dec every 1½-1½-2 (2½-2½) cm a total of 7-7-7 (6-8) times = 32-35-36 (41-42) sts. Continue until sleeve measures 12-15-18 (20-23) cm from armhole. On next round, dec 0-1-0 (1-0) sts = 32-34-36 (40-42) sts. Then switch to double pointed needles size 2 mm and continue in rib (K 1/P 1) for 3-3-3 (4-4) cm. Loosely cast off all sts. NECK OPENING: Knit up approx. 21 - 25 sts from RS along the opening on right back piece with brown on double pointed needles size 2 mm. Work rib (K 1/P 1) back and forth for approx. 1½ cm (= right band, 1st row = WS). Loosely cast off all sts. Repeat along the opening on left back piece, but on 2nd row (= RS) cast off for 3 button holes (1 button hole = 1 YO, K 2 tog) evenly on band. When rib measures approx. 1½ cm, loosely cast off all sts. Place band with button holes on top of the other at the bottom of neck opening and fasten through both layers with stitches. LEG OPENING: Knit up from RS approx. 16 sts per 5 cm along one leg opening inside 1 edge st with brown on circular needle size 2 mm, no of sts must be divisible by 2 + 1. On next row (= WS) work as follows: * P 1, K 1 *, finish with P 1. Continue back and forth in rib for 1 cm, loosely cast off all sts. Repeat on the other leg opening. ASSEMBLY: Sew the openings under the sleeves. Sew buttons on to rib at the bottom of back piece, and on to right band in neck opening. |
|||||||
Diagram explanations |
|||||||
|
|||||||
 |
|||||||
 |
|||||||
Have you finished this pattern?Tag your pictures with #dropspattern #littewilliamsbody or submit them to the #dropsfan gallery. Do you need help with this pattern?You'll find 19 tutorial videos, a Comments/Questions area and more by visiting the pattern on garnstudio.com. © 1982-2026 DROPS Design A/S. We reserve all rights. This document, including all its sub-sections, has copyrights. Read more about what you can do with our patterns at the bottom of each pattern on our site. |
|||||||


With over 40 years in knitting and crochet design, DROPS Design offers one of the most extensive collections of free patterns on the internet - translated to 17 languages. As of today we count 324 catalogues and 12272 patterns translated into English (UK/cm).
We work hard to bring you the best knitting and crochet have to offer, inspiration and advice as well as great quality yarns at incredible prices! Would you like to use our patterns for other than personal use? You can read what you are allowed to do in the Copyright text at the bottom of all our patterns. Happy crafting!
Post a comment to pattern DROPS Baby 21-32
We would love to hear what you have to say about this pattern!
If you want to leave a question, please make sure you select the correct category in the form below, to speed up the answering process. Required fields are marked *.