
Popular categories
Looking for a yarn?


Comments / Questions (131)
![]() Stefania wrote:
Stefania wrote:
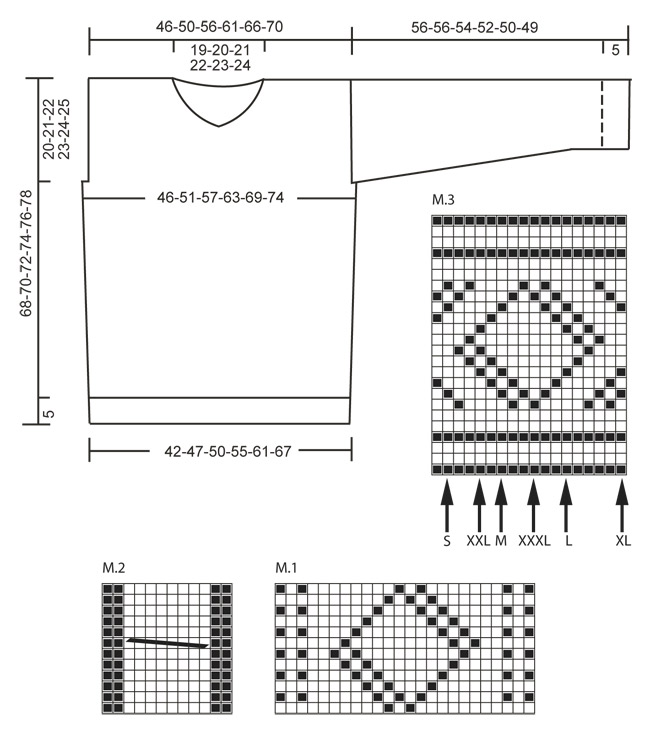
Quindi, se ho capito bene per la taglia S il diagramma M3 è composto di 20 maglie invece che 18 ? Grazie ancora e buona giornata
24.03.2026 - 08:18DROPS Design answered:
Buonasera Stefania, è solo per l'inizio che si parte dalla taglia, poi si lavora il diagramma intero. Buon lavoro!
28.03.2026 - 20:45
![]() Stefania wrote:
Stefania wrote:
Scusate, sto facendo la parte alta del davanti dove si parla del diagramma M3. Sto eseguendo la taglia S. Voi dite di iniziare dove c’è la lettera S ma il diagramma poi lo termino dove c’è la lettera S o a fine diagramma.? Grazie
23.03.2026 - 20:08DROPS Design answered:
Buonasera Stefania, poi deve lavorare il diagramma intero. Buon lavoro!
23.03.2026 - 22:11
![]() Stefania wrote:
Stefania wrote:
Ho eseguito diversi vostri maglioni . Ora però Non riesco a capire gli aumenti delle maniche. Cosa si intende quando dite di fare ogni 9/8/6/ecc ferri per 12 ecc volte? E i numero delle maglie 86/90/94 ecc sono maglie totali o quelle di aumento ? Grazie
04.03.2026 - 18:30DROPS Design answered:
Buonasera Stefania, i diversi numeri sono le taglie del modello: deve fare riferimento al numero riportato per la taglia che sta lavorando. Buon lavoro!
04.03.2026 - 22:50
![]() Mariángeles wrote:
Mariángeles wrote:
Buenos días, muchas gracias por el patrón, me parece muy bonito. Me extraña mucho que después del elástico o resorte haya que disminuir puntos, ¿no será más bien aumentarlos? Muchas gracias por la aclaración.
03.02.2026 - 14:23DROPS Design answered:
Hola Mariángeles, normalmente tenemos más puntos en el elástico para que el elástico no quede tenso. Como se trabaja de abajo arriba, el borde elástico inferior en elástico no tiene que quedar prieto y la disminución de puntos después nos asegura que la sección en elástico y el comienzo del jersey tenga una anchura similar, a pesar de la diferencia en la textura de los puntos.
23.02.2026 - 00:36
![]() Donna wrote:
Donna wrote:
Knitting an XXL I'm confused about where to start each row in M.3, and after repeating the design 7 times, where to start the finish of each row. On the RS, start at the arrow and reading from R to L, do 5 stitches; then , after 7 repeats, at the end of the row, do 6 stitches, reading from far R to L? Do I start every row on RS at the arrow? But not on WS? On WS, do I start 6 stitches in from the far right side of the diagram, and then finish the final 5 starting on the far left?
20.01.2026 - 02:04DROPS Design answered:
Hi Donna, It is just starting the diagram which involves the arrow, you then work to the end of the round, repeating the full width of the diagram each side until you work the edge stitch at the end of the row (this will not be the end of a repeat as both sides are symmetrical). When you work back from the right side, you begin the diagram where you finished on the previous row, repeat full widths until you reach where you started on the diagram, then work 1 edge stitch. Hope this helps. Regards, Drops Team.
20.01.2026 - 08:00
![]() Arlene wrote:
Arlene wrote:
What does “adjust after one half repetition or one whole repetition of diagram m1 and m2 vertically” mean? Also when I start on size medium in m3 do I keep going back to where I started or the beginning of the row?
30.12.2025 - 17:46DROPS Design answered:
Dear Arlene, it means that we don't need to exactly stop working charts M1 and M2 when piece measures 58-60-62-64-66-68 cm but rather we need to ensure that, around that measurement, we stop at a row that is the last row of the chart or the row in the middle of the chart, to avoid interrupting the stitch-pattern too much. The arrow show which stitch of the chart will be the first stitch of the row; afterwards you need to work the stitch in the same position in the next row, so you should consider the arrow the beginning/end of the chart (for the first/last repeat of the row). Happy knitting!
12.01.2026 - 00:16
![]() Francine Pelletier wrote:
Francine Pelletier wrote:
Merci , Mon problème est M3. je débute rg end avec 1 m. lis puis à partir de la flèche pour L, je tricote de dr. vers la gche les 13 m et les 5 m avant la flèche. J’ai fait 6x le diag de 18 m et il me reste 9 m ( 8 et 1 lis) avant la fin du rv end. Je fais quoi avec ces m? J’espère que je suis claire avec mes explications Merci de m’éclairer
12.12.2025 - 18:12DROPS Design answered:
Bonjour Mme Pelletier, après avoir répété le diagramme en entier, reprenez le diagramme au début pour terminer le rang avec les 8 premières mailles du diagramme. Notez bien quelle est la dernière maille tricotée sur l'endroit, ce sera la 1ère m à tricoter sur l'envers, et pensez à lire le diagramme de gauche à droite sur l'envers. Bon tricot!
15.12.2025 - 10:15
![]() Francine Pelletier wrote:
Francine Pelletier wrote:
Pouvez-vous m’éclairer svp À la grandeur L , au dos, lorsque je suis rendue à tricoter le M3 j’ai 118 m. et le diagramme a 18 m. . Il reste 10 m à la fin du rang dont 2 pour les m. lisières. Je débute bien le diagramme comme indiqué. Est-ce moi qui fait erreur ? Merci de m’éclairer J’aime votre modèle
12.12.2025 - 16:13DROPS Design answered:
Bonjour Mme Pelletier, continuez vos diagrammes comme avant, comme vous avez rabattu la 1ère maille et la dernière de M.1 au début et à la fin du rang, vous allez commencer (sur l'endroit) M.1 par la 2ème maille (= 1 m jersey) et vous terminez le dernier M.1 du rang par l'avant-dernière maille (1 m jersey). Bon tricot!
12.12.2025 - 16:49
![]() Corrie wrote:
Corrie wrote:
Bij m3 beging je dan bij de pijl? En dan het hele patroon
17.09.2025 - 17:46
![]() Louise wrote:
Louise wrote:
Je vois la correction apportée pour la taille XL qui n'est pas différente du patron original. Est-ce que le patron d'origine a été corrigé? Merci
11.08.2025 - 22:53DROPS Design answered:
Bonjour Louise, la correction ne s'applique que si vous aviez imprimé les explications auparavant, autrement, les explications en ligne ont déjà été corrigées. Bon tricot!
12.08.2025 - 09:03
|
||||||||||
Sir Lancelot#sirlancelotsweater |
||||||||||
|
|
||||||||||
Men's knitted jumper with textured pattern and v-neck, in DROPS Karisma. Sizes S to XXXL
DROPS 135-36 |
||||||||||
|
GARTER ST (back and forth on needle): K all rows. PATTERN: See diagrams M.1 to M.3 – diagrams show pattern from RS. M.1 = 24 sts in width, M.2 = 12 sts in width and M.3 = 18 sts in width. -------------------------------------------------------- BACK PIECE: Worked back and forth on needle. Cast on 110-122-134-146-158-170 sts (incl 1 edge st in each side) on needle size 3 mm with Karisma. Work rib as follows (seen from from RS): 1 edge st in GARTER ST - see explanation above, * K 1, P 3 *, repeat from *-*, finish with 1 edge st in garter st. When rib measures approx. 5 cm (adjust so that next row is worked from WS), switch to needle size 4 mm. P 1 row from WS while at the same time dec 12 sts evenly = 98-110-122-134-146-158 sts. Work next row as follows (from RS): SIZE S: 1 edge st in garter st, diagram M.1, M.2, M.1, M.2, M.1 and 1 edge st in garter st. SIZE M: 1 edge st in garter st, 6 sts in stocking st, diagram M.1, M.2, M.1, M.2, M.1, 6 sts in stocking st and 1 edge st in garter st. SIZE L: 1 edge st in garter st, diagram M.2, M.1, M.2, M.1, M.2, M.1, M.2 and 1 edge st in garter st. SIZE XL: 1 edge st in garter st, 6 sts in stocking st, diagram M.2, M.1, M.2, M.1, M.2, M.1, M.2, 6 sts in stocking st and 1 edge st in garter st. SIZE XXL: 1 edge st in garter st, 12 sts of diagram M.1 – start in the 13th st from the right side in diagram, diagram M.2, M.1, M.2, M.1, M.2, M.1, M.2 and 12 sts of diagram M.1 – start in first st in diagram - and 1 edge st in garter st. SIZE XXXL: 1 edge st in garter st, 18 sts of diagram M.1 – start in the 7th st from the right side in diagram, diagram M.2, M.1, M.2, M.1, M.2, M.1, M.2 and 18 sts of diagram M.1 – start in first st in diagram - and 1 edge st in garter st. ALL SIZES: Continue to work the same way until piece measures 48-49-50-51-52-53 cm. REMEMBER THE KNITTING TENSION! Now cast off 1-2-2-3-4-5 sts in each side for armholes (i.e. cast off at the beg of the next 2 rows) = 96-106-118-128-138-148 sts. Continue the pattern as before with 1 edge st in garter st in each side. When piece measures approx. 58-60-62-64-66-68 cm (adjust after 1 half repetition or 1 whole repetition of diagram M.1 and M.2 vertically), work 2 rows in stocking st, then continue with diagram M.3 over all sts (except edge st) – see arrow for your size; this marks where to beg in the diagram. AT THE SAME TIME when 4 rows remain of diagram M.3, cast off the middle 36-38-40-42-44-46 sts for neck and finish each shoulder separately. Continue to cast off 2 sts on next row from neck = 28-32-37-41-45-49 sts remain on the shoulder. When diagram M.3 has been worked, work approx. 1 cm in stocking st, then cast off. Piece measures approx. 68-70-72-74-76-78 cm. FRONT PIECE: Cast on and work as back piece. Cast off for armhole as on back piece and continue until piece measures approx. 58-60-62-64-66-68 cm. Then work 2 rows in stocking st - while at the same time on 1st row casting off the middle 4 sts for neck and finish each shoulder separately. Work pattern as on back piece (make sure that diagram M.3 is worked the same way on each side of neck) – AT THE SAME TIME cast off on every row from neck: 2 sts 5-6-7-8-9-10 times and then 1 st 8-7-6-5-4-3 times = 28-32-37-41-45-49 sts remain on shoulder. Cast off when same no of rows has been worked as on back piece. SLEEVE: Worked back and forth on needle. Cast on 62 sts for all sizes (incl 1 edge st in each side) on needle size 3 mm with Karisma. Work rib as follows (seen from from RS): 1 edge st in garter st, * K 1, P 3 *, repeat from *-*, finish with 1 edge st in garter st. When piece measures approx. 5 cm (adjust so that next row is worked from WS), switch to needle size 4 mm. P 1 row from WS. Work next row as follows: 1 edge st in garter st, diagram M.1, M.2, M.1 and 1 edge st in garter st, continue like this. When piece measures 9 cm, inc 1 st in each side. Repeat inc every 9th-8th-6th-5th-4th-4th row a total of 12-14-16-18-20-21 times - work the inc sts in stocking st = 86-90-94-98-102-104 sts. When piece measures approx. 46-46-44-42-40-39 cm (adjust after 1 half or 1 whole repetition of diagram M.1 and M.2 vertically, inc should be finished), work 2 rows in stocking st, then continue with diagram M.3 – start in first st on right side of diagram (the pattern will not fit at the end of row). After diagram M.3 work (if there is room) in stocking st until piece measures 56-56-54-52-50-49 cm (shorter measurements in the larger sizes because of broader shoulder width), cast off. ASSEMBLY: Sew the shoulder seams. NECK: Knit up approx. 119 to 139 sts (divisible by 4 + 3) around the neck on circular needle size 3 mm with Karisma – beg mid front. Then the piece is worked back and forth from mid front. First row from WS is worked as follows: 1 edge st in garter st, * P 1, K 3 *, repeat from *-* and finish with P 1 and 1 edge st in garter st. Continue with K over K and P over P and edge st in garter st until neck edge measures approx. 6 cm. Cast off with K over K and P over P. Place the neck on top of each other mid front, left side over right, fasten with stitches from both WS and RS. Sew the sleeves inside 1 edge st. Sew sleeve and side seams in one inside 1 edge st. |
||||||||||
Diagram explanations |
||||||||||
|
||||||||||
 |
||||||||||
Have you finished this pattern?Tag your pictures with #dropspattern #sirlancelotsweater or submit them to the #dropsfan gallery. Do you need help with this pattern?You'll find 19 tutorial videos, a Comments/Questions area and more by visiting the pattern on garnstudio.com. © 1982-2026 DROPS Design A/S. We reserve all rights. This document, including all its sub-sections, has copyrights. Read more about what you can do with our patterns at the bottom of each pattern on our site. |
||||||||||


With over 40 years in knitting and crochet design, DROPS Design offers one of the most extensive collections of free patterns on the internet - translated to 17 languages. As of today we count 324 catalogues and 12284 patterns translated into English (UK/cm).
We work hard to bring you the best knitting and crochet have to offer, inspiration and advice as well as great quality yarns at incredible prices! Would you like to use our patterns for other than personal use? You can read what you are allowed to do in the Copyright text at the bottom of all our patterns. Happy crafting!
Post a comment to pattern DROPS 135-36
We would love to hear what you have to say about this pattern!
If you want to leave a question, please make sure you select the correct category in the form below, to speed up the answering process. Required fields are marked *.