
Looking for a yarn?


Comments / Questions (13)
![]() Valerie Powell wrote:
Valerie Powell wrote:
What exactly does it mean when it says M.2B (=11 sts) when there are only 10 sts in the B pattern. If you are doing the XL size you do M.2A over 30 sts - is this 3 times the A section of the pattern? I have not done a Drops pattern before but love the look of this one and have begun it with the first 12 rows.
17.05.2019 - 15:29DROPS Design answered:
Dear Mrs Powell, you first repeat the 10 sts in M.2A a total of 3 times in width = over the next 30 stitches, then work the 11 stitches in M.2B as shown in diagram. You can insert a marker between each diagram so that it will be easier to follow them and to check your number of stitches. Happy knitting!
20.05.2019 - 08:53
![]() Isabelle wrote:
Isabelle wrote:
Bonjour, pouvez vous m'expliquer : - a 52 cm ajuster apres le 1er, 9eme ou 11eme rang de M2 , c a dire pr que le rang suivant soit tricote a l'envers - comment dois je faire ?. Merci
29.05.2014 - 17:23DROPS Design answered:
Bonjour Isabelle, ajustez les 52 cm pour que le rang suivant soit tricoté sur l'envers, et de sorte que le dernier rang tricoté sur l'endroit soit un rang 1, ou un rang 9 ou un rang 11 de M2. Bon tricot!
29.05.2014 - 18:39Marlène Lavoie wrote:
Bonjour, j'ai commencé à tricoter ce magnifique modèle, cependant après les premières diminutions à 9cm de hauteur totale, le rang qui suit dans la section de 61 mailles ( rg 19 du diagramme) en tricotant ces mailles on obtient 5 mailles de plus, donc 66 mailles. On ne peut donc pas arriver à 141 mailles une fois les diminutions terminées (on enlève 4m à tous les 3 cm). Je vous remercie à l'avance de votre réponse le plus tôt possible serait très apprécié.
14.03.2013 - 00:27DROPS Design answered:
Bonjour Madame Lavoie, au rang 19 du diagramme, les jetés sont compensés par les diminutions, le nombre de mailles de M2 reste le même, et donc en diminuant 9 fois 4 m, on obtient bien 177 - (4x9) = 141 m. Bon tricot !
14.03.2013 - 09:15Erika wrote:
Wunderschön
17.01.2011 - 21:38
![]() LeneL wrote:
LeneL wrote:
Very nice
09.01.2011 - 23:37Cecilia wrote:
Muy bonito cardigan, espero que pronto nos brinden su patrón. Feliz Año, saludos desde ARgentina
08.01.2011 - 00:05
![]() Elisabeth wrote:
Elisabeth wrote:
Flot trøje og igen i Paris dejligt garn :)
07.01.2011 - 17:28
![]() Enid Bergsma wrote:
Enid Bergsma wrote:
Dit is een heel mooi patroon kan je op veel manieren dragen ga ik ook maken
06.01.2011 - 22:15
![]() Margit Pedersen wrote:
Margit Pedersen wrote:
Den er super flot
05.01.2011 - 10:47
![]() Sylvia Tocklin wrote:
Sylvia Tocklin wrote:
Återigen ett underbart vackert mönster, toppenfin kofta
02.01.2011 - 09:45
|
|||||||||||||||||||
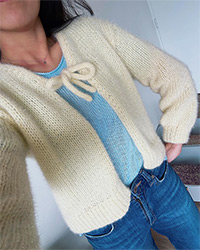
From the Coast#fromthecoastcardigan |
|||||||||||||||||||
 |
 |
||||||||||||||||||
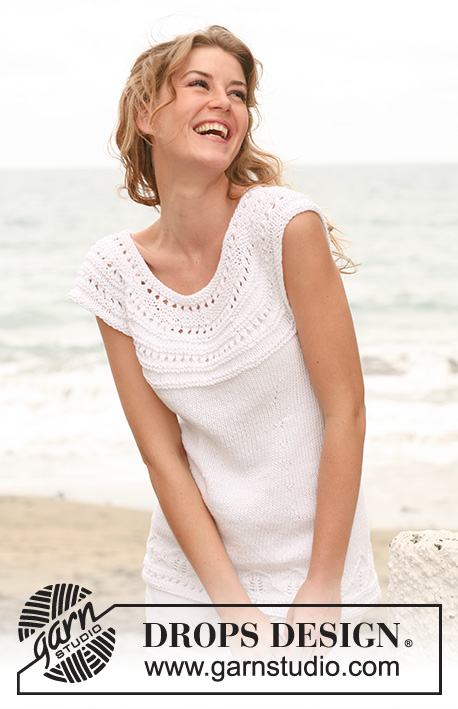
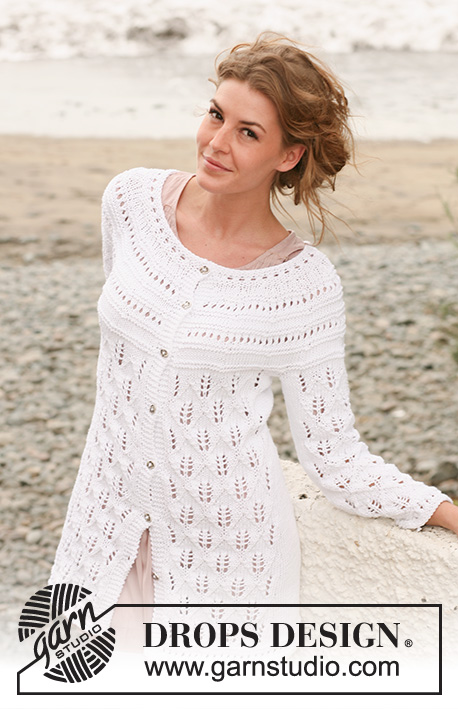
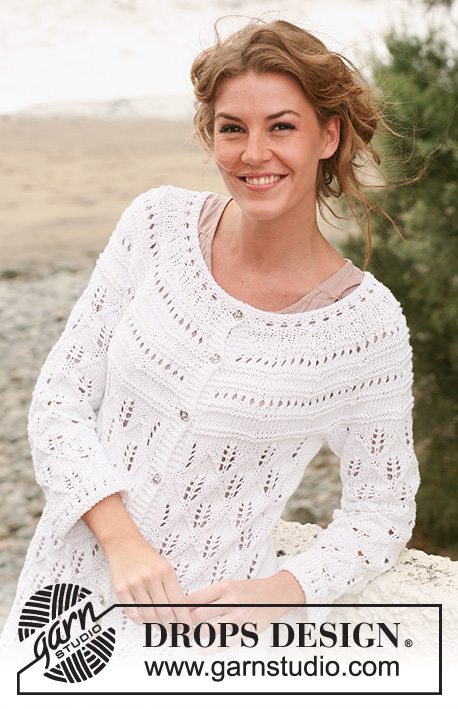
Knitted DROPS jacket with lace pattern and round yoke in "Paris". Size: S - XXXL.
DROPS 128-28 |
|||||||||||||||||||
|
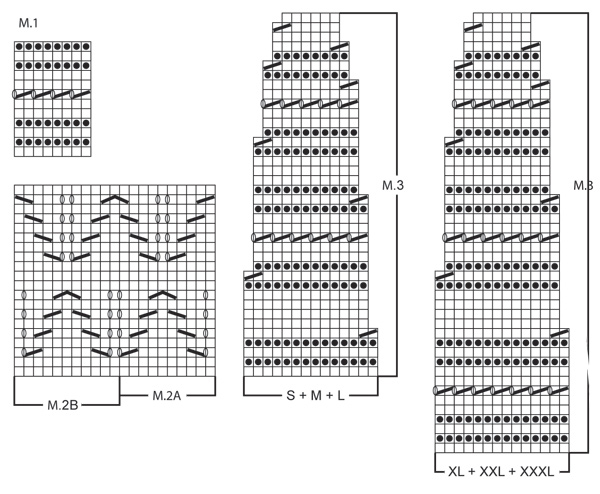
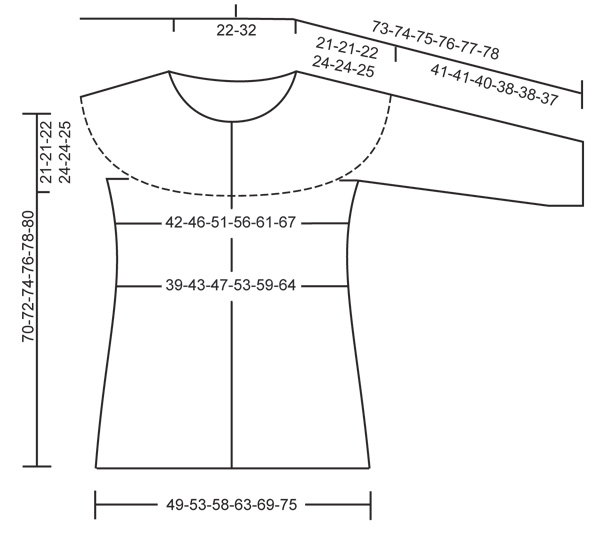
GARTER ST (back and forth on circular needle): K all rows. PATTERN: See diagram M.1 to M.3. The diagram shows the pattern from RS. DECREASE TIP (applies to body): All dec are done from RS! Dec as follows after marker: Slip 1 st as if to K, K 1, psso. Dec as follows before marker: K 2 tog. INCREASE TIP: All inc are done from RS! Inc 1 st by picking up a st from previous row, K this st. BUTTON HOLES: Cast off for button holes on right front band. 1 BUTTON HOLE = K tog second and third st from edge and make 1 YO. Cast off for button holes when piece measures: SIZE S: 14, 23, 32, 41, 50, 59 and 68 cm SIZE M: 16, 25, 34, 43, 52, 61 and 70 cm SIZE L: 18, 27, 36, 45, 54, 63 and 72 cm SIZE XL: 21, 29, 37, 45, 53, 60, 67 and 74 cm SIZE XXL: 23, 31, 39, 47, 55, 62, 69 and 76 cm SIZE XXXL: 21, 30, 39, 48, 57, 64, 71 and 78 cm I.e. approx. 2 cm remain until finished measurements after last button hole and 3rd-3rd-3rd-4th-4th-4th button hole from top is in the transition to M.3 on the round yoke. -------------------------------------------------------- JACKET: Worked back and forth on circular needle from mid front. Cast on 177-191-207-225-245-265 sts (incl 5 band sts each side towards mid front) on circular needle size 4 mm with Paris. Work first row from RS as follows: 5 band sts in GARTER ST - see explanation above -, M.1 until 6 sts remain, finish with first st in M.1 and 5 band sts in GARTER ST. Continue the pattern like this. NOTE! On 7th row in M.1 K last st before band. After M.1, switch to circular needle size 5 mm and work next row from RS as follows: 5 band sts as before, 1 st in stocking st, M.2A over the next 20-20-20-30-30-40 sts, M.2B (= 11 sts), insert a marker (= marker 1), work 21-28-31-25-30-25 sts in stocking st, insert a marker (= marker 2), work M.2A over the next 50-50-60-70-80-90 sts, M.2B (= 11 sts), insert a marker (= marker 3), work 21-28-31-25-30-25 sts in stocking st, insert a marker (= marker 4), work M.2A over the next 20-20-20-30-30-40 sts, M.2B (= 11 sts), 1 st in stocking st and 5 band sts in garter st. Continue the pattern like this. REMEMBER THE KNITTING TENSION! When piece measures 9-9-10-10-10-10 cm, dec 1 st after marker 1 and 3 and before marker 2 and 4 (= 4 sts dec). READ DECREASE TIP! Repeat dec every 3 cm a total of 9 times = 141-155-171-189-209-229 sts. REMEMBER BUTTON HOLES ON RIGHT BAND - see explanation above. When piece measures 37-38-38-38-39-39 cm, inc 1 st after marker 1 and 3 and before marker 2 and 4 (= 4 sts inc). READ INCREASE TIP! Repeat inc every 5-5-5-5-9-9 cm a total of 3-3-3-3-2-2 times = 153-167-183-201-217-237 sts. Now remove the 4 markers and insert 2 new markers in the piece after 41-44-48-53-57-62 sts from each side (= 71-79-87-95-103-113 sts between markers on back piece). Continue pattern as before. When piece measures approx. 49-51-52-52-54-55 cm - adjust after 1st, 9th or 11th row in M.2, i.e. so that next row is worked from WS -, cast off 6-6-6-8-8-8 sts in each side for armholes (i.e. 3-3-3-4-4-4 sts on each side of both markers) = 65-73-81-87-95-105 sts on back piece and 38-41-45-49-53-58 sts on each front piece. Put piece aside and knit the sleeves. SLEEVE: Worked in the round on double pointed needles. Cast on 42-42-42-44-44-44 sts on double pointed needles size 4 mm with Paris. Insert a marker at beg of round = mid under sleeve. Work M.1. AT THE SAME TIME on last round of M.1, inc 1 st = 43-43-43-45-45-45 sts. After M.1, switch to double pointed needles size 5 mm and work next round as follows: 1-1-1-2-2-2 sts in stocking st, M.2A over the next 30 sts, M.2B (= 11 sts) and 1-1-1-2-2-2 sts in stocking st. Continue the pattern like this. When piece measures 8-9-9-9-10-12 cm, inc 2 sts mid under sleeve (i.e. 1 st on each side of marker). Repeat inc every 5-3½-3-2½-2-1½ cm a total of 7-9-10-11-13-15 times = 57-61-63-67-71-75 sts. NOTE! Work inc sts in stocking st until they can be worked in one whole repetition of the pattern. When piece measures approx. 41-41-40-38-38-37 cm (NOTE! Shorter measurements in the larger sizes because of longer sleeve cap and broader shoulder width) - adjust to finish after same round in diagram as on body - cast off 6-6-6-8-8-8 sts mid under sleeve (i.e. 3-3-3-4-4-4 sts on each side of marker) = 51-55-57-59-63-67 sts. Slip sts on a stitch holder and knit another sleeve. YOKE: Slip sleeves on to same circular needle size 5 mm as body where armholes were cast off = 243-265-285-303-327-355 sts. Work 2-2-4-2-2-4 rows in stocking st (1st row = K from RS and work bands in garter st as before until finished measurements) while AT THE SAME TIME dec 8-2-8-12-8-8 sts evenly (do not dec over bands) = 235-263-277-291-319-347 sts. Work next row from RS as follows (NOTE! see diagram for correct size): 5 band sts, M.3 over the next 224-252-266-280-308-336 sts (1 repetition = 14 sts), finish with 1st st in M.3 and 5 band sts. Continue the pattern like this. NOTE: On the rows that start with K 2 tog at beg of 1 repetition, K last st before band. Continue the pattern like this. After last dec, 107-119-125-131-143-155 sts remain on needle, work last row in diagram = P from WS. NECKLINE: Switch to circular needle size 4 mm and work M.1 with 5 band sts in each side (1st row = RS) while AT THE SAME TIME on 1st row, dec 22-28-28-28-32-36 sts evenly (do not dec over bands) = 85-91-97-103-111-119 sts. When 2 rows of M.1 have been worked, continue with GARTER ST back and forth on needle while AT THE SAME TIME working an elevation in the back of neck as follows (start from RS): Work until 12-13-14-15-16-17 sts remain on needle, turn piece, tighten the thread and work back until 12-13-14-15-16-17 sts remain in the other side. Turn piece, tighten thread and work until 24-26-28-30-32-34 sts remain on needle, turn piece, tighten thread and work back until 24-26-28-30-32-34 sts remain in the other side. Turn piece, tighten thread and work until 36-39-42-45-48-51 sts remain on needle, turn piece, tighten thread and work back until 36-39-42-45-48-51 sts remain in the other side. Turn piece, tighten thread and K the rest of the row. Then continue M.1 with 5 band sts in each side but now start from WS on 4th row in diagram (last st on needle before band is worked as first st in M.1). NOTE! On 7th row in diagram K last st before band. After M.1, loosely cast off with K from RS. ASSEMBLY: Sew the openings under the sleeves. Sew on buttons. |
|||||||||||||||||||
Diagram explanations |
|||||||||||||||||||
|
|||||||||||||||||||
 |
|||||||||||||||||||
 |
|||||||||||||||||||
Have you finished this pattern?Tag your pictures with #dropspattern #fromthecoastcardigan or submit them to the #dropsfan gallery. Do you need help with this pattern?You'll find 19 tutorial videos, a Comments/Questions area and more by visiting the pattern on garnstudio.com. © 1982-2025 DROPS Design A/S. We reserve all rights. This document, including all its sub-sections, has copyrights. Read more about what you can do with our patterns at the bottom of each pattern on our site. |
|||||||||||||||||||


With over 40 years in knitting and crochet design, DROPS Design offers one of the most extensive collections of free patterns on the internet - translated to 17 languages. As of today we count 320 catalogues and 12075 patterns translated into English (UK/cm).
We work hard to bring you the best knitting and crochet have to offer, inspiration and advice as well as great quality yarns at incredible prices! Would you like to use our patterns for other than personal use? You can read what you are allowed to do in the Copyright text at the bottom of all our patterns. Happy crafting!
Post a comment to pattern DROPS 128-28
We would love to hear what you have to say about this pattern!
If you want to leave a question, please make sure you select the correct category in the form below, to speed up the answering process. Required fields are marked *.