
Popular categories
Looking for a yarn?


Comments / Questions (88)
![]() Viktorija wrote:
Viktorija wrote:
Hi, I wonder whether the two extra rows over the 8 sts garter edge are still needed when the increases for the collar start?
02.09.2019 - 22:29DROPS Design answered:
Dear Viktorija, you need more rows in garter stitch than in stocking stitch for the same height, without these extra rows, the garter stitch edge would contract piece in height. Happy knitting!
03.09.2019 - 08:53
![]() Joann Grubb wrote:
Joann Grubb wrote:
When setting up the left front after the garter stitch rows the pattern says to do 8 st in garter stitch, p3 *k1 1yo **repeat from *-** 5-5-5-6-6-6times. This is incorrect it should say 5-5-5-6-6-6 Times total. If you repeat it 5-5-5-6-6-6 times you have an extra stitch 151 not 150
22.08.2019 - 20:20
![]() Jeannette wrote:
Jeannette wrote:
Can u please send me the pattern please thx jeanette
25.06.2019 - 08:16DROPS Design answered:
Dear Jeannette, you can print the patttern by clicking on the icon "print: pattern" at any time. Choosing a virtual printer will allow you to save it as a .PDF file. Happy knitting!
25.06.2019 - 08:33
![]() Inita wrote:
Inita wrote:
Hi. i have 500gr of nice yarn(25g/65m) recommend needle size 3.5. will i be able to knit at least sleevless S or M size cardi. thanks
05.02.2019 - 21:10DROPS Design answered:
Dear Inita, We are able to provide free patterns thanks to our yarns sold throughout the world. You will therefore understand that we can only recomand you to use our yarns. Thank you for your comprehension.
06.02.2019 - 08:59
![]() Heike Rennert wrote:
Heike Rennert wrote:
Sind die cm Angaben ab dem Bündchen oder inklusive des Bündchen?
07.01.2019 - 10:50DROPS Design answered:
Liebe Frau Rennert, die Angaben werden von der Anschlagskante gemessen. Viel Spaß beim stricken!
07.01.2019 - 12:15
![]() Shirley wrote:
Shirley wrote:
Ik ben bezig met het linker voorpand, nu heb ik volgens de uitleg de buitenste 81 st aan de linkerkant op een hulpdraad gezet en vervolgens 6 nld over de overgebleven 69 st gebreid. Maar wanneer ik nu het armsgat brei over de 81 st loopt het telpatroon niet meer gelijk. Ik heb aan de linkerkant 4 nld minder dan aan de rechterkant van het werk. Is dit wel de bedoeling of ik doe ik iets verkeerd?
31.10.2018 - 15:13DROPS Design answered:
Dag shirly,
Dat klopt. Door de verkorte toeren ben je aan de ene kant op een andere plek in M.1 qua hoogte dan aan de andere kant. Dat maakt niet uit als M.1 maar mooi doorloopt op elke kant.
31.10.2018 - 18:01
![]() Nicole FORTIN wrote:
Nicole FORTIN wrote:
Bonjour, à 51 cm du hauteur totale, j'ai fait le rg 8 du diagramme; puis je tricote 2cm sur les m de droite, soit 4 rgs pour moi, j'ai fait le rg 12 du diagramme - je reprends les m de gauche, je rabats les 44 premières m, je tourne, soit 2 rgs, j'ai fait le rg 10 du diagramme + 44m et reprendre toutes les mailles; mais je me retrouve avec un décalage de 2 rgs dans le dessin de gauche par rapport à celui de droite!...merci de me dire où je me suis trompée; cordialement
29.06.2017 - 09:43DROPS Design answered:
Bonjour Mme Fortin, à 51 cm (en taille L), vous tricotez 6 rangs sur les 73 m restant sur l'aiguille (soit si vous commencez par le rang 9, les rangs 9 à 14, et vous mettez ces mailles en attente (bas du côté, sous la manche). Vous reprenez les 83 m restant sur l'aiguille, rabattez 44 m et tricotez les 39 m restantes, tournez tricotez ces 39 m et montez 44 m (= vous tricotez 2 rangs sur ces mailles, soit les rangs 9 et 10) coupez le fil. Reprenez ensuite les 73 m en attente = (39+44+73=) 156 m au total. Les diagrammes ne vont plus se suivre en même temps mais continuez les comme avant pour que le motif reste le même. Bon tricot!
29.06.2017 - 14:44
![]() Olga Sergeeva wrote:
Olga Sergeeva wrote:
Thank you, sorry,but I meant this part, i dont understand this part: increase for collar in the left side seen from RS. Inc 1 st by making 1 YO inside the outermost 2 sts. On next row K YO twisted to avoid holes. Work the inc sts in garter st. The holes in the 8 sts in garter st are made the same way and same place as before. What are the outermost sts?and where should I add?
09.09.2016 - 13:53DROPS Design answered:
Dear Mrs Sergeeva, then for this part, inc for collar at the end of row from RS, before the last 2 sts on needle (= towards top of the jacket on left front piece). Happy knitting!
09.09.2016 - 15:02
![]() Olga Sergeeva wrote:
Olga Sergeeva wrote:
Hi,sorry,i dont understand where should I add loops after armhole?what are this furthermost loops?apreciate your help,thank you
08.09.2016 - 23:38DROPS Design answered:
Dear Mrs Sergeeva, After you have worked some rows over the sts at the bottom of piece, put them on a st holder and slip the sts on the left side of piece back onto needle, work 1 row from RS binding off the sts for armhole at beg of row, work to end of row, turn and at the end of next row from WS cast on the new sts for armhole (2 rows in the 3 smaller sizes and 4 rows in the 3 larger sizes) - cut the thread. Now slip all sts back onto needle, ie from bottom to top of jacket = there are same number of sts on needle as before shaping armhole. Happy knitting!
09.09.2016 - 09:22
![]() Olga Sergeeva wrote:
Olga Sergeeva wrote:
Prosim,kde mam pridat po tom pruramku?nerozumim co jsou nejvzdalenejsi oky.dekuji moc
24.08.2016 - 21:57DROPS Design answered:
Dobrý den Olgo, jedná se o oka na okraji dílu. Hodně zdaru!
18.10.2016 - 06:57
|
||||||||||||||||||||||||||||||||||
Timeless Grace#timelessgracecardigan |
||||||||||||||||||||||||||||||||||
 |
 |
|||||||||||||||||||||||||||||||||
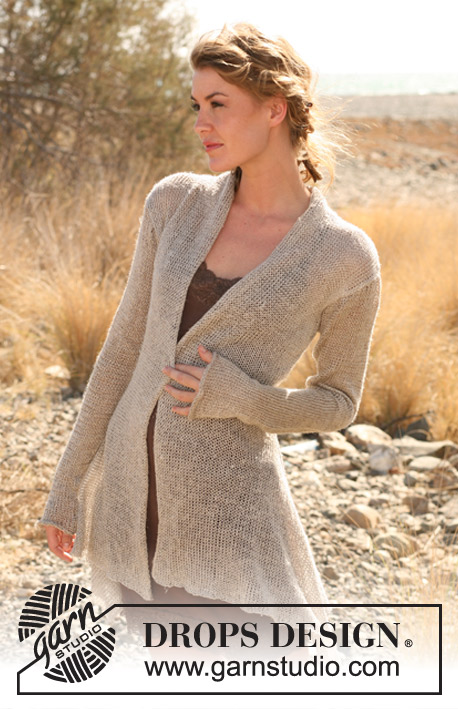
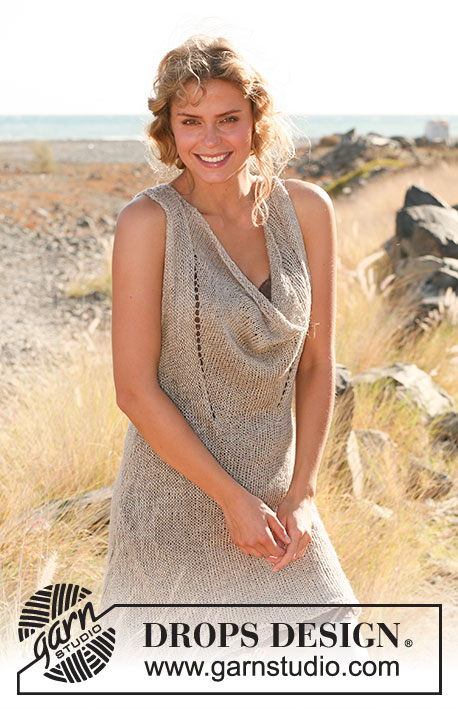
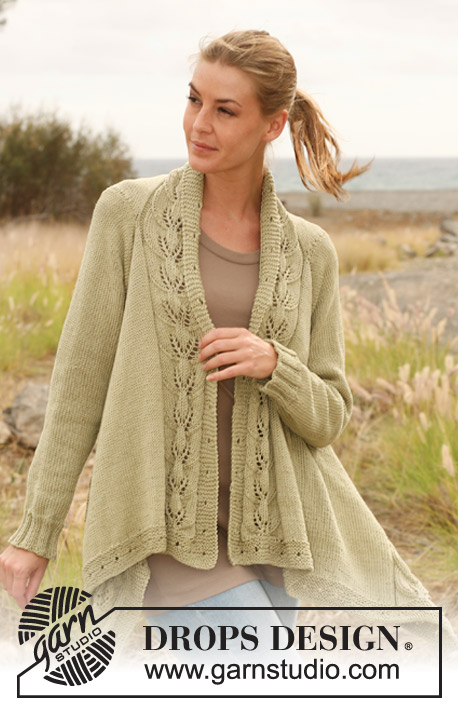
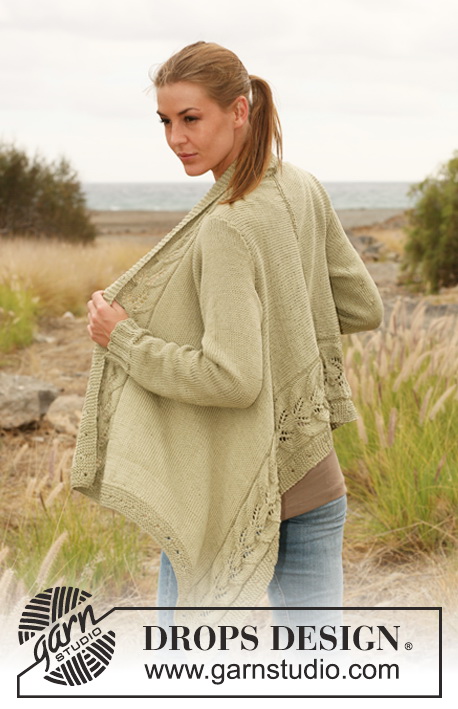
Knitted DROPS jacket worked sideways with lace pattern in "Muskat". Size: S - XXXL
DROPS 129-1 |
||||||||||||||||||||||||||||||||||
|
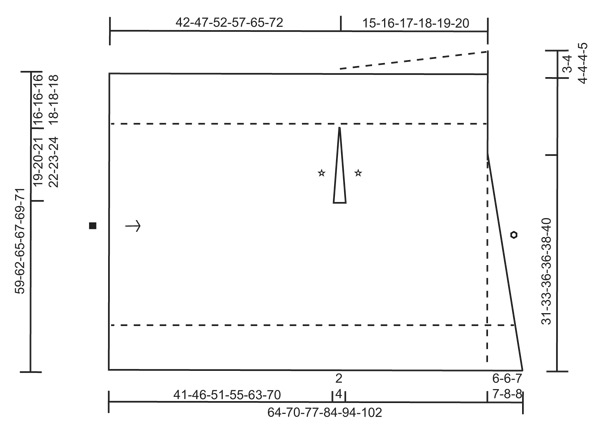
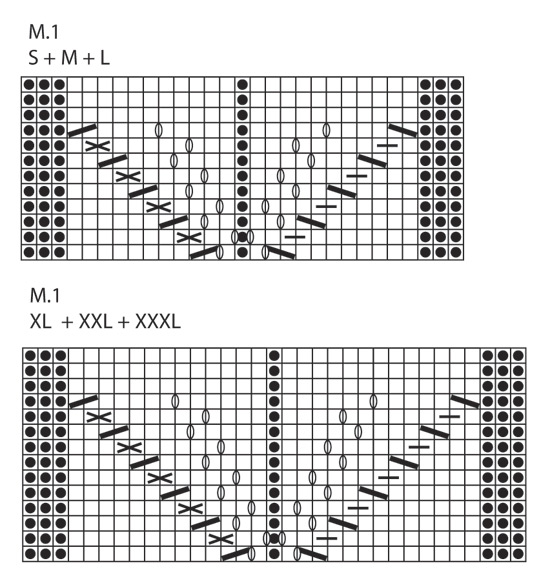
PATTERN: See diagram M.1. The diagram shows the pattern from RS. See diagram for size! GARTER ST (back and forth on needle): K all rows. GARTER ST (in the round): *K 1 round and P 1 round*, repeat from *-*. --------------------------------------------------------- JACKET: The garment is knitted back and forth on circular needle because of no of sts. Work the jacket from mid front on left front piece and out towards the side, cast off for sleeve and continue until mid back before casting off. Then work right front piece the same way but reversed from mid front before the garment is sewn tog mid back. Finish by knitting and sewing in the sleeves. LEFT FRONT PIECE: Cast on 109-114-119-124-129-134 sts on circular needle size 4 mm with Muskat. K 7 rows back and forth over all sts (1st row = from WS). Continue working next row from RS as follows: * K3, K2 tog, 1 dbl YO (= 2 YO) *, repeat from *-* and finish with K4. Then K 7 rows over all sts (K one YO, slip the other YO off the needle). Work next row as follows (from RS): 8 sts in GARTER ST - see explanation above -, P3, * K1, 1 YO *, repeat from *-* 5-5-5-6-6-6 times in total, K1, P1, *-* 5-5-5-6-6-6 times in total, K1, P3, K 55-60-65-66-71-76 sts while AT THE SAME TIME inc 14-16-17-16-15-16 sts evenly (inc 1 st by making 1 YO), P3, *-* 5-5-5-6-6-6 times in total, K1, P1, *-* 5-5-5-6-6-6 times in total, K1, P3 and 8 sts in garter st = 143-150-156-164-168-174 sts on needle. Work next row as follows (from WS): 8 sts in garter st , K3, P 11-11-11-13-13-13 sts, K1, P 11-11-11-13-13-13 sts, K3, P 69-76-82-82-86-92 sts, K3, P 11-11-11-13-13-13 sts, K1, P 11-11-11-13-13-13 sts, K3 and 8 sts in garter st (NOTE! P YO twisted, i.e. in back loop of st instead of front to avoid holes). READ ALL OF THE FOLLOWING SECTION BEFORE CONTINUING! Continue to work as follows (from RS): NOTE! See diagram for size! 8 sts in garter st, M.1, K 69-76-82-82-86-92 sts, M.1 and 8 sts in garter st. AT THE SAME TIME make 1 hole in the 8 sts in garter st each side on every 14th row (every 7th garter st) as follows: At beg of row (from RS): K3, K2 tog, 1 dbl YO, K3. At end of row (from RS): K2, K2 tog, 1 dbl YO, K4. On row after the dbl YO work 8 sts in garter st each side as before (K one YO, slip the other YO off the needle). AT THE SAME TIME approx. every 4 cm work 2 extra rows back and forth only over the 8 sts in garter st each side (this is done so that the edge in garter st does not tighten the edge of piece). REMEMBER THE KNITTING TENSION! When piece measures approx. 41-46-51-55-63-70 cm - adjust so that next row is knitted from RS - slip the outermost 79-81-83-89-91-93 sts in the left side of piece (seen from RS) on a stitch holder. Work 6-6-6-10-10-10 rows as before (= approx. 2-2-2-4-4-4 cm) over the remaining 64-69-73-75-77-81 sts on needle. Cut the thread. Then slip these sts on a stitch holder. Slip the 79-81-83-89-91-93 sts from the first stitch holder back on circular needle size 4 mm and work armholes as follows from RS: Size S + M + L: Cast off the first 40-42-44 sts at beg of row, work the remaining 39 sts on needle as before. Now insert a marker in the outermost st in the right side of needle (seen from RS - this marks where the sleeve cap is sewn into the armhole). Turn piece, work the 39 sts as before and then cast on 40-42-44 sts at the end of row. Cut the thread. Size XL + XXL + XXXL: Cast off the first 23-24-25 sts at beg of row, work the remaining 66-67-68 sts on needle as before, turn piece. Work the 66-67-68 sts on the needle as before, turn piece. Cast off the first 23-24-25 sts at beg of row, work the remaining 43 sts on needle as before. Now insert a marker in the outermost st in the right side of needle (seen from RS - this marks where the sleeve cap is sewn into the armhole). Turn piece, work the 43 sts on needle as before and cast on 23-24-25 new sts at the end of row, turn piece. Work the 66-67-68 sts on the needle as before, turn piece. Work the 66-67-68 sts on needle as before and cast on 23-24-25 new sts at the end of row. Cut the thread. ALL SIZES: Now slip the 64-69-73-75-77-81 sts from the stitch holder back on needle = 143-150-156-164-168-174 sts. Continue to work as before over all sts (1st row = RS). AT THE SAME TIME increase for collar in the left side seen from RS. Inc 1 st by making 1 YO inside the outermost 2 sts. On next row K YO twisted to avoid holes. Work the inc sts in garter st. The holes in the 8 sts in garter st are made the same way and same place as before. Inc 1 st for collar every 2 cm a total of 7-8-8-9-9-10 times (= 15-16-16-17-17-18 sts in garter st) = 150-158-164-173-177-184 sts. When piece measures 56-62-68-74-83-91 cm (measured in left side of piece seen from RS, piece measures approx. 57-63-69-76-85-93 cm in the right side), work 1 row from RS as before. Inc for collar should now be finished. Continue to work with short rows to add extra width mid back as follows (start at beg of row from WS = from neckline): Work the first 68-70-71-76-76-78 sts on needle and then slip these sts on a stitch holder, work the remaining sts on the needle, turn piece and work back over all sts, turn piece, * work the first 7-7-6-7-6-7 sts on the needle, then slip sts on the same stitch holder and work the remaining sts on the needle, turn piece and work back over all sts *, repeat from *-* a total of 7-7-8-8-10-10 times. Then work the first 25-31-37-33-33-28 sts on needle, slip the sts on the same stitch holder and work the remaining 8 sts on needle. Slip all sts back on needle. Work next row as follows (from RS): 8 sts in garter st, K3, K2 tog 5-5-5-6-6-6 times, K3, K2 tog 5-5-5-6-6-6 times, K3, K 69-76-82-82-86-92 sts while AT THE SAME TIME dec 14-16-17-16-15-16 sts evenly, K3, K2 tog 5-5-5-6-6-6 times, K3, K2 tog 5-5-5-6-6-6 times, K3 and work 15-16-16-17-17-18 sts in garter st = 116-122-127-133-138-144 sts. K 1 row from WS over all sts. The piece now measures approx. 57-63-69-75-84-92 cm in the left side (seen from RS) and 64-70-77-84-94-102 cm in the right side, measured in knitting direction! Cast off LOOSELY. RIGHT FRONT PIECE: Cast on and work as left front piece but reversed, i.e all measurements that were done in the left side of piece (seen from RS) are now done in the right side of piece (seen from RS). When working the 6-6-6-10-10-10 rows under the sleeve adjust so that the first row is worked from WS (instead of RS) and the outermost 79-81-83-89-91-93 sts in the left side of piece (seen from WS, not RS) are slipped on a stitch holder. Continue to follow explanation for sleeve from WS (instead of RS). Finish by working the short rows mid back by starting at beg of row from RS (instead of beg of row from WS). SLEEVE: Cast on 54-54-54-60-60-60 sts on double pointed needles size 3.5 mm with Muskat. K 1 round. Continue to work rib K3/P3. When rib measures 6-6-7-7-8-8 cm, K 1 round while AT THE SAME TIME dec 6-4-2-6-6-4 sts evenly = 48-50-52-54-54-56 sts. Switch to double pointed needles size 4 mm. Insert a marker at beg of round = mid under sleeve. Continue to work in the round in stocking st. AT THE SAME TIME when piece measures 9-9-11-11-13-13 cm, inc 2 sts mid under sleeve (= 1 st each side of marker). Repeat inc every 4½-3½-2½-2-1½-1½ cm a total of 9-11-13-15-18-20 times = 66-72-78-84-90-96 sts. Continue to work until piece measures 49-48-47-46-45-44 cm (NOTE! Shorter measurements in the larger sizes because of longer sleeve cap and broader shoulder width). Now cast off 10 sts mid under sleeve (5 sts each side of marker) and continue to work back and forth in stocking st. Continue working while AT THE SAME TIME casting off 1 st at beg of every row a total of 11-12-13-15-16-18 times each side. Then cast off 5 sts at beg of the next 2 rows. The piece now measures approx. 58 cm in all sizes. Cast off the remaining sts. ASSEMBLY: Sew the jacket tog mid back inside the cast off edge so that there are 2 garter st mid back. Sew in the sleeves - NOTE: Sew sleeve cap against the marker on the shoulder and sew the sleeve in each side along the opening of armhole marked with a star in the chart. |
||||||||||||||||||||||||||||||||||
Diagram explanations |
||||||||||||||||||||||||||||||||||
|
||||||||||||||||||||||||||||||||||
 |
||||||||||||||||||||||||||||||||||
 |
||||||||||||||||||||||||||||||||||
Have you finished this pattern?Tag your pictures with #dropspattern #timelessgracecardigan or submit them to the #dropsfan gallery. Do you need help with this pattern?You'll find 27 tutorial videos, a Comments/Questions area and more by visiting the pattern on garnstudio.com. © 1982-2026 DROPS Design A/S. We reserve all rights. This document, including all its sub-sections, has copyrights. Read more about what you can do with our patterns at the bottom of each pattern on our site. |
||||||||||||||||||||||||||||||||||


With over 40 years in knitting and crochet design, DROPS Design offers one of the most extensive collections of free patterns on the internet - translated to 17 languages. As of today we count 324 catalogues and 12290 patterns translated into English (UK/cm).
We work hard to bring you the best knitting and crochet have to offer, inspiration and advice as well as great quality yarns at incredible prices! Would you like to use our patterns for other than personal use? You can read what you are allowed to do in the Copyright text at the bottom of all our patterns. Happy crafting!
Post a comment to pattern DROPS 129-1
We would love to hear what you have to say about this pattern!
If you want to leave a question, please make sure you select the correct category in the form below, to speed up the answering process. Required fields are marked *.