
Popular categories
Looking for a yarn?


Comments / Questions (60)
![]() Cindy wrote:
Cindy wrote:
Mooi dit❤️, is terug in met dit patroon ook de kleur.
19.04.2026 - 12:37
![]() Ghouali Meriem wrote:
Ghouali Meriem wrote:
Merci pour votre réponse mais il faut juste les 5 premières mailles en point mousse ou tout le Long de la bordure en points bmousse merci pour votre compréhension
31.10.2025 - 09:11DROPS Design answered:
Bonjour Mme Ghouali, seules les 5 premières mailles en début de rang sur l'endroit (bordure devant droit) autrement dit en bas du gilet sont à tricoter au point mousse, les autres mailles se tricotent en côtes (1 m end, 2 m env) et vous terminez par 1 m lis au point mousse côté encolure. Pour la bordure du devant gauche, commencez par 1 m lis au point mousse en début de rang sur l'endroit, tricotez en côtes (1 m end, 2 m env) et terminez par 5 m point mousse en bas du gilet. Bon tricot!
03.11.2025 - 07:19
![]() Ghouali wrote:
Ghouali wrote:
Bsr svp pour la bordure il faut 5 m au point mousse alors que sur la photo il y a des cotes 1 m endroit et 2 m envers je comprends pas merci pour votre compréhension
31.10.2025 - 00:42DROPS Design answered:
Bonjour Mme Ghouali, les 5 mailles en bas des devants se tricotent au point mousse, juste avant les côtes, on ne les voit pas bien sur la photo car elles sont tout en bas. Bon tricot!
31.10.2025 - 07:21
![]() Ghouali Meriem wrote:
Ghouali Meriem wrote:
Je m excuse de vous importuner encore une fois pour une taille S c est 12 fois M1B merci de votre gentillesse
18.09.2025 - 00:50DROPS Design answered:
Retrouvez ci-dessous le décompte des 142 mailles du bas du gilet en taille S. Bon tricot!
18.09.2025 - 18:29
![]() Ghouali Meriem wrote:
Ghouali Meriem wrote:
Je m excuse de vous importuner encore une fois pour une taille S c est 12 fois M1B merci de votre gentillesse
18.09.2025 - 00:50DROPS Design answered:
Bonjour Mme Ghouli, en taille S vous allez tricoter ainsi vos 142 mailles: 1 m lis, les 3 mailles de M.1A puis 6 fois les 4 mailles de M.1B puis 1 fois les 3 mailles de M.1C; tricotez ensuite 13 m en côtes comme avant, puis tricotez les 3 mailles de M.1A, 12 fois les 4 mailles de M.1B, les 3 mailles de M.1C, puis 13 m en côtes comme avant, puis les 3 mailles de M.1A, 6 fois les 4 mailles de M.1B, et terminez par les 3 mailles de M.1C et 1 m lis soit= 1+3+(6x4)+3+13+3+(12x4)+3+13+3+(6x4)+3+1=142. Bon tricot!
18.09.2025 - 18:29
![]() Ghouali Meriem wrote:
Ghouali Meriem wrote:
Merci de votre réponse mais le M1B vaut 4mailles et une autre fois il vaut 6 points d apres vos explications c est confus pour moi merci
18.09.2025 - 00:34DROPS Design answered:
Bonjour Mme Ghouali, le nombre de mailles des diagrammes ne doit pas changer, si nécessaire, recomptez bien vos mailles sur l'envers pour placer un marqueur entre chaque partie A, B et C. Ce sera ainsi plus facile de vous repérer. Bon tricot!
18.09.2025 - 18:19
![]() Ghouali Meriem wrote:
Ghouali Meriem wrote:
Bsr svp je n arrive pas à trouver le nombre du motif sur 30 mailles ou 54 pour 6fois M1A M1Bet M1C je tombe pas pas sur le nombre écrit et voulu merci pour vos explications
17.09.2025 - 13:13DROPS Design answered:
Bonjour Mme Ghouali, lorsque vous devez tricotez 6 fois M.1B, vous commencez par M.1A et vous terminez par M.1C autrement dit: 3 mailles de M.1A, on répète ensuite 6 fois les 4 mailles de M.1B et on termine par les 3 mailles de M.1C = 3+24+3=30 mailles point fantaisie au total; pour 54: 3 m de M.1A + 8 fois les 6 mailles de M.1B + 3 mailles de M.1C = 3+48+6=54 mailles. Bon tricot!
17.09.2025 - 16:27
![]() Jana Hlavová wrote:
Jana Hlavová wrote:
Dobrý den, ráda bych se zeptala, proč neuvádíte pro lepší pochopení ke vzorům názorná videa? Děkuji za odpověď, Jana Hlavová
26.08.2024 - 19:32DROPS Design answered:
Dobrý den, Jano, seznam odkazů na související video-ukázky i výukové lekce/kurzy nejdete v záložkách hned pod nadpisem. Hodně zdaru! Hana
27.08.2024 - 13:00
![]() Vera wrote:
Vera wrote:
Ich habe eine Frage zum Muster Ist bei der Beschreibung 2 re zusammen Bzw 1 re abheben das Symbol vertauscht? Üblicherweise ist es andersherum und gestrickt schaut es dann auch ganz anders aus Danke für die Antwort Lg
21.04.2023 - 10:16DROPS Design answered:
Liebe Vera, die Symbole sehen hier anders als üblich aus, aber stricken Sie genau wie in der Beschreibung, so bekommen Sie das Lochmuster wie im Foto. Viel Spaß beim stricken!
21.04.2023 - 12:42
![]() HILDE VAN DURPE wrote:
HILDE VAN DURPE wrote:
Wat betekend vierkantje en vierkantje met streepje door vind uitleg wat onduidelijk
01.09.2021 - 19:17DROPS Design answered:
Dag HIlde,
Een leeg vierkantje betekent dat je de betreffende steek recht breit aan de goede kant en averecht aan de verkeerde kant. Een vierkantje met een horizontaal streepje erin betekent dat je deze steek averecht aan de goede kant breit en recht aan de verkeerde kant.
03.09.2021 - 09:21
|
|||||||||||||||||||||||||
Eiffel#eiffelcardigan |
|||||||||||||||||||||||||
 |
 |
||||||||||||||||||||||||
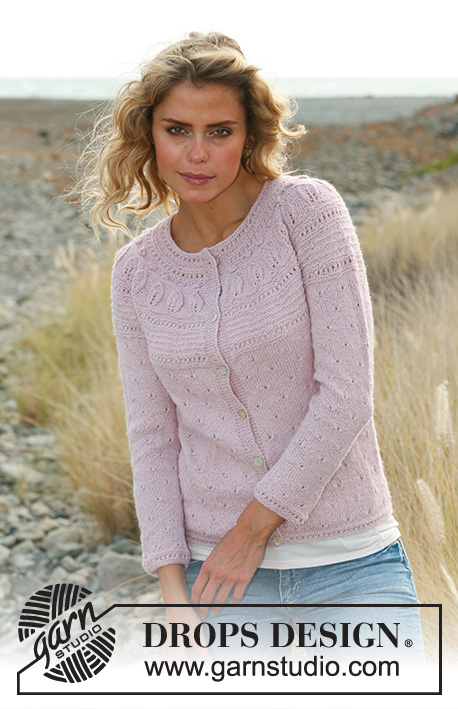
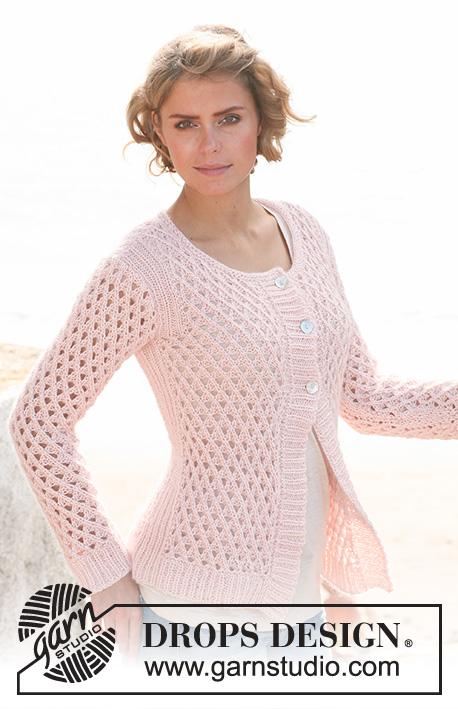
Knitted DROPS jacket with pattern and front band in rib in "Muskat" and "Kid-Silk". Size S-XXXL
DROPS 127-17 |
|||||||||||||||||||||||||
|
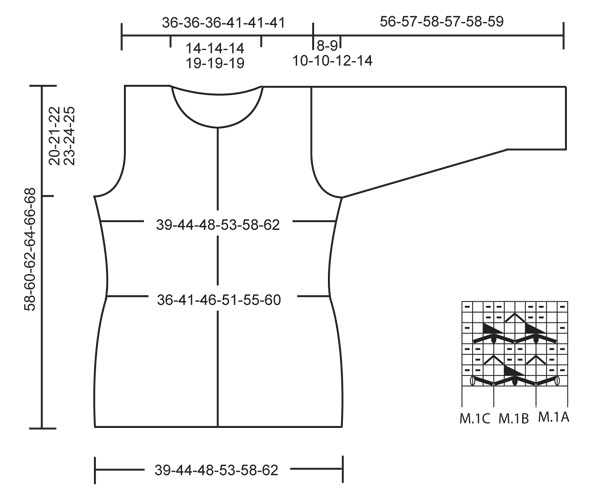
GARTER ST (back and forth on needle): K all rows. PATTERN: See diagram M.1. The diagram shows the pattern from RS. BUTTON HOLES: Cast off for button holes when right front band measures 2.5 cm. 1 button hole = cast off 1 P st in P section. On next row cast on 1 new st over the cast off st. Cast off for button holes when piece measures (measured from the neck and down): SIZE S-L: 1, 10 and 18 cm. SIZE XL-XXXL: 1, 10, 18 and 26 cm. -------------------------------------------------------- JACKET: Worked back and forth on circular needle. Cast on 168-189-210-225-249-270 sts on circular needle 4.5 mm with 1 thread Muskat and 1 thread Kid-Silk. Work first row from RS as follows: 1 edge st, rib K1/P2, finish with K1 and 1 edge st. Continue with rib until piece measures 5 cm. Work next row from RS as follows: 1 edge st, work in stocking st over the first 36-42-48-51-57-63 sts while AT THE SAME TIME dec 6-8-10-9-11-13 sts evenly (= 30-34-38-42-46-50 sts) work rib as before over the next 13 sts (K1, P2, K1, P2, K1, P2, K1, P2, K1), work in stocking st over the next 68-77-86-95-107-116 sts while AT THE SAME TIME dec 14-15-16-17-21-22 sts evenly (= 54-62-70-78-86-94 sts), work rib as before over the next 13 sts (K1, P2, K1, P2, K1, P2, K1, P2, K1), work in stocking st over the next 36-42-48-51-57-63 sts while AT THE SAME TIME dec 6-8-10-9-11-13 sts evenly (= 30-34-38-42-46-50 sts), finish with 1 edge st = 142-158-174-190-206-222 sts. Switch to circular needle size 5 mm. K 1 row from WS (continue with rib over the sts in the sides). Work next row from RS as follows: 1 edge st, M.1A (= 3 sts), M.1B a total of 6-7-8-9-10-11 times, M.1C (= 3 sts), 13 sts in rib as before, M.1A, M.1B a total of 12-14-16-18-20-22 times, M.1C, 13 sts in rib as before, M.1A, M.1B a total of 6-7-8-9-10-11 times, finish with M.1C and 1 edge st. Continue this pattern. When piece measures 18 cm, dec 4 sts in each side, i.e. dec 1 st in every P section in the sides (P 2 tog) = 134-150-166-182-198-214 sts. Continue with pattern as before and rib K1/P1 in the sides. When piece measures 24 cm, inc 4 sts in each side, i.e. inc 1 st in every P section in the sides (P 2 sts in 1 P st) = 142-158-174-190-206-222 sts. Continue with pattern as before and rib K1/P2 in the sides. When piece measures 38-39-40-41-42-43 cm, cast off for armholes on next row from RS as follows: Work 35-35-35-39-39-39 sts, cast off 5-13-21-21-29-37 sts, work 62-62-62-70-70-70 sts, cast off 5-13-21-21-29-37 sts, work 35-35-35-39-39-39 sts. Now finish each piece separately. BACK PIECE: = 62-62-62-70-70-70 sts. Work as follows from RS: 1 edge st, K1, P2, K1, P2, K1, M.1A, M.1B a total of 10-10-10-12-12-12 times, M.1C, K1, P2, K1, P2, K1, 1 edge st. When piece measures 56-58-60-62-64-66 cm, cast off the middle 24-24-24-32-32-32 sts for neckline and finish each piece separately with pattern = 19 sts remain on the shoulder. Continue from the side (seen from RS) as follows: 1 edge st, K1, P2, K1, P2, K1, M.1A, M.1B, M.1C, 1 edge st. Cast off when piece measures 58-60-62-64-66-68 cm. RIGHT FRONT PIECE: = 35-35-35-39-39-39 sts. Work from RS and mid front as follows: 1 edge st, M.1A, M.1B a total of 5-5-5-6-6-6 times, M.1C, K1, P2, K1, P2, K1, 1 edge st. When piece measures 50-52-54-54-56-58 cm, slip 7 sts towards mid front for neckline on a stitch holder. Continue to cast off on every row from mid front as follows: 4 sts 1-1-1-2-2-2 times and 5 sts 1 time (the sts that do not fit the pattern after cast off are worked in stocking st) = 19 sts remain on the shoulder. Work from RS and mid front as follows: 1 edge st, M.1A, M.1B, M.1C, K1, P2, K1, P2, K1, 1 edge st. Cast off when piece measures 58-60-62-64-66-68 cm. LEFT FRONT PIECE: Work as right front piece but reversed. SLEEVES: Worked back and forth on circular needle. Cast on 54-54-54-57-57-60 sts on circular needle 4.5 mm with 1 thread Muskat and 1 thread Kid-Silk. Work as follows from RS: 1 edge st, *K1, P2*, repeat from *-* and finish with K1 and 1 edge st. When piece measures 5 cm, K 1 row from RS while AT THE SAME TIME dec 10-10-10-9-9-8 sts evenly = 44-44-44-48-48-52 sts. Switch to circular needle size 5 mm and K 1 row from WS. Continue to work as follows from RS: 1 edge st, M.1A, M.1B a total of 9-9-9-10-10-11 times, M.1C, 1 edge st. When piece measures 8 cm, inc 1 st in each side, work the inc sts in stocking st until there are enough sts for another repetition of M.1. Repeat inc every 5-4-3-3-2½-2 cm a total of 8-10-13-13-15-16 times = 60-64-70-74-78-84 sts. When piece measures 48-48-48-47-46-45 cm (NOTE! Shorter measurements in the larger sizes because of longer sleeve cap and broader shoulder width), cast off for sleeve cap at beg of every row in each side as follows: 3 sts 1 time, 2 sts 3 times, 1 st 1-2-3-3-5-7 times, then cast off 2 sts in each side until piece measures 55-56-57-56-57-58 cm. Cast off 3 sts 1 time in each side before the remaining sts are cast off. ASSEMBLY: Sew the shoulder seams. Sew the seams under the sleeve. Sew in the sleeves. RIGHT FRONT BAND: Knit up 106-109-112-112-115-118 sts on circular needle 4.5 mm with 1 thread Muskat and 1 thread Kid-Silk up along the right front piece. K 1 row from WS, then work as follows from RS: 5 sts in garter st, *K1, P2*, repeat from *-* until 2 sts remain, K1 and 1 st in garter st. When the front band measures 2.5 cm, start casting off for BUTTON HOLES on next row from RS - see explanation above! When the front band measures 5 cm, cast off with K over K and P over P. Repeat on left front piece but without button holes. Sew the buttons on to the left front band. NECKLINE: Knit up approx. 78 to 98 sts around the neckline and also over the front bands inside 1 edge st (including the sts on the stitch holders). Work 4 rows in garter st, cast off. |
|||||||||||||||||||||||||
Diagram explanations |
|||||||||||||||||||||||||
|
|||||||||||||||||||||||||
 |
|||||||||||||||||||||||||
Have you finished this pattern?Tag your pictures with #dropspattern #eiffelcardigan or submit them to the #dropsfan gallery. Do you need help with this pattern?You'll find 28 tutorial videos, a Comments/Questions area and more by visiting the pattern on garnstudio.com. © 1982-2026 DROPS Design A/S. We reserve all rights. This document, including all its sub-sections, has copyrights. Read more about what you can do with our patterns at the bottom of each pattern on our site. |
|||||||||||||||||||||||||


With over 40 years in knitting and crochet design, DROPS Design offers one of the most extensive collections of free patterns on the internet - translated to 17 languages. As of today we count 324 catalogues and 12290 patterns translated into English (UK/cm).
We work hard to bring you the best knitting and crochet have to offer, inspiration and advice as well as great quality yarns at incredible prices! Would you like to use our patterns for other than personal use? You can read what you are allowed to do in the Copyright text at the bottom of all our patterns. Happy crafting!
Post a comment to pattern DROPS 127-17
We would love to hear what you have to say about this pattern!
If you want to leave a question, please make sure you select the correct category in the form below, to speed up the answering process. Required fields are marked *.