DROPS Karisma
DROPS Karisma
100% Wool
from 2.30 £ /50g
Get the yarn to make this pattern from 16.10£.

The yarn cost is calculated from the pattern’s smallest size and the yarn’s cheapest product type. Looking for an even better price? You might find it on the DROPS Deals!

DROPS Super Sale

Misty vines

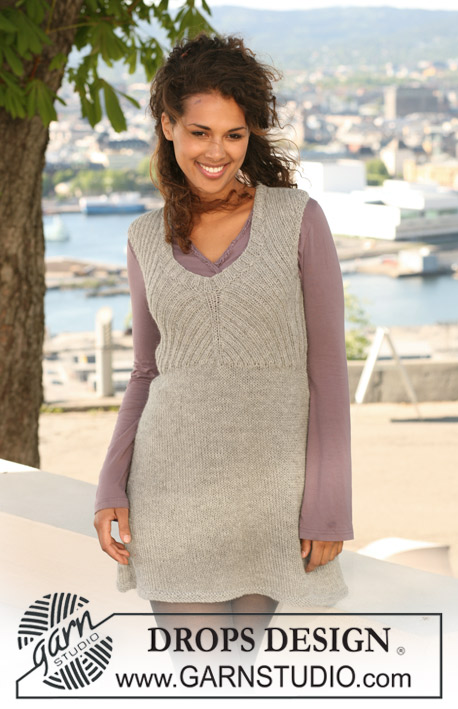
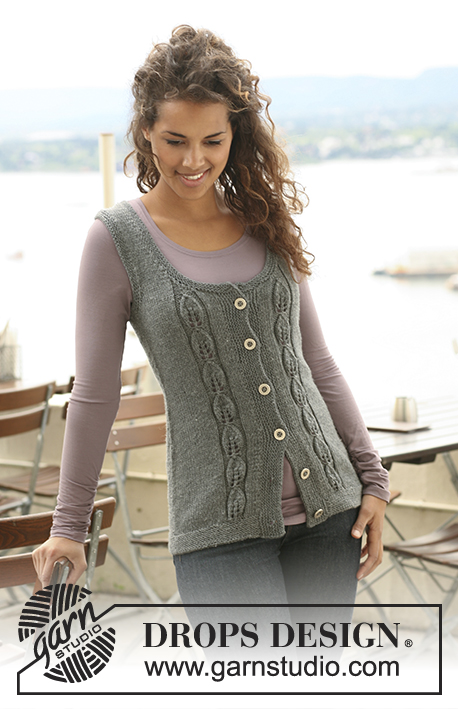
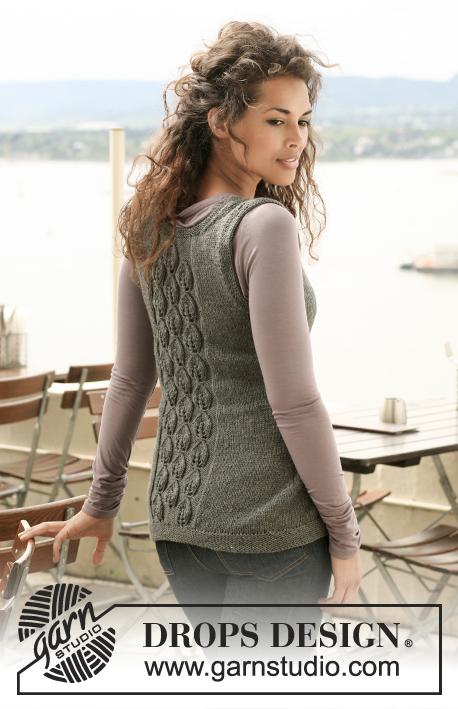
Knitted DROPS sleeveless top with leaf pattern in ”Karisma”. Size S - XXXL.

DROPS 125-2
DROPS design: Pattern no U-596
--------------------------------------------------------
Size: S - M - L - XL - XXL - XXXL
Materials: DROPS KARISMA from Garnstudio
350-400-400-450-500-550 g colour no 16, dark grey

DROPS CIRCULAR NEEDLE (80 cm) size 4 mm - or size needed to get 21 sts x 28 rows in stocking st = 10 x 10 cm.
DROPS CIRCULAR NEEDLE (40 + 60 cm) size 3.5 mm – for borders.

DROPS SILVER BUTTON, no 533: 6 pcs for all sizes.

-------------------------------------------------------

Alternative Yarn – See how to change yarns here
Yarn Groups A to F – Use the same pattern and change the yarn here
Yarn usage using an alternative yarn – Use our yarn converter here

-------------------------------------------------------

DROPS Karisma
DROPS Karisma
100% Wool
from 2.30 £ /50g
Get the yarn to make this pattern from 16.10£.

The yarn cost is calculated from the pattern’s smallest size and the yarn’s cheapest product type. Looking for an even better price? You might find it on the DROPS Deals!

DROPS Super Sale

SAVE 30% on 6 cotton favourites!
Valid until 12.04.2024

Pattern instructions

NOTE: This pattern is written in British English. All measurements in charts are in cm. For conversion from cm to inches - click here. There are different terms for crocheting in British and American English. If this pattern includes crochet, click for "crochet terms" here. For this pattern in American English, please click here.
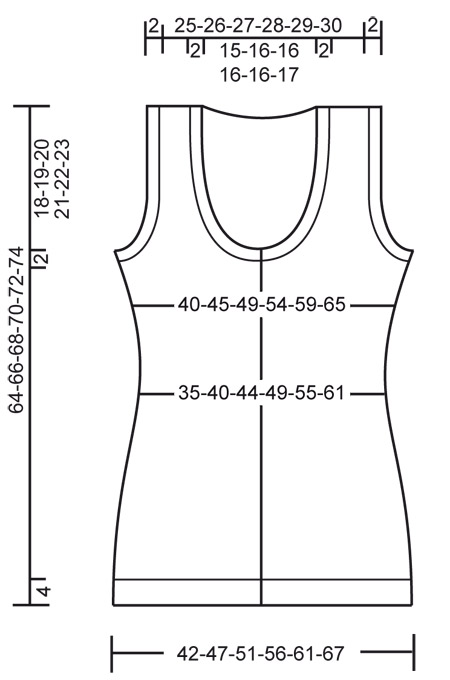
GARTER ST (back and forth on needle): K all rows.

GARTER ST (in the round): K 1 round, P 1 round.

DECREASING TIP (applies to the side on body piece):
Make all dec from RS.
Beg 2 sts before marker: K2 tog, slip 1 st as if to K, K1, psso.

INCREASING TIP (applies to the side on body piece):
Make all inc from RS.
Inc 1 st by picking up st from previous row and K this.

PATTERN:
See diagram M.1 and M.2. Diagram shows the pattern from RS and row 1 in diagram = RS.
--------------------------------------------------------

SLEEVELESS TOP:
Worked back and forth on circular needle from mid front.

BODY PIECE:
Cast on 173-193-209-231-255-277 sts on circular needle size 3.5 mm with Karisma. Work GARTER ST back and forth on needle – see above. When piece measures 4 cm change to circular needle size 4 mm. Now insert 2 markers 42-47-51-57-63-68 sts in from each side = 89-99-107-117-129-141 sts between markers on back piece. Work next row as follows from RS: 1 edge st in garter st, 5-5-6-7-8-8 stocking sts, M.1 (= 9 sts), 62-72-79-89-100-111 stocking sts, M.2A (= 19 sts), 62-72-79-89-100-111 stocking sts, M.1 (= 9 sts), 5-5-6-7-8-8 stocking sts and 1 edge st in garter st. Continue pattern like this – NOTE: After 1 vertical repeat of M.2A, continue in M.2B, work 8-8-8-8-9-9 vertical repeats of M.2B, then work 1 repeat of M.2C and then continue in reverse stocking st on the 19 sts in M.2 up to neckline dec. Work 7 vertical repeats of M.1 for all sizes, then continue in reverse stocking st on the 9 sts in M.1 up to neckline dec.
REMEMBER THE KNITTING TENSION!
AT THE SAME TIME When piece measures 5 cm dec 1 st each side of both markers (= 4 dec sts) – See DECREASING TIP! Repeat the dec on every 3-3-3.5-3.5-3.5-4. cm a total of 8-8-7-7-7-6 times = 141-161-181-203-227-253 sts. When piece measures 31-32-31-31-32-31 cm inc 1 st each side of both markers (= 4 inc sts) – See INCREASING TIP! Repeat the inc on every 2-2-3-3-4-4.5 cm a total of 6-6-5-5-4-4 times = 165-185-201-223-243-269 sts.
Note! When piece measures 45 cm dec for the neck is starting on all sizes. See explanation under right front piece.
When piece measures 44-45-46-47-48-49 cm work next row as follows: work 36-41-44-50-54-60 sts as before (= front piece), cast off 8-8-10-10-12-12 sts for armhole (i.e. 4-4-5-5-6-6 sts each side of marker), work 77-87-93-103-111-125 sts (= back piece), cast off 8-8-10-10-12-12 sts for armhole and work the remaining 36-41-44-50-54-60 sts as before (= front piece). Complete each piece separately.

BACK PIECE:
= 77-87-93-103-111-125 sts. Continue as before in stocking st and M.2 on the middle 19 sts AT THE SAME TIME cast off for armhole at the beg of every row each side as follows: 3 sts 0-0-0-1-1-2 times, 2 sts 3-5-6-7-8-10 times and 1 st 5-5-5-4-5-4 times = 55-57-59-61-63-65 sts (includes 1 edge st each side). Continue pattern as before. When piece measures 61-63-64-66-68-69 cm cast off the middle 31-33-27-29-29-31 sts for neck and complete each shoulder separately. Cast off for neckline at the beg of every row from neck: 2 sts 1-1-2-2-2-2 times and 1 st 2-2-3-3-3-3 times = 8-8-9-9-10-10 sts left on shoulder. Cast off when piece measures 64-66-68-70-72-74 cm.

RIGHT FRONT PIECE:
= 36-41-44-50-54-60 sts. Continue as before in stocking st and M.1, AT THE SAME TIME cast off for armhole at the beg of every row from the side (i.e. on every row from WS) as described for back piece. AT THE SAME TIME when piece measures 45 cm for all sizes cast off 6-6-7-8-9-9 sts towards mid front, i.e. from RS for neck. Cast off to shape the neckline at the beg of every row from mid front as follows: 2 sts 3 times and 1 st 3 times, then cast off at the beg of every other row from mid front: 1 st 2-3-2-3-2-2 times. After all dec for armhole and neckline are complete there 8-8-9-9-10-10 sts left on needle. Cast off as described for back piece.

LEFT FRONT PIECE:
Like right front piece, but mirrored, i.e. cast off for armhole on every row from RS and cast off for neck from WS.

ASSEMBLY:
Sew shoulder seams.

SLEEVE EDGE:
Pick up from RS approx 84-106 sts round armhole inside 1 edge st on circular needle size 3.5 mm. Work GARTER ST in the round – see above. When edge measures approx 2 cm cast off. Repeat round the other armhole.

RIGHT FRONT BAND:
Pick up from RS approx 86-102 sts along right front piece inside 1 edge st on circular needle size 3.5 mm with Karisma. Work garter st back and forth on needle. After 2.5 cm make 6 buttonholes evenly distributed – place the top buttonhole approx 1 cm from neckline and the bottom one 2-3 cm from bottom edge. 1 BUTTONHOLE = cast off 1 st and cast on 1 new st on next row.
Cast off when front band measures 4 cm.

LEFT FRONT BAND:
Like right front band but without buttonholes. Sew buttons on left front band.

NECKLINE:
Pick up from RS approx 140 –170 sts round neck (also pick up on front bands) on circular needle size 3.5 mm. Work garter st back and forth on needle until neckline measures approx 2 cm and cast off.

This pattern has been corrected.

Updated online: 24.11.2010
BODY PIECE:
... = 165-185-201-223-243-269 sts.
Note! When piece measures 45 cm dec for the neck is starting on all sizes. See explanation under right front piece.
When piece measures 44-45-46-47-48-49 cm work next row as follows...

Diagram

symbols = P from RS, K from WS
symbols = P from WS on all the new sts
symbols = 1 YO, K1, 1 YO
symbols = K1, 1 YO, K1, 1 YO, K1
symbols = K2, 1 YO, K1, 1 YO, K2
symbols = K3, 1 YO, K1, 1 YO, K3
symbols = slip 1 st as if to K, K1, psso, K5, K2 tog
symbols = slip 1 st as if to K, K1, psso, K3, K2 tog
symbols = slip 1 st as if to K, K1, psso, K1, K2 tog
symbols = slip 1 st s if to K, K2 tog, psso
diagram
diagram

Each of our patterns has specific tutorial videos to help you.

Do you have a question? See a list of frequently asked questions (FAQ)

Knitting tension is what determines the final measurements of your work, and is usually measured per 10 x 10 cm. It is provided like so: number of stitches in width x number of rows in height - eg: 19 stitches x 26 rows = 10 x 10 cm.

The knitting tension is very individual; some people knit/crochet loosely while others work tightly. You adjust the knitting tension with the needle size, which is why the suggested needle size is only meant as a guide! You need to adjust this (up or down) to ensure that YOUR knitting tension matches the knitting tension provided in the pattern. If you work with a different knitting tension than provided you will have a different yarn consumption, and your work will have different measurements than what the pattern suggests.

The knitting tension also determines which yarns can replace each other. As long as you achieve the same knitting tension you can replace one yarn with another.

See DROPS lesson: How to measure your tension/gauge

See DROPS video: How to make a gauge tension swatch

The required amount of yarn is provided in grams, eg: 450 g. To calculate how many balls you’ll need you first need to know how many grams are in 1 ball (25g, 50g or 100g). This information is available if you click on the individual yarn quality on our pages. Divide the amount required with the amount of each ball. For example, if each ball is 50g (the most common amount), the calculation will be as follows: 450 / 50 = 9 balls.

The important thing when changing from one yarn to another is that the knitting/crochet tension remains the same. This is so that the measurements of the finished piece will be the same as on the sketch provided. It is easier to achieve the same knitting tension using yarns from the same yarn group. It is also possible to work with multiple strands of a thinner yarn to achieve the knitting tension of a thicker one. Please try our yarn converter. We recommend you to always work a test swatch.

Please NOTE: when changing yarn the garment might have a different look and feel to the garment in the photo, due to individual properties and qualities of each yarn.

See DROPS lesson: Can I use a different yarn than the one mentioned in the pattern?

All our yarns are categorised into yarn groups (from A to F) according to thickness and knitting tension – group A contains the thinnest yarns and group F the thickest. This makes it easier for you to find alternative yarns to our patterns, should you wish to switch yarn. All yarns within the same group have a similar knitting tension and can easily replace each other. However, different yarn qualities have different structures and properties which will give the finished work a unique look and feel.

Click here for an overview of the yarns in each yarn group

At the top of all our patterns you’ll find a link to our yarn calculator, which is a helpful tool should you wish to use a different yarn than suggested. By filling in the yarn quality you wish to replace, the amount (in your size) and number of strands, the calculator will present good alternative yarns with the same knitting tension. Additionally it will tell you how much you’ll require in the new qualities and whether you’ll need to work with multiple strands. Most skeins are 50g (some are 25g or 100g).

If the pattern is worked with multiple colours, every colour will have to be calculated separately. Similarly, if the pattern is worked with several strands of different yarns (for example 1 strand Alpaca and 1 strand Kid-Silk) you will have to find alternatives for each, individually.

Click here to see our yarn calculator

Since different yarns have different qualities and textures we have chosen to keep the original yarn in our patterns. However, you can easily find options among our available qualities by using our yarn calculator, or simply pick a yarn from the same yarn group.

It is possible that some retailers still have discontinued yarns in stock, or that someone has a few skeins at home that they would like to find patterns for.

The yarn calculator will provide both alternative yarn as well as required amount in the new quality.

If you think it's hard to decide what size to make, it can be a good idea to measure a garment you own already and like the size of. Then you can pick the size by comparing those measures with the ones available in the pattern's size chart.

You'll find the size chart at the bottom of the pattern.

See DROPS lesson: How to read size chart

The needle size provided in the pattern serves only as a guide, the important thing is to follow the knitting tension. And since knitting tension is very individual, you will have to adjust the needle size to ensure that YOUR tension is the same as in the pattern – maybe you’ll have to adjust 1, or even 2 needle sizes, up or down to achieve the correct tension. For this, we recommend that you work test swatches.

Should you work with a different knitting tension than the one provided, the measurements of the finished garment might deviate from the measurement sketch.

See DROPS lesson: How to measure your tension/gauge

See DROPS video: How to make a tension/gauge swatch

Working a garment top-down provides more flexibility and room for personal adjustment. For example it is easier to try the garment on while working, as well as making adjustments to length of yoke and shoulder caps.

The instructions are carefully explaining every step, in the correct order. Diagrams are adjusted to the knitting direction and are worked as usual.

The diagram depicts all rows/rounds, and every stitch seen from the right side. It is read from bottom to top, from right to left. 1 square = 1 stitch.

When working back and forth, every other row is worked from the right side and every other row is worked from the wrong side. When working from the wrong side, the diagram will have to be worked reversed: from left to right, knit stitches are purled, purl stitches are knit etc.

When working in the round every round is worked from the right side and the diagram are worked from right to left on all rounds.

See DROPS lesson: How to read knitting diagrams

The diagram depicts all rows/rounds, and every stitch seen from the right side. It is worked from bottom to top, from right to left.

When working back and forth every other row is worked from the right side: from right to left and every other row is worked from the wrong side: from left to right.

When working in the round, every row in the diagram are worked from the right side, from right to left.

When working a circular diagram you start in the middle and work your way outwards, counter clockwise, row by row.

The rows usually start with a given number of chain stitches (equivalent to the height of the following stitch), this will either be depicted in the diagram or explained in the pattern.

See DROPS lesson: How to read crochet diagrams

Instructions for working several diagrams after each other on the same row/round, will often be written like so: “work A.1, A.2, A.3 a total of 0-0-2-3-4 times". This means you work A.1 once, then A.2 is worked once, and A.3 is repeated (in width) the number of times provided for your size – in this case like so: S = 0 times, M = 0 times, L=2 times, XL= 3 times and XXL = 4 times.

The diagrams are worked as usual: begin with the first row in A.1, then work the first row in A.2 etc.

See DROPS lesson: How to read knitting diagrams

See DROPS lesson: How to read crochet diagrams

The total width of the garment (from wrist-to-wrist) will be larger in the larger sizes, despite the actual sleeves being shorter. The larger sizes have longer sleeve caps and wider shoulders, so there will be a good fit in all sizes.

The measurement sketch/schematic drawing provides information regarding the full length of the garment. If it’s a jumper or a jacket the length is measured from the highest point on the shoulder closest to the neckline, and straight down to the bottom of the garment. It is NOT measured from the tip of shoulder. Similarly, the length of yoke is measured from the highest point on the shoulder and down to where yoke is split into body and sleeves.

On a jacket measures are never taken along bands, unless specifically stated. Always measure inside band stitches when measuring the length.

See DROPS lesson: How to read a schematic drawing

Diagrams are often repeated on the round or in height. 1 repeat is the diagram the way it appears in the pattern. If it says to work 5 repeats of A.1 in the round, then you work A.1 a total of 5 times after/next to each other in the round. If it says to work 2 repeats of A.1 vertically/in height you work the entire diagram once, then begin again at the start and work the entire diagram one more time.

Chain stitches are slightly narrower than other stitches and to avoid working the cast-on edge too tight, we simply chain more stitches to begin with. The stitch count will be adjusted on the following row to fit the pattern and measurement sketch.

The rib edge is more elastic and will contract slightly compared to, for example, stocking stitch. By increasing before the rib edge, you avoid a visible difference in width between the rib edge and the rest of the body.

It’s very easy to cast off too tightly, and by making yarn overs while casting off (and simultaneously casting these off) you avoid a too tight cast off edge.

See DROPS video: How to bind off with yarn overs (yo)

To achieve an even increase (or decrease) you can increase on, for example: every 3rd and 4th row alternately, like so: work 2 rows and increase on the 3rd row, work 3 rows and increase on the 4th. Repeat this until the increase is complete.

See DROPS lesson: Increase or decrease 1 st on every 3rd and 4th row alternately

Should you prefer to work in the round instead of back and forth, you may of course adjust the pattern. You’ll need to add steeks mid-front (usually 5 stitches), and follow the instructions. When you would normally turn and work from the wrong side, simply work across the steek and continue in the round. At the end you’ll cut the piece open, pick up stitches to work bands, and cover the cut edges.

See DROPS video: How to knit steeks and cut open

Should you prefer to work back and forth instead of in the round, you may of course adjust the pattern so you work the pieces separately and then assemble them at the end. Divide the stitches for the body in 2, add 1 edge stitch in each side (for sewing) and work the front and back pieces separately.

See DROPS lesson: Can I adapt a pattern for circular needles into straight needles?

Pattern repeats can vary slightly in the different sizes, in order to get the correct proportions. If you’re not working the exact same size as the garment in the photo, yours might deviate slightly. This has been carefully developed and adjusted so that the complete impression of the garment is the same in all sizes.

Make sure to follow instructions and diagrams for your size!

If you have found a pattern you like which is available in women’s size it’s not very difficult to convert it to men’s size. The biggest difference will be the length of sleeves and body. Start working on the women size that you think would fit across the chest. The additional length will be worked right before you cast off for the armhole/sleeve cap. If the pattern is worked top-down you can add the length right after the armhole or before the first decrease on sleeve.

Regarding additional yarn amount, this will depend on how much length you add, but it is better with a skein too many than too few.

All yarns will have excess fibres (from production) that might come off as lint or shedding. Brushed yarns (ie hairier yarns) have more of these loose, excess fibres, causing more shedding.

Shedding also depends on what is worn under or over the garment, and whether this pulls at the yarn fibres. It’s therefore not possible to guarantee that there will be no shedding

Below are some tips on how to get the best result when working with hairier yarns:

1. When the garment is finished (before you wash it) shake it vigorously so the looser hairs come off. NOTE: do NOT use a lint roller, brush or any method that pulls at the yarn.

2. Place the garment in a plastic bag and put it in your freezer - the temperature will cause the fibres to become less attached to each other, and excess fibres will come off easier.

3. Leave in the freezer for a few hours before taking it out and shaking it again.

4. Wash the garment according to the instructions on the yarn label.

Pilling is a natural process that happens to even the most exclusive of fibers. It's a natural sign of wear and tear that is hard to avoid, and that is most visible in high friction areas of your garment like a sweater's arms and cuffs.

You can make your garment look as new by removing the pilling, using a fabric comb or a pill/lint remover.

Still can't find the answer you need? Then scroll down and leave your question so one of our experts can try to help you. This will be done normally within 5 to 10 working days.
In the meantime, you can read the questions and answers that others have left to this pattern or join the DROPS Workshop on Facebook to get help from fellow knitters/crocheters!

You might also like...

Post a comment to pattern DROPS 125-2

We would love to hear what you have to say about this pattern!

If you want to leave a question, please make sure you select the correct category in the form below, to speed up the answering process. Required fields are marked *.

Comments / Questions (65)

country flag Saisha Gardner wrote:

Help, I am very confused. I am knitting the Large size. I got to 45 cm and did all the binding off as instructed and finished off the right and left front pieces all fine. But I am left with 107 stitches on the back not 93 stitches as I should I have gone back over all the instructions again and again and cannot see where or why I have an extra 14 stitches everything was done as instructed. What has gone wrong?

16.12.2023 - 22:30

DROPS Design answered:

Dear Saisha, before working each piece separately, you should have checked that all of the pieces were correctly divided. After the piece, reaches 46 cm divide as follows: 44 stitches for the front piece, cast off 10 stitches for armhole, 93 stitches for the back, cast off 10 stitches for armhole and 44 stitches for the front piece. Remember that, 1cm before dividing the piece (at the 45 cm mark) you should have cast off 7 stitches towards the mid-front in each front piece, for the neck. So you will have 14 stitches less when dividing the front pieces and back piece. Happy knitting!

17.12.2023 - 19:06

country flag Saisha Gardner wrote:

Hi I cannot buy the buttons for this pattern anymore : 533 what size were they so I can pick a replacement? Thank you so much Saisha

17.09.2023 - 00:00

DROPS Design answered:

Dear Saisha, we use 20mm buttons. Happy knitting!

17.09.2023 - 21:11

country flag Caroline wrote:

When I've made the 8 decreases = 32 stitches in size M, it says I should be left with 161 stitches, do I discount the stitches of the leaf pattern when counting these? Thank you

15.03.2022 - 18:31

DROPS Design answered:

Dear Caroline, count M.1 = 9 sts and M.2A = 19 sts when checking your number of stitches (= do not count the extra stitches increased in the leaf pattern). Happy knitting!

16.03.2022 - 09:08

country flag Manuela Meyer wrote:

Rechtes Vorderteil: Ich verstehevnicht den Unterschied von „zur Mitte“ und „zum Hals“ hin abketten“ ! Bitte um eine Erklärung! Dankeschön

21.02.2022 - 01:21

DROPS Design answered:

Liebe Frau Meyer, wenn Sie "gegen die Mitte" abketten/abnehmen sollen, sollen Sie die Maschen am Anfang der Reihe vom Hals abketten/abnehmen, dh beim rechten Vorderteil ketten/nehmen Sie am Anfang einer Hinreihe ab; beim linken Vorderteil ketten Sie bei den Rückreihen ab und nehmen Sie am Ende einer Hinreihe; Viel Spaß beim stricken!

21.02.2022 - 10:16

country flag Sylke Prager-Ngejeme wrote:

Fehler bei der Maschenangabe für Gr. M: Es sollen 193 M angeschlagen werden, dann Markierung nach 47 und 99 M. Also 2x 47 M für die Voederseiten und 99 für das Rückenteil . Dies ergeben insgesamt 183 und nicht 193 M. Werde statt 72 M glatt rechts also nur 67 M stricken.

03.12.2021 - 19:29

DROPS Design answered:

Liebe Frau Prager-Ngejeme, die Maschenanzahl stimmt so: 47+99+47=193 Maschen - Viel Spaß beim stricken!

06.12.2021 - 09:23

Hanaa Zahran wrote:

Hi I'm fm Egypt I wish to do this pattern I need yr help to do same with double pointed needles unfortunately I can't make it with circle needles thanks

02.03.2017 - 19:42

DROPS Design answered:

Dear Mrs Zahran, pattern is here worked back and forth on needle, only edges around armholes are worked in the round. Please find here how to adjust a pattern on straight needle. For any further assistance you are welcome to contact your DROPS store even per mail or telephone. Happy knitting!

03.03.2017 - 10:06

country flag Katja wrote:

Habe gerade die schöne Weste angefangen, aber finde in der Anleitung nicht, wie ich die Rückseite des Musters stricken muss?!

12.04.2016 - 17:34

DROPS Design answered:

Liebe Katja, es sind Hin-und Rückreihen dargestellt.

12.04.2016 - 19:16

Larala wrote:

Really pretty pattern, but not well written. I'm doing the XL size. At 45 cm, there are 223 st. If I bind off as indicated, by the time I get to 47 cm, I have only 199 st left. But the pattern shows 50+103+50=203. It doesn't make sense, as I would have to bind off every over row instead of every row to get there. At what point does the 50/103 st count starts? If that takes into account the armhole decrease, shouldn't the markers be at 55 on each side between 45 and 47 cm. Please clarify.

21.02.2016 - 22:29

DROPS Design answered:

Dear Larala, when piece measures 45 cm you start dec for neckline on both sides (see under right front piece, ie: 8 sts 1 time + 2 sts 3 times, 1 st 3 times ..x 2 sides), when you bind off for armholes, you will have already bound off/dec for neckline on both front pieces, that's why you have less sts. Happy knitting!

22.02.2016 - 11:10

country flag Jacinthe Marcoux wrote:

Vers la fin des explications: Dos et devant: à 45 cm de hauteur total.... Et ensuite on dit, à 46 cm de hauteur pour la taille Large que j'utilise, tricoter le rang suivant ainsi : tricoter... C'est comme s'il faut faire un tour complet, alors qu'on a deja commencer à rabatre selon le modele du devant droit???????

16.02.2016 - 15:19

DROPS Design answered:

Bonjour Mme Marcoux, à 45 cm, vous commencez à former l'encolure comme expliqué sous le devant droit, mais vous continuez à tricoter sur toutes les mailles (formez bien l'encolure sur chacun des 2 devants), et, à 46 cm, rabattez les mailles des emmanchures et continuez chaque pièce séparément. Bon tricot!

16.02.2016 - 15:56

country flag BORGNIEZ Jeanine wrote:

Bonjour, j'ai réalisé ce gilet pour ma fille Amélie et il est magnifique !

26.11.2015 - 09:54