
Popular categories
Looking for a yarn?


Comments / Questions (63)
![]() Vivian wrote:
Vivian wrote:
Det står der skal bruges 3 tråde i hals opskriften. Skal der så bruges 3 tråde resten af stykket?
06.02.2026 - 10:17
![]() Merche Rodríguez wrote:
Merche Rodríguez wrote:
Hola, muy bonito modelo. Se puede hacer el modelo con agujas circulares? alguna idea de cómo se realizaría? muchas gracias
08.01.2026 - 10:48DROPS Design answered:
Hola Merche, se usan agujas de doble punta porque se trabaja sobre pocos puntos, por lo que puede resultar molesto trabajar con agujas circulares, que tienen un cable más largo. Se puede trabajar con 2 sets de agujas circulares en vez de agujas de doble punta.
16.02.2026 - 13:51
![]() HACQUARD wrote:
HACQUARD wrote:
Bonjour. Pour le béret, doit on lire la grille M 1 etM 2 de gauche à droite pour le rang envers du travail. Je ne comprends pas pourquoi les torsades se feraient sur l'envers. Merci de votre réponse.
27.12.2024 - 11:25DROPS Design answered:
Bonjour Mme Hacquard, vous tricotez d'abord le 1er rang sur l'endroit ainsi: 12 m end, 2 m env, 2 m end, 4 m env, 4 m end, 4 m env, 2 m end, 2 m env, 26-30 m end. Puis, vous commencez les diagrammes au rang suivant sur l'envers ainsi: 26-30 m point mousse, M1 (= 20 m), M2 (= 6m), 5 m jersey et 1 m point mousse. Commencez par le 1er rang des diagrammes = sur l'envers et lisez le de gauche à droite. Bon tricot!
02.01.2025 - 12:06
![]() HACQUARD wrote:
HACQUARD wrote:
Rebonjour. Les torsades de M 1 au rang 2 se font sur l'endroit du travail ? Pouvez vous m'éclairer s'il vous plaît Merci beaucoup.
27.12.2024 - 10:27DROPS Design answered:
Bonjour Mme Hacquard, tout à fait, les torsades de M.1 doivent se faire sur l'endroit - le 1er rang des diagrammes se tricote sur l'envers. Bon tricot!
02.01.2025 - 12:05
![]() HACQUARD wrote:
HACQUARD wrote:
Bonjour. Je commence le béret. Je ne comprends pas comment on tricote le rang envers du diagramme M 1 etM 2. Je vous remercie de votre réponse.
27.12.2024 - 10:17DROPS Design answered:
Bonjour Mme Hacquard, Lisez les rangs sur l'endroit de M.1 de droite à gauche et ceux sur l'envers de gauche à droite; pour M.2, tricotez ainsi sur l'endroit: (6 m end), et sur l'envers, on tricote M.2 ainsi: (2 m env, 2 m end, 2 m env). Notez bien que le 1er rang de M.1 et de M.2 se fait sur l'envers. Bon tricot!
02.01.2025 - 12:04
![]() Delrue Maryse wrote:
Delrue Maryse wrote:
Bonjour Je ne comprends pas très bien le diagramme des rangs raccourcis Pouvez vs m en dire un peu plus Cordialement Mme Delrue
19.12.2023 - 21:46DROPS Design answered:
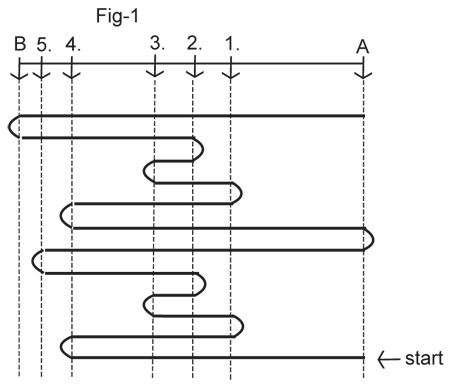
Bonjour Mme Delrue, le schéma montre les rangs raccourcis, vus sur l'endroit, autrement dit, tricotez jusqu'au 4ème marqueur, tournez et tricotez jusque'(au 1er marqueur, tournez et tricotez jusqu'au 3ème marqueur, tournez et tricotez jusqu'au 2ème marqueur, tournez e tricotez jusqu'au 5ème marqueur, tournez, tricotez jusqu'au 1er marqueur, etc... Quand vous avez tricoté tous les rangs raccourcis du schéma, reprenez au début. En même temps, tricotez bien les mailles comme indiqué, point mousse, jersey et diagramme. Bon tricot!
20.12.2023 - 08:04
![]() Carole wrote:
Carole wrote:
Dans les explications des rangs raccourcis du chauffe épaules, après avoir tricoté jusqu’au marqueur 2 et tourné je ne comprends pas : - Faut-il tricoter le rang suivant jusqu’au bout puis le rang suivant jusqu'au marqueur 1 ? - ou bien le rang suivant après avoir tourné au marqueur 2 est tricoté jusqu’au marqueur 1 ? Ensuite, quand on tourne après le marqueur 1 on tricoté bien le rang jusqu’à la fin du rang ? Merci de m’éclairer
01.08.2021 - 15:04DROPS Design answered:
Bonjour Carole, tricotez les rangs raccourcis ainsi: 2 rangs sur toutes les mailles, 2 rangs sur les mailles du début du rang sur l'endroit jusqu'au 2ème marqueur (1 rang sur l'endroit jusqu'au 2ème marqueur, tournez et tricotez ces mailles sur l'envers), 2 rangs sur les mailles du début du rang sur l'endroit jusqu'au 1er marqueur (= tricotez sur l'endroit jusqu'au 1er marqueur, tournez et tricotez ces mailles sur l'envers) = vous avez tricoté 2 rangs sur les mailles à gauche, vu sur l'endroit et 6 rangs sur les mailles à droite, vu sur l'endroit. Bon tricot!
02.08.2021 - 07:32
![]() Celine Francoeur wrote:
Celine Francoeur wrote:
J'ai monté les mailles, placé les marqueurs en même temps. quand je commence le 2ième rang côté endroit les marqueurs se trouvent à gauche c'est ok? quand je me rends au 4e marqueur je tourne tricote jusqu'au 1er marqueur comment suivre le diagramme à ce moment? apres le 4e marqueur en tournant c'est M2...suis-je dans la bonne direction?
15.07.2021 - 21:53DROPS Design answered:
Bonjour Mme Francoeur, avez-vous regardé le schéma Fig.1? Il montre plus simplement comment tricoter les rangs raccourcis, en même temps, suivez attentivement les diagrammes en tricotant le rang suivant de ces mêmes diagrammes comme il se doit. Les diagrammes M.1 et M.2 se trouvent avant le 1er marqueur, vu sur l'endroit, vous les tricoterez donc à chaque fois que vous devez tricoter ces mailles; autrement dit, le 1er rang = flèche start, 2ème rang (envers) = 6ème des rangs raccourcis, 3ème rang = 7ème des rangs raccourcis etc... Bon tricot!
16.07.2021 - 08:37
![]() Celine Francoeur wrote:
Celine Francoeur wrote:
Comment placer les marqueurs? je comprends pas ''à partir du bas'' merci
15.07.2021 - 20:20DROPS Design answered:
Bonjour Mme Francoeur, le béret se tricote à partir du bas de la bordure (celle qui sera contre le front/en bas du béret porté), placez vos marqueurs en comptant les mailles à partir du début du rang: après 32 m, après 40 m, après 46-48 m, après 52-56 m et après 56-60 m, il vous reste 2 m après le dernier marqueur. Tricotez ensuite sur l'endroit comme indiqué en suivant bien les rangs raccourcis. Bon tricot!
16.07.2021 - 08:33
![]() Géraldine wrote:
Géraldine wrote:
Bonjour J'j'ai réalisé le béret taille S- donc 58 mailles aiguilles numéro 4 et je ne comprends pas j'ai user juste 1 pelotes de chaque en fermant à 48cm comme il disait. Mais je ne le trouve pas aussi volumineux que la photo pas aussi gonflant. Quand il est écrit tricoter sur toutes les mailles jusqu'à À c'est bien les 56 et 58 mailles ?? Comment ce fait il qu'il me reste une pelote de chaque ?
25.05.2021 - 12:21DROPS Design answered:
Bonjour Géraldine, aviez-vous le bon échantillon, soit 20 m x 40 rangs point mousse avec 1 fil Kid-Silk + 1 fil Alpaca = 10 x 10 cm? Et bien tricoté ces 2 laines? Et pas exactement, jusqu'à A = la 1ère fois = vous partez du 5ème marqueur jusqu'à la fin du rang: la 2ème fois, oui vous tricotez toutes les mailles. Vérifiez bien que vous avez bien tricoté les rangs raccourcis = 4 rangs à droite, 12 au milieu et 2 à gauche, vu sur l'endroit. Bon tricot!
25.05.2021 - 14:14
|
|||||||||||||||||||
Twine Love |
|||||||||||||||||||
|
|
|||||||||||||||||||
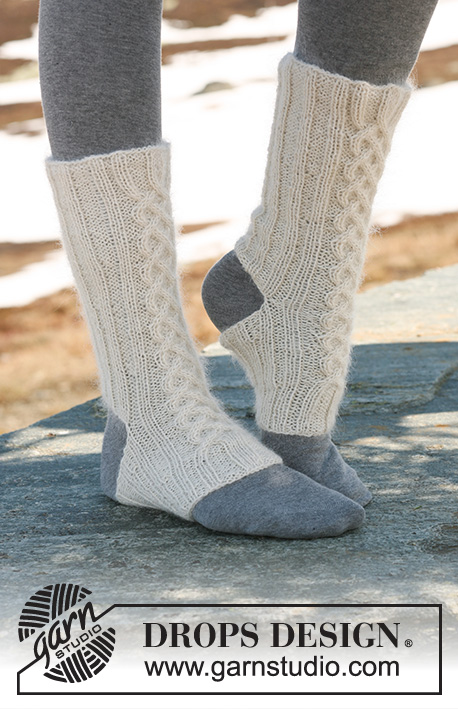
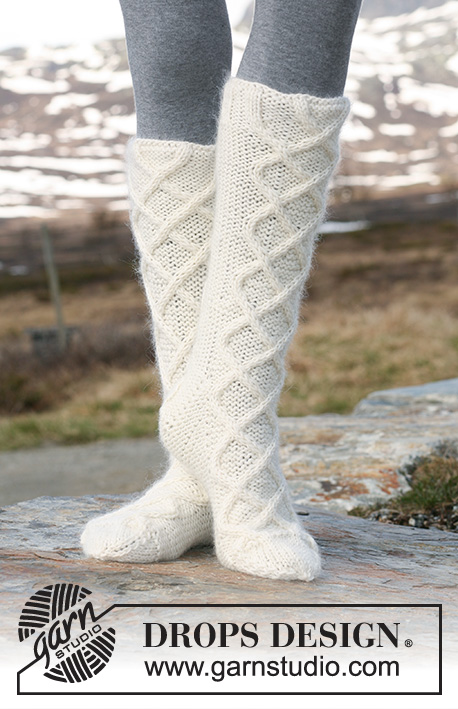
DROPS Beret and shoulder wrap with cables knitted from side to side in ”Alpaca” and ”Kid-Silk”.
DROPS 115-32 |
|||||||||||||||||||
|
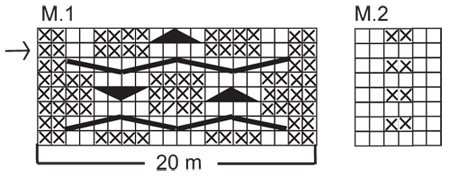
GARTER ST (back and forth on needle): K all rows. PATTERN: See diagram M.1 and M.2 – pattern in diagram is seen from RS and shows 1 pattern repeat (first row = WS). ---------------------------------------------------------- BASQUE HAT: SHORTENED ROWS: To make the hat wider in the middle to create the Basque shape. When turning mid piece, tighten thread before working return row to avoid holes in transitions. Work shortened rows as follows – see Fig-1 (beg by A): * work row to marker-4, turn, work row to marker-1, turn, work row to marker-3, turn, work row to marker-2, turn, work row to marker-5, turn, work all sts on row (= to A), turn, work row to marker-4, turn, work row to marker-1, turn, work row to marker-3, turn, work row to marker-2, turn, work all sts on row (= to B), turn, work all sts on row (= to A) *, repeat from *-*. I.e. 1 repeat = 12 rows in the middle of piece, 4 rows on right side of piece and 2 rows on left side of piece. HAT: Worked back and forth on needle from side to side. Loosely cast on 58-62 sts with 1 thread of each quality on needle size 3.5 mm. Insert 5 markers in piece as follows from bottom edge: MARKER-1 after 32-32 sts, MARKER-2 after a total of 40-40 sts, MARKER-3 after a total of 46-48 sts, MARKER-4 after a total of 52-56 sts and MARKER- 5 after a total of 56-60 sts, = 2 sts left after the last marker. Work first row as follows (from RS): K12, P2, K2, P4, K4, P4, K2, P2 and K26-30. Work next row as follows (from WS): 26-30 garter sts, M.1 (= 20 sts), M.2 (= 6 sts), 5 stocking sts and 1 garter st (the bottom 6 sts = folding edge). Continue in pattern like this, AT THE SAME TIME work SHORTENED ROWS – see above. Continue until hat measures approx 48-54 cm along bottom edge (by A) – adjust so that last row is the row marked by an arrow in diagram. Cast off loosely with K over K and P over P. ASSEMBLY: Sew hat tog mid back, edge to edge. Run a thread through sts at the top of hat, tighten thread and fasten. Fold bottom edge towards WS along folding edge and fasten – make sure to have an even seam. ---------------------------------------------------------- SHOULDER WRAP: SHORTENED ROWS: To make the piece wider along bottom edge work shortened rows as follows (beg from RS - when turning mid piece, tighten thread to avoid holes in transitions): * Work 2 rows on all sts, work row to marker-2, turn, work return row, work row to marker-1, turn, work return row *, repeat from *-*. I.e. 1 repeat = 6 rows along bottom edge and 2 rows at the top. SHOULDER WRAP: Worked back and forth on needle from side to side. Loosely cast on 52-56 sts on needle size 3.5 mm with 1 thread of each quality. Insert 2 markers in piece as follows (from RS): MARKER-1 after 27-27 sts, MARKER-2 after a total of 37-39 sts = 15-17 sts left at the top after last marker. Let markers follow the piece as you go along. Work SHORTENED ROWS - see above (NOTE: work the bottom 4 sts in 2 threads Alpaca + 1 thread Kid-Silk, i.e. 3 threads, throughout), AT THE SAME TIME work pattern as follows - first row = RS: K4, P2, K2, P4, K4, P4, K2, P2 and K28-32. Work next row as follows from WS: 28-32 garter sts, M.1 (= 20 sts) and 4 garter sts. Continue in pattern like this until piece measures 35-40 cm at the top (= approx 105-120 cm along bottom edge, the opposite side) – adjust so that last row is the row marked with an arrow in diagram. NOTE: Make all measurements when piece is lying flat. Cast off loosely with K over K and P over P. Sew shoulder wrap tog mid back, edge to edge. |
|||||||||||||||||||
Diagram explanations |
|||||||||||||||||||
|
|||||||||||||||||||
 |
|||||||||||||||||||
 |
|||||||||||||||||||
Have you finished this pattern?Tag your pictures with #dropspattern or submit them to the #dropsfan gallery. Do you need help with this pattern?You'll find 15 tutorial videos, a Comments/Questions area and more by visiting the pattern on garnstudio.com. © 1982-2026 DROPS Design A/S. We reserve all rights. This document, including all its sub-sections, has copyrights. Read more about what you can do with our patterns at the bottom of each pattern on our site. |
|||||||||||||||||||


With over 40 years in knitting and crochet design, DROPS Design offers one of the most extensive collections of free patterns on the internet - translated to 17 languages. As of today we count 324 catalogues and 12272 patterns translated into English (UK/cm).
We work hard to bring you the best knitting and crochet have to offer, inspiration and advice as well as great quality yarns at incredible prices! Would you like to use our patterns for other than personal use? You can read what you are allowed to do in the Copyright text at the bottom of all our patterns. Happy crafting!
Post a comment to pattern DROPS 115-32
We would love to hear what you have to say about this pattern!
If you want to leave a question, please make sure you select the correct category in the form below, to speed up the answering process. Required fields are marked *.