
Popular categories
Looking for a yarn?


Comments / Questions (131)
![]() Anette Stafström Persson wrote:
Anette Stafström Persson wrote:
Fråga om ärmarna på tröjan; Man ska väl maska av för ärmkullen i början av varje varv? Det står vartannat varv. Avmaskningen börjar vid 19 cm och ska vara klar vid 25 cm. Då blir ju ärmkullen bara 6 cm i stället för 13 cm enl ritningen. Tacksam för förtydligande, har väl gjort en tankevurpa här. Mvh Anette
21.01.2026 - 12:47DROPS Design answered:
Hei Anette. Oppskriften er oversendt til Design avd. slik at de kan ta en dobbeltsjekk og se hva som er riktig. mvh DROPS Design
30.01.2026 - 09:57
![]() Heather wrote:
Heather wrote:
I can’t figure out how to knit the m.2.p chart on the cardigan size small , the instructions say to knit M2’s , then 128 stitches M2b , then m2c but when I get to row 5 , the chart shows that the stitches from m2b spill over into M2a and m2b , how do you knit the 8 stitches from m2b on row 5 ?
19.01.2026 - 23:11DROPS Design answered:
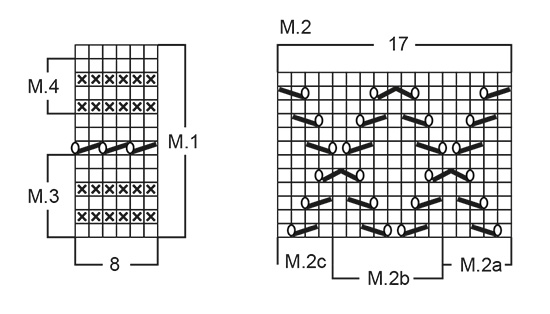
Dear Heather, on 5th row, work the 5 sts M.2a as before, the last 2 sts M.2a are worked together with the first stitch M.2b = this is now the last stitch M.2a; the yarn over is now the first stitch M.2b, work the last 2 sts M.2b together with the first stitch next M.2b / M.2c (at the end of the row), the decrease is now the last st M.2b and the yarn over the first stitch next M.2b/M.2c. Happy knitting!
20.01.2026 - 10:37
![]() Emilce wrote:
Emilce wrote:
Hola estoy tejiendo la chaqueta hice M3 y la primera y segunda hilera como indica el patrón ( M2a M2b M2C) tengo 179 puntos tejí la tercera vuelta 1 punto de orillo y 10 de 17 puntos y me quedan 10 puntos como los tejo o he hecho algo mal espero respuesta. Gracias
08.11.2025 - 15:50
![]() Unni Håkonsdatter wrote:
Unni Håkonsdatter wrote:
Utrolig dårlig monteringsanvisning til denne buksen. 4 kantede føtter og sammensying i skrittet er helt utelatt og håpløst å finne ut av. Det tar alt for lang tid å få svar på spørsmål så denne anbefales ikke.
06.11.2025 - 19:48
![]() Martina wrote:
Martina wrote:
Hallo, Ich verstehe nicht wo ich bei der Mütze unten 80 -90 M aufnehmen soll. Da bin ich ja ganz rum. Bitte Hilfe LG Martina
24.10.2025 - 03:26DROPS Design answered:
Liebe Martina, ja, der Rand geht fast ganz rum, der Kinnbereich bleibt noch ein kleines Stück offen. Wie weit genau geht leider aus der schon recht alten Anleitung nicht hervor. Sie stricken den Rand in Hin- und Rück-Reihen und arbeiten zwei Löcher für Bindebänder, diese können Sie bei genauem Hinschauen auf dem Foto sehen. Gutes Gelingen weiterhin!
24.10.2025 - 09:51
![]() Maria wrote:
Maria wrote:
Hallo, ich stricke die Mütze für Kopfumfang 47 cm. Ich frage mich ob es nicht sinnvoll sein könnte, die je 34 Maschen seitlich nicht abzuketten sondern stillzulegen und dann sozusagen reihenweise immer eine Masche mit dem Mittelteil zusammen zu stricken?! Könnte das aufgehen? Oder habe ich einen Denkfehler... Ich würde mir gern die zwei Nähte sparen ;-) vielen Dank für eine Rückmeldung und auch für die vielen wunderbaren Anleitungen!
02.04.2025 - 21:17DROPS Design answered:
Liebe Maria, dafür sollen Sie zuerst kalkulieren ob Sie so die richtige Länge erreichen werden, dh ob die Maschenanzahl / die Reihenanzahl diese 24 cm anpassen. Viel Spaß beim Stricken!
03.04.2025 - 08:47
![]() Merja Rissanen wrote:
Merja Rissanen wrote:
Miten housupuvun jalkaterän viimeistely on tarkoitus tehdä? Ei selviä ohjeesta
16.03.2025 - 19:05DROPS Design answered:
Hei, ompele jalkaterä yhteen keskeltä jalan alta, uloimmista silmukanreunoista.
21.03.2025 - 17:40
![]() Raymond wrote:
Raymond wrote:
Au début du devant dis on mentionne de tricoter en M3 en débutant par maille lisière en point mousse?? C est une bizarre de phrase. Qu est ce que je tricote en point mousse … et où je tricote en M3 est ce seulement les 8 premières et dernières mailles de chaque rang?
06.03.2025 - 03:37DROPS Design answered:
Bonjour Raymond, tricotez M.3 ainsi: 1 maille lisière au point mousse, répétez ensuite les 8 mailes de M.3 jusqu'à ce qu'il reste 1-5-1 maille (cf taille), terminez par les 0-4-0 premières mailles de M.3 (vous tricotez ainsi 17-18,5-22 fois M.3 en largeur) et 1 maille lisière au point mousse. Bon tricot!
06.03.2025 - 11:07
![]() Ina Rasmussen wrote:
Ina Rasmussen wrote:
Hvis man kun skal strikke hue og trøje i den mindste størrelse, hvor meget garn skal man så bruge?
04.03.2025 - 19:25
![]() Dedetton wrote:
Dedetton wrote:
Je ne comprends pas comment terminer la manche après avoir rabattu tous les deux rangs de chaque coté 3 m puis 2 m. Ensuite vous écrivez encore 2 mais c'est une seule fois de chaque côté ou bien jusqu'à ce qu'on atteigne la hauteur souhaitée? Merci
29.01.2025 - 08:27DROPS Design answered:
Bonjour Mme Dedetton, après vérification, il faut rabattre pour les manches 1 fois 3 m, 1 fois 2 m, 11-11-14 fois 1 m puis 2 m jusqu'à ce que la manche mesure 24-25-27 cm de hauteur totale. La correction a été faite, merci pour votre retour. Le nombre de fois que l'on doit rabattre 2 m de chaque côté jusqu'à la hauteur indiquée va dépendre de votre tension en hauteur, la hauteur est ici plus importante que le nombre de fois, veillez juste à avoir rabattu autant de mailles de chaque côté pour que la tête de manche soit bien symétrique. Bon tricot!
29.01.2025 - 13:43
|
||||||||||||||||
Lykkeliten#lykkelitenjacket |
||||||||||||||||
 |
 |
|||||||||||||||
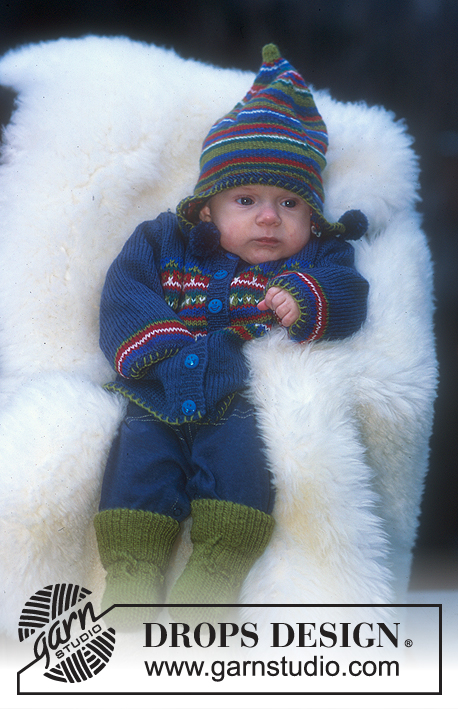
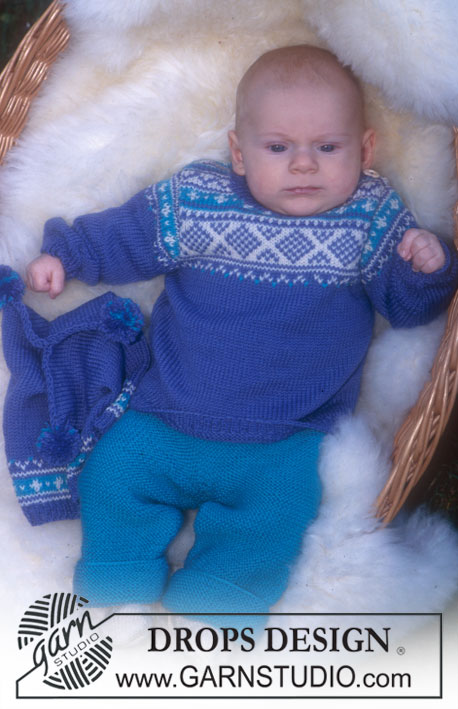
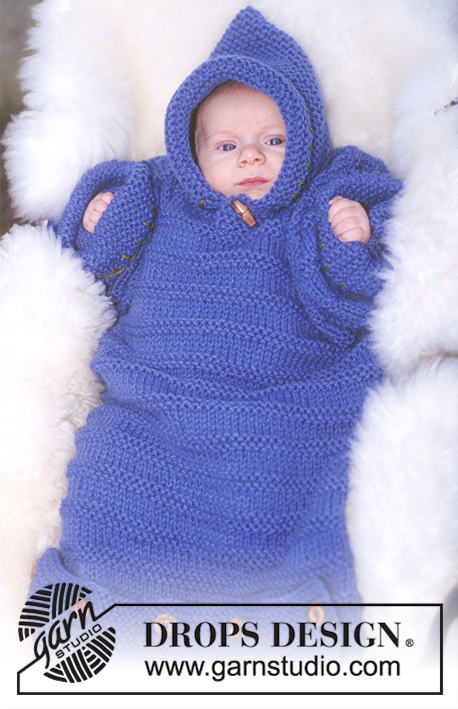
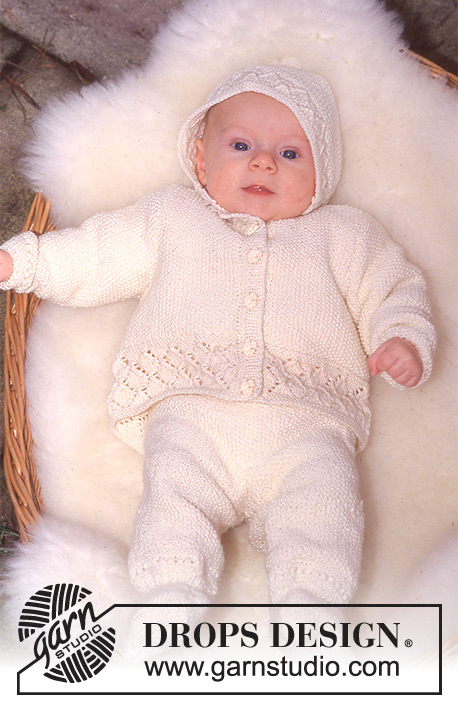
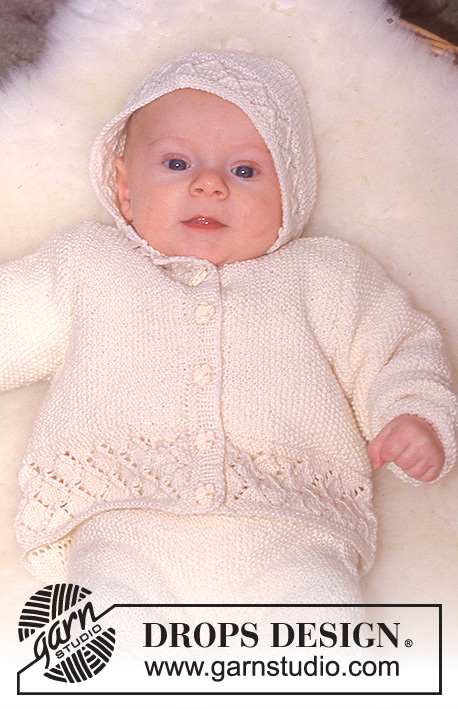
Jacket, trousers/jumpsuit and hat in BabyMerino
DROPS Baby 10-11 |
||||||||||||||||
|
Knitting tension: 26 sts x 52 rows with Baby-ull on needle size 2.5 mm in moss sts = 10 x 10 cm. Garter sts (back and forth on needle): Knit all rows. Moss sts: 1st row: *K1, P1*, repeat from *-*. 2nd row: P over K and K over P. Repeat 2nd row. Rib: *K1,P1*, repeat from *-*. Pattern: See diagrams M.1-M.4. The diagram shows the pattern from the right side. ------------------------------------------------------- JACKET: Back and front piece: The jacket is knitted back and forth on circular needle from mid front. Cast on 139-155-179 sts (incl 1 edge st each side towards mid front) on needle size 2.5 mm. Knit M.3 with edge sts in garter sts. After M.3 knit next row as follows: 1 edge st, 5-5-5 sts of M.2A, 128-144-168 sts of M.2B, 4-4-4 sts in M.2C, 1 edge st. Knit 2 vertical repeats of M.2, 1 repeat of M.4 and finish the piece in moss sts. Remember the knitting tension! At the same time when piece measures 14-15-17 cm knit next row as follows: knit 32-36-42 sts (= front piece), cast off 6 sts for armhole, knit 63-71-83 sts (= back piece), cast off 6 sts for armhole, knit 32-36-42 sts (= front piece). Now complete each piece separately. Left front: = 32-36-42 sts. Cast off for sleeve cap on every other row: 2 sts 2-1-2 times and 1 st 4-5-6 times = 24-29-32 sts. When piece measures 21-23-25 cm cast off 5-6-7 sts mid front for neck and dec to shape the neckline on every other row: 2 sts 1-1-1 time and 1 st 3-4-4 times = 14-17-19 sts left on shoulder. Cast off when piece measures 26-28-31 cm. Right front: = 32-36-42 sts. Continue as for left front, but mirrored. Back: = 63-71-83 sts. Cast off for sleeve cap each side as described for front piece = 47-57-63 sts. When piece measures 25-27-30 cm cast off the middle 17-21-23 sts for neck and dec 1 st on neckline on next row = 14-17-19 sts left on each shoulder. Cast off when piece measures 26-28-31 cm. Sleeves: Knitted back and forth on needles. Loosely cast on 40-42-44 sts on needles size 2.5 mm. Knit 2 cm Rib and continue in M.1 with 1 edge st each side in garter sts. After M.1 finish sleeve in moss sts. At the same time when piece measures 5 cm inc 1 st each side a total of 10-11-12 times on every 6 row = 60-64-68 sts. When piece measures 17-19-20 cm cast off for sleeve cap each side on every other row: 3 sts 1-1-1 time, 2 sts 1-1-1 time, 1 st 11-11-14 times and then 2 sts until sleeve measures 23-25-27 cm. Cast off remaining sts. Assembly: Sew shoulder seams. Pick up approx 55 to 65 sts along left front edge on needle size 2.5 mm. Knit M.4 and then 2 cm Rib. Cast off in Rib. Repeat along right front edge, but after 0.5 cm make 5 buttonholes evenly distributed on row, the bottom and top ones 1 cm from edges. 1 buttonhole = cast off 2 sts and cast on 2 new sts on the return row. Pick up approx 60 to 70 sts (divisible by 2) round the neck (incl front edges) on needle size 2.5 mm and knit M.1 with 2 edge sts each side in garter sts. Knit row 7 in M.1 as follows: 2 edge sts, *K2 tog, yo", repeat from *-* and finish with K2 tog and 2 edge sts. Cast off after M.1. Sew sleeve seams, set in sleeves and sew on buttons. ------------------------------------------------------- TROUSERS/JUMPSUIT: Left leg: Start mid under food and knit back and forth on circular needle. Cast on 54-60-64 sts (incl 1 edge st each side) on circular needles size 2.5 mm and knit garter sts. When piece measures 2 cm insert a marker and measure piece from here. After 4-4-5 cm dec each side on every other row: 3 sts 0-1-1 time and 2 sts 3-2-2 times = 42-46-50 sts. Distribute the sts on double pointed needles size 2.5 mm and knit round in Rib. After 2 cm continue in M.1, at the same time inc 20 sts evenly on 1st round = 62-66-70 sts. After M.1 divide piece before the last 16-17-18 sts (= split to facilitate putting legs on the same circular needle later) and work moss stitch back and forth. At the same time, inc 1 st each side for seam = 64-68-72 sts. When piece measures 12-11-12 cm (from cast-on edge), inc 1 st each side on every 6 row a total of 6-8-9 times = 74-84-90 sts. When piece measures 21-23-26 cm cast off 5 sts each side = 66-74-80 sts. Put the piece aside and knit the other leg. Right leg: Cast on and knit as left leg. When dividing piece for split, divide after the first 16-17-18 sts. Body: Put both legs on the same circular needle = 132-148-160 sts. Insert a marker mid front. Continue in moss sts back and forth on needle from mid back. At the same time inc 1 st each side for seam = 134-150-162 sts. Trousers: When piece measures 42-46-50 cm P 1 row from RS and knit 2 cm stocking sts (= casing). Cast off. Jumpsuit: When piece measures 42-51-56 cm knit M.1 with 1 edge st each side in garter sts and after M.1 finish piece in moss sts. When piece measures 46-55-60 cm cast off for armholes as follows: knit 31-35-38 sts (= half back piece), cast off 6 sts for armhole, knit 60-68-74 sts (= front piece), cast off 6 sts for armhole, knit 31-35-38 sts (= half back piece). Now finish each piece separately. Front piece: = 60-68-74 sts. Dec for armhole each side on every other row: 2 sts 1-1-1 time and 1 st 2-3-4 times = 52-58-62 sts. When piece measures 49-59-64 cm cast off the middle 14-16-18 sts for neck and dec to shape the neckline on every other row: 2 sts 1-1-1 time and 1 st 4-4-4 times = 13-15-16 sts left on each shoulder. When piece measures 54-64-70 cm continue in garter sts over all shoulder sts, at the same time after 2 rows make 2 buttonholes as follows: K2, cast off 2 sts, K 5-7-8 sts, cast off 2 sts, K1. On the return row cast on 2 sts over the cast off sts. Cast off after 6 rows in garter sts. Knit the other shoulder the same way. Left back piece: = 31-35-38 sts. Dec for armhole at side as done for front piece = 27-30-32 sts. When piece measures 53-63-69 cm cast off 13-14-15 sts for neck and dec 1 st on neckline on next row = 13-15-16 sts left on shoulder. When piece measures 54-64-70 cm knit 6 rows in garter sts over all shoulder sts and cast off. Right back piece: = 31-35-38 sts. Knit as left front piece, but reversed. Assembly: Trousers: Sew leg seams and seam mid back inside 1 edge st. Sew together the opening between the legs. Fold casing double towards WS and insert an elastic ribbon. Jumpsuit: Sew leg seams and seam mid back inside 1 edge st. Sew together the opening between the legs.. Pick up approx 65 to 75 sts round right armhole on needle size 2.5 mm and knit 4 rows garter sts. Cast off. Repeat round left armhole. Pick up 50 to 70 sts round front neck on needle size 2.5 mm and knit 4 rows garter sts. Cast off. Pick up 35 to 50 sts round back neck on needle size 2.5 mm and knit 4 rows garter sts. Cast off. Sew on buttons. Sew the seam under foot from the heel and up over the toes, sew inside 1 edge st. Sew on the buttons. ------------------------------------------------------- HAT: To fit head circumference: 41-44-47 cm Cast on 75-91-99 sts on needle size 2.5 and knit M.3. After M.3 knit next row as follows: 1 garter st, 5 sts of M.2A, 64-80-88 sts in M.2B, 4 sts in M.2C, 1 garter sts. Knit 1 vertical repeat of M.2 and finish piece in moss sts. When piece measures 10-11-12 cm cast off 24-31-34 sts each side and continue in moss sts over the middle 27-29-31 sts until piece measures 20-22-24 cm. Cast off. Sew the piece mid back to side pieces. Pick up approx 80 to 90 sts along lower edge and knit M.1 with 2 edge sts in garter sts each side. Knit row 7 in M.1 as follows: 2 edge sts, *K2 tog, yo", repeat from *-* and finish with K2 tog and 2 edge sts. Cast off after M.1. Cut a thread measuring approx 3 meters, fold it double, twist into a ribbon and pull through row of holes on bottom edge |
||||||||||||||||
Diagram explanations |
||||||||||||||||
|
||||||||||||||||
 |
||||||||||||||||
 |
||||||||||||||||
 |
||||||||||||||||
Have you finished this pattern?Tag your pictures with #dropspattern #lykkelitenjacket or submit them to the #dropsfan gallery. Do you need help with this pattern?You'll find 30 tutorial videos, a Comments/Questions area and more by visiting the pattern on garnstudio.com. © 1982-2026 DROPS Design A/S. We reserve all rights. This document, including all its sub-sections, has copyrights. Read more about what you can do with our patterns at the bottom of each pattern on our site. |
||||||||||||||||


With over 40 years in knitting and crochet design, DROPS Design offers one of the most extensive collections of free patterns on the internet - translated to 17 languages. As of today we count 324 catalogues and 12290 patterns translated into English (UK/cm).
We work hard to bring you the best knitting and crochet have to offer, inspiration and advice as well as great quality yarns at incredible prices! Would you like to use our patterns for other than personal use? You can read what you are allowed to do in the Copyright text at the bottom of all our patterns. Happy crafting!
Post a comment to pattern DROPS Baby 10-11
We would love to hear what you have to say about this pattern!
If you want to leave a question, please make sure you select the correct category in the form below, to speed up the answering process. Required fields are marked *.