
Popular categories
Looking for a yarn?


Comments / Questions (19)
![]() Rossella wrote:
Rossella wrote:
Il modello prevede 2 fili da lavorare insieme ma preferirei un solo filo, è possibile?
28.08.2025 - 14:38DROPS Design answered:
Buonasera Rossella, se utilizza un filo solo, il risultato sarà diverso da quello indicato. Buon lavoro!
30.08.2025 - 19:13
![]() Rosse wrote:
Rosse wrote:
Per sapere quanti gomitoli mi servono devo dividere i grammi della taglia scelta per il peso di un gomitolo? Grazie
28.08.2025 - 14:21DROPS Design answered:
Buonasera Rosse, è corretto, deve dividere la quantità totale del filato indicato per il peso di un gomitolo. Buon lavoro!
30.08.2025 - 19:54
![]() Lineke wrote:
Lineke wrote:
Would like to make cardigan with needles 5 and wool hobbit amigo xl. Can I use the measures as indicated in this free pattern
02.02.2021 - 16:37DROPS Design answered:
Dear Lineke, this pattern has been worked for a tension of 17 sts x 22 rows in stocking stitch = 10 x 10 cm. Should you need any assistance adjusting the pattern, please contact the store where you bought the yarn, we are unfortunateley not able to adjust every pattern to every single request. Thanks for your comprehension. Happy knitting!
02.02.2021 - 16:48
![]() Francesca Antonelli wrote:
Francesca Antonelli wrote:
Buonasera lei potrebbe gentilmente suggerirmi come fare lo scollo rotondo in questo modello ?
31.03.2020 - 21:22DROPS Design answered:
Buonasera Francesca, per un aiuto così personalizzato può rivolgersi al suo rivenditore DROPS di fiducia, purtroppo in questa sede non possiamo fornirle un'assistenza così specifica. Buon lavoro!
31.03.2020 - 22:03
![]() Evelyne Louaked wrote:
Evelyne Louaked wrote:
Bonjour, pourriez vous m indiquer combien il reste de mailles à rabattre a la fin pour la manche en taille M?
04.08.2019 - 17:39DROPS Design answered:
Bonjour Evelyne! Avant de repeter les diminutions de 2 mailles de chaque cote vous avez 38 mailles. Ensuite vous repetez ces diminutions (quelques fois, cela depend de la hauteur de la manche) jusqu'à ce que la manche mesure 56 cm de hauteur totale. Puis vous diminuez 1 fois 3 m et a la fin il faut rabattre les mailles restantes, mais je ne peux pas vous donner un nombre precis. Bon tricot!
05.08.2019 - 08:45
![]() Wilma wrote:
Wilma wrote:
Ik heb wol met een stekenverhouding van 16 st x 20 pennen (10x10 lapje). Zal ik dan een maat kleiner nemen voor het patroon, maar wel de cm aanhouden wanneer ik moet minderen of meerderen? Zou dat goed uitkomen?
26.09.2018 - 15:47DROPS Design answered:
Dag Wilma, Een maat kleiner is waarschijnlijk een te groot vershil. Je kan het aantal steken dat opgezet moet worden delen door 17 (de stekenverhouding in de breedte van het patroon) en dan keer 16 doen. Bij het meerderen en minderen kun je inderdaad de cm's aanhouden die aangegeven staan in het patroon bij jouw maat.
06.10.2018 - 10:23Dawn Whittall wrote:
Hello I am new to this site but very excited to be starting a new knitting project. I have previously used old patterns which told me how many balls of wool I would need. Here I am confused in knowing how many balls of wool to order for this pattern. I want to make size large. How do I work it out? I intend to use the recommended yarn. Thanks so much, Dawn
29.07.2018 - 12:04DROPS Design answered:
Dear Dawn, you can find information about material - which yarn and how much of it - in header of each pattern, close to the main photo. Amount of yarn we give not in balls, but in grams (we count only whole balls). For this model we use DROPS Kid Silk, which is produced in 25 g balls, so for size large you need 200 g of this yarn = 8 balls. Happy knitting!
29.07.2018 - 14:55
![]() Kristina wrote:
Kristina wrote:
Hallo, ich würde gern dieses Modell mit 1 Faden Brushed Alpaca Silk stricken. Geht das, und rechne ich die Menge der Knäuel so aus, dass ich die benötigte Lauflänge durch zwei teile (weil ja hier nur mit einem Faden gestrickt wird)?
09.12.2014 - 20:57DROPS Design answered:
Liebe Kristina, ja, das geht gut - 2 Fäden Kid-Silk (Garngruppe A) entsprechen 1 Faden Brushed Alpaca Silk (Garngruppe C). Und genau, Sie teilen die Gesamtlauflänge durch 2, weil Sie ja den Faden nicht doppelt nehmen müssen. Viel Spaß beim Stricken und gutes Gelingen!
10.12.2014 - 22:52
![]() Marga Hoogeboom wrote:
Marga Hoogeboom wrote:
Ik wil het vest breien met safran. Moet je dan ook twee draden gebruiken?
19.08.2014 - 19:14DROPS Design answered:
Hoi Marga. Ja, maar brei een proeflapje om de stekenverhouding voor het patroon correct te krijgen. Je kan ook proberen met 1 draad en zien of je de structuur mooier vindt - maar het is hier ook belangrijk dat de stekenverhouding correct is.
20.08.2014 - 17:13
![]() Linda wrote:
Linda wrote:
Jättefin!
26.01.2009 - 08:55
|
|
Nuvola#nuvolacardigan |
|
|
|
|
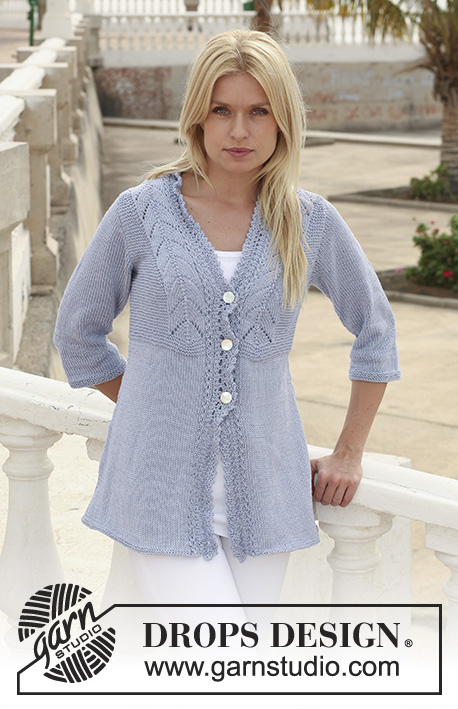
DROPS jacket in 2 threads ”Kid-Silk”. Size S - XXXL.
DROPS 112-11 |
|
|
GARTER ST (back and forth on needle): K all rows. DECREASING TIP (neckline): Dec after 8 garter sts as follows: slip 1 st as if to K, K1, psso Dec as follows before 8 garter sts: K2 tog. BUTTONHOLES: Make buttonholes on right front band. 1 buttonhole = K tog 3rd and 4th st from mid front and make 1 YO. Make buttonholes when piece measures: SIZE S: 7, 15, 23, 31 and 38 cm. SIZE M: 7, 15, 23, 31 and 39 cm. SIZE L: 7, 16, 24, 32 and 40 cm. SIZE XL: 7, 16, 24, 33 and 41 cm. SIZE XXL: 7, 16, 25, 34 and 42 cm. SIZE XXXL: 7, 16, 25, 34 and 43 cm. BACK PIECE: Cast on 70-76-84-92-100-110 sts (includes 1 edge st each side) on needle size 5 mm with 2 threads Kid-Silk. Work 4 rows garter st – see above – and continue in stocking st. REMEMBER THE KNITTING TENSION! When piece measures 10 cm dec 1 st each side on every 5 cm a total of 3 times = 64-70-78-86-94-104 sts. When piece measures 30-31-32-33-34-35 cm inc 1 st each side on every 3 cm a total of 5 times = 74-80-88-96-104-114 sts. When piece measures 45-46-47-48-49-50 cm cast off for armhole each side at the beg of every row: 4 sts 1-1-1-1-1-2 times, 3 sts 0-0-1-1-2-2 times, 2 sts 1-1-1-2-2-2 times and 1 st 1-3-3-4-4-4 times = 60-62-64-66-68-70 sts. When piece measures 61-63-65-67-69-71 cm work 4 rows garter st on 36 sts mid back (work remaining sts as before). Now cast off the middle 20 sts for neck = 20-21-22-23-24-25 sts left on each shoulder. Complete each shoulder separately with 8 garter sts towards neckline. Cast off when piece measures 64-66-68-70-72-74 cm. RIGHT FRONT PIECE: Cast on 40-43-47-51-55-60 sts (includes 1 edge st at the side and 8 front band sts towards mid front, worked in garter st throughout) on needle size 5 mm with 2 threads Kid-Silk. Work 4 rows garter st and continue in stocking st with front band in garter st. When piece measures 7 cm make buttonhole on front band – see above. When piece measures 10 cm dec at the side as described for back piece = 37-40-44-48-52-57 sts. When piece measures 30-31-32-33-34-35 cm inc at the side as described for back piece = 42-45-49-53-57-62 sts. READ ALL OF THE FOLLOWING SECTION BEFORE CONTINUING! When piece measures approx 40-41-42-43-44-45 cm work 2 rows garter st on the 8 front band sts only. Continue on all sts and dec 1 st for neckline – SEE DECREASING TIP – on every other row 4 times and then on every 4th row 10 times. AT THE SAME TIME when piece measures 45-46-47-48-49-50 cm cast off for armhole at the side as described for back piece. When all dec for armhole and neckline are complete there are 20-21-22-23-24-25 sts left on shoulder. Cast off when piece measures 64-66-68-70-72-74 cm. LEFT FRONT PIECE: Like right front piece, but mirrored and without buttonholes. SLEEVE: Cast on 50-52-54-56-58-60 sts (includes 1 edge st each side) on needle size 5 mm with 2 threads Kid-Silk. Work 4 rows garter st and continue in stocking st. AT THE SAME TIME when piece measures 2 cm dec 1 st each side on every 2 cm 5 times = 40-42-44-46-48-50 sts. When piece measures 13 cm inc 1 st each side and repeat the inc on every 3.5-3-2.5-2.5-2-2 cm a total of 10-11-12-13-14-15 times = 60-64-68-72-76-80 sts. When piece measures 49-48-46-45-44-43 cm (less for the larger sizes because of longer sleeve cap and wider shoulder) cast off for sleeve cap each side at the beg of every row: 3 sts 1 time, 2 sts 3 times and 1 st 3-4-6-7-8-9 times, then 2 sts each side until piece measures 56 cm, now cast off 3 sts each side 1 time and cast off remaining sts on next row. Piece measures approx 57 cm. ASSEMBLY: Sew shoulder seams. Set in sleeves and sew side and sleeve seams inside 1 edge st. Sew on buttons. |
|
 |
|
Have you finished this pattern?Tag your pictures with #dropspattern #nuvolacardigan or submit them to the #dropsfan gallery. Do you need help with this pattern?You'll find 17 tutorial videos, a Comments/Questions area and more by visiting the pattern on garnstudio.com. © 1982-2026 DROPS Design A/S. We reserve all rights. This document, including all its sub-sections, has copyrights. Read more about what you can do with our patterns at the bottom of each pattern on our site. |


With over 40 years in knitting and crochet design, DROPS Design offers one of the most extensive collections of free patterns on the internet - translated to 17 languages. As of today we count 325 catalogues and 12298 patterns translated into English (UK/cm).
We work hard to bring you the best knitting and crochet have to offer, inspiration and advice as well as great quality yarns at incredible prices! Would you like to use our patterns for other than personal use? You can read what you are allowed to do in the Copyright text at the bottom of all our patterns. Happy crafting!
Post a comment to pattern DROPS 112-11
We would love to hear what you have to say about this pattern!
If you want to leave a question, please make sure you select the correct category in the form below, to speed up the answering process. Required fields are marked *.