
Popular categories
Looking for a yarn?


Comments / Questions (154)
![]() Mamm wrote:
Mamm wrote:
Küsimus parema hõlma kohta . Kui ma hakkan mustrit tegema, Tagasi real (pahempidisel) ,kas alustan ka 5s ripskoega või alustan 4s pärlkoega ?
03.04.2026 - 18:07DROPS Design answered:
Tere Mamm! Paremal hõlmal on 5 ripskoes nööbiliistusilmust töö parempoolse rea alguses. Töö pahemal pool on alguses 1 ääresilmus ja siis pärlkoes silmused (külg varruka all). Head kudumist!
09.04.2026 - 14:15
![]() Simona wrote:
Simona wrote:
SOCKEN: Mit Merino Extra Fine auf Nadelspiel Nr. 3, 36-36-42 (42-42) M. anschlagen und 2 cm Bündchen = 3 re. / 3 li. stricken. 1 R. stricken und alle 3 re. auf 4 re. erhöhen = 42-42-49 (49-49) M. 1 R. mit 4 re. / 3 li. stricken. Danach wie folgt: * M4, 3 li. *, von *-* total 6-6-7 (7-7) Mal wiederholen. Nachdem M4 Mal in der Höhe gestrickt Wie oft muss das Muster M4 der Höhe nach gestrickt werden? Bei der kleinsten Größe. Lieben Dank
26.01.2026 - 10:49DROPS Design answered:
Liebe Simona, M.4 wird 3 x in der Höhe gestrickt, die Information wurde gerade in der Anleitung ergänzt, danke für Ihren Hinweis und viel Spaß beim Weiterstricken!
26.01.2026 - 12:09
![]() Nicole wrote:
Nicole wrote:
Bonjour Ces explications ne correspondent pas à la photo affichée !
30.11.2025 - 13:51DROPS Design answered:
Bonjour Nicole, les explications semblent être les bonnes, qu'est-ce qu'il vous faire penser le contraire? N'hésitez pas à nous en dire plus que nous puissions à nouveau vérifier. Merci pour votre compréhension.
01.12.2025 - 09:31
![]() Marilyn wrote:
Marilyn wrote:
I started knitting this sweater but: The cable legend is not complete. There are 8 stitch areas and it doesn't tell or explain how to knit the 8 stitch cable. Please explain. TY
30.10.2025 - 13:14DROPS Design answered:
Hi, Marilyn, I don't know what size you are knitting, but for size 12/18 months, there are 8 stitches at the beginning and end of the rows that are knitted in moss stitch. For size 2 years, there are 2 places where there are 8 purl stitches. Happy knitting!
30.10.2025 - 14:20
![]() Charlotte wrote:
Charlotte wrote:
På huvan ska man plocka upp CA 46-68m. Jag fattar inte, ca ? Det är en skillnad på 22 m. Hur många ska jag plocka upp ???
21.10.2025 - 15:39DROPS Design answered:
Hej Charlotte. Det beror på vilken storlek du stickar. På den minsta storleken blir det runt 46 maskor och på den största runt 68 maskor. Mvh DROPS Design
22.10.2025 - 07:04
![]() Charlotte wrote:
Charlotte wrote:
När jag stickar mönstret, M1, M2,M3, räknas första maskan från vänster till höger ? Alltså M1 börjar med 2 aviga eller 3 räta ? När man är på avigsidan stickar man mönstret rät på rät och avig på avig förutom på mosstickningen ?
30.09.2025 - 17:08DROPS Design answered:
Hej Charlotte. Från rätsidan stickas diagrammet från höger till vänster och från avigsidan stickas diagrammet från vänster till höger. Från rätsidan stickar du först 3 räta maskor i A.1. Vit ruta stickas rät från rätsidan och avig från avigsidan. Läs gärna mer i lektionen Hur man läser ett stickdiagram. Mvh DROPS Design
01.10.2025 - 11:08
![]() Anita Boserup wrote:
Anita Boserup wrote:
Når der skal tages ind til ærmekuppel står der at der skal lukkes for “4 m 1 gang, og så 2 m til arb måler 21-23-26 (30-34) cm, og til sidst 3 m 1 gang” . Jeg er i tvivl om hvor mange gange der skal lukkes for 2 masker. Er det én gang i hver side, eller er det 2 m på hver pind indtil arbejdet måler 23 cm ( str 6/9) Tak for hjælpen. Vh Anita
26.08.2025 - 10:08DROPS Design answered:
Hej Anita. Det er 2 m på hver pind indtil arbejdet måler 23 cm. Mvh DROPS Design
29.08.2025 - 07:14
![]() Valeria wrote:
Valeria wrote:
Nelle maniche della giacca, come faccio gli aumenti dopo i primi 7 cm? Li inserisco nella parte lavorata a grana di riso? Come li lavoro poi a grana di riso senza scombinare l’alternanza?
01.08.2025 - 22:39DROPS Design answered:
Buongiorno Valeria, esatto, deve incorporare gli aumenti nella lavorazione a grana di riso. Buon lavoro!
02.08.2025 - 14:16
![]() Ruth Slingers wrote:
Ruth Slingers wrote:
Do I read the graphs from the top down or from the bottom up?
22.07.2025 - 22:59DROPS Design answered:
Dear Mrs Slingers, diagrams are read from bottom up - read more here. Happy knitting!
25.07.2025 - 16:13
![]() Nanda Ramerman wrote:
Nanda Ramerman wrote:
Er staat bij dit patroon dat de diagrammen de heengaande toeren er alleen staan maar als ik de teruggaande toeren de steken brei zoals ze zich voordoen dan krijg ik hele uitgerekte kabels dus volgens mij klopt er iets niet
11.05.2025 - 23:24DROPS Design answered:
Dag Nanda,
In de telpatronen zijn altijd alle naalden opgenomen, dus zowel de heengaande als de teruggaande naalden. Wel geven de telpatronen het werk aan de goede kant weer.
14.05.2025 - 09:06
|
|||||||||||||||||||||||||
Matheo#matheojacket |
|||||||||||||||||||||||||
 |
 |
||||||||||||||||||||||||
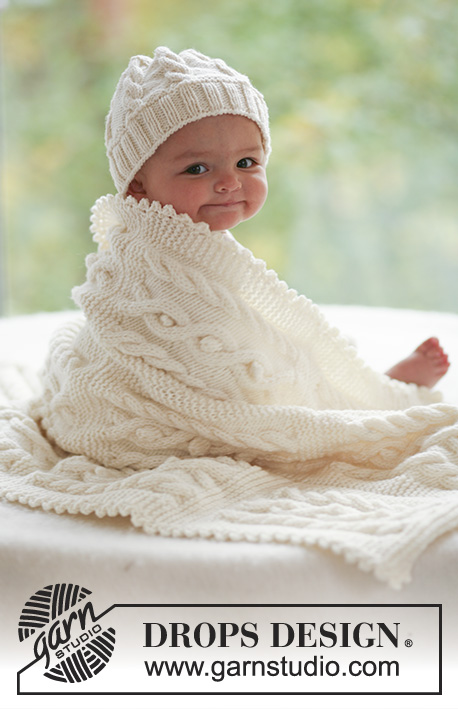
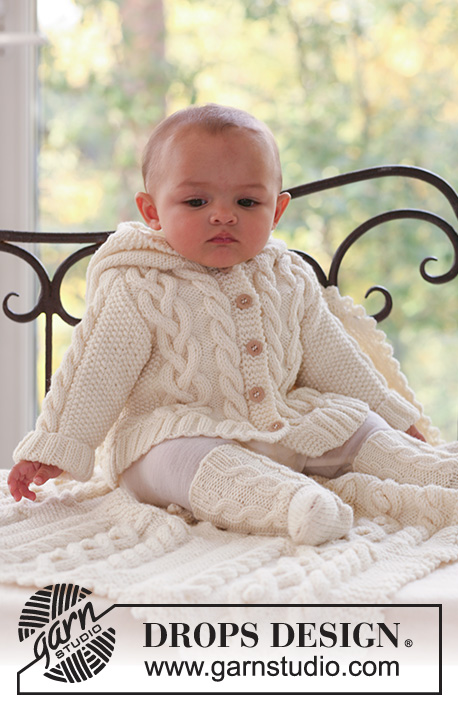
Set of knitted jacket with hood, socks and blanket with cables for baby and children in DROPS Merino Extra Fine. Theme: Baby blanket
DROPS Baby 17-2 |
|||||||||||||||||||||||||
|
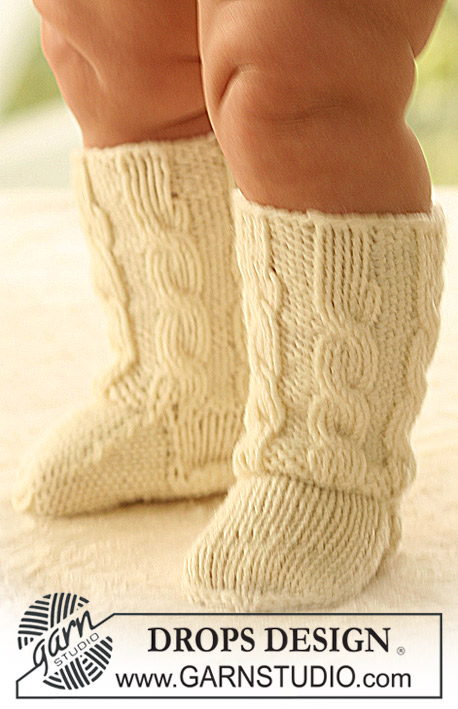
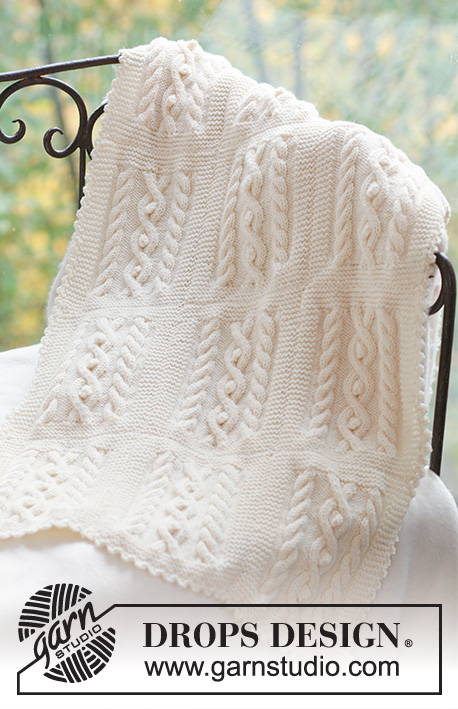
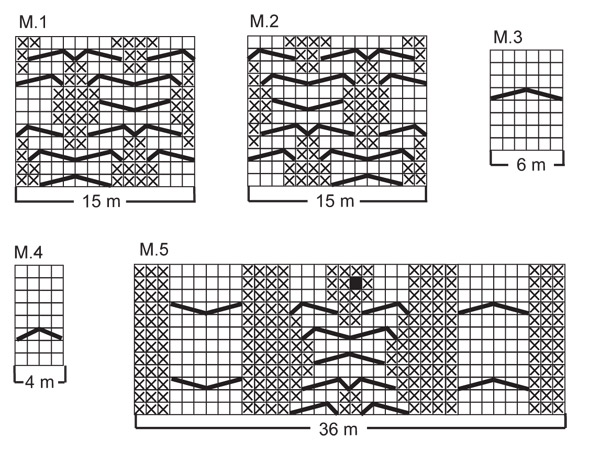
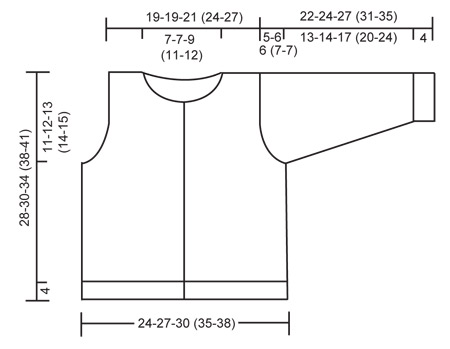
JACKET: MOSS ST: Row 1: * K1, P1 *, repeat from *-*. Row 2: K over P and P over K. Repeat row 2. PATTERN: See diagram M.1, M.2 and M.3. The diagrams show the pattern from the RS. BUTTONHOLES: Make buttonholes on right front band by K tog 2nd and 3rd st from edge and make 1 YO. Make buttonholes when piece measures: SIZE 1/3 months: 3, 8, 13, 18 and 23 cm SIZE 6/9 months: 5, 10, 15, 20 and 25 cm SIZE 12/18 months: 5, 11, 17, 23 and 29 cm SIZE 2 years: 5, 11, 16, 21, 27 and 32 cm SIZE 3/4 years: 5, 11, 17, 23, 29 and 35 cm ---------------------------------------------------------- BACK PIECE: Worked back and forth on needle. Cast on 72-80-84 (96-104) sts (includes 1 edge st each side) on needle size 3.5 mm with Merino Extra Fine. Work rib as follows (first row = RS): 1 edge st, * K2, P2 *, repeat from *-*, and finish with K2 and 1 edge st. When rib measures 4 cm change to needle size 4.5 mm and K 1 row from RS, AT THE SAME TIME dec 6-8-6 (8-10) sts evenly = 66-72-78 (88-94) sts. K 1 row from WS and continue as follows from RS: 1 edge st, 4-7-8 (11-11) moss sts – SEE ABOVE – P 2, M.1 (= 15 sts), P 4-4-6 (8-11), M.3 (= 6 sts), P 2, M.3 (= 6 sts), P 4-4-6 (8-11), M.2 (= 15 sts), P 2, 4-7-8 (11-11) moss sts and 1 edge st. Continue in pattern like this. REMEMBER THE KNITTING TENSION! When piece measures 17-18-21 (24-26) cm cast off for armhole each side at the beg of every row from the side: 3 sts 1 time, 2 sts 0-1-2 (3-3) times and 1 st 2-3-2 (2-2) times = 56-56-60 (66-72) sts. When piece measures 26-28-32 (36-39) cm work the 6 sts on M.3 tog 2 by 2 = 50-50-54 (60-66) sts. On next row cast off the middle 12-12-16 (20-22) sts for neck and complete each side separately. Cast off 1 st on neckline on next row = 18-18-18 (19-21) sts left on shoulder. When piece measures 28-30-34 (38-41) cm dec 6 sts evenly on row = 12-12-12 (13-15) sts left on shoulder, cast off on next row. RIGHT FRONT PIECE: Worked back and forth on needle from mid front. Cast on 42-46-50 (54-58) sts (includes 1 edge st at side and 5 front band sts towards mid front) on needle size 3.5 mm with Merino Extra Fine. Work rib as follows from mid front (first row = RS): 5 garter sts (= front band), * K2, P2 *, repeat from *-* and finish with 1 edge st. Remember buttonholes on front band - SEE ABOVE. When piece measures 4 cm change to needle size 4.5 mm, K 1 row from RS, AT THE SAME TIME dec 4-5-6 (5-6) sts evenly (do not dec on front band) = 38-41-44 (49-52) sts. K 1 row from WS and work next row as follows from RS: 5 garter sts (= front band), P 1, M.3 (= 6 sts), P 4-4-6 (8-11), M.1 (= 15 sts), P 2, 4-7-8 (11-11) moss sts and 1 edge st. Continue in pattern like this. When piece measures 17-18-21 (24-26) cm cast off for armhole at the side as described for back piece = 33-33-35 (38-41) sts. When piece measures 24-26-30 (33-36) cm work the 6 sts on M.3 tog 2 by 2 = 30-30-32 (35-38) sts. Now slip the 8-8-10 (12-13) sts towards mid front on a stitch holder for neck. Cast off to shape the neckline at the beg of every row from mid front: 2 sts 1 time and 1 st 2 times = 18-18-18 (19-21) sts left on shoulder. When piece measures 28-30-34 (38-41) cm dec 6 sts evenly = 12-12-12 (13-15) sts left on shoulder, cast off LEFT FRONT PIECE: Cast on and work like right front piece, but mirrored, i.e. work first row as follows from the side: 1 edge st * P2, K2 *, repeat from *-*, and finish with 5 garter sts (= front band). When working pattern work row from RS as follows: 1 edge st, 4-7-8 (11-11) moss sts, P 2, M.2 (= 15 sts), P 4-4-6 (8-11), M.3 (= 6 sts), P 1 and 5 garter sts (= front band). Do not make buttonholes! SLEEVE: Worked back and forth on needle. Cast on 46-46-46 (50-50) sts (includes 1 edge st each side) on needle size 3.5 mm with Merino Extra Fine. Work 4 cm rib, K2/P2, with 1 edge st each side. Change to needle size 4.5 mm and K 1 row from RS, AT THE SAME TIME dec 10-8-8 (10-10) sts evenly = 36-38-38 (40-40) sts. K 1 row from WS and work next row as follows from RS: 1 edge st, 12-13-13 (14-14) moss sts, P 2, M.3 (= 6 sts), P 2, 12-13-13 (14-14) moss sts and 1 edge st. Continue in pattern like this. AT THE SAME TIME when piece measures 7 cm inc 1 st each side and repeat the inc on every 4th row a total of 6-7-9 (10-12) times = 48-52-56 (60-64) sts – work the inc sts in moss st. When piece measures 17-18-21 (24-28) cm cast off for sleeve cap each side at the beg of every row: 4 sts 1 time, and then 2 sts until piece measures 21-23-26 (30-34) cm, now cast off 3 sts each side 1 time, AT THE SAME TIME on the last row work the 6 sts on M.3 tog 2 by 2. Cast off remaining sts on next row. Piece measures approx 22-24-27 (31-35) cm. ASSEMBLY: Sew shoulder seams. HOOD: Pick up approx 46 to 68 sts (incl sts on stitch holders at front) round neckline on needle size 4.5 mm. K 2 rows, AT THE SAME TIME on second row inc evenly to 68-72-76 (80-84) sts. Continue in reverse stocking st with 5 garter sts each side until hood measures 21-23-25 (27-28) cm, cast off. Sew hood tog at the top, edge to edge to avoid a chunky seam. Set in sleeves. Sew sleeve and side seams inside 1 edge st. Sew on buttons. ---------------------------------------------------------- SOCK: PATTERN: See diagram M.4. The diagram shows the pattern from the RS. DECREASING TIP: Dec as follows before marker: K 2 tog. Dec as follows after marker: Slip 1 st as if to K, K1, psso. HEEL DECREASES: ROW 1 (= RS): Work row until 5-5-6 (6-6) sts remain, slip next st as if to K, K1, psso, turn piece, ROW 2 (= WS): Work row until 5-5-6 (6-6) sts remain, slip next st as if to P, P1, psso, turn piece, ROW 3 (= RS): Work row until 4-4-5 (5-5) sts remain, slip next st as if to K, K1, psso, turn piece, ROW 4 (= WS): Work row until 4-4-5 (5-5) sts remain, slip next st as if to P, P1, psso, turn piece. Continue dec like this with 1 less st between each dec until there are 9-9-12 (12-12) sts on row. ---------------------------------------------------------- SOCK: Worked in the round on double pointed needles. Cast on 36-36-42 (42-42) sts on double pointed needles size 3 mm with Merino Extra Fine and work 2 cm rib, K3/P3. Work 1 round rib, AT THE SAME TIME inc all K3 to K4 = 42-42-49 (49-49) sts. Work 1 round K4/P3. Now continue as follows: * M.4, P3 *, repeat from *-* a total of 6-6-7 (7-7) times. After 3 vertical repeats of M.4 work sts in M.4 tog 2 by 2 = 30-30-35 (35-35) sts. Now keep the first 17-17-22 (22-22) sts on needle for heel and slip remaining 13 sts on a stitch holder (= upper foot). Work 3-3.5-4 (4-4.5) cm stocking st back and forth on heel sts. Insert a marker in piece and now dec for heel – SEE ABOVE. After heel dec pick up 7-8-9 (9-10) sts on each side of heel and slip sts from stitch holder back on needle = 36-38-43 (43-45) sts. Continue in stocking st on all sts, AT THE SAME TIME dec as follows on each side of the 13 sts on upper foot: K tog the 2 sts before the 13 sts on upper foot into back of loop and K tog the 2 sts after the 13 sts. Dec on every other row a total of 5-6-7 (6-6) times = 26-26-29 (31-33) sts. When piece measures approx 8-9-9.5 (11.5-12.5) cm from marker on heel (approx 2-2-2.5 (2.5-3.5) cm remain) insert 1 marker each side with 13-13-15 (15-17) sts on upper foot and 13-13-14 (16-16) sts under foot. Dec on each side of both markers – SEE DECREASING TIP – on every other round 2-2-3 (3-5) times and then on every round 3-3-3 (3-2) times = 6-6-5 (7-5) sts. Cut the thread, pull through remaining sts and fasten. Sock measures approx 10-11-12 (14-16) cm. ---------------------------------------------------------- : BLANKET GARTER ST (back and forth on needle): K all rows. INCREASING TIP: Make all inc from RS. Inc 1 st by making 1 YO. Work YO into back of loop on return row to avoid a hole. PATTERN: See diagram M.5. The diagram shows the pattern from the RS. --------------------------------------------------------- BLANKET: Blanket is made up of 12 squares, sewn tog 3 by 4. 1 square measures approx: width 18 cm, length 22.5 cm 1 SQUARE: Cast on 36 sts on needle size 5 mm with Merino Extra Fine. Work 8 rows garter st – SEE ABOVE. K 1 row from RS, AT THE SAME TIME inc 10 sts evenly on the middle 26 sts = 46 sts. Work next row from WS as follows: 5 garter sts, K3, P6, K 4, P3, K4, P3, K4, P6, K3 and 5 garter sts. Continue as follows from RS: 5 garter sts, M.5 on the next 36 sts, 5 garter sts. Work 4 vertical repeats of M.5 like this, but on the last repeat finish when 2 rows of diagram remain. K 1 row from RS on all sts, AT THE SAME TIME dec 10 sts on the middle 36 sts = 36 sts. Work 8 rows garter st on all sts and cast of loosely. Note: You may work 4 squares in a row without casting off, i.e. beg a new square after the last 8 rows in garter st. ASSEMBLY: Sew the squares tog, 3 by 4. Sew in outer loops of sts to avoid a chunky seam. CROCHET BORDER: Crochet a border round the whole blanket with crochet hook size 5 mm as follows: * 1 dc in edge st, 3 ch, 1 dc in the first of these 3 ch, skip 1 cm *, repeat from *-*, and finish with 1 sl st in first dc from beg of round. |
|||||||||||||||||||||||||
Diagram explanations |
|||||||||||||||||||||||||
|
|||||||||||||||||||||||||
 |
|||||||||||||||||||||||||
 |
|||||||||||||||||||||||||
Have you finished this pattern?Tag your pictures with #dropspattern #matheojacket or submit them to the #dropsfan gallery. Do you need help with this pattern?You'll find 34 tutorial videos, a Comments/Questions area and more by visiting the pattern on garnstudio.com. © 1982-2026 DROPS Design A/S. We reserve all rights. This document, including all its sub-sections, has copyrights. Read more about what you can do with our patterns at the bottom of each pattern on our site. |
|||||||||||||||||||||||||


With over 40 years in knitting and crochet design, DROPS Design offers one of the most extensive collections of free patterns on the internet - translated to 17 languages. As of today we count 324 catalogues and 12290 patterns translated into English (UK/cm).
We work hard to bring you the best knitting and crochet have to offer, inspiration and advice as well as great quality yarns at incredible prices! Would you like to use our patterns for other than personal use? You can read what you are allowed to do in the Copyright text at the bottom of all our patterns. Happy crafting!
Post a comment to pattern DROPS Baby 17-2
We would love to hear what you have to say about this pattern!
If you want to leave a question, please make sure you select the correct category in the form below, to speed up the answering process. Required fields are marked *.