DROPS Bomull-Lin
DROPS Bomull-Lin
53% Cotton, 47% Linen
from 1.75 £ /50g
DROPS Cotton Viscose
54% Cotton, 46% Viscose
Discontinued
find alternatives
DROPS Super Sale
DROPS 107-14
Size: S/M – M/L
Head circumference: 52/54 – 56/58 cm

Materials: DROPS Bomull-Lin, from Garnstudio
150-150 g colour no 03, beige-linen
and use: DROPS Cotton Viscose, from Garnstudio
100-100 g colour no 17, beige

DROPS crochet hook size 4 mm - or size needed to obtain 13 tr x 6.5 rows with 1 thread of each quality = 10 x 10 cm.

-------------------------------------------------------

Alternative Yarn – See how to change yarns here
Yarn Groups A to F – Use the same pattern and change the yarn here
Yarn usage using an alternative yarn – Use our yarn converter here

-------------------------------------------------------

DROPS Bomull-Lin
DROPS Bomull-Lin
53% Cotton, 47% Linen
from 1.75 £ /50g
DROPS Cotton Viscose
54% Cotton, 46% Viscose
Discontinued
find alternatives

DROPS Super Sale

SAVE 30% on 6 cotton favourites!
Valid until 12.04.2024

Pattern instructions

NOTE: This pattern is written in British English. All measurements in charts are in cm. For conversion from cm to inches - click here. There are different terms for crocheting in British and American English. If this pattern includes crochet, click for "crochet terms" here. For this pattern in American English, please click here.
Crochet info: Replace the first tr on row with 3 ch. Replace first dc on row with 1 ch. Finish all rows with 1 sl st in first st.

Hat:
Round 1: Crochet 4 ch with crochet hook size 4 mm with 1 thread of each yarn quality, then 7 tr in the first ch, finish with 1 sl st in third ch = 8 tr
Round 2: Read Crochet info! 2 tr in each tr = 16 tr
Round 3: 2 tr in each tr = 32 tr
Round 4: *1 tr in first tr, 2 tr in next tr*, repeat from *-* = 48 tr
Round 5: *1 tr in each of the first 2 tr, 2 tr in next tr*, repeat from *-* = 64 tr
Round 6: 1 tr in each tr, but inc 6-12 tr evenly distributed = 70-76 tr
Round 7: 3 ch (= 1 tr), 1 ch, *skip 1 tr, 1 tr in tr, 1 ch*, repeat from *-* = 35-38 tr
Round 8: *1 dc in ch, 1 dc in tr*, repeat from *-* = 70-76 dc
Round 9: 3 ch in 1st dc, 1 tr back in last dc on previous round, 1 tr in 3rd dc, 1 tr back in second dc, 1 tr in fifth dc, 1 tr back in fourth dc, continue like this and end round with a sl st in the 3rd ch in beg of round (= cross-tr).
Repeat round 7-9 another 2 times.
Round 16: 1 dc in each tr, at the same time inc 12-12 dc evenly = 82-88 dc
Round 17 and 18: 1 dc in each dc, at the same time inc 5-5 dc evenly on each round = 92-98 dc.
Round 19-24: 1 dc in each dc
Round 25: 1 dc in each dc, at the same time inc 16-18 dc evenly = 108-116 dc
Round 26: 1 dc in each dc
Round 27: 1 dc in each dc, at the same time inc 16-18 dc evenly = 124-134 dc.
Continue with 1 dc in each dc until piece measures approx 29-30 cm from the top. Cut the thread and fasten.

This pattern has been corrected.

Updated online: 11.08.2010
Round 9: 3 ch in 1st dc, 1 tr back in last dc on previous round, 1 tr in 3rd dc, 1 tr back in second dc, 1 tr in fifth dc, 1 tr back in fourth dc, continue like this and end round with a sl st in the 3rd ch in beg of round (= cross-tr).
Updated online: 09.06.2011
Materials: DROPS Bomull-Lin from Garnstudio
150-150 g colour no 03, off-white mix
Do you have a question? See a list of frequently asked questions (FAQ)

Knitting tension is what determines the final measurements of your work, and is usually measured per 10 x 10 cm. It is provided like so: number of stitches in width x number of rows in height - eg: 19 stitches x 26 rows = 10 x 10 cm.

The knitting tension is very individual; some people knit/crochet loosely while others work tightly. You adjust the knitting tension with the needle size, which is why the suggested needle size is only meant as a guide! You need to adjust this (up or down) to ensure that YOUR knitting tension matches the knitting tension provided in the pattern. If you work with a different knitting tension than provided you will have a different yarn consumption, and your work will have different measurements than what the pattern suggests.

The knitting tension also determines which yarns can replace each other. As long as you achieve the same knitting tension you can replace one yarn with another.

See DROPS lesson: How to measure your tension/gauge

See DROPS video: How to make a gauge tension swatch

The required amount of yarn is provided in grams, eg: 450 g. To calculate how many balls you’ll need you first need to know how many grams are in 1 ball (25g, 50g or 100g). This information is available if you click on the individual yarn quality on our pages. Divide the amount required with the amount of each ball. For example, if each ball is 50g (the most common amount), the calculation will be as follows: 450 / 50 = 9 balls.

The important thing when changing from one yarn to another is that the knitting/crochet tension remains the same. This is so that the measurements of the finished piece will be the same as on the sketch provided. It is easier to achieve the same knitting tension using yarns from the same yarn group. It is also possible to work with multiple strands of a thinner yarn to achieve the knitting tension of a thicker one. Please try our yarn converter. We recommend you to always work a test swatch.

Please NOTE: when changing yarn the garment might have a different look and feel to the garment in the photo, due to individual properties and qualities of each yarn.

See DROPS lesson: Can I use a different yarn than the one mentioned in the pattern?

All our yarns are categorised into yarn groups (from A to F) according to thickness and knitting tension – group A contains the thinnest yarns and group F the thickest. This makes it easier for you to find alternative yarns to our patterns, should you wish to switch yarn. All yarns within the same group have a similar knitting tension and can easily replace each other. However, different yarn qualities have different structures and properties which will give the finished work a unique look and feel.

Click here for an overview of the yarns in each yarn group

At the top of all our patterns you’ll find a link to our yarn calculator, which is a helpful tool should you wish to use a different yarn than suggested. By filling in the yarn quality you wish to replace, the amount (in your size) and number of strands, the calculator will present good alternative yarns with the same knitting tension. Additionally it will tell you how much you’ll require in the new qualities and whether you’ll need to work with multiple strands. Most skeins are 50g (some are 25g or 100g).

If the pattern is worked with multiple colours, every colour will have to be calculated separately. Similarly, if the pattern is worked with several strands of different yarns (for example 1 strand Alpaca and 1 strand Kid-Silk) you will have to find alternatives for each, individually.

Click here to see our yarn calculator

Since different yarns have different qualities and textures we have chosen to keep the original yarn in our patterns. However, you can easily find options among our available qualities by using our yarn calculator, or simply pick a yarn from the same yarn group.

It is possible that some retailers still have discontinued yarns in stock, or that someone has a few skeins at home that they would like to find patterns for.

The yarn calculator will provide both alternative yarn as well as required amount in the new quality.

If you think it's hard to decide what size to make, it can be a good idea to measure a garment you own already and like the size of. Then you can pick the size by comparing those measures with the ones available in the pattern's size chart.

You'll find the size chart at the bottom of the pattern.

See DROPS lesson: How to read size chart

The needle size provided in the pattern serves only as a guide, the important thing is to follow the knitting tension. And since knitting tension is very individual, you will have to adjust the needle size to ensure that YOUR tension is the same as in the pattern – maybe you’ll have to adjust 1, or even 2 needle sizes, up or down to achieve the correct tension. For this, we recommend that you work test swatches.

Should you work with a different knitting tension than the one provided, the measurements of the finished garment might deviate from the measurement sketch.

See DROPS lesson: How to measure your tension/gauge

See DROPS video: How to make a tension/gauge swatch

Working a garment top-down provides more flexibility and room for personal adjustment. For example it is easier to try the garment on while working, as well as making adjustments to length of yoke and shoulder caps.

The instructions are carefully explaining every step, in the correct order. Diagrams are adjusted to the knitting direction and are worked as usual.

The diagram depicts all rows/rounds, and every stitch seen from the right side. It is read from bottom to top, from right to left. 1 square = 1 stitch.

When working back and forth, every other row is worked from the right side and every other row is worked from the wrong side. When working from the wrong side, the diagram will have to be worked reversed: from left to right, knit stitches are purled, purl stitches are knit etc.

When working in the round every round is worked from the right side and the diagram are worked from right to left on all rounds.

See DROPS lesson: How to read knitting diagrams

The diagram depicts all rows/rounds, and every stitch seen from the right side. It is worked from bottom to top, from right to left.

When working back and forth every other row is worked from the right side: from right to left and every other row is worked from the wrong side: from left to right.

When working in the round, every row in the diagram are worked from the right side, from right to left.

When working a circular diagram you start in the middle and work your way outwards, counter clockwise, row by row.

The rows usually start with a given number of chain stitches (equivalent to the height of the following stitch), this will either be depicted in the diagram or explained in the pattern.

See DROPS lesson: How to read crochet diagrams

Instructions for working several diagrams after each other on the same row/round, will often be written like so: “work A.1, A.2, A.3 a total of 0-0-2-3-4 times". This means you work A.1 once, then A.2 is worked once, and A.3 is repeated (in width) the number of times provided for your size – in this case like so: S = 0 times, M = 0 times, L=2 times, XL= 3 times and XXL = 4 times.

The diagrams are worked as usual: begin with the first row in A.1, then work the first row in A.2 etc.

See DROPS lesson: How to read knitting diagrams

See DROPS lesson: How to read crochet diagrams

The total width of the garment (from wrist-to-wrist) will be larger in the larger sizes, despite the actual sleeves being shorter. The larger sizes have longer sleeve caps and wider shoulders, so there will be a good fit in all sizes.

The measurement sketch/schematic drawing provides information regarding the full length of the garment. If it’s a jumper or a jacket the length is measured from the highest point on the shoulder closest to the neckline, and straight down to the bottom of the garment. It is NOT measured from the tip of shoulder. Similarly, the length of yoke is measured from the highest point on the shoulder and down to where yoke is split into body and sleeves.

On a jacket measures are never taken along bands, unless specifically stated. Always measure inside band stitches when measuring the length.

See DROPS lesson: How to read a schematic drawing

Diagrams are often repeated on the round or in height. 1 repeat is the diagram the way it appears in the pattern. If it says to work 5 repeats of A.1 in the round, then you work A.1 a total of 5 times after/next to each other in the round. If it says to work 2 repeats of A.1 vertically/in height you work the entire diagram once, then begin again at the start and work the entire diagram one more time.

Chain stitches are slightly narrower than other stitches and to avoid working the cast-on edge too tight, we simply chain more stitches to begin with. The stitch count will be adjusted on the following row to fit the pattern and measurement sketch.

The rib edge is more elastic and will contract slightly compared to, for example, stocking stitch. By increasing before the rib edge, you avoid a visible difference in width between the rib edge and the rest of the body.

It’s very easy to cast off too tightly, and by making yarn overs while casting off (and simultaneously casting these off) you avoid a too tight cast off edge.

See DROPS video: How to bind off with yarn overs (yo)

To achieve an even increase (or decrease) you can increase on, for example: every 3rd and 4th row alternately, like so: work 2 rows and increase on the 3rd row, work 3 rows and increase on the 4th. Repeat this until the increase is complete.

See DROPS lesson: Increase or decrease 1 st on every 3rd and 4th row alternately

Should you prefer to work in the round instead of back and forth, you may of course adjust the pattern. You’ll need to add steeks mid-front (usually 5 stitches), and follow the instructions. When you would normally turn and work from the wrong side, simply work across the steek and continue in the round. At the end you’ll cut the piece open, pick up stitches to work bands, and cover the cut edges.

See DROPS video: How to knit steeks and cut open

Should you prefer to work back and forth instead of in the round, you may of course adjust the pattern so you work the pieces separately and then assemble them at the end. Divide the stitches for the body in 2, add 1 edge stitch in each side (for sewing) and work the front and back pieces separately.

See DROPS lesson: Can I adapt a pattern for circular needles into straight needles?

Pattern repeats can vary slightly in the different sizes, in order to get the correct proportions. If you’re not working the exact same size as the garment in the photo, yours might deviate slightly. This has been carefully developed and adjusted so that the complete impression of the garment is the same in all sizes.

Make sure to follow instructions and diagrams for your size!

If you have found a pattern you like which is available in women’s size it’s not very difficult to convert it to men’s size. The biggest difference will be the length of sleeves and body. Start working on the women size that you think would fit across the chest. The additional length will be worked right before you cast off for the armhole/sleeve cap. If the pattern is worked top-down you can add the length right after the armhole or before the first decrease on sleeve.

Regarding additional yarn amount, this will depend on how much length you add, but it is better with a skein too many than too few.

All yarns will have excess fibres (from production) that might come off as lint or shedding. Brushed yarns (ie hairier yarns) have more of these loose, excess fibres, causing more shedding.

Shedding also depends on what is worn under or over the garment, and whether this pulls at the yarn fibres. It’s therefore not possible to guarantee that there will be no shedding

Below are some tips on how to get the best result when working with hairier yarns:

1. When the garment is finished (before you wash it) shake it vigorously so the looser hairs come off. NOTE: do NOT use a lint roller, brush or any method that pulls at the yarn.

2. Place the garment in a plastic bag and put it in your freezer - the temperature will cause the fibres to become less attached to each other, and excess fibres will come off easier.

3. Leave in the freezer for a few hours before taking it out and shaking it again.

4. Wash the garment according to the instructions on the yarn label.

Pilling is a natural process that happens to even the most exclusive of fibers. It's a natural sign of wear and tear that is hard to avoid, and that is most visible in high friction areas of your garment like a sweater's arms and cuffs.

You can make your garment look as new by removing the pilling, using a fabric comb or a pill/lint remover.

Still can't find the answer you need? Then scroll down and leave your question so one of our experts can try to help you. This will be done normally within 5 to 10 working days.
In the meantime, you can read the questions and answers that others have left to this pattern or join the DROPS Workshop on Facebook to get help from fellow knitters/crocheters!

You might also like...

Post a comment to pattern DROPS 107-14

We would love to hear what you have to say about this pattern!

If you want to leave a question, please make sure you select the correct category in the form below, to speed up the answering process. Required fields are marked *.

Comments / Questions (71)

country flag Elva Anderson wrote:

Do you use two strands thru the whole pattern? Brim one or two strands.

11.05.2022 - 22:09

DROPS Design answered:

Hi Elva, You work the whole pattern with 2 strands. Happy crocheting!

12.05.2022 - 06:59

country flag Mascha wrote:

Vielen Dank für die schnelle Antwort! :-) Das Viskose-Garn ist nicht mehr lieferbar; könnte ich stattdessen 2 Fäden Bomull-Lin verwenden?

09.05.2022 - 08:56

DROPS Design answered:

Liebe Mascha, DROPS Cotton Viscose gehörte der Garngruppe A, am besten benutzen Sie unseren Garnumrechner um eine Alternative zu finden - gerne kan Ihnen Ihr DROPS Laden auch damit - auch telefonisch oder per E-Mail - weiterhelfen. Viel Spaß beim häkeln!

09.05.2022 - 12:41

country flag Mascha wrote:

Wird hier zweifädig gehäkelt? Für Bomull-Lin allein wird Nadelstärke 5 empfohlen, und hier wird nur 4 verwendet... - Könnte man den Hut auch nur aus Bomull-Lin arbeiten?

07.05.2022 - 00:10

DROPS Design answered:

Liebe Mascha, der Hut wird mit je 1 Faden jeder Qualität (= Bomull-Lin + Cotton Viscose) gehäkelt, er wird etwas fester als üblig gehäkelt, also Häkelnadel Größe je nach Ihrer eigenen Maschenprobe anpassen - hier lesen Sie mehr. Viel Spaß beim häkeln!

09.05.2022 - 08:23

country flag Lisen Hillestad wrote:

Goddag😍. Hba betyr «stb» i omg. 9, gjentatt i rettelsen -?

21.04.2021 - 18:23

DROPS Design answered:

Hej Lisen. Vi menar st (ikke stb), detta har nu rättats i texten. Tack för info! Mvh DROPS Design

22.04.2021 - 07:25

country flag Evelyne Beijer wrote:

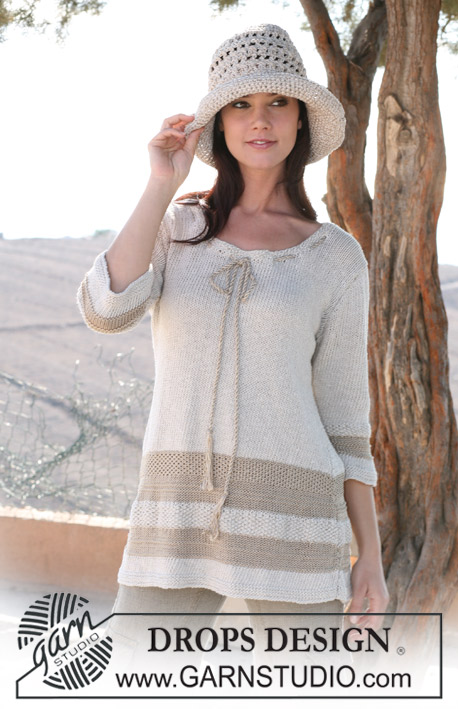
Hallo. Ik heb een vraag over de dame die model staat voor de hoed. De trui die zij aanheeft is dat een patroon van jullie?

18.03.2021 - 16:45

DROPS Design answered:

Dag Evelyne,

Eerlijk gezegd weet ik dat niet, het zou best kunnen. Mar ik heb even gezocht en ik kan hem niet vinden in de collectie.

21.03.2021 - 11:14

country flag Nancy Marotta wrote:

I plan on making the DROPS Design hat, To the Sun. (The DROPS number is 107-14) in beige linen color. I will order the yarn but how many skeins do I need.? Also the website indicates the cotton viscose is discontinued. What else can I use? Thank you in advance for your help.

18.04.2020 - 22:33

DROPS Design answered:

Dear Nancy, you can find the sible substitutions for teh Cotton Viscose yarn here To get the rustic, but summery texture of the hat in the picture, probably Safran would be the best choice. You would need 3 skeins (50 grams each) of the Bomull lin and 2 balls of the other yarn. Happy Crafting!

19.04.2020 - 20:52

country flag Sherry wrote:

On the DROPD woman’s hat a question again please.....#107-14 round 9, is there a count on how many cross double crochet sets there are? Thank you for helping me!!!I am on the 2nd set of rows 7-9. 👏🏻👏🏻👏🏻

11.01.2020 - 20:08

DROPS Design answered:

Dear Sherry, since you will crochet 1 dc in each dc from previous row (just crossed) there will be the same number of dc as you had sc previously, but there will be half the number of these X (= 1 X = 2 dc). Hope it helps. Happy crocheting!

13.01.2020 - 09:19

country flag Sherry wrote:

On a woman’s hat DROPS 107-14. I am stuck on round 9. I did buy my yarn from DROPS on line. I have started this project many times and I still do Not get the written instructions.

08.01.2020 - 01:16

DROPS Design answered:

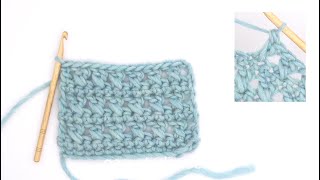
Dear Sherry, this video shows how to work this kind of double crochets, ie you cross them: at the beg of the round, replace 1st dc with 3 ch and work 1 dc in last dc from previous round, then always skip 1 ch, 1 dc in next dc, 1 dc in skipped dc. Hope this helps. Happy crocheting!

08.01.2020 - 09:20

country flag Cindy wrote:

I am not a big "crocheter" but your pattern and explanations are so good! Reading and studying it the 1st time seems to be Greek but with your videos and comments from other Crocheters, whow!! Even i now know how to crochet a Treble Cross Stick - after watching your video. thank you for making it easier for the beginner to enjoy, Sunny South African hugs Cindy

13.11.2019 - 13:39

country flag Paola wrote:

Salve, dopo il giro n.9 occorre fare un giro di maglie basse e poi ripetere il giro n7 e n9? Grazie

04.08.2019 - 16:12

DROPS Design answered:

Buongiorno Paola. Dopo il giro 9 ripete i giri 7,8 e 9, altre 2 volte. Non occorre fare un giro di maglie basse. Buon lavoro!

04.08.2019 - 16:30