
Popular categories
Looking for a yarn?


Comments / Questions (28)
![]() SylvieC wrote:
SylvieC wrote:
Bonjour Je termine ce pull et je voudrais juste une confirmation pour les 4cm de côtes de l’encolure. On doit faire les diminutions uniquement au devant et au dos tous les deux tours comme indiqué et pas sur les épaules afin de faire le V de l’encolure je suppose. Merci pour votre confirmation.
10.12.2025 - 00:03DROPS Design answered:
Bonjour Sylvie, ces diminutions se font au 1er tour des côtes, puis vous tricotez vos 4 cm de côtes sur ces 140 mailles. Bon tricot!
22.12.2025 - 17:09
![]() SylvieC wrote:
SylvieC wrote:
Bonjour Merci encore et donc à chaque tour de diminution, c'est à dire un tour sur deux, on diminue en tout de 8 mailles. En effet, il y avait confusion entre nombre de diminutions et mailles diminuées. Super
17.11.2025 - 08:19
![]() SylvieC wrote:
SylvieC wrote:
Merci pour la réponse claire. Au sujet des diminutions de l'encolure, il faut tricoter la première et la troisième maille ensemble. Donc on diminue d'1 maille. Je ne comprends pas cette phrase : "Passer la m en attente par-dessus la m tricotée". C'est simplement mettre la m en attente à la suite de l'autre (maille 1 + 3) et ne pas faire passer la m en attente sur la m tricotée sinon je diminuerai alors de 2 mailles et donc de 8 mailles par tour. Merci!
14.11.2025 - 21:47DROPS Design answered:
Bonjour Sylvie, vous tricotez ensemble à l'endroit la 1ère et la 3ème maille et vous passez la 2ème maille par-dessus ces mailles tricotées ensemble, ainsi cette maille continue en ligne droite le long des diminutions = vous diminuez ainsi 2 mailles au milieu devant + au milieu dos + à chaque épaule = on diminue 4 fois au total à chaque tour de diminutions (j'efface toutefois les 4 diminutions indiquées au début des explications pour éviter la confusion). Bon tricot!
17.11.2025 - 07:18
![]() SylvieC wrote:
SylvieC wrote:
Bonjour Je viens de me remettre au pull après un arrêt. Pour la partie assemblage, on doit faire 3 tours, 4 cm (taille M), 1 tour de nopes puis symétrique. D'après les échantillons, en B.A. Silk, 4 cm = 11 tours environ. Au total, on aura donc 30 tours environ. On doit faire 8 dims au total (296-264/4) 1 tour sur 2 comme indiqué et donc sur 16 tours. Reste 14 tours droits. Est ce bien cela car sur la photo, les dims semblent réparties sur toute la hauteur? Merci de votre aide
14.11.2025 - 10:05DROPS Design answered:
Bonjour Sylvie, vous devez diminuer pour l'encolure V au milieu du devant et au milieu dos tout du long, soit dès le premier tour après avoir relevé les 296 mailles, ajustez le nombre de mailles au tour indiqué pour avoir le nombre de mailles requis pour tricoter ensuite le diagramme A.2 et continuez à diminuer comme avant au milieu devant et au milieu dos. Il doit vous rester 184 m quand A.2 est terminé + les derniers tours. Bon tricot!
14.11.2025 - 16:03
![]() Patricia wrote:
Patricia wrote:
I love your patterns but im ancient so cang download from your site to pfint out easier for me as its a large pfint could you help please thanks patricia
24.03.2025 - 12:42
![]() Dorothée wrote:
Dorothée wrote:
Bonjour je ne comprends pas dans la partie « devant » je travaille la taille S et il est indiqué d’augmenter 1m de chaque côté 9x tous les 10 rangs je ne comprends pas comment augmenter 1 maille de chaque côté. On doit augmenter de deux mailles de chaque fois en en début et fin de rang ? Je suis perdue
07.03.2025 - 19:19DROPS Design answered:
Bonjour Dorothée, vous devez augmenter 1 maille de chaque côté, autrement dit 1 maille en début de rang et 1 maille en fin de rang = 2 mailles par rang d'augmentations. Utilisez la technique d'augmentation que vous préférez, par ex celle-ci ou bien une autre parmi celles-ci. Bon tricot!
10.03.2025 - 07:55
![]() Lina wrote:
Lina wrote:
Liebes Drops Team Ich stricke die Grösse L in Flora. Habe nun das Vorderteil abgekettet. Meines sieht aber nicjt aus, wie das, dass oben abgebildet ist. Durch die 2 mal 2 zunahmen am Seitenrand wurde mein Oberteil extrem Spitz und Lang. Und nicht gerade nach oben, wo man später die Ärmel einfügen könnte. Sollte es sich dabei um Abnahmen an Stelle von Zunahmen handeln? Falls die Anleitung doch stimmt. Wo sind die Schülternähte?? Ich bin sehr dankbar für die Hilfe.
06.03.2025 - 00:11DROPS Design answered:
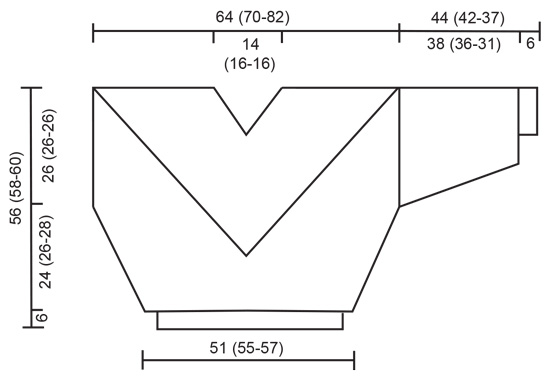
Liebe Lina, wenn Sie 2 Mal 2 Maschen am Seitenrang zugenommen haben, stricken Sie diese Seite ohne weitere Zunahmen bis alle Abnahmen für den V-Halsausschnitt fertig sind, so wird es eine Spitze bilden siehe MaßSkizze. Später wird man Maschen um den V-Halsausschnitt aufnehmen- siehe auch vielleicht 2. Foto, man kann dan diese "Spitze" sehen, bei der rechten Ärmel (links im Foto). Viel Spaß beim Stricken!
06.03.2025 - 09:36
![]() Sylvie wrote:
Sylvie wrote:
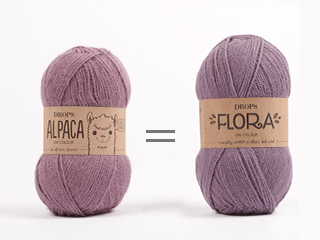
Bonjour N'y a t il pas une erreur pour l'échantillon en Flora ou Alpaca car avec 21 m, c'est largement inférieur à 10 cm et sur la pelote, il est écrit 10 cm = 24 m. Merci!
21.01.2025 - 14:32DROPS Design answered:
Bonjour Sylvie, c'est la tension avec laquelle ce modèle a été tricoté, pensez à bien ajuster la taille des aiguilles pour bien avoir la bonne tension de 21 m de A.1 = 10 cm en Alpaca ou Flora. Bon tricot!
21.01.2025 - 17:05
![]() Louise Wegmann wrote:
Louise Wegmann wrote:
Den er lidt svær at følge- kan jeg få hjælp et sted
26.08.2024 - 11:56DROPS Design answered:
Hei Louise. Du kan fint kontakte din lokale DROPS Forhandler. Om du ikke har en lokalt DROPS Forhandler kan du fint legge inn ditt spørsmål her. Bare husk å gi en nøyaktig beskivelse på hva du har problemer med + hvilken størrelse du strikker, så hjelper vi deg så gost vi kan. Ta gjerne en titt på tidligere spørsmål, kanskje svaret allerede ligger det :) mvh DROPS Design
26.08.2024 - 14:26
![]() Christina wrote:
Christina wrote:
Hvordan laver man størrelsen større? Jeg er en xxl/xxxl (brystmål 128). Kan det lade sig gøre? Vi plus-size vil også gerne være med, blusen er vidunderlig.
25.04.2024 - 11:12DROPS Design answered:
Hej Christina, de ældre opskrifter har vi kun lavet i nogle få størrelser. Men prøv at lave et søg. Se her: Dame - Bluser - XXXL
26.04.2024 - 11:42
|
|||||||||||||||||||||||||
DROPS 11-17 |
|||||||||||||||||||||||||
 |
 |
||||||||||||||||||||||||
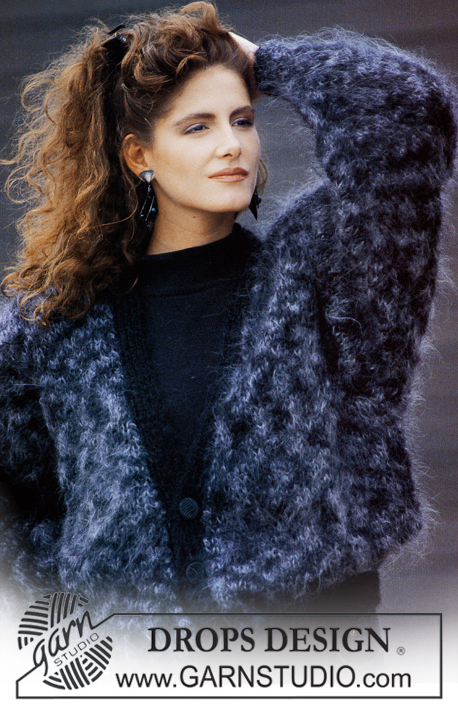
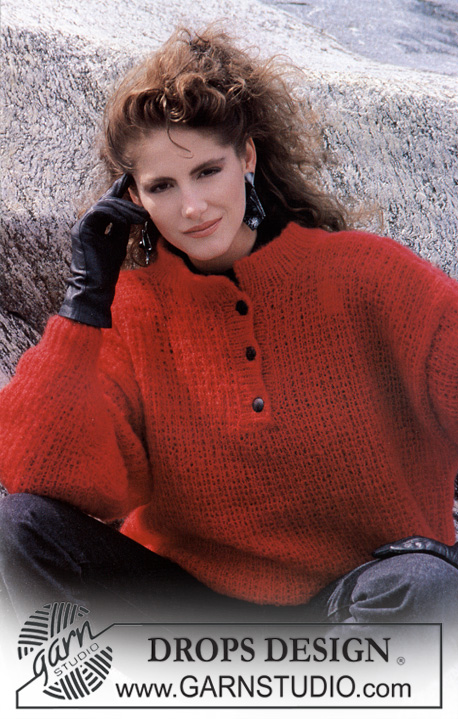
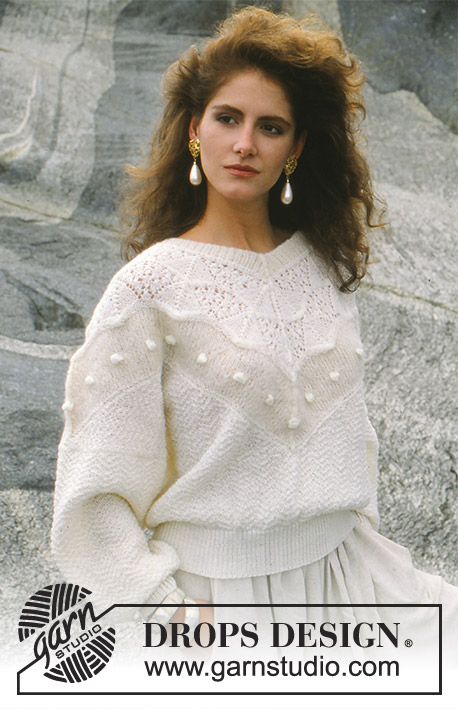
Knitted jumper with patterned V-neck in DROPS Alpaca and DROPS Vivaldi or use DROPS Flora and DROPS Brushed Alpaca Silk Size: S- L
DROPS 11-17 |
|||||||||||||||||||||||||
|
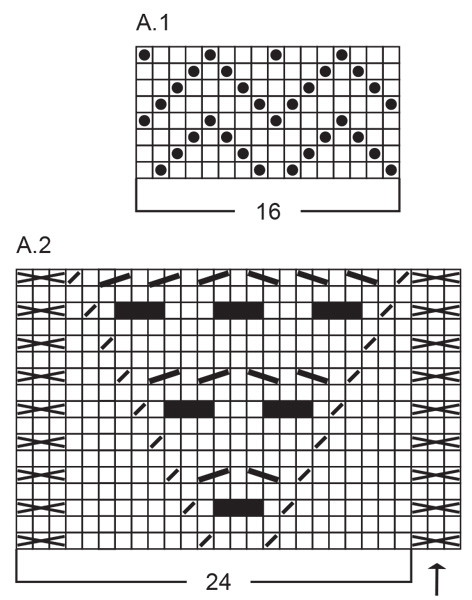
Row of bubbles: Round the neck. Beg mid back with 1 bubble and place 5 (5-7) bubbles on each side of V-neck. Bubble: Knit 5 sts with Alpaca/Flora in 1 st in Vivaldi/Brushed Alpaca Silk. Work 5 rows back and forth over these 5 sts. Now knit tog sts as follows: Lift 2nd st over 1st st, lift 3rd st over 1st st, lift 4th st over 1st st, lift 5th st over 1st st = 1 st left. Continue in Vivladi/Brushed Alpaca Silk until next bubble. Pattern: See diagrams A.1 and A.2. Diagrams show all rows seen from the right side. Rib: *K1, P1*, repeat from *_*. Decreasing instructions (apply to yoke/V-neck): Dec as follows at the bottom of V-neck back and front and at top of each shoulder: Knit until the 3 middle sts, put the middle st on cable needle in front of work, knit tog the 1st and 3rd st and pass over the st on cable needle. Repeat the dec on every other round as instructed in pattern. Front piece: Cast on 108 (114-120) sts on needle size 2.5 mm with Alpaca/Flora and work 6 cm Rib. Change to needle size 3.5 mm and work A.1. At the same time inc 1 st each side 9 (12-22) times as follows: Size S on every 10th row, Size M on every 8th and 9th row alternately, Size L on every 5th row. At the same time when piece measures 23 (22-19) cm cast off the 2 middle sts and finish each side separately. Dec to shape the V-neck as follows: dec 1 st on every other row 66 (72-85) times. At the same time when piece measures 30 (32-34) cm inc each side on every other row: 2 sts 2 times. Cast off after the last dec for V-neck. Piece measures approx 56 (58-60) cm. Back piece: Cast on and knit as front piece. Sleeves: Cast on 48 (48-50) sts on needle size 2.5 mm with Alpaca/Flora and work 6 cm Rib. Change to needle size 3.5 mm and work A.1, at the same time inc 16 (16-14) sts evenly on first row = 64 (64-64) sts. Inc 1 st each side a total of 22 (22-22) times as follows: Size S on every 7th row, Size M on every 6th and 7th row alternately, Size L on every 5th and 6th row alternately. Cast off when sleeve measures 44 (42-37) cm. Assembly: Sew the shoulder seams. Neckline: See Decreasing Instructions above! Pick up 282 (296-350) sts round the V-neck on circular needle size 3.5 mm with Vivaldi/Brushed Alpaca Silk. Change to Alpaca/Flora and continue as follows: P 1 round, K 1 round in Vivaldi/Brushed Alpaca Silk, K 1 round in Alpaca/Flora, K 3 (4-3) cm in Vivaldi/Brushed Alpaca Silk, 1 row of bubbles (see above), K 3 (4-3.5) cm in Vivaldi/Brushed Alpaca Silk, K 1 round in Alpaca/Flora , K 1 round in Vivaldi/Brushed Alpaca Silk, K 1 round in Alpaca/Flora, P 1 round in Vivaldi/Brushed Alpaca Silk, at the same time dec/inc no of sts evenly to 264 (264-352). Now knit 3 rounds in Alpaca/Flora without dec. Continue with A.2 in Alpaca/Flora – beg mid back (see arrow in diagram) and continue the dec – for size S and M: work A.2 1 time vertically. Size L: Work A.2 1 time vertically, P 3 rounds, work A.2 1 time vertically. For all 3 sizes: P 3 rounds and K 1 round in Vivaldi/Brushed Alpaca Silk. There are now approx 184 (184-192) sts on needle. Change to needle size 2.5 mm and dec evenly on the first round to 140 (140-146) sts. Knit 4 (4-3) cm Rib and cast off loosely. Sew sleeve seams and set in sleeves. |
|||||||||||||||||||||||||
Diagram explanations |
|||||||||||||||||||||||||
|
|||||||||||||||||||||||||
 |
|||||||||||||||||||||||||
 |
|||||||||||||||||||||||||
Have you finished this pattern?Tag your pictures with #dropspattern or submit them to the #dropsfan gallery. Do you need help with this pattern?You'll find 24 tutorial videos, a Comments/Questions area and more by visiting the pattern on garnstudio.com. © 1982-2026 DROPS Design A/S. We reserve all rights. This document, including all its sub-sections, has copyrights. Read more about what you can do with our patterns at the bottom of each pattern on our site. |
|||||||||||||||||||||||||


With over 40 years in knitting and crochet design, DROPS Design offers one of the most extensive collections of free patterns on the internet - translated to 17 languages. As of today we count 324 catalogues and 12278 patterns translated into English (UK/cm).
We work hard to bring you the best knitting and crochet have to offer, inspiration and advice as well as great quality yarns at incredible prices! Would you like to use our patterns for other than personal use? You can read what you are allowed to do in the Copyright text at the bottom of all our patterns. Happy crafting!
Post a comment to pattern DROPS 11-17
We would love to hear what you have to say about this pattern!
If you want to leave a question, please make sure you select the correct category in the form below, to speed up the answering process. Required fields are marked *.