
Popular categories
Looking for a yarn?


Comments / Questions (43)
![]() Jenny wrote:
Jenny wrote:
Ich stricke Größe S. Da ich das abketten nach dem Halbkreis nicht verstanden habe, habe ich mir die englische Anleitung angeschaut. Diese enthält jedoch eine völlig andere Anzahl an Maschen die man haben soll und auch die abzukettenden Maschen sind völlig unterschiedlich beschrieben. Die deutsche Anleitung scheint völlig falsch zu sein, das ergibt dort alles keinen Sinn.
19.04.2025 - 21:45DROPS Design answered:
Liebe Jenny, stimmt, die deutsche Anleitung wird neu bearbeitet, die Maschenanzahl der Englishen Anleitung stimmt die originale Anleitung in Norwegian. Danke für den Hinweis. Viel Spaß beim Stricken!
22.04.2025 - 14:59
![]() Jenny wrote:
Jenny wrote:
Hallo, die deutsche Übersetzung ist schlecht. Ndl (Nadel) muss R (Reihe) sein. Für ungeübte Strickerinnen ist das sonst nicht verständlich.
19.04.2025 - 02:14DROPS Design answered:
Liebe Jenny, danke für den Hinweis, die Anleitung wurde komplett neu übersetzt. Viel Spaß beim Stricken!
24.04.2025 - 13:24
![]() Gaby wrote:
Gaby wrote:
Bonjour Quel est l intérêt d aiguille double pointe , pourquoi pas une aiguille circulaire ? Pourquoi aiguille 6 alors que l échantillon est en aiguille 5 Merci
01.07.2024 - 04:30DROPS Design answered:
Bonjour Gaby, en fait l'échantillon doit se tricoter avec les aiguilles 6 - correction faite, merci pour votre retour. Vous pouvez choisir de tricoter en rond sur aiguille circulaire (40 cm ou 80 avec la technique du magic loop) si vous préférez. Bon tricot!
01.07.2024 - 13:33
![]() Vacheron Sylvie wrote:
Vacheron Sylvie wrote:
Pour les diminutions des devants qu'est ce que vous appelez vers le bas(pour les emmanchures c'est compris)
27.06.2023 - 17:08DROPS Design answered:
Bonjour Mme Vacheron, vous devez rabattre les mailles du demi-cercle pour former l'arrondi du devant, cette partie se trouve en bas du devant, autrement dit pour le devant gauche, on forme l'emmanchure à droite, vu sur l'endroit et l'arrondi du bas du devant en début de rang sur l'envers (à gauche, vu sur l'endroit). Bon tricot!
28.06.2023 - 08:31
![]() Vacheron Sylvie wrote:
Vacheron Sylvie wrote:
Pour les diminutions des devants qu\'est ce que vous appelez vers le bas (pour emmanchure c\'estcompris).merci d\'avance
27.06.2023 - 17:02
![]() Danielle wrote:
Danielle wrote:
Je pense qu'il y a une erreur dans la taille XL: 33 fois 1m au lieu de 1 fois 33 m
07.04.2021 - 10:33DROPS Design answered:
Bonjour Danielle, c'est tout à fait exact; la correction a été faite. Merci! Bon tricot!
07.04.2021 - 13:44
![]() Sarah Dale wrote:
Sarah Dale wrote:
I don't know how long the cable should be on the circular needles? Can anyone help as I need to buy some?
31.10.2018 - 17:03DROPS Design answered:
Dear Sarah, circular needles long 80 cm will be perfectly fine, for smaller sizes you can use 60 cm as well. Happy knitting!
31.10.2018 - 20:46
![]() Tina wrote:
Tina wrote:
Scusate la mia ignoranza... Ma cosa si intende x ferri appuntiti?? Grazie mille!! 😊😍😍
22.02.2018 - 09:51DROPS Design answered:
Buongiorno Tina. Abbiamo corretto il testo; sono ferri dritti. Buon lavoro!
22.02.2018 - 10:58Sophia wrote:
Yes,but say that after 34 row will have 97st. 34*6=204st. or if we don't count purl row and have 17row * 6st=102st. that is where i'm comfused.thank you .
23.12.2015 - 12:51DROPS Design answered:
Dear Sophia, there are 13 sts as you start row 8, then you inc 6 sts a total of 14 times (14 rows from RS, starting on row 8 to 34) = 84 sts inc + 13 = 97 sts. Happy knitting!
02.01.2016 - 12:56Sophia wrote:
To the 8th row,left front piece the pattern say: inc 1st before and after 2 marker , and the same time inc 1st before and after the midlle marker every other row. it means i will inc 6st in the same row or 4st in 1row and to the next row only 2st in the midlle marker?
22.12.2015 - 11:03DROPS Design answered:
Dear Sophia, you ins 6 sts every other row (= every row from RS): 1 st after the first 2 marking threads + 1 st before the last 2 marking threads + 1 st on each side of middle st. Happy knitting!
23.12.2015 - 09:03
|
|
DROPS 95-33 |
|
 |
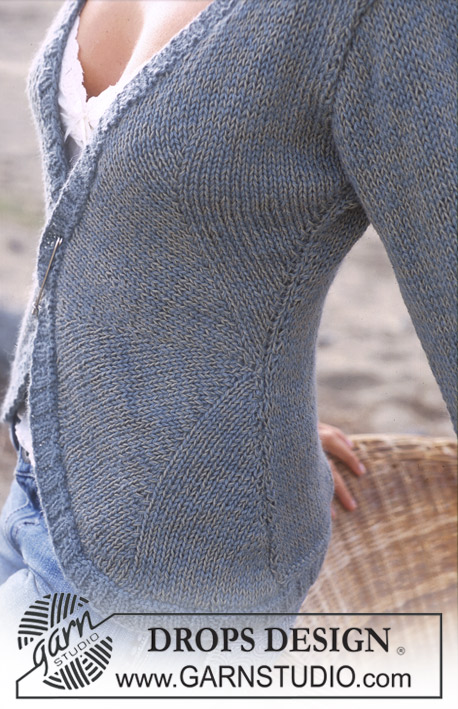 |
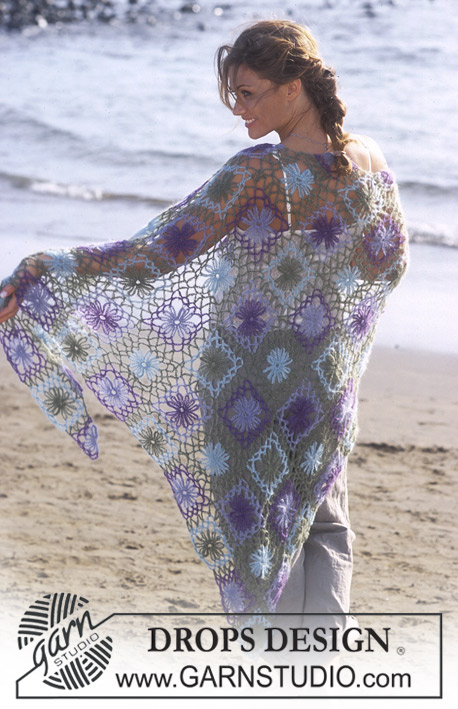
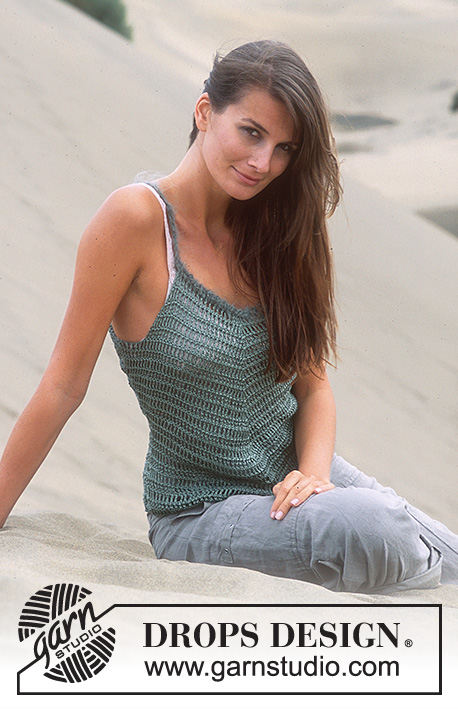
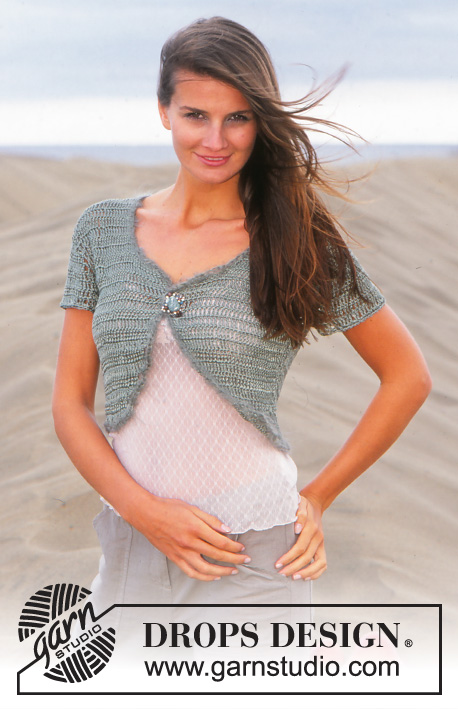
DROPS Jacket in Alpaca and Safran with circle effect
DROPS 95-33 |
|
|
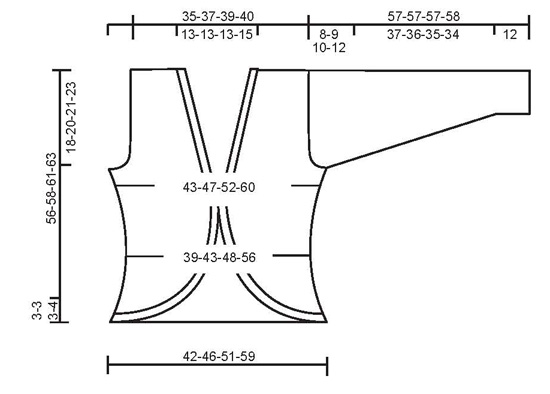
Knitting tension: 15 sts x 19 rows with 1 thread of each yarn quality on needle size 6mm = 10 x 10 cm Knitting tips: It is very important to adhere to the knitting tension, both width and length wise as otherwise the circle on front piece will not be of the right shape. If you knit more than 19 rows to reach 10 cm, you may compensate by knitting a couple of rows without increasing in the circle at regular intervals. Increasing tips: Inc 1 st by picking up st from previous row and knit it. Left front piece: Read Knitting tips! Cast on 3 sts on double pointed needle size 6 with 1 thread of each yarn quality (= double thread). NB! As increases are made, it might be a good idea to distribute sts on more needles to ensure the piece doesn’t “pull”. 1st row: Purl 2nd row: (= right side): Knit, at the same time inc 1 st on both sides of the middle st – see Increasing tips = 5 sts 3rd row: Purl 4th row: Knit, at the same time inc 1 st after 1st st, 1 st on both sides of the middle st, and 1 st before the last st = 9 sts 5th row: Purl 6th row: Knit 2, inc 1 st, knit 2, inc 1 st, knit 1, inc 1 st, knit 2, inc 1 st and knit 2 = 13 sts 7th row: Purl 8th row: Insert a marking thread in the 2nd, 5th, 7th (= middle st), 9th and 12th st. Continue inc as before on all rows from the right side, i.e. inc 1 st after the first 2 marking threads and 1 st before the last 2 marking threads. At the same time inc 1 st on the right and left side of the middle st on every other row. After 34-34-36-38 rows (remember Knitting tips!) there are 97-97-103-109 sts on needle and the piece measures approx 18-18-19-20 cm (= half circle). Continue in stocking sts over all sts, at the same time casting off loosely towards lower edge on one side and for armhole the other side on every other row as follows: Size S: Towards lower edge: 10 sts 2 times and 46 sts 1 time. For armhole: 3 sts 1 time, 2 sts 1 time and 1 st 2 times. Size M: Towards lower edge: 7 sts 1 time, 6 sts 1 time, 5 sts 1 time, 4 sts 1 time and 41 sts 1 time. For armhole: 3 sts 1 time, 2 sts 2 times and 1 st 2 times. Size L: Towards lower edge: 7 sts 1 time, 6 sts 1 time, 4 sts 2 times, 3 sts 1 time and 42 sts 1 time. For armhole: 3 sts 1 time, 2 sts 3 times and 1 st 2 times. Size XL/XXL: Towards lower edge: 10 sts 1 time, 8 sts 1 time, 6 sts 1 time, 4 sts 1 time, 3 sts 2 times, 2 sts 2 times and 33 sts 1 time. For armhole: 3 sts 2 times, 2 sts 3times and 1 st 4 times. After all dec are complete there are 24-25-26-22 sts left. Now dec to shape the neckline on every 4th row: 1 st 7-7-7-3 times = 17-18-19-19 sts left on shoulder. Cast off loosely when armhole measures 18-20-21-23 cm. Right Front: Cast on and knit as left front, but mirrored. Back piece: Cast on 65-71-78-90 sts (incl 1 seam st each side) on needle size 6 with 1 thread of each yarn quality (= double thread). Knit stocking sts. When piece measures 8 cm dec 1 st each side. Repeat the dec when piece measures 16 cm = 61-67-74-86 sts. When piece measures 20-21-22-23 cm inc 1 st each side on every 6 cm a total of 3 times = 67-73-80-92 sts. When piece measures 38-38-40-40 cm dec for armhole each side on every other row as follows: 3 sts 1-1-1-2 times, 2 sts 1-2-3-3 times and 1 st 2-2-2-4 times = 53-55-58-60 sts. When piece measures 54-56-59-61 cm cast off the middle 17-17-18-20 sts for neck. Dec 1 st at neckline on next row = 17-17-18-19 sts left on each shoulder. Cast off when piece measures 56-58-61-63 cm. Sleeve: Cast on 36-38-40-42 sts (inclusive of 1 edge st each side) on needle size 6 mm with 1 thread of each yarn quality (= double thread). Knit 2 rows garter st and continue in stocking sts. When sleeve measures 12 cm, inc 1 st each side on every 5.5-4-3.5-2.5 cm a total of 7-9-10-13 times = 50-56-60-68 sts. When piece measures 49-48-47-46 cm cast off for sleeve cap each side on every other row as follows: 3 sts 1 time, 2 sts 2-3-3-3 times, 1 st 1-1-2-3 times, and then 2 sts each side until piece measures 56-56-56-57 cm, now dec 3 sts each side and cast off when sleeve measures approx 57-57-57-58 cm Assembly: Sew shoulder seams. Set in sleeves. Sew sleeve and side seams within 1 edge st. Rib: Pick up approx 392 to 420 sts (i.e. approx 18-22 sts per 10 cm – number of sts multiple of 4) along the entire opening, i.e. along right front piece, along neckline at back piece, along left front piece and along lower edge, using circular needle size 5mm and double thread Alpaca (make sure you pick up enough sts round the circle on front piece so that the border won’t pull). Purl 1 row, knit 1 round and continue in Rib K2, P2. Cast off loosely when border measures 3-3-3-4 cm. Close the jacket with a pin or brooch. |
|
 |
|
Have you finished this pattern?Tag your pictures with #dropspattern or submit them to the #dropsfan gallery. Do you need help with this pattern?You'll find 17 tutorial videos, a Comments/Questions area and more by visiting the pattern on garnstudio.com. © 1982-2026 DROPS Design A/S. We reserve all rights. This document, including all its sub-sections, has copyrights. Read more about what you can do with our patterns at the bottom of each pattern on our site. |
|


With over 40 years in knitting and crochet design, DROPS Design offers one of the most extensive collections of free patterns on the internet - translated to 17 languages. As of today we count 324 catalogues and 12290 patterns translated into English (UK/cm).
We work hard to bring you the best knitting and crochet have to offer, inspiration and advice as well as great quality yarns at incredible prices! Would you like to use our patterns for other than personal use? You can read what you are allowed to do in the Copyright text at the bottom of all our patterns. Happy crafting!
Post a comment to pattern DROPS 95-33
We would love to hear what you have to say about this pattern!
If you want to leave a question, please make sure you select the correct category in the form below, to speed up the answering process. Required fields are marked *.