
Popular categories
Looking for a yarn?


Comments / Questions (11)
![]() Chacaline wrote:
Chacaline wrote:
Achtung, es haben sich einige Fehler in der deutschen Anleitung eingeschlichen: da steht beispielsweise "gleichmäßig verteilt abk." statt "abn." oder "Alle 2 Ndl. 1 M. [...] abketten" statt "Alle 2 Reihen". Ich habe in den Anleitungen auf Englisch oder Frz. nachgeschaut, um sicher zu gehen.
30.04.2026 - 20:51
![]() Robin Joss wrote:
Robin Joss wrote:
What do you mean when you say start knitting mid front.
30.04.2024 - 22:50DROPS Design answered:
Dear Robin, since the body is knitted in one piece (up to the armholes), the start and end of each row will be the mid front edge of the piece. Happy Knitting!
01.05.2024 - 05:14
![]() Pia wrote:
Pia wrote:
Wo finde ich diese Anleitung auf Deutsch, die Strickschrift benötige ivh auf deusch. Danke. VG Pia
03.05.2019 - 11:09DROPS Design answered:
Liebe Pia, alle unseren Modellen sind auf deutsch erhältlich, um die Sprache zu ändern, klicken Sie auf das Menu unter dem Foto (und dann "deutsch" wählen). Viel Spaß beim stricken!
03.05.2019 - 14:41
![]() Mar G Hermosa wrote:
Mar G Hermosa wrote:
¿Cómo puedo saber la raya que me corresponde?¿no encuentro la guía de tallas? Gracias
04.05.2016 - 23:07DROPS Design answered:
Hola Mar, tienes que comprobar las medidas que vienen en el diagrama debajo de cada patrón y compararlas con las tuyas para calcular tu talla.
07.05.2016 - 09:44
![]() DROPS Design NL wrote:
DROPS Design NL wrote:
Hoi Toos. De teltekening voor dit patroon geeft zowel de heengaande als de teruggaande nld aan. Dus de tweede, vierde, zesde rij (enzovoort) zijn de teruggaande naalden. Volgens de beschrijving moet u deze av breien (verkeerde kant). Succes verder.
05.07.2011 - 10:11
![]() Toos wrote:
Toos wrote:
Ik heb even een vraag over een patroon. De tweede toer er van is dat averecht want dat staat er niet op. Graag een antwoord. Heel hartelijke dank er voor .
05.07.2011 - 10:09
![]() Parnia wrote:
Parnia wrote:
Absolutely stunning pattern i couldn't believe my eyes this was the pattern i was dying to get my hands on. Thanks to your team i finally got it but i am stuck in the pattern could u please check that if the transation is correct. Thank you.
14.02.2008 - 21:00
![]() Beate Quartarolo wrote:
Beate Quartarolo wrote:
Meget yndig. Bestemt en jeg vil producere.
22.02.2006 - 10:48
![]() Gitte Norlander wrote:
Gitte Norlander wrote:
Meget elegant og flot. Glæder mig til at skrikke den.
29.12.2005 - 20:14Mailinglisten wrote:
Den är nätt och fin passar bra till en nätt figur.
12.12.2005 - 22:34
|
||||||||||||||||
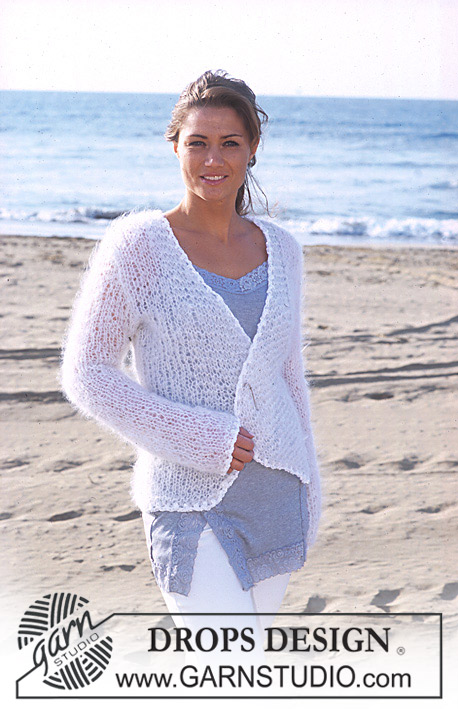
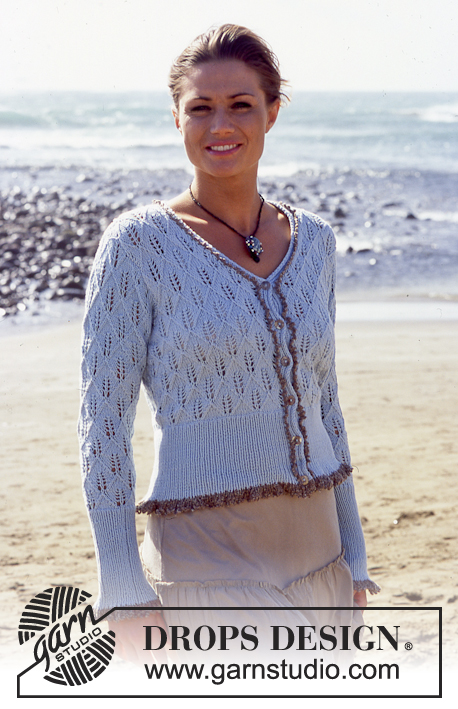
Ariella Cardigan |
||||||||||||||||
 |
 |
|||||||||||||||
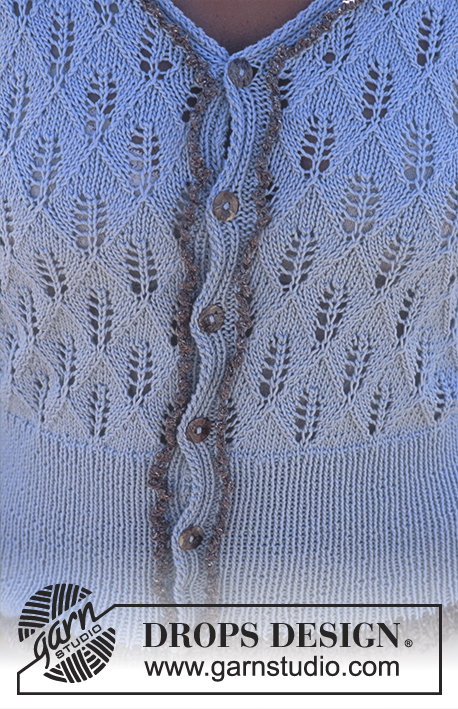
DROPS Cardigan in lace pattern in Safran
DROPS 94-28 |
||||||||||||||||
|
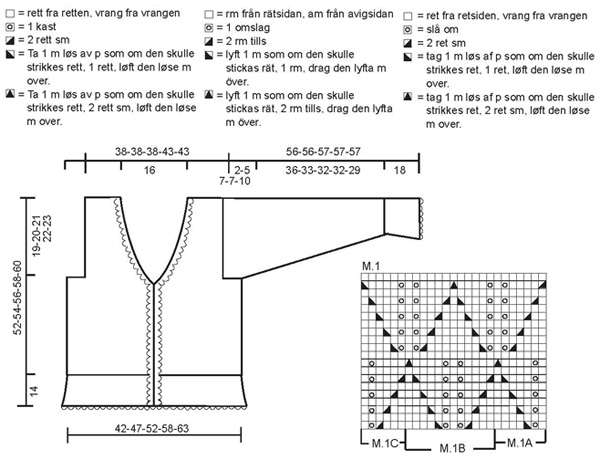
Knitting Gauge: 23 sts x 30 rows on needles size 3.5 mm stocking sts. = 10 x 10 cm. Rib 1: *K1, P2*, repeat from *-*. Rib 2: *K1, P1*, repeat from *-*. Lace Pattern: See diagram M.1. The diagram is seen from the right side. Buttonholes: Make buttonholes on the right front edge from the right side as follows: K tog 3rd and 4th st and make a yo. Make buttonholes when piece measures: Size S: 2, 8, 14, 20, 26 and 32 cm Size M: 2, 8, 15, 21, 27 and 33 cm Size L: 2, 8, 15, 21, 28 and 34 cm Size XL: 2, 8, 15, 22, 28 and 35 cm Size XXL: 2, 9, 16, 22, 29 and 36 cm Decreasing tips (for neck shaping): Dec inside the 7 edge sts, (knitted as explained in the pattern). All decreases are done from the right side. Dec after the 7 sts: Slip a st as if to knit, K1, psso. Dec before the 7 sts: K2 tog. Front and Back Piece: The cardigan is knitted back and forth on circular needles starting mid front. Loosely cast on 330-366-411-447-483 sts (inclusive of 7 edge sts each side = mid front) on circular needle size 3 in Silke-Tweed. Knit 3 rows of rib with 1 edge each side - all edge sts are knitted in garter sts throughout (1st row = right side). Knit next row from the wrong side as follows: 1 edge st, P1, K2, P1, K2 *P1, K2 tog.* repeat from *-* until 8 sts left on row – then: P1, K2, P1, K2, P1, 1 edge st = 225-249-279-303-327 sts left on row. Change to Safran and continue in Rib-2, with 7 edge sts each side, knitted as before until finished measurements(this means 1 edge sts, K1, P2, K1, P2 – seen from the right side) – remember the button holes at the right front edge – see explanation above. When the piece measures 14 cm change to circular needle size 3.5 and K 1 row from the right side (edges as before) at the same time dec 18-18-24-24-24 sts evenly on row (do not dec over the front edges) = 207-231-255-279-303 sts. P 1 row from the wrong side (front edge as before). Now continue with pattern M.1 until finished measurements as follows: 7 edge sts as before, M.1A (= 7 sts), M.1B over the following 180-204-228-252-276 sts, M.1C (= 6 sts) and 7 edge sts as before. When the piece measures 33-34-35-36-37 cm knit the next row from the right side as follows: 50-50-50-56-56 sts (right front piece), bind off 10-22-34-34-46 sts (= armhole), knit 87-87-87-99-99 (= back piece), bind off 10-22-34-34-46 (= armhole), knit 50-50-50-56-56 sts (= left front). Finish each piece separately. Left front: = 50-50-50-56-56 sts. Continue in pattern with 1 seam st at the side. When the piece measures 34-35-36-37-38 cm dec mid front for neck – see decreasing tips – on every other row as follows: 1 st a total of 12 times, and hereafter on every 4th row: 1 st a total of 6 times = 32-32-32-38-38 sts left for shoulder – NB: when decreasing, knit sts not fitting into pattern in stocking sts). When the piece measures 52-54-56-58-60 cm, put 7 sts mid front on a st holder or a thread for the neck and bind off remaining sts. Right front: = 50-50-50-56-56 sts. Knit as left front but reverse. Back piece: = 87-87-87-99-99 sts. Continue the pattern with a seam sts each side. When the piece measures 50-52-54-56-58 cm bind of the middle 33 sts for neck. Continue to bind off for the neck on every other row as follows: 1 st 2 times = 25-25-25-31-31 sts left for each shoulder. Bind off remaining sts when the piece measures 52-54-56-58-60 cm. Sleeve: Cast 87-99-99-111-111 sts on double pointed needles size 3 mm with Silke-Tweed. Knit 3 rounds in rib-1, knit 1 round at the same time reducing all P2 to P1 = 58-66-66-74-74 sts. Change to Safran and knit rib-2 until the piece measures 18 cm. Change to double pointed needles 3.5 mm and K 1 round at the same time dec 10-6-6-2-2 sts evenly on round = 48-60-60-72-72 sts. Continue in M.1B over all sts. At the same time when the piece measures 20 cm inc 2 sts mid under arm a total of 19-16-18-14-16 times, for size S + L + XXL : on every 5th row, Size M: alternate between every 5th and 6th row and for size XL: on every 6th row – incorporate the new sts in Rib-2 as you go along = 86-92-96-100-104 sts. When the piece measures 54-51-50-50-47 cm split the piece mid under arm and continue back and forth on needles. At the same time when the piece measures 54-54-55-55-55 cm bind off 4 sts at the beginning of each row until the piece measures 56-56-57-57-57 cm. Bind off remaining sts. Assembly: Put the 7 edge sts from the front edge on needle size 3.5 mm. Cast on 1 st towards the shoulder (= seam st for sewing the neck edge to the back piece) and continue the edge rib (P1, K2, P1, K2, P1, 1 edge –right side) until the edge measures 8 cm. Repeat, but reverse, for the other side of the neck and sew the neck edges together mid back with invisible sts. Sew the shoulder seam and sew the neck edge to the back piece. Sew in the sleeves and the buttons. Crochet borders: Using crochet hook size 3 and Silke-tweed crochet along the bottom edge front and back and around the sleeves as follows: 1 sl st in the 1st K st, *1 ch, 1 picot (= 2 ch, 1 dc in the 1st of the 2 ch), 1 ch , 1 sl st in the next K st* repeat from *-*. Crochet the same way along both front edges and around the neck on back piece, but crochet inside the 7 edge sts, i.e. in the 8th st from the edge (= a knitted st) – skip 2 rows vertically between each sl st. |
||||||||||||||||
Diagram explanations |
||||||||||||||||
|
||||||||||||||||
 |
||||||||||||||||
Have you finished this pattern?Tag your pictures with #dropspattern or submit them to the #dropsfan gallery. Do you need help with this pattern?You'll find 29 tutorial videos, a Comments/Questions area and more by visiting the pattern on garnstudio.com. © 1982-2026 DROPS Design A/S. We reserve all rights. This document, including all its sub-sections, has copyrights. Read more about what you can do with our patterns at the bottom of each pattern on our site. |
||||||||||||||||


With over 40 years in knitting and crochet design, DROPS Design offers one of the most extensive collections of free patterns on the internet - translated to 17 languages. As of today we count 325 catalogues and 12298 patterns translated into English (UK/cm).
We work hard to bring you the best knitting and crochet have to offer, inspiration and advice as well as great quality yarns at incredible prices! Would you like to use our patterns for other than personal use? You can read what you are allowed to do in the Copyright text at the bottom of all our patterns. Happy crafting!
Post a comment to pattern DROPS 94-28
We would love to hear what you have to say about this pattern!
If you want to leave a question, please make sure you select the correct category in the form below, to speed up the answering process. Required fields are marked *.