
Popular categories
Looking for a yarn?


Comments / Questions (31)
![]() Rubi wrote:
Rubi wrote:
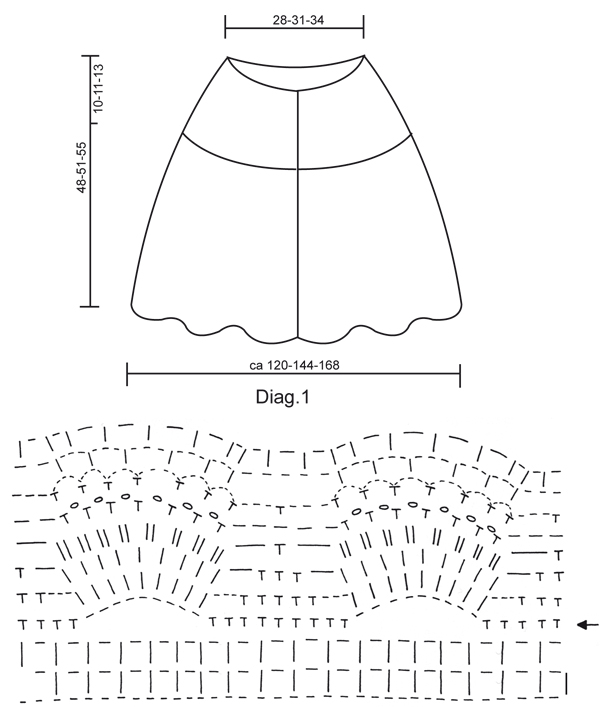
Guten Tag ich habe tatsächlich eine Frage zum Diagramm. In der Text-Beschreibung sind Doppelstabchen erwähnt - da im Diagramm keine zu sehen sind bin ich etwas verwirrt?! Fangen die Doppelstäbchen mit dem Diagramm an? Alle vorherigen Reihen habe ich mit Stäbchen gehäkelt - hoffentlich ist das jetzt nicht falsch. Über eine Antwort würde ich mich sehr freuen. Liebe Sonntags-Grüße von Rubi
16.02.2020 - 13:56DROPS Design answered:
Liebe Rubi, Diagram wird mit Stäbchen gehäkelt, aber nachdem Sie das Muschelmuster 2 mal gehäkelt haben, häkeln Sie 2-3-4 (siehe Größe) Reihen mit Doppelstäbchen, dann noch mal das Muschelmuster aber von der 1. bis 7. Reihe. Viel Spaß beim häkeln!
17.02.2020 - 09:13
![]() Sandra wrote:
Sandra wrote:
Hi. I'm very lost on the desert bloom poncho pattern. I'm making the XL pattern and completed the 253 stitches. I'm not clear on how to proceed after that. The pattern says to refer to the diagram but then lists out 4 rows to do. I'm also confused in the diagram as to whether or not to begin each dc in the dc from the prior row and when I need to skip them ( which obviously happens). Any help you can give would be greatly appreciated. Thank you.
28.08.2017 - 02:06DROPS Design answered:
Dear Sandra, when you have the 253 sts crochet diagram A a total of 2 times in height (starting 2nd repeat in row with arrows) - then crochet 4 rows of tr as explained., then crochet diagram 1 one more time as explained. Happy crocheting!
29.08.2017 - 09:22Goedert wrote:
Gr. S/M: 1 Stb. in jedes 2. Stb. zun., aber in dem letzen Stb. wird nur 1 Stb. gehäkelt = 101 Stb. Leider verstehe ich nicht wie das sein sollte? Heisst dies ich häckele in jedes 2te St. zwei Stäbchen?
22.05.2017 - 15:39DROPS Design answered:
Liebe Frau Goedert, ja genau so wird es gehäkelt: *1 Stb in das nächste Stb, 2 Stb in das nächste Stb*, von *-* wiederholen bis 1 Stb übrig ist, dann 1 Stb in das letzte Stb häkeln. Viel Spaß beim häkeln!
22.05.2017 - 16:00
![]() GeasHsaj wrote:
GeasHsaj wrote:
Hello. google And Bye.
11.10.2016 - 20:33
![]() Jet wrote:
Jet wrote:
Goedenavond ik ben deze poncho aan het haken, en ik snap niet zo goed wat er met de lange lijnen word bedoeld in de laatste toer kunt u dit mij aub uitleggen. Mvg Jet Vonk
20.04.2015 - 18:37DROPS Design answered:
Hoi Jet. De horizontale lijnen op de laatste toer zijn lossen (net zoals de eerdere lijntjes/lossen - deze zijn alleen een beetje groter).
21.04.2015 - 13:09
![]() Fatima wrote:
Fatima wrote:
Hallo, bitte bitte helft mir weiter und beantwortet mir meine Frage. Ich will weiter häkeln aber komm nicht weiter. BItte helft mir weiter. Fatima
26.11.2014 - 12:51DROPS Design answered:
Antwort siehe unten!
26.11.2014 - 21:38
![]() Fatima wrote:
Fatima wrote:
Hallo, ich habe eine dringende Frage. und zwar im Diagramm 1 in der Reihe 5 und 6 sind diese lagen Striche ein kleiner Strich bedeutet eine Luftmasche aber was bedeuen diese langen Striche in Reihe 5 und 6, wieviel Luftmaschen sind das dann 1 oder mehrere. Bin gerade etwas iritiert.. Über eine baldige Antwort würde ich mich sehr freuen damir ich schnell weiter häkeln kann. Vielen lieben Dank und verbleibe mit freundlichen Grüßen.
25.11.2014 - 11:31DROPS Design answered:
Liebe Fatima, jeder Strich, ob kurz oder lang, ist 1 Lm. Also sind auch mittellange und lange Striche je 1 Lm. Weiterhin gutes Gelingen!
26.11.2014 - 21:37
![]() Fabs wrote:
Fabs wrote:
Bonjour, Je réalise la taille XL, je viens de finir R4 avec DB et 3ml et j'ai 127 DB. J'ai un souci pour continuer avec le diagramme : sur le diagramme il ne faut donc pas faire le tout 1er rang de mailles serrées? 2eme question, si je réalisé comme c'est écrit "1B dans l'arceau suivant, 1 ml, 1B dans l'arceau suivant", je n'obtiens pas 252 arceaux... ne faut il pas réaliser 1B 2 fois dans le même arceau et séparée par 1ml? Merci d'avance pour votre réponse!
17.03.2014 - 16:09DROPS Design answered:
Bonjour Fabs, après le rang 4 (= 127 DB), reprenez le diagramme à partir du 1er rang, mais faites le 1er rang comme indiqué (correction faite) : 3 ml (=1B), 1 ml, *1B dans l’arceau suiv, 1 ml, 1B dans la B suiv* répéter de *à* tout le rang = 252 arceaux. Bon crochet!
17.03.2014 - 18:40
![]() Kate wrote:
Kate wrote:
Silly question, but I want to clarify, the pattern states to crochet with one strand of each yarn......that means putting then two strands together as if they were one strand, correct?
17.11.2013 - 08:30DROPS Design answered:
Dear Kate, you are correct, this poncho is worked all the way with 1 strand Alpaca + 1 strand Cotton Viscose held together. Happy crocheting!
18.11.2013 - 09:53
![]() Joke wrote:
Joke wrote:
Ik vind hem prachtig ,hoop dat hij niet te moelijk is ,ben pas beginner met haken.
26.07.2013 - 21:19
|
|||||||||||||
Desert Bloom |
|||||||||||||
 |
 |
||||||||||||
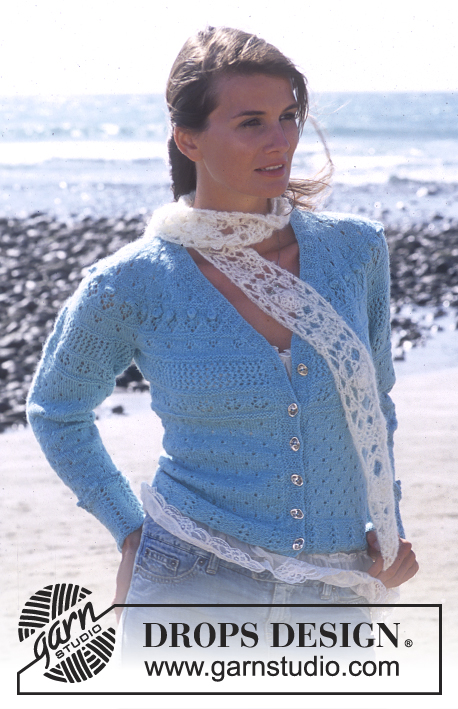
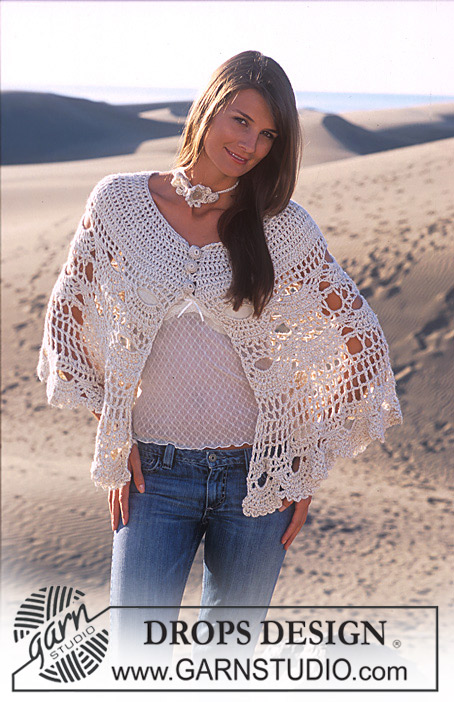
DROPS Nostalgic poncho crochet in Alpaca and Cotton Viscose and crochet necklace and bracelet
DROPS 94-10 |
|||||||||||||
|
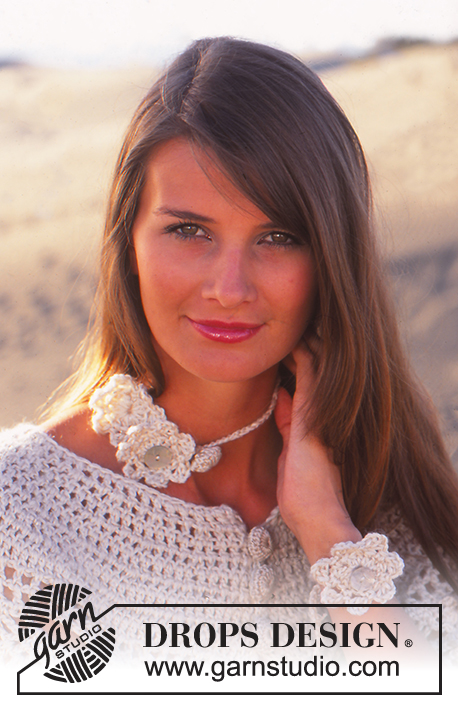
Crochet Gauge: 12 tr x 7 rows with 1 thread of Alpaca and 1 thread of Cotton Viscose = 10 x 10 cm. 12 dtr x 5 rows = 10 x 10 cm. 1 report in pattern = width approx 12 cm. Crochet info: At the beginning of each row substitute 1 dc with a ch, 1 tr with 3 ch and 1 dtr with 4 ch. Pattern: See diagram 1 – diagram 2 shows the repeat in the width. PONCHO Crochet the piece from the top and down. Crochet loosely 70-76-84 ch on hook size 5 with 1 thread of Alpaca and 1 thread of Cotton Viscose. Crochet 1st row as follows: 1 tr in the 4th ch from the hook, 1 tr in each remaining 66-72-80 ch = 68-74-82 tr. Turn the piece. Read crochet info! Continue to crochet tr’s forward and backward at the same time inc as follows (to inc 1 tr crochet 2 tr’s in 1 tr): Size S/M: Inc 1 tr in every other tr but finish with only 1 tr in the last tr = 101 tr. Crochet 1 row without inc. On the next row inc 1 tr in every 3rd tr = 134 tr. Crochet 2 rows without any inc. On the next row inc. 47 tr evenly distributed on row = 181tr Size M/L: Inc 1 tr in every other tr but finish with only 1 tr in the last tr = 110 tr. Crochet 1 row without inc. On the next row inc 1 tr in every 3rd tr = 146 tr. Crochet 1 row without any inc. On the next row inc. 1 tr in every 4th tr = 182 tr. Crochet 1 row without any inc, and on the next row inc. 35 tr evenly distributed on row = 217 tr. Size XL/XXL: Inc 1 tr in every other tr but finish with only 1 tr in the last tr = 122 tr. Crochet 1 row without inc. On the next row inc 1 tr in every 3rd tr = 162 tr. Crochet 1 row without any inc. On the next row inc. 1 tr in every 4th tr = 202 tr. Crochet 2 rows without any inc, and on the next row inc. 51 tr evenly distributed on row = 253 tr. When all inc. are complete the piece measures 10-11-13 cm. Now crochet pattern – see diagram 1. Crochet 2 repeats, but start the second repeat in the row marked with arrows. Now crochet 2-3-4 rows of dtr as follows: NB: If you want to adjust the length of the poncho either add or subtract a row of dtr’s. 1st row: Remember crochet info: Crochet 1 dtr around each ch-loop with a ch in between = 90-109-127 dtr, turn the piece. 2nd row: Crochet 1 dtr into each dtr but instead of 1 ch in between crochet 2 ch’s – Size S/M finish here before the last pattern repeat = 91 dtr’s. 3rd row: Crochet a dtr in each dtr but now crochet 3 ch’s in between each dtr instead of 2 ch – size M/L finish here before the last pattern repeat = 109 dtr’s. 4th row: Crochet 1 dtr into each dtr with 3 ch’s in between each dtr. Size XL/XXL finish here before the last pattern repeat = 127 dtr’s. After the last row of dtr crochet Diagram 1 again from the beginning, but finish the pattern after the 7th row in diagram – NB: Crochet 1st row in diagram as follows so the pattern fits: 3 ch (=1 tr), 1 ch, *1 tr around the ch-loop, 1 ch, 1 tr around the next ch-loop*, repeat from *-* to the end of the row = 180-216-252 ch-loops. Buttons: Crochet a “cover” for the 3 buttons with Cotton Viscose as follows: Crochet 2 ch, continue to crochet 16 tr in the 1st of the 2 ch crochet, finish off with a sl st in the top of the 1st tr (= 1st round 1). 2nd round: Crochet 1 dc into each tr and finish off with a sl st in the 1st dc from beginning of round. 3rd round: Crochet 1 tr into every other dc and finish off with a sl st in the 1st tr from beginning of the round = 8 tr. Put the buttons into the cover, sew around the edge and pull together. Sew the buttons on the right side of the poncho. The top button should be approx 1 cm from the edge and leave 4-6 cm in between the others. Button loop: Crochet loops for the buttons on left side as follows: 1 dc in the corner of the neck, 1 dc into the same st, *4 ch, skip 3-3.5-4 cm, 1 dc in the next st*, repeat a total of 3 times - a total of 3 loops matching the location of the buttons. NECKLACE AND BRACELET Length: Necklace: 60 cm. Bracelet: 35 cm Materials: Alpaca and Cotton Viscose. Leftovers from the Poncho Drops crochet hook size 3 mm for the buttons and size 5 mm for flowers and chain. Drops mother of pearl button, no. 521: 2 pcs. Accessories: 1 button approx. 2 cm in diameter to crochet round. Necklace: Flower: Crochet 4 ch on hook size 5 mm with 1 thread of Alpaca and 1 thread of Cotton Viscose and make a loop with a sl st. 1st round: 3 ch (=1 tr), crochet 13 tr around the loop and finish with a sl st in the 3rd ch from beginning of round. 2nd round: *4 ch, 1 tr in the 1st of the 1st of the 4 ch, skip 1 tr, 1 dc in the next tr*, repeat from *-* a total of 7 times but finish with a sl st in the sl st from the end for the previous round (instead of a dc in the next st) = 7 leaves. To make a small loop on the backside of the flower, use the thread end from the beginning and crochet 1 dc in the centre of the flower, 2 ch, and attach with a sl st. Chain: Crochet 2 ch on hook size 5 mm with 1 thread of Alpaca and 1 thread of Cotton Viscose, crochet 1 sl st and 1 dc in the 1st ch crochet. Continue with ch’s until the chain is approx 60 cm and finish with a dc and a sl st in the second but last ch. Cut and sew the threads. Crochet 2 flowers – see explanation above. Sew a mother of pearl button in the centre of 1 flower and pull them on the chain. Crochet a button with 1 thread of Cotton Viscose on hook size 3 as explained under Poncho. Crochet 1 loop on the backside of the button the same way as done for the flowers and pull the button on the chain. Bracelet: Crochet 2 ch on hook size 5 mm with 1 thread o Alpaca and 1 thread of Cotton Viscose. Crochet a sl st and a dc in the 1st crochet ch. Continue with ch’s until the bracelet measures 35 cm and finish with a dc and a sl st in the second last ch. Cut and sew the thread. Crochet 1 flower – see explanation above. Sew a mother of pearl button in the centre of the flower and pull it on the bracelet chain. |
|||||||||||||
Diagram explanations |
|||||||||||||
|
|||||||||||||
 |
|||||||||||||
Have you finished this pattern?Tag your pictures with #dropspattern or submit them to the #dropsfan gallery. Do you need help with this pattern?You'll find 7 tutorial videos, a Comments/Questions area and more by visiting the pattern on garnstudio.com. © 1982-2026 DROPS Design A/S. We reserve all rights. This document, including all its sub-sections, has copyrights. Read more about what you can do with our patterns at the bottom of each pattern on our site. |
|||||||||||||


With over 40 years in knitting and crochet design, DROPS Design offers one of the most extensive collections of free patterns on the internet - translated to 17 languages. As of today we count 324 catalogues and 12290 patterns translated into English (UK/cm).
We work hard to bring you the best knitting and crochet have to offer, inspiration and advice as well as great quality yarns at incredible prices! Would you like to use our patterns for other than personal use? You can read what you are allowed to do in the Copyright text at the bottom of all our patterns. Happy crafting!
Post a comment to pattern DROPS 94-10
We would love to hear what you have to say about this pattern!
If you want to leave a question, please make sure you select the correct category in the form below, to speed up the answering process. Required fields are marked *.