
Popular categories
Looking for a yarn?


Comments / Questions (52)
![]() Karin wrote:
Karin wrote:
Stickar baskern, har kommit till varv 20. Förstår inte hur många gånger till man ska öka, hur många maskor ska det vara innan avmaskning. Står inte heller hur hög baskern blir innan man gör nederkanten
14.03.2026 - 16:24DROPS Design answered:
Hej Karin, du fortsätter ökningen, som innan till arb mäter 10 cm. Sedan minskas det i 3 cm. Stickas 3 cm till och sedan kanten. När du har stickat alla varv enligt beskrivningen är baskern färdig :)
08.04.2026 - 11:46
![]() Cathy wrote:
Cathy wrote:
Bonjour, je tricote ce joli petit pull pour mon petit fils et j’ai une question. Je le tricote en rond et j’ai rabattu les 6m de chaque côté pour les emmanchures. Le patron dit de tricoter ensuite le dos et le devant séparément. Ils se tricotent ensuite en aller-retour ? Comme je n’ai pas complètement terminé M1 et que je ne tricote du jacquard qu’en rond, je ne sais pas comment terminer le croquis en aller-retour. Merci de votre aide.
15.02.2026 - 09:22DROPS Design answered:
Bonjour Cathy, vous allez simplement continuer le diagramme, mais cette fois, vous lirez les rangs sur l'envers de gauche à droite. Notez la 1ère/la dernière maille du diagramme que vous tricotez sur le dos/le devant et sur l'envers, lisez à partir de cette maille de gauche à droite sur l'envers (et de droite à gauche, comme avant sur l'endroit). Bon tricot!
17.02.2026 - 11:32
![]() Kirsten wrote:
Kirsten wrote:
Hei. Kan denne oppskriften ha raglanfelling i stedet for isatte armer? I tilfelle ja, kan jeg få tips på hvordan jeg kan endre det? Syns det blir for klumpet/hardt til baby med isatte armer.
13.02.2026 - 16:01DROPS Design answered:
Hei Kristin. Design avd har dessverre ikke muligheten til å omskrive en allerede publisert oppskrift. Men ta en titt på baby gensere med raglan i samme garngruppe/strikkefasthet, og sammenligne maskeantall og se om du får det til sel. mvh DROPS Design
16.02.2026 - 09:08
![]() Kerstin wrote:
Kerstin wrote:
Stickar byxorna och har kommit till Kant i ovansidan. Ska den först vara blå för att sedan bli grön på insidan som benen eller tvärtom?
31.01.2026 - 15:57DROPS Design answered:
Hej Kerstin, ja, det blir fint att göra som på benen :)
05.02.2026 - 12:04
![]() Sigrid wrote:
Sigrid wrote:
Hallo, ich habe eine Frage zum Ärmel, und zwar steht in der Anleitung, beidseitig 9x1 M aufnehmen, das wären 18 Maschen. Wird der Ärmel dann nicht zu breit für 4 Monate?
25.05.2025 - 17:46DROPS Design answered:
Liebe Sigrid, so ist es richtig, und so wird der Ärmel das Armoch passen - siehe auch Maßskizze. Viel Spaß beim Stricken!
26.05.2025 - 10:31
![]() Thuận Nguyen wrote:
Thuận Nguyen wrote:
Bonjour, vous serait-il possible de m’éclaircir sur le nombre de mailles à rabattre pour les épaules droite et gauche, 13 mailles restantes pour l’épaule droite et 15 mailles restantes pour l’épaule gauche alors qu’on a 21 mailles pour chaque épaule (52 m au total = 21m+10m encolure+21m). Merci beaucoup, le modèle du pull est adorable!
30.09.2024 - 06:02DROPS Design answered:
Bonjour Mme Nguyen et merci; on ne doit diminuer que 1 fois 1 m à la fin de l'épaule gauche (et non 3 x 1 m), correction faite, merci pour votre retour. Bon tricot!
30.09.2024 - 10:11
![]() Brams wrote:
Brams wrote:
Loopt het patroon door op het rugpand
24.07.2024 - 22:15DROPS Design answered:
Dag Brams,
Ja, het patroon loopt door op het achterpand.
26.07.2024 - 18:34
![]() Gaby Goedecke wrote:
Gaby Goedecke wrote:
Ist in dem Diagramm nur die rechte Reihe angegeben oder wird auch die linke Reihe angegeben
29.02.2024 - 18:32DROPS Design answered:
Liebe Gaby, Das Diagramm zeigt die Reihen auf der rechten und der linken Seite, alle von der rechten Seite gesehen. Viele spass beim stricken!
29.02.2024 - 23:14
![]() REINE MARIE wrote:
REINE MARIE wrote:
MERCI ,le pull est magnifique ,mais je pense que le tricoter en 3et demi serait préférable pour la largeur car il manque 4cm en largeur ,alors je pense que je le referai comme ça dans quelques temps car magnifique ce modèle , je viens de commencer :Sailor aksel .Merci pour ces beaux modèles et explications détaillée dès que l'on comprend pas c'est sympa .Bonne journée
21.07.2023 - 12:37
![]() REINE MARIE wrote:
REINE MARIE wrote:
Bonsoir ,faut-il lorsque l'on monte les mailles pour l'encolure monter des mailles sur l'autre bordure sans boutonnière car j'ai bien 90mailles mais en rajoutant pour ce coté cela m'en fait95 ?. Merci d'une réponse
13.07.2023 - 17:09DROPS Design answered:
Bonjour, oui il faut monter des mailles sur l'autre bordure (sans boutonnière). Ce n'est pas qrave que vous avez plus de mailles. Ajustez le nombre de mailles au rang suivant (en tricotant regulierement 2 mailles ensemble). Bon tricot!
25.07.2023 - 16:25
|
||||||||||
Le Petit Explorateur#lepetitexplorateursweater |
||||||||||
 |
 |
|||||||||
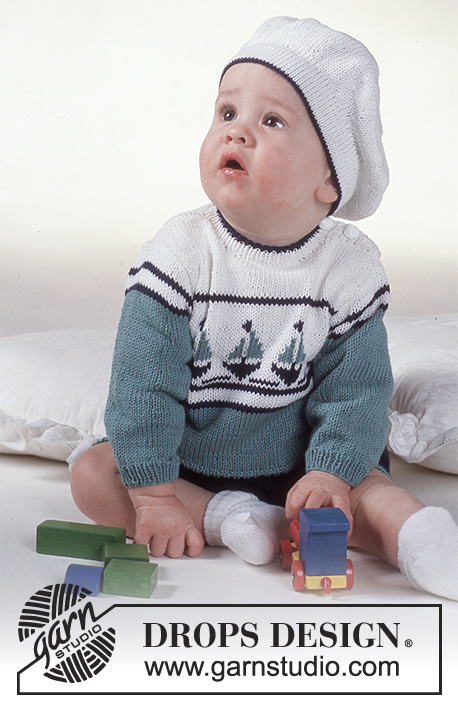
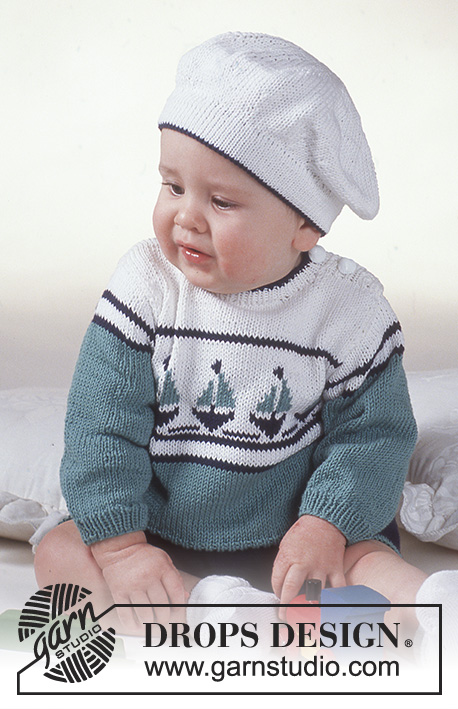
DROPS jumper with boat motif, shorts and beret in “Safran”.
DROPS Baby 2-5 |
||||||||||
|
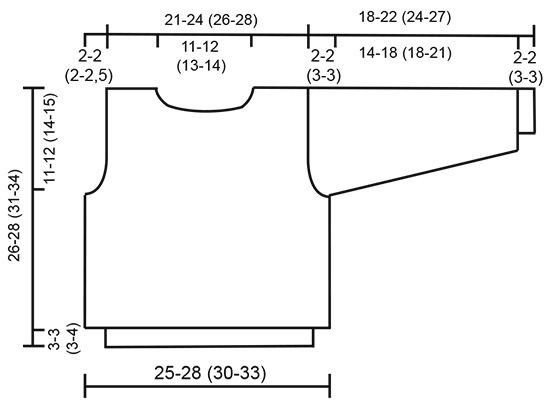
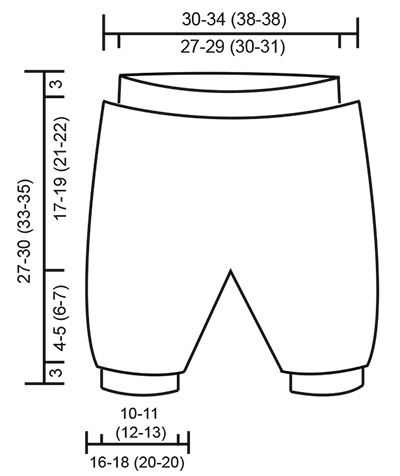
JUMPER: Knitting tension: 24 sts x 32 rows on needles size 3 mm in stocking sts = 10 x 10 cm. Rib: *K1, P1*, repeat from *-*. Body: Worked in the round on circular needle. Cast on 120-132-144-156 sts on circular needle size 2.5 mm with green and work 3-3-3-4 cm Rib in the round. Change to needle size 3 mm and continue in stocking st. When piece measures 8-9-11-13 cm work M.1 – make sure to place a pattern repeat mid front. Remember the knitting tension. When piece measures 15-16-17-19 cm cast off 4-6-6-6 sts each side for armhole and complete front and back pieces separately. Front piece: = 56-60-66-72 sts. Dec to shape the armhole on every other row: 1 st twice = 52-56-62-68 sts. After M.1 complete piece in white. When piece measures 22-24-27-30 cm cast off the middle 10-12-16-18 sts for neck and complete and side separately. Right shoulder: dec to shape the neckline on every other row: 3 sts 1 time, 2 sts 1 time and 1 st 3 times. Cast of remaining 13-14-15-17 sts when piece measures 26-28-31-34 cm. Left shoulder: dec to shape the neckline on every other row: 3 sts 1 time, 2 sts 1 time and 1 st 1 time. When piece measures 25-27-30-33 cm change to needle size 2.5 mm and work 2 cm Rib (button band), but after 2 rows make 1 buttonhole mid shoulder. 1 buttonhole = cast off 2 sts and cast on 2 new sts on return row. Cast off remaining 15-16-17-19 sts when piece measures 27-29-32-35 cm. Back piece: = 56-60-66-72 sts. Dec for armhole and work pattern as described for front piece. When piece measures 25-27-30-33 cm cast off the middle 22-24-28-30 sts for neck and complete each side separately. Right shoulder: dec 2 sts on neckline and cast of remaining 13-14-15-17 sts when piece measures 26-28-31-34 cm. Left shoulder: When piece measures 25-27-30-33 cm change to needle size 2.5 mm and work 2 cm Rib. Cast of remaining 15-16-17-19 sts when piece measures 27-29-32-35 cm. Sleeve: Cast on 38-40-40-42 sts on double pointed needles size 2.5 mm with green and work 2-2-3-3 cm Rib. Change to needle size 3 mm and continue in stocking st, at the same time inc 2-4-8-10 sts evenly on first round = 40-44-48-52 sts. Now inc 2 sts mid under arm a total of 9-9-10-10 times as follows: Size 3 months: on every 4th round Size 6/9 months: on every 4th and 5th round alternately Size 12/18 + 24 months: on every 5th round = 58-62-68-72 sts. When piece measures 15-18-20-23 cm work M.2 and then complete piece in white. At the same time when piece measures 16-20-22-24 cm cast off 6 sts mid under arm and complete sleeve back and forth on needle. Cast off to shape the sleeve cap each side on every other row: 5 sts 2-2-3-3 times. Cast off, sleeve measures approx 18-22-24-27 cm. Assembly: Sew right shoulder seam. Pick up approx 80-90 sts round neck on needle size 2.5 mm with white and work 2 cm Rib, at the same time after 2 rows make a buttonhole on left shoulder in line with the other, cast off in navy blue. Lay button band on front piece over button band on back piece, with a 1 cm overlapping. Sew the button bands to the outer edge of the armhole. Sew the sleeves to the armhole in the outer st so that the seam does not become thick. Sew in buttons on the button band on the back piece/neckline. __________________________________________________________________ SHORTS: Size: 3 – 6/9 – 12 - 24 months DROPS circular needle size 3 mm and double pointed needles size 2.5 mm Knitting tension: 24 sts x 32 rows on needles size 3 mm in stocking sts = 10 x 10 cm. Hem: 3 cm stocking st, P 1 round (measure piece from here), K 1 round, change to navy blue, 3 cm stocking st. Right leg: Cast on 52-58-62-68 sts on double pointed needles size 2.5 mm with green and work Hem. Change to double pointed needles size 3 mm and continue in stocking st, at the same time inc 24-28-34-28 sts evenly on first round = 76-86-96-96 sts. When piece measures 6-7-8-9 cm divide piece at inside leg (= split) and complete piece back and forth on needle. Inc 1 st each side for seam = 78-88-98-98 sts. When piece measures 7-8-9-10 cm cast off 4-5-5-5 sts each side = 70-78-88-88 sts. Put piece aside and knit the other leg. Left leg: like right leg. Trousers: Put both legs in on the same circular needle = 140-156-176-176 sts – measure piece from here. Now inc 1 st in the last st on each leg (= middle sts mid front and mid back) = 142-158-178-178 sts. Now inc mid back on both sides of the middle 2 sts on every 3rd round: 1 st 5 times, at the same time dec mid front on every 3rd round on both sides of the middle 2 sts: 1 st 6 times – dec as follows: K2 tog into back of st, K2 middle sts, K2 tog = 140-156-176-176 sts. When piece measures 17-19-21-22 cm change to needle size 2.5 mm and knit Hem, at the same time dec evenly to 140-154-158-162 sts. Cast off. Fold Hem double towards WS and fasten, leave an opening and pull through a ribbon. Sew the split on the inside of each leg up to the cast off stitches and then sew the opening between the legs from the mid front to the mid back of the trousers. __________________________________________________________________ HAT: Size: 3 – 6/9 – 12 - 24 months Head circumference: 39-43-46-48 cm. DROPS double pointed needles size 2.5 mm and 3 mm Knitting tension: 24 sts x 32 rows on needles size 3 mm in stocking sts = 10 x 10 cm. Cast on 8 sts on double pointed needles size 3 mm with white and distribute sts on needles. Continue as follows: K 1 round into back of loops. Round 2: inc 1 st in each st = 16 sts Round 3 and all odd rounds: stocking st Round 4: inc 1 st in every other st = 24 sts Round 6: K1, inc 1 st in next st, *inc 1 st in every 3rd st* = 32 sts Round 8: inc 1 st in every 4th st = 40 sts Round 10: K1, inc 1 st in next st, *inc 1 st in every 5th st* = 48 sts Round 12: inc 1 st in first st, *inc 1 st in every 6th st* = 56 sts Round 14: K4, inc 1 st in next st, *inc 1 st in every 7th st* = 64 sts Round 16: K1, inc 1 st in next st, *inc 1 st in every 8th st* = 72 sts Round 18: inc 1 st in first st, *inc 1 st in every 9th st* = 80 sts Round 20: K5, inc 1 st in next st, *inc 1 st in every 10th st* = 88 sts Continue increasing like this, begin row with K1 and K6, 7, 8 etc. alternately. When piece measures 9-10-10-10 cm work 8 rounds without inc. Now dec in reverse order until piece measures 2-3-3-3 cm from beg of decreases. Now dec evenly to 102-112-120-125 sts on next round. Change to needle size 2.5 mm and work 3 cm stocking st, change to navy blue, work 1 round in stocking st, P 1 round, 3 cm stocking st, cast off. Fold hem double towards WS and fasten. |
||||||||||
Diagram explanations |
||||||||||
|
||||||||||
 |
||||||||||
 |
||||||||||
 |
||||||||||
Have you finished this pattern?Tag your pictures with #dropspattern #lepetitexplorateursweater or submit them to the #dropsfan gallery. Do you need help with this pattern?You'll find 21 tutorial videos, a Comments/Questions area and more by visiting the pattern on garnstudio.com. © 1982-2026 DROPS Design A/S. We reserve all rights. This document, including all its sub-sections, has copyrights. Read more about what you can do with our patterns at the bottom of each pattern on our site. |
||||||||||


With over 40 years in knitting and crochet design, DROPS Design offers one of the most extensive collections of free patterns on the internet - translated to 17 languages. As of today we count 324 catalogues and 12290 patterns translated into English (UK/cm).
We work hard to bring you the best knitting and crochet have to offer, inspiration and advice as well as great quality yarns at incredible prices! Would you like to use our patterns for other than personal use? You can read what you are allowed to do in the Copyright text at the bottom of all our patterns. Happy crafting!
Post a comment to pattern DROPS Baby 2-5
We would love to hear what you have to say about this pattern!
If you want to leave a question, please make sure you select the correct category in the form below, to speed up the answering process. Required fields are marked *.