
Popular categories
Looking for a yarn?


Comments / Questions (20)
![]() Eva Torkildsen wrote:
Eva Torkildsen wrote:
Skal man strikke vrangpinden ret?
10.09.2023 - 11:52DROPS Design answered:
Hej Eva, hver 2.pind i diagrammet strikkes fra vrangen. Den skal være ret (glatstrik) fra retsiden dvs vrang fra vrangen :)
14.09.2023 - 15:43
![]() Britt Wehlast wrote:
Britt Wehlast wrote:
Jeg kan ikke se noget diagram til strikkeopskriften. Elsker at strikke dropsmodeller, så lidt øv at jeg mangler diagram
12.08.2023 - 18:48
![]() SILKE Hempel wrote:
SILKE Hempel wrote:
Hallo Drops Design, Ihre Antwort auf meine Nachricht hat mir nicht weiter geholfen. Ich habe mit dem gleichen Garn,Nadelspiel 5,5 und weniger Maschen noch einmal eine Jacke gestrickt,die mir jetzt besser passt. LG
02.04.2023 - 11:19
![]() Hempel wrote:
Hempel wrote:
Ich habe die Strickjacke 2xmal gestrickt. Erst in Größe M,dann nochmal in Größe S. Beide Male ist die Strickjacke viel zu groß und schwer geworden. Ich habe wie vorgegeben das Nadelspiel Nr. 4 genommen. Die Strickprobe ließ nicht erkennen, daß die Jacke solche Ausmaße nimmt. Ich habe die Strickjacke dann meiner Freundin gegeben, sie ist 1,75 Groß. Die Jacke wird beim tragen immer größer und länger. Was ist schief gelaufen?
27.02.2023 - 11:55DROPS Design answered:
Liebe Frau Hempel, sollte Ihre Maschenprobe (20 M. x 26 R. auf Nadel Nr.4 glatt gestrickt = 10 x 10 cm) stimmen, dann bekommen Sie dieselben Maßnahmen wie bei der Maßskizze - beachten Sie nur, daß diese Jacke etwas "oversized" ist. Hoffentlich kann es Ihnen helfen. Viel Spaß beim stricken!
27.02.2023 - 14:02
![]() Yasmine wrote:
Yasmine wrote:
Bonjour madame, D’après le diagramme, le rang 2 doit-il être tricoté à l’envers, incluant la dernière maille au point mousse du rang précédent ? Merci !
28.12.2022 - 01:12DROPS Design answered:
Bonjour Yasmine, les rangs pairs du diagramme se tricotent sur l'envers en lisant les diagrammes de gauche à droite, autrement dit, (sur l'envers, on tricote toutes les mailles à l'envers, en commençant et en terminant par 1 m lisière au point mousse). Bon tricot!
02.01.2023 - 10:58
![]() Francine wrote:
Francine wrote:
Bonjour, je ne comprends pas comment il est possible d’obtenir 57 cm de large avec 132 mailles sachant que pour un échantillon de 10 cm il faut 20 mailles. Avec 132 mailles, j’obtiens 66 cm de large sur mon travail, ce qui est cohérent avec l’échantillon mais pas avec les dimensions mentionnées sur votre diagramme .. du coup, mon gilet me paraît nettement trop large ..
02.11.2021 - 00:12DROPS Design answered:
Bonjour Francine, l'echantillon est fait en jersey. Le pull est tricote avec de differents points fantaisie comme les torsades qui naturellement rendreront votre ouvrage plus etroit. Bon tricot!
02.11.2021 - 08:29
![]() Louise Lacelle wrote:
Louise Lacelle wrote:
Bonjour, Je fais le modèle 41-5. J’ai fait l’échantillon en Jersey, pour conclure que je dois tricoter avec des aiguilles no 2...mais même avec ces aiguilles mon tricot est ne correspond pas aux dimensions du gilet (trop grand), j’ai donc décidé de fait le small au lieu du médium...du coup je voulais confirmer avec vous si c’est les bonnes dimensions indiqués sur le croquis! Merci!
17.02.2020 - 18:46DROPS Design answered:
Bonjour Mme Lacelle, si votre échantillon est juste, vous devriez avoir les mesures du schéma, mais ce modèle est d'une autre époque, et est plutôt "oversize" - il est très large (cf mesures du schéma), pensez à bien vérifier les mesures si besoin et les adapter si vous le souhaitez. Bon tricot!
18.02.2020 - 10:33
![]() Louise Lacelle wrote:
Louise Lacelle wrote:
Bonjour, je fais ce modèle (41-5), et je me demandais s’il n’y avait pas une erreur dans le diagramme. Dans la description des points, sur les jetés. J’ai toujours une maille de plus. Je ne devrais pas avoir toujours le même nombre de maille pour le motif? Merci
20.01.2020 - 21:54DROPS Design answered:
Bonjour Mme Lacelle, vous avez tout à fait raison, l'avant-dernier symbole a été corrigé, on ne fait qu'un seul jeté au début, pas à la fin. Merci pour votre retour, bon tricot!
21.01.2020 - 09:51
![]() Dagmar wrote:
Dagmar wrote:
Auf beiden Seiten gegen die Mitte 3 M. anschlagen .Was heißt das genau. Stehe etwas auf dem schlauch.
29.09.2019 - 18:06DROPS Design answered:
Liebe Dagmar, nach 18(19-20) cm, schlagen Sie 3 neuen Maschen am Ende jeder beiden Reihe = es sind jetzt 3 Masschen für die BlendeMaschen auf beiden Seiten. Viel spaß beim stricken!
30.09.2019 - 11:16
![]() Dagmar wrote:
Dagmar wrote:
Sind im Diagramm nur die Hinreihen angezeigt.
13.09.2019 - 17:29DROPS Design answered:
Liebe Dagmar, alle Reihen sind im Diagram gezeichnet - die Hin- sowie die Rückreihen - hier lesen Sie mehr über Diagramme. Viel Spaß beim stricken!
16.09.2019 - 08:20
|
|||||||||||||||||||
Pearl Passion |
|||||||||||||||||||
 |
 |
||||||||||||||||||
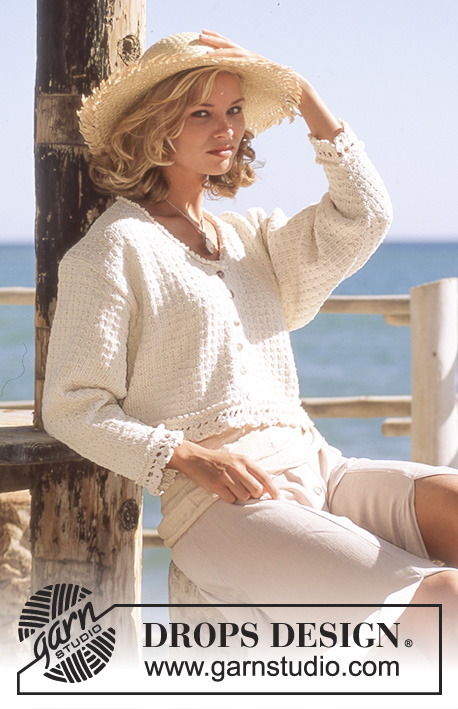
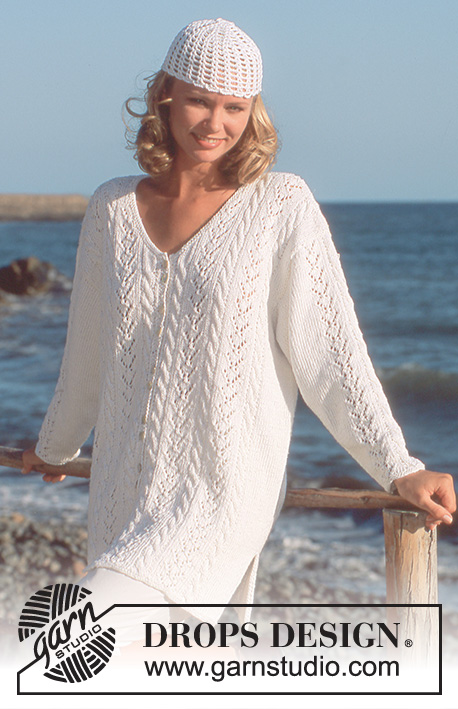
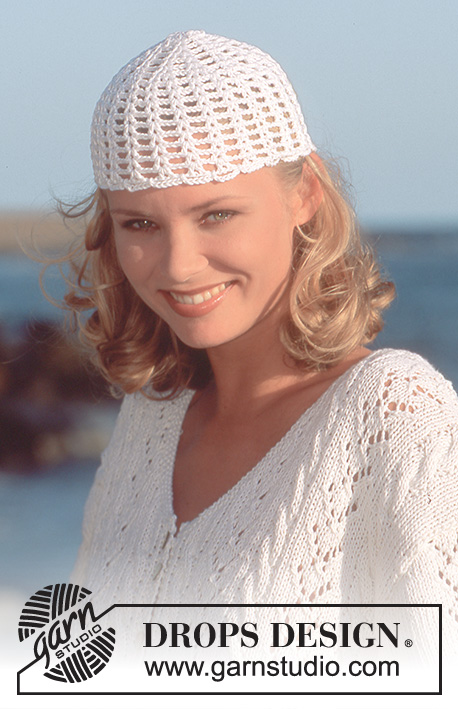
DROPS jacket with cable pattern in “Bomull-lin” and crochet hat. Size S – L.
DROPS 41-5 |
|||||||||||||||||||
|
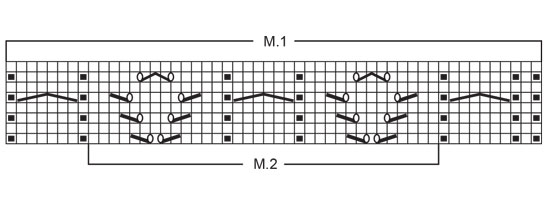
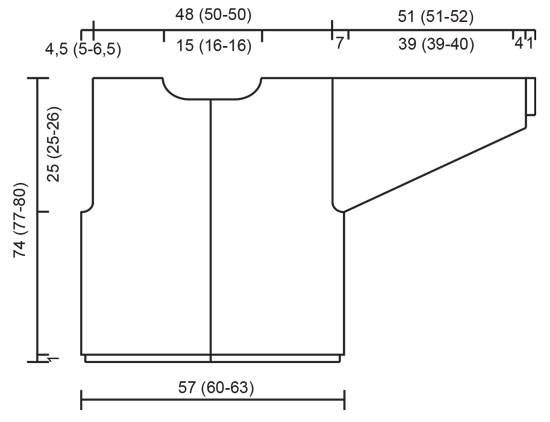
JACKET: Pattern: See diagram. The diagram is seen from the RS. Garter st, back and forth on needle: K all rows. Garter st, in the round: K 1 round, P 1 round. Moss st: Row 1: * K1, P1 *, repeat from *-*. Row 2: P over K, K over P. Repeat row 2. Buttonholes: Make buttonholes on right front piece. 1 buttonhole = cast off 3rd st from mid front, cast on 1 new st on return row. Make buttonholes when piece measures: Size S: 1, 4, 10, 13, 19, 22, 28, 31, 37 and 40 cm. Size M: 1, 4, 10, 13, 19, 22, 28, 31, 37 and 40 cm. Size L: 1, 4, 10.5, 13.5, 20, 23, 29.5, 32.5, 39 and 42 cm. Right front piece: Cast on 66-69-72 sts on circular needle size 4 mm and work 4 rows garter st back and forth on needle. Continue in pattern as follows from RS: M.1, 13-16-19 stocking sts, 1 garter st. When piece measures 15 cm put it aside and work left front piece. Left front piece: Cast on and work like right front piece, but mirrored. Back piece: Cast on 132-138-144 sts on needle size 4 mm and work 4 rows garter st back and forth on needle. Continue in pattern as follows from RS: 1 garter st, 13-16-19 stocking sts, M.1, M.1 worked from left to right in diagram, 13-16-19 stocking sts, 1 garter st. When piece measures 15 cm put it aside. Body piece: Slip both front pieces and back piece on the same circular needle. Continue in pattern back and forth on needle from mid front, but now work garter sts from before in stocking st. Remember the knitting tension! When piece measures 18-19-20 cm inc 3 sts each side towards mid front for front bands = 270-282-294 sts. Work front band sts and the first st in M.1 in moss st = 4 front band sts. Remember buttonholes on right front band! When piece measures 49-52-54 cm, work next row as follows: 67-70-73 sts = front piece, cast off 4 sts for armhole, 128-134-140 sts = back piece, cast off 4 sts for armhole, 67-70-73 sts = front piece. Now complete each piece separately. Front piece: = 67-70-73 sts. Cast off to shape the armhole on every other row: 2 sts 2-3-4 times, 1 st 3-2-3 times = 60-62-62 sts. When piece measures 58-59-62 cm cast off to shape the neckline towards mid front on every other row: 3-4-4 sts 1 time, 2 sts 4 times, then on every 4th row: 2 sts 2 times and then on every 6th row: 2 sts 2 times, 1 st 2 times. Cast off remaining sts on shoulder when piece measures 74-77-80 cm. Back piece: = 128-134-140 sts. Cast off for armhole as described for front piece = 114-118-118 sts. When piece measures 72-75-78 cm cast off the middle 32-34-34 sts for neck and complete each side separately. Cast off 2 sts on neckline on next row. Cast off remaining sts on shoulder when piece measures 74-77-80 cm. Sleeve: Worked in the round on double pointed needles. Cast on 44-44-46 sts on needle size 4 mm and work 4 rounds garter st. Continue in pattern as follows: 5-5-6 stocking sts, M.2, 5-5-6 stocking sts. At the same time when piece measures 5 cm inc 2 sts mid under arm on every 3rd round a total of 29-29-30 times = 102-102-106 sts. When piece measures 44-44-45 cm cast off 6 sts mid under arm and complete piece back and forth on needle. Cast off to shape the sleeve cape each side on every other row: 4 sts 8 times. Cast off remaining sts. Assembly: Sew shoulder seams. Pick up approx 110-120 sts round neckline on needle size 4 mm and work 4 rows garter st back and forth on needle, cast off. Crochet a row of dc along the splits at sides with crochet hook size 3.5 mm. Set in sleeves and sew on buttons. _______________________________________________________ Hat: ch = chain stitch tr = treble stitch Crochet 7 ch on crochet hook size 3mm and create 1 ring with 1 sl st in first ch. 1st round: 3 ch, 11 tr around ring, finish off with 1 sl st in 3rd ch on both rounds. 2nd round: 4 ch (= 1 tr + 1 ch), 1 tr in first tr, * 2 ch, skip 1 tr crochet 1 tr in next tr, 1 ch, 1 tr *, repeat from *-*, finish with 2 ch, 1 sl st in 3rd ch at start of round = 12 tr. 3rd round: 4 ch, 1 tr in first loop, 1 ch, 1 tr in same loop, * 2 ch skip 2 ch, in next loop crochet 1 tr, 1 ch, 1 tr, 1 ch, 1 tr *, repeat from *-*, finish with 2 ch, 1 sl st in 3rd ch at beg of round = 18 tr. 4th round: 4 ch, 1 tr in first loop, 1 ch, in next loop crochet 1 tr, 1 ch, 1 tr * 2 ch, skip 2 ch, in next loop crochet 1 tr, 1 ch, 1 tr, 1 ch, in next loop crochet 1 tr, 1 ch, 1 tr *, repeat from *-*, finish with 2 ch, 1 sl st in 3rd ch at beg of round = 24 tr. 5th round: 4 ch, 1 tr in first loop, * 2 ch, skip 2 tr, in next loop crochet 1 tr, 1 ch, 1 tr, 2 ch, skip 2 ch, in next loop crochet 1 tr, 1 ch, 1 tr *, repeat from *-*, finish with 2 ch, 1 sl st in 3rd ch at beg of round = 24 tr. 6th round: Crochet like 3rd round = 36 tr when round is crochet. 7th round: Crochet like 4th round = 48 tr when round is crochet. 8th round: Crochet like 5th round: = 48 tr when round is crochet. Piece measures approx 8-9 cm from middle. Now repeat 8th round until piece measures approx 15-16 cm from middle of piece. At the end crochet an edge as follows: * 1 sl st in ch loop of 2 st, 6 ch *, repeat from *-* and finish with 1 sl st. |
|||||||||||||||||||
Diagram explanations |
|||||||||||||||||||
|
|||||||||||||||||||
 |
|||||||||||||||||||
 |
|||||||||||||||||||
Have you finished this pattern?Tag your pictures with #dropspattern or submit them to the #dropsfan gallery. Do you need help with this pattern?You'll find 32 tutorial videos, a Comments/Questions area and more by visiting the pattern on garnstudio.com. © 1982-2026 DROPS Design A/S. We reserve all rights. This document, including all its sub-sections, has copyrights. Read more about what you can do with our patterns at the bottom of each pattern on our site. |
|||||||||||||||||||


With over 40 years in knitting and crochet design, DROPS Design offers one of the most extensive collections of free patterns on the internet - translated to 17 languages. As of today we count 324 catalogues and 12290 patterns translated into English (UK/cm).
We work hard to bring you the best knitting and crochet have to offer, inspiration and advice as well as great quality yarns at incredible prices! Would you like to use our patterns for other than personal use? You can read what you are allowed to do in the Copyright text at the bottom of all our patterns. Happy crafting!
Post a comment to pattern DROPS 41-5
We would love to hear what you have to say about this pattern!
If you want to leave a question, please make sure you select the correct category in the form below, to speed up the answering process. Required fields are marked *.