
Populaarsed kategooriad
Otsid lõnga?


Kommentaarid / Küsimused (135)
![]() Camilla kirjutas:
Camilla kirjutas:
I give up! I am quite experienced knitter, this is the first time i give up
24.04.2026 - 22:30
![]() Camilla kirjutas:
Camilla kirjutas:
Jag har läst mönstret så här: varv 1 från höger till vänster, varv två från vänster till höger. Har för mig att det stod så i en kommentar, men varven kanske alltid ska läsas från hö - vä? Lite lurigt då mitten ändå blir ✅
24.04.2026 - 17:18DROPS Design vastas:
Hei Camilla. Ja, man leser et strikkediagram motsatt av slik man normalt leser: Fra høyre mot venstre, nedenfra og opp. Du begynner altså nederst i det høyre hjørnet, og jobber deg mot venstre og oppover. mvh DROPS Design
27.04.2026 - 10:51
![]() Camilla kirjutas:
Camilla kirjutas:
Är inte mönstret fel på aviga varven med att man ska FÖRST göra omslag sedan sticka ihop två rm i bakre maskbågen, borde man inte göra som på räta varv först sticka ihop, SEN omslag, resultatet ser konstigt ut på den sidan, blir inte lika snygga ”hål” på mönstrets vänstra sida jämfört med högra
24.04.2026 - 17:14DROPS Design vastas:
Hei Camilla. Skjønner hva du mener, men på denne oppskriften er det skrevet/tegnet slik. Det er ikke feil, men om du ønsker å forandre det slik du mener blir penere, må du gjerne gjøre det. mvh DROPS Design
27.04.2026 - 10:15
![]() Gillian kirjutas:
Gillian kirjutas:
I have completed the first row of the chart (23 sts) and knitted remaining sts to the end of the row. Do i have to knit another row ? if not how do i get back to the 23st to do the second row?
14.04.2026 - 18:03
![]() Gillian kirjutas:
Gillian kirjutas:
I have completed the first row of the chart (23 sts) and knitted remaining sts to the end of the row. Do i have to knit another row ? if not how do i get back to the 23st to do the second row?
14.04.2026 - 15:51DROPS Design vastas:
Dear Gillian, short rows start from the first row M.1, starting from the right side work 30 to 47 sts (see size) - with the first 23 sts as shown in M.1 and the remaining sts in garter stitch, turn and work garter stitch and 2nd row M.1 (read diagram from the left towards the right), turn work 46-70 sts with 3rd row M.1 and knit remaining sts, turn and knit + work 4th row M.1, turn and continue short rows as stated for the size continuing M.1 and knitting remaining sts. Happy knitting!
15.04.2026 - 07:36
![]() Gillian kirjutas:
Gillian kirjutas:
Can you tell me what 1 YO between 2 sts mean
14.04.2026 - 15:25DROPS Design vastas:
Dear Gillian, work the previous stitch as shown in diagram, make 1 yarn over then work the next stitch as shown in diagram = you have worked 1 yarn over between 2 stitches. On first row M.1 eg, work: K3, YO, K2 tog, P2, YO, slip 1, K1, psso, K5, K2 tog, YO,l P2, K1, YO, K2 tog, K2. Happy knitting!
14.04.2026 - 15:43
![]() Inge Glarborg kirjutas:
Inge Glarborg kirjutas:
Jeg for ikke det samme hulmønster frem på hver side af trekanterne, altså de første og sidste 5 masker, når jeg strikker M1, som det ser ud på fotoet
12.04.2026 - 22:19DROPS Design vastas:
Hei Inge. Om man følger diagrammet skal man få det hullmønstret man ser på bildet. Husk at bildet viser diagrammet loddrett, mens selve diagrammet ligger vannrett (jakken strikkes sidelengs). Men hvordan blir ditt mønster? mvh DROPS Design
13.04.2026 - 14:49
![]() Sibylle kirjutas:
Sibylle kirjutas:
Meine Frage ist leider noch nicht beantwortet. Das Muster wird doch nicht am unteren Rand begonnen. Die Blende besteht aus 4 Krausrippen. Dann beginnt das Muster. Doch nicht direkt am unteren Rand?
09.02.2026 - 19:57DROPS Design vastas:
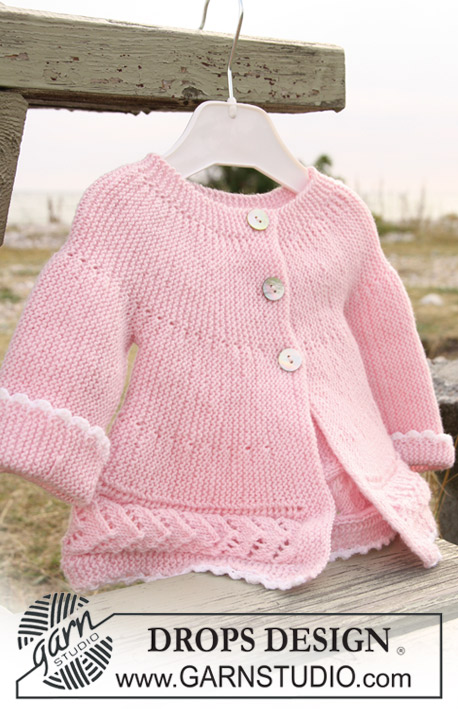
Liebe Sibylle, Sie stricken tatsächlich die ersten 23 Maschen gemäß Diagramm, dabei werden ja auch ein paar Maschen am Anfang des Diagramms kraus rechts gestrickt. Die Löcher (nach der 3. Masche im Diagramm) sind am unteren Rand nicht gut erkennbar, das liegt aber an der Fotoaufnahme bzw. daran, dass die Jacke genau an der Stelle etwas geknickt liegt. An der anderen Seite des mittleren Musters können Sie die Löcher gut erkennen.
18.02.2026 - 20:18
![]() Sibylle kirjutas:
Sibylle kirjutas:
Laut Beschreibung wird das Muster direkt am Rand begonnen. Laut Bild aber nicht.
08.02.2026 - 17:06DROPS Design vastas:
Liebe Sibylle, auch laut Beschreibung stricken Sie zuerst 4 Krausrippen, dann kommt erst das Muster. Sie stricken die vordere Blende also zuerst und dann geht es mit dem Muster weiter. Viel Spaß beim Stricken!
09.02.2026 - 08:38
![]() Lucia Nardella kirjutas:
Lucia Nardella kirjutas:
Se il diagramma M1 mostra come lavorare le maglie sul diritto del lavoro dove indica cone lavorare il rovescio quando necessario?
21.10.2025 - 13:47DROPS Design vastas:
Buonasera Lucia, i diagrammi mostrano tutti i ferri del lavoro, anche quelli lavorati sul rovescio. Buon lavoro!
21.10.2025 - 17:53
|
||||||||||||||||||||||
DROPS Baby 20-12 |
||||||||||||||||||||||
 |
 |
|||||||||||||||||||||
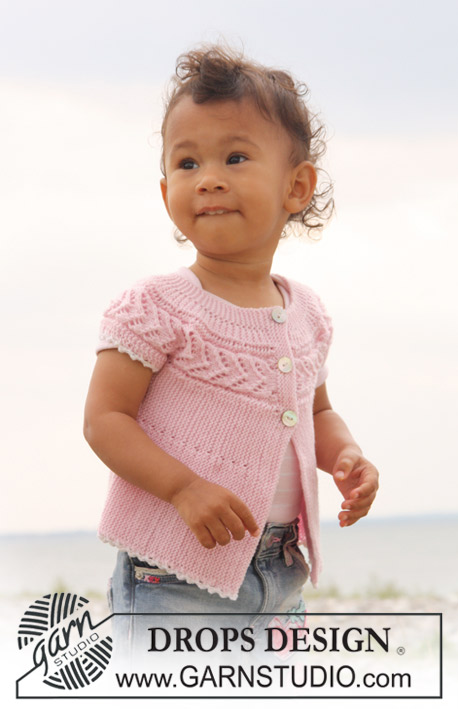
DROPS BabyMerino lõngast ristipidi kootud beebi ja laste pitsmustriga ja ripskoes kampsun
DROPS Baby 20-12 |
||||||||||||||||||||||
|
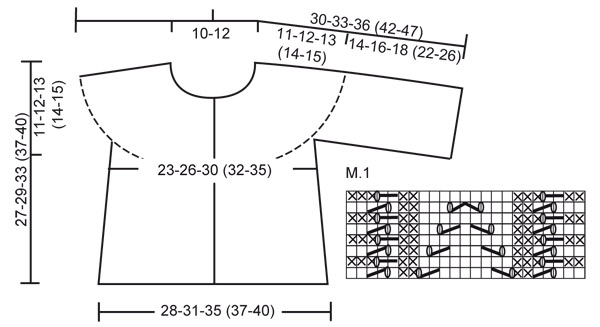
KAMPSUN MUSTER Vaata skeemi M.1. Skeem on antud vaadatuna töö paremalt poolt (PP). KUDUMISE NIPP Kui pöörad töö keskel, siis tõsta esimene silmus pr kudumata, pinguta lõnga ja koo nagu enne, et vältida augu teket ülemineku kohas. -------------------------- KAMPSUN Alusat vasakust esiosast, koo varruka poole, seljaosa, teise varruka poole ja lõpetuseks koo parem esiosa. Loo LÕDVALT üles 62-68-78 (88-96) s 2,5 mm vardale ja koo 8 rida parempidi nööbiliistu jaoks (1. rida = töö PP). Järgmine rida koo järgmiselt, töö PP: koo pr esimesed 15 s, SAMAL AJAL kasvata 8 silmust ühtlaste vahedega (kasvata 1 silmus tehes 1 õs), koo ülejäänud silmused pr = 70-76-86 (96-104) s. Koo 1 rida parempidi töö VP kõikide silmustega, koo õs keerdsilmusena, et ei tekiks auku. Edasi koo järgmiselt: koo skeemi M.1 järgi esimesed 23 silmust ja koo ülejäänud silmused parempidi igal real. SAMAL AJAL koo lühendatud ridu järgmiselt – vaata KUDUMISE NIPPI: *koo esimesed 30-32-38 (42-47) s, pööra ja koo tagasirida, koo esimesed 46-50-57 (65-70) s, pööra ja koo tagasirida, koo esimesed 64-70-80 (90-98) s, pööra ja koo tagasirida, koo kõik 70-76-86 (96-104) s, pööra ja koo tagasirida *, korda alates *-*, kuni töö kõrgus on umbes 16-17,5-19,5 (20,5-22) cm (mõõdetud natuke enne esimest pööramist, st. skeemi M.1 kohalt). Katkesta lõng. Nüüd tõsta esimesed 41-45-52 (60-65) s alumise serva poolt silmusehoidjale (= külg). Loo varruka jaoks 36-42-46 (60-70) uut silmust silmusehoidjal olevate silmuste kohale (st. enne vardal olevat 29-31-34 (36-39) silmust) ja nüüd koo järgmiselt (1. rida = töö PP): * koo esimesed 41-47-51 (65-75) s, pööra ja koo tagasirida, koo esimesed 59-67-74 (90-103) s, pööra ja koo tagasirida, koo kõik 65-73-80 (96-109) s, pööra ja koo tagasirida *. Korda alates *-*. Kui töö kõrgus on 16-17-18 (18-20) cm mõõdetud varruka jaoks ülesloodud silmustest (mõõda laiemast kohast, st. mööda alumist serva), koo varruka otsa poolt maha 36-42-46 (60-70) s. Katkesta lõng. Tõsta silmusehoidjal olevad 41-45-52 (60-65) s tagasi vardale ja paigalda silmusemärkija (SM). Koo kehaosa allservast alustades nagu enne *-* nagu on kirjeldatud esiosas (1. rida = töö PP), st. koo lühendatud ridu järgmiselt- vaata KUDUMISE NIPPI: *koo esimesed 30-32-38 (42-47) s, pööra ja koo tagasirida, koo esimesed 46-50-57 (65-70) s, pööra ja koo tagasirida, koo esimesed 64-70-80 (90-98) s, pööra ja koo tagasirida, koo kõik 70-76-86 (96-104) s, pööra ja koo tagasirida *, korda alates *-*. Kui töö kõrgus on 28-31-35 (37-40) cm mõõdetuna SM-st (mõõda enne esimsest pööramist, st. skeemi M.1 kohalt), katkesta lõng. Tõsta allääre poolsed esimesed 41-45-52 (60-65) s silmusehoidjale (= külg). Loo varruka jaoks 36-42-46 (60-70) uut silmust silmusehoidjal olevate silmuste kohale (st. enne vardal olevat 29-31-34 (36-39) silmust) ja koo nagu enne *-* nagu on kirjeldatud teises varrukas, st. koo järgmiselt (1. rida = töö PP): * koo esimesed 41-47-51 (65-75) s, pööra ja koo tagasirida, koo esimesed 59-67-74 (90-103) s, pööra ja koo tagasirida, koo kõik 65-73-80 (96-109) s, pööra ja koo tagasirida *. Korda alates *-*. Kui varrukad on ühelaiused, koo maha varruka alläärest 36-42-46 (60-70) s. Katkesta lõng. Tõsta silmusehoidjal olevad 41-45-52 (60-65) kehaosa küljesilmust tagasi vardale ja koo kehaosa allservast alustades nagu enne *-* nagu on kirjeldatud esiosas (1. rida = töö PP), st. koo lühendatud ridu järgmiselt- vaata KUDUMISE NIPPI: * koo esimesed 30-32-38 (42-47) s, pööra ja koo tagasirida, koo esimesed 46-50-57 (65-70) s, pööra ja koo tagasirida, koo esimesed 64-70-80 (90-98) s, pööra ja koo tagasirida, koo kõik 70-76-86 (96-104) s, pööra ja koo tagasirida *, korda alates *-*. Kui esiosad on sama laiusega (nööbiliistuvõrra vähem), koo järgmine rida, töö PP, järgmiselt: koo pr esimesed 23 s, SAMAL AJAL kahanda 8 silmust võrdsete vahedega (kahanda 1 silmus kududes 2 pr kokku) ja koo pr ülejäänud 47-53-63 (73-81) s = 62-68-78 (88-96) s. Nüüd koo nööbiliist järgmiselt (1. rida = töö VP: koo pr 3 rida kõikide silmustega, järgmisel real, töö PP, tee 3 nööpauku järgmiselt (st. allservast kaelakaare poole): koo 41-45-53 (61-65) pr, 1 õs, 2 pr kokku, 7-8-9 (10-12) pr, 1 õs, 2 pr kokku, 7-8-9 (10-12) pr, 1 õs, 2 pr kokku ja lõpetuseks koo 1 pr. Pööra ja koo tagasireal kõik silmused pr. Nüüd koo 5 rida parempidi kõikide silmustega ja koo silmused lõdvalt maha, töö PP. ÜHENDAMINE Õmble kokku käealused õmblused, serv servaga. Õmble külge nööbid. HEEGELDATUD ÄÄRIS Heegelda ääris mööda alumist serva valge lõngaga järgmiselt: 1 kinnissilmus (ks), * 3 ahels, 1 ühekordne sammas (sm) esimesse ahels-sse, jäta vahele umbes 1 cm, 1 ks *, korda alates *-*. Heegelda samamoodi ääris ka mõlema varruka ümber. |
||||||||||||||||||||||
Skeemi seletused |
||||||||||||||||||||||
|
||||||||||||||||||||||
 |
||||||||||||||||||||||
Kas oled teinud seda mustrit?Lisa oma piltidele viide #dropspattern või saada link projektile meie #dropsfan galeriisse. Vajad abi selle mustriga?Garnstudio.com kodulehel on 16 õppevideot, küsimuste/vastuste osa ja muudki. © 1982-2026 DROPS Design A/S. Kõik õigused kaitstud. See dokument, ning selle alajaotused on kaitsud autoriõigustega. Loe rohkem, mida meie mustritega võib teha, iga mustrilehe alt meie kodulehel. |
||||||||||||||||||||||


Tegeledes üle 40 aasta kudumise ja heegeldamise disainidega, pakub DROPS Design ühte suurimat tasuta mustrite kollektsiooni internetis - tõlgituna 17 keelde. Tänaseks on meil 325 kataloogi ja 12298 mustrit - millest 9442 on tõlgitud Eesti keelde.
Me anname endast parima, et tuua teieni kõike mida kudumine ja heegeldamine võib pakkuda - inspiratsiooni, nõuandeid ning ka kvaliteetseid lõngu parima hinnaga! Soovid kasutada mustreid muukski, kui ainult oma tarbeks? Loe infot meie Copyright osas iga lehekülje all. Rõõmsat loomist!
Jäta kommentaar mustrile DROPS Baby 20-12
Ootame kommentaare selle mustri kohta!
Kui soovid midagi küsida, siis kiiremaks vastuse saamiseks veendu, et valid õige kategooria alloleval formil. Vajaliku väljad *.