
Oblíbené kategorie
Hledáte přízi?


Komentáře / Otázky (130)
![]() Camilla napsala:
Camilla napsala:
Förstår inte mönstret när jag ska sticka benetgenom att delapå benets insida ?
12.01.2026 - 21:48Odpověď DROPS Design :
Hej Camilla, du deler øverst på benet, så der bliver en lille kile, så det ikke bliver for trangt :)
29.01.2026 - 10:17
![]() Anne napsala:
Anne napsala:
Hei, kaarrokkeen pääntien kavennukset tehdään jokatoinen kerros. Tarkoittaako tämä että toisen reunan kavennus tulee nurjalla puolella?
29.11.2025 - 17:08Odpověď DROPS Design :
Kyllä, toisen reunan kavennukset tehdään aina työn nurjalta puolelta.
01.12.2025 - 17:14
![]() Zoe Davies napsala:
Zoe Davies napsala:
I am working on the leg but I don’t understand what to do when the pattern tells me to divide piece at inside of leg and complete piece back and forth. Do I use just 2 dpn here instead of 4 (like regular knitting)????
07.11.2025 - 20:15Odpověď DROPS Design :
Hi Zoe, you will knit it like the sleeve in the video HERE. You can use circular needle to do so. It will be easier. Happy knitting!
24.11.2025 - 10:50
![]() Riikka napsala:
Riikka napsala:
Mistä saan tän ohjeen?
27.06.2025 - 08:18Odpověď DROPS Design :
Hei, kaikki ohjeemme ovat ilmaisia. Klikkaa vain lehteä Baby 20 ja valitse malli 23.
27.06.2025 - 16:38
![]() Penelope napsala:
Penelope napsala:
Hvad betyder dette, jeg forstår det ikke. Retstrik i hver side mod midt foran til hætten måler 21-23-25 (27-28) cm, luk af.
16.04.2025 - 15:39
![]() Laura napsala:
Laura napsala:
Hei, Olen kohdassa, jossa hihat tulisi ottaa mukaan kädenteitä varten päätettyjen silmukoiden tilalle. Päätin ohjeen mukaisesti puvun silmukat oikean puolen kerroksella eli seuraavaksi tulisi nurja kerros. Ohjevideossa hihat neulotaan oikean puolen kerroksella mukaan työhön. Pitäisikö tässä siis kuitenkin ottaa hihat mukaan nurjan puolen kerroksella vai miten se tulisi tehdä?
13.02.2025 - 19:20Odpověď DROPS Design :
Hei, voit hyvin ottaa hihat mukaan työhön oikean puolen kerroksella.
17.02.2025 - 18:04
![]() Anke Keil napsala:
Anke Keil napsala:
Liebes Team, die Kapuze ist nicht das Problem, die ist fertig. Es geht um: "Rund um die Kapuze auf Rundnadel Nr. 3,5, 112-124-136 (144-152) M. aufnehmen." Die Kapuze selber hat ja viel weniger Maschen. Soll man hier auch Maschen über den Blenden aufnehmen? Ich weiß nicht genau, woher so viele Maschen aufgenommen werden sollen. Auf dem Foto sieht es so aus, als seien die Maschen von der Innenseite der Kapuze aufgenommen? Liebe Grüße....Anke
22.08.2024 - 10:47Odpověď DROPS Design :
Liebe Anke, die Kapuze misst ca 21-23-25 (27-29) cm x 2 Seiten, so werden Sie an den 42-46-50 (54-58) cm diese 112-124-136 (144-152) Maschen auffassen, man braucht soviele Maschen, weil das Bündchen die Arbeit zusammenzieht, gerne können Sie bei der 1. Reihe die Maschenanzahl anpassen, wenn Sie dann nicht soviele Maschen aufgefassen haben. Viel Spaß beim Stricken!
22.08.2024 - 15:51
![]() Anke Keil napsala:
Anke Keil napsala:
Ich verstehe nicht, wo genau ich die Maschen aufnehmen soll: Die Kapuze oben zusammennähen. Danach rund um die Kapuze .....Maschen aufnehmen? Die glatt re Reihen hatten ja 72 M. Wo setze ich an mit der Aufnahme und wo bekomme ich die ganzen M her? Soll ich die zunehmen?
21.08.2024 - 22:22Odpověď DROPS Design :
Liebe Frau Keil, die Kapuze wird wie in diesem Video zusammengenäht, Unterschied ist das im Video strickt man 3 M Krausrechts beidseitig und in diesem Modell wird man anstattt die Maschen um die Kapuze auffassen um das Bündchen zu stricken. Viel Spaß beim stricken!
22.08.2024 - 08:30
![]() Anke Keil napsala:
Anke Keil napsala:
Liebes Team, ich bin am Anfang der Blende. Soll man inclusive der 1. und 2. Reihe mit dem Bündchenmuster zusammen 2 cm erreichen bis die Knopflöcher gestrickt werden oder 2 cm allein das Bündchenmuster? Beginnt die Knopflochreihe in der Hin- oder Rückreihe?
09.08.2024 - 19:33Odpověď DROPS Design :
Liebe Frau Keil, Sie können vom Anfang messen, die Krausrippe wird nicht so "hoch" sein; die Knopflöcher werden bei einer Hinreihe bearbeitet. Viel Spaß beim Stricken!
12.08.2024 - 07:43
![]() Anke Keil napsala:
Anke Keil napsala:
Für die Raglanpasse werden doch sicherlich die Maschen des Stramplers zusammen mit den Maschen der Ärmel aufgenommen? Mit welcher Rundnadelstärke wird denn dann gestrickt? Es steht dort nur, dass alle Maschen auf eine Rundnadel gelegt werden. Wo genau sollen die vier Markierungen angebracht werden? Liebe Grüße.....Anke
02.08.2024 - 08:00Odpověď DROPS Design :
Liebe Frau Keil, ja genau, alle Maschen werden mit der Nadel Nr 4,5 für die Passe gestrickt. Die Markierungen setzen Sie bei jedem Übergang zwischen Vorder-/Rückenteil und Ärmel. Viel Spaß beim Stricken!
02.08.2024 - 14:28
|
|
Little Blue Dream#littlebluedreamoverall |
|
 |
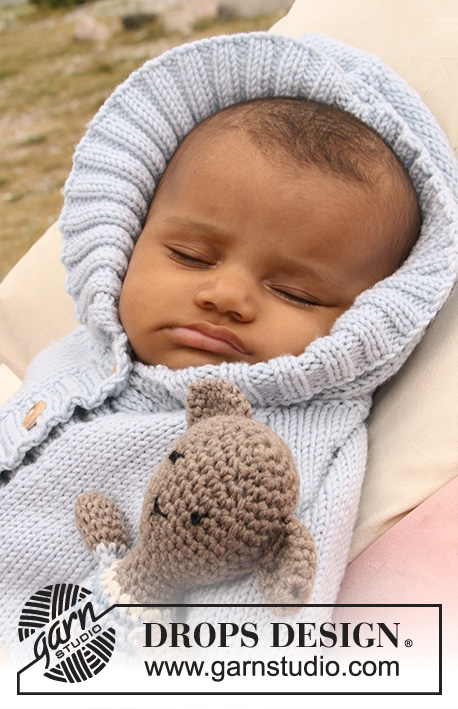 |
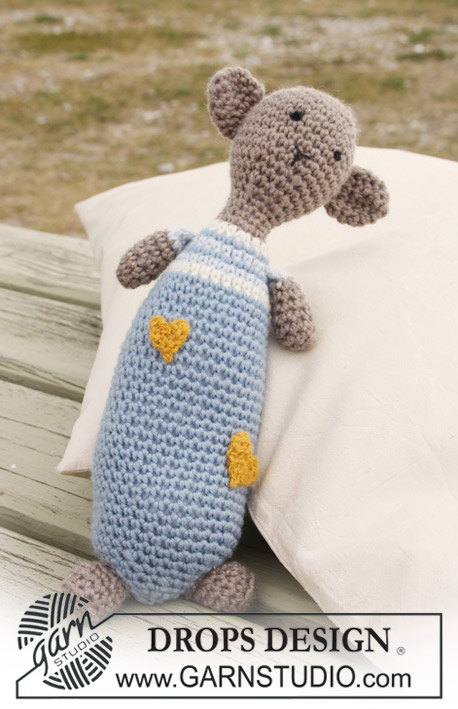
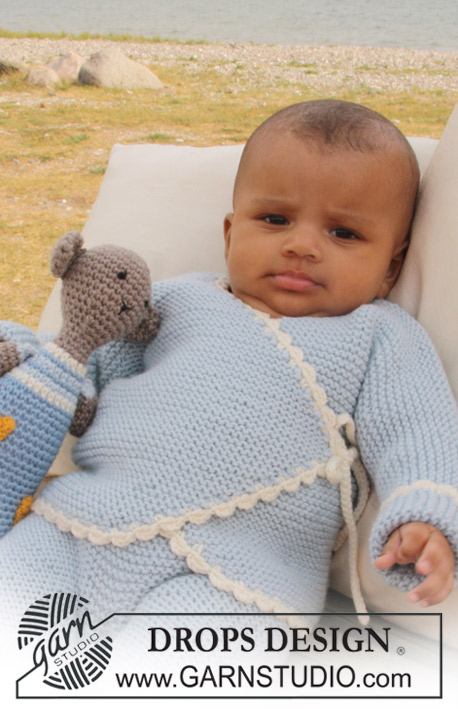
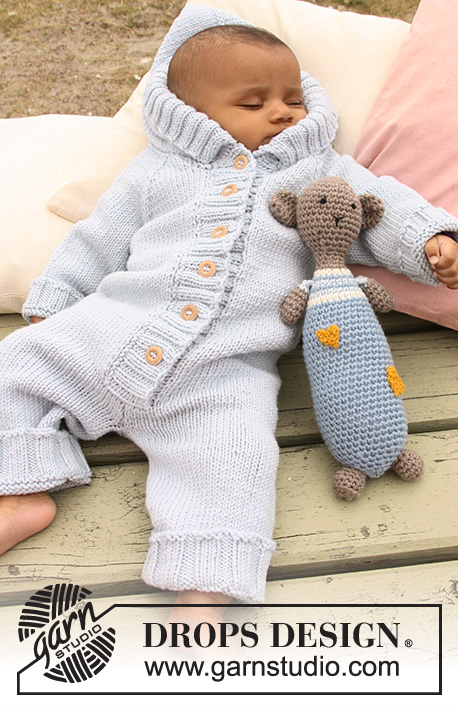
Souprava: overal s raglánovými rukávy pletený z příze DROPS Merino Extra Fine a medvídek se srdíčky háčkovaný z příze DROPS Merino Extra Fine
DROPS Baby 20-23 |
|
|
OVERAL: VROUBKOVÝ VZOR: Pleteme stále hladce, lícové i rubové řady. TIP - UJÍMÁNÍ: Ujímáme v lícových řadách, takto: PŘED značkou splétáme 2 oka hladce, ZA značkou ujímáme přetažením: 1 oko sejmeme hladce, 1 oko upleteme hladce a sejmuté přes ně přetáhneme. ---------------------------------------------------------------------- NOHAVICE: Pleteme v kruhových řadách na ponožkových jehlicích. Na ponožkové jehlice č.3,5 nahodíme přízí Merino Extra Fine 48-54-60 (66-72) ok. Označíme si začátek kruhové řady = vnitřní strana nohavice. Upleteme 1 kruhovou řadu hladce a pokračujeme patentem 3/3 (tj. 3 oka hladce/3 obrace) do výše 4-4-4 (5-5) cm. Pak upleteme 1 kruhovou řadu hladce a SOUČASNĚ ujmeme rovnoměrně 6 ok = 42-48-54 (60-66) ok. Pleteninu převedeme na ponožkové jehlice č.4,5, upleteme 1 kruhovou řadu obrace a pokračujeme lícovým žerzejem. Ve výši 6-6-6 (7-7) cm přidáme na obou stranách značky 1 oko a toto přidávání opakujeme vždy po 3-4-5 (5-7) cm výšky pleteniny, celkem 4x = 50-56-62 (68-74) ok. Ve výši 16-20-23 (25-32) cm díl u značky rozdělíme a dopleteme ho v řadách (usnadníme si tak pozdější přechod na kruhovou jehlici). Na každé straně přidáme 1 krajové oko = 52-58-64 (70-76) ok. Ve výši 18-22-25 (29-34) cm uzavřeme na každé straně 1 oko. Díl odložíme na pomocnou jehlici a stejným způsobem upleteme druhou nohavici. TRUP: Obě nohavice převedeme na společnou kruhovou jehlici č.4,5 = 100-112-124 (136-148) ok. Pleteme v řadách od okraje jedné přední légy ke druhé (první řada = lícová), takto: 4 oka uzavřeme, zbylá oka upleteme hladce. Práci otočíme, uzavřeme 4 oka a zbývající oka upleteme obrace = 92-104-116 (128-140) ok. Pokračujeme lícovým žerzejem v řadách. Ve výši 37-45-53 (58-65) cm pleteme následující lícovou řadu takto: 17-20-23 (26-29) ok lícovým žerzejem (= pravý přední díl), pro průramek uzavřeme 8 ok, 42-48-54 (60-66) ok upleteme lícovým žerzejem (= zadní díl), pro průramek uzavřeme 8 ok, 17-20-23 (26-29) ok upleteme lícovým žerzejem (= levý přední díl). Díl odložíme a upleteme rukávy. RUKÁV: Pleteme v kruhových řadách. Na ponožkové jehlice č.3,5 nahodíme přízí Merino Extra Fine 36-42-42 (48-48) ok. Upleteme 1 kruhovou řadu hladce a pokračujeme patentem 3/3. Ve výši 3 cm upleteme 1 kruhovou řadu hladce a SOUČASNĚ ujmeme rovnoměrně 6-10-8 (12-10) ok = 30-32-34 (36-38) ok. Pleteninu převedeme na ponožkové jehlice č.4,5 a upleteme 1 kruhovou řadu obrace. Označíme si začátek kruhové řady = střed vnitřní strany rukávu. Pleteme lícovým žerzejem a SOUČASNĚ ve výši 5 cm přidáme na obou stranách značky 1 oko; toto přidávání opakujeme v každé 5.-5.-6.(6.-6.) kruhové řadě, celkem 6-6-7 (8-9)x = 42-44-48 (52-56) ok. Ve výši 17-18-21 (24-28) cm uzavřeme středních 8 ok (4 oka na každé straně značky) = 34-36-40 (44-48) ok. Díl odložíme a stejným způsobem upleteme druhý rukáv. SEDLO: Oba rukávy přidáme k trupu na společnou kruhovou jehlici (rukávy přiložíme k otvorům pro průramky) = 144-160-180 (200-220) ok. Označíme si všechna místa, kde se rukávy stýkají s trupem = do pleteniny umístíme 4 značky. Pleteme v řadách lícovým žerzejem a SOUČASNĚ ve 3. řadě začneme tvarovat raglán: na obou stranách každé značky ujmeme 1 oko – viz TIP - UJÍMÁNÍ! Toto ujímání opakujeme v každé 2. řadě (= v každé lícové), celkem 10-11-12 (13-15)x. SOUČASNĚ začneme po 7.-6.-6. (6.-7.) raglánovém ujmutí tvarovat i průkrčník: na obou stranách uzavíráme na začátku každé řady 3-3-4 (5-5)x 2 oka a 0-2-2 (2-3)x 1 oko. Po dokončení tvarování raglánu i průkrčníku zbývá na jehlici 52-56-64 (72-74) ok a díl měří asi 45-53-62 (68-77) cm. Poté všechna oka uzavřeme. PŘEDNÍ LÉGA: Z okraje pravého předního dílu nabereme kruhovou jehlicí č.3,5 přízí Merino Extra Fine 63-75-91 (95-103) ok - postupujeme od dolního okraje směrem k průkrčníku. Upleteme 1 rubovou a 1 lícovou řadu hladce a v následující rubové řadě rozvrhneme patent 2/2 - pleteme takto: 1 oko vroubkovým vzorem, *2 oka obrace, 2 hladce*, *-* opakujeme a řadu končíme 2 oky obrace. Ve výšce patentu 2 cm vypleteme v následující lícové řadě knoflíkové dírky: prvních 10-10-2 (6-2) ok upleteme patentem, *2 oka spleteme obrace, 1x nahodíme, 10 ok patentem*, *-* opakujeme celkem 4-5-7 (7-8)x, řadu končíme spletením 2 ok obrace, 1x nahodíme, 2 oka upleteme hladce, 1 oko vroubkovým vzorem. Pokračujeme patentem. Když léga měří 4 cm, všechna oka uzavřeme (hladce nad hladkými, obrace oka pletená obrace). Stejně upleteme i levou přední légu, jen bez knoflíkových dírek. KAPUCE: Z okraje průkrčníku nabereme kruhovou jehlicí č.4,5 asi 60 až 100 ok (na oběma légami oka nenabíráme!). Pleteme 1 řadu (rubovou) hladce a SOUČASNĚ upravíme počet ok na výsledných 44-48-52 (56-60) ok. Upleteme 4 řady vroubkovým vzorem. Dále pleteme 1 lícovou řadu hladce a SOUČASNĚ přidáme rovnoměrně 24 ok = 68-72-76 (80-84) ok. Upleteme 1 rubovou řadu obrace a pokračujeme patentem 2/2, takto: 1 oko vroubkovým vzorem, 2 oka hladce, *2 obrace, 2 hladce*, *-* opakujeme a řadu končíme 1 okem vroubkovým vzorem. Patentem pleteme do výšky 2 cm a dále pokračujeme lícovým žerzejem, krajová oka pleteme vroubkovým vzorem. Ve výši 21-23-25 (27-28) cm oka uzavřeme. Kapuci přeložíme na polovinu a v horní části sešijeme; šev vedeme krajovými oky, aby byl co nejjemnější. Z okraje kapuce nabereme kruhovou jehlicí č.3,5 112-124-136 (144-152) ok. 1. (rubovou) i 2. řadu upleteme hladce a pokračujeme patentem, takto - následující řada je rubová: 1 krajové oko, *2 obrace, 2 hladce*, *-* opakujeme nad následujícími 108-120-132 (140-148) oky, řadu končíme 2 oky obrace a krajovým okem. Patentem upleteme 8 cm výšky pleteniny a poté všechna oka dle vzoru uzavřeme. DOKONČENÍ: Sešijeme otvory v podpaží, sešijeme vnitřní švy nohavic. Dolní okraj levé légy všijeme do trupu a přišijeme na ni knoflíky. Okraj kapuce přehneme do lícu naplovic, na každé straně přišijeme k hornímu okraji légy a rožek přehnuté části přichytíme na lícové straně několika stehy. ---------------------------------------------------------------------- MEDVÍDEK: TIP NA HÁČKOVÁNÍ: První KS v řadě nahrazujeme řo a každou kruhovou řadu končíme pevným okem do prvního KS ze začátku řady. SPOJENÍ 2 KS: Háček vpíchneme do prvního oka, přízi protáhneme, háčkem vpíchneme do dalšího oka, přízi protáhneme, 1x nahodíme a háček protáhneme třemi smyčkami na háčku. ---------------------------------------------------------------------- HLAVA A TĚLO: Začínáme na vrcholu hlavu a po dokončení hlavy pokračujeme tělem. Následují ouška, ruce, srdíčka, která na závěr přišijeme. HLAVA: Viz TIP NA HÁČKOVÁNÍ! Háčkem č. 4 světle hnědou barvou uháčkujeme 4 řo a spojíme pevným okem do kruhu. 1. kruhová řada: 6 KS do kruhu. 2.kr.ř.: do každého KS háčkujeme 2 KS = 12 KS. 3.kr.ř.: * do prvního KS háčkujeme KS, do následujícího KS háčkujeme 2 KS*, mezi *-* opakujeme = 18 KS 4.kr.ř.: * do prvních dvou KS háčkujeme KS, do následujícího KS háčkujeme 2 KS*, mezi *-* opakujeme = 24 KS. 5.kr.ř.: * do prvního tří KS háčkujeme KS, do následujícího KS háčkujeme 2 KS*, mezi *-* opakujeme = 30 KS. 6. – 11.kr.ř.: do každého KS háčkujeme KS = 30 KS. 12.kr.ř.: * do prvních tří KS háčkujeme KS, 2 KS spojíme v jeden (viz popis výše)*, mezi *-* opakujeme = 24 KS. 13.kr.ř.: do každého KS háčkujeme KS = 24 KS. 14.kr.ř.: * do prvních dvou KS háčkujeme KS, 2 KS spojíme v jeden *, mezi *-* opakujeme = 18 KS. 15.kr.ř.: * do prvního KS háčkujeme KS, 2 KS spojíme v jeden*, mezi *-* opakujeme = 12 KS. 16. – 18.kr.ř.: do každého KS háčkujeme KS = 12 KS. 19.kr.ř.: * do prvních dvou KS háčkujeme KS, do následujícího KS háčkujeme 2 KS*, mezi *-* opakujeme = 16 KS. Změníme barvu na přírodní. 20.kr.ř.: * do prvních dvou KS háčkujeme KS, do následujícího KS háčkujeme 2 KS*, mezi *-* opakujeme = 20 KS. Změníme barvu na světle šedá/modrá. 21.kr.ř.: do každého KS háčkujeme KS = 20 KS. Změníme barvu na světle šedá/zelená. 22.kr.ř.: * do prvních čtyř KS háčkujeme KS, do následujícího KS háčkujeme 2 KS*, mezi *-* opakujeme = 24 KS. Změníme barvu na světle šedá/zelená. 23.kr.ř.: do každého KS háčkujeme KS = 24 KS. Změníme barvu na světle šedá/modrá 24.kr.ř.: * do prvních tří KS háčkujeme KS, do následujícího KS háčkujeme 2 KS*, mezi *-* opakujeme = 30 KS. Změníme barvu na přírodní. 25.kr.ř.: do každého KS háčkujeme KS = 30 KS. Změníme barvu na světle šedá/modrá a háčkujeme zbývající část těla: 26. – 29.kr.ř.: do každého KS háčkujeme KS = 30 KS 30.kr.ř.: * do prvních devíti KS háčkujeme KS, do následujícího KS háčkujeme 2 KS*, mezi *-* opakujeme = 33 KS. 31. – 39. kr.ř.: do každého KS háčkujeme KS = 33 KS. 40.kr.ř.: * do prvních deseti KS háčkujeme KS, do následujícího KS háčkujeme 2 KS*, mezi *-* opakujeme = 36 KS. 41. – 46.kr.ř.: do každého KS háčkujeme KS = 36 KS. 47.kr.ř.: * do prvních deseti KS háčkujeme KS, 2 KS spojíme v jeden*, mezi *-* opakujeme = 33 KS. 48.kr.ř.: do každého KS háčkujeme KS = 33 KS. 49.kr.ř.: * do prvních devíti KS háčkujeme KS, 2 KS spojíme v jeden*, mezi *-* opakujeme = 30 KS. 50.kr.ř.: * do prvních tří KS háčkujeme KS, 2 KS spojíme v jeden*, mezi *-* opakujeme = 24 KS. 51.kr.ř.: do každého KS háčkujeme KS = 24 KS. 52.kr.ř.: * do prvních dvou KS háčkujeme KS, 2 KS spojíme v jeden*, mezi *-* opakujeme = 18 KS. 53. kr.ř.: do každého KS háčkujeme KS = 18 KS. 54. kr. ř.: * do prvního KS háčkujeme KS, 2 KS spojíme v jeden*, mezi *-* opakujeme = 12 KS. 55. kr.ř.: 2 KS spojíme v jeden = 6 KS. Tělo vyplníme bavlněnou vatou, přízi ustřihneme, protáhneme zbývajícími oky, utáhneme a zapošijeme. NOHY: Háčkem č. 4 světle hnědou barvou uháčkujeme 4 řo, která spojíme pevným okem do kruhu. 1. kruhová řada: 8 KS do kruhu. 2.kr.ř.: *do prvního KS háčkujeme KS, do následujícího KS háčkujeme 2 KS*, mezi *-* opakujeme = 12 KS: 3.kr.ř.: do každého KS háčkujeme KS = 12 KS – POZN. Háčkujeme za zadní část oka. 4.kr.ř.: do každého KS háčkujeme KS = 12 KS – POZN. Háčkujeme za obě smyčky oka. 5.kr.ř.: do každého KS háčkujeme KS, současně na začátku a konci každé řady spojíme 2 KS = 10 KS. 6. kr. ř.: do každého KS háčkujeme KS, současně spojíme v jeden vždy 5. a 6. KS a 7. a 8. KS = 8 KS. Přízi ustřihneme, druhou nohu uháčkujeme stejně. Díly naplníme bavlněnou vatou a přišijeme ke spodní části těla. RUCE: Háčkem č. 4 světle hnědou barvou uháčkujeme 4 řo, která spojíme pevným okem do kruhu. 1. kruhová řada: 4 KS do kruhu. 2.kr.ř.: do každého KS háčkujeme 2 KS = 8 KS. 3. – 6. kr. ř.: do každého KS háčkujeme KS = 8 KS. Změníme barvu na světle šedá/zelená. 7.kr.ř.: do každého KS háčkujeme KS = 8 KS. Ruce naplníme bavlněnou vatou, položíme a sháčkujeme vždy dva KS proti sobě = 4 KS. Přízi ustřihneme. Druhou ruku uháčkujeme stejně a přišijeme k tělu. UŠI: Háčkem č. 4 světle hnědou barvou uháčkujeme 4 řo, která spojíme pevným okem do kruhu. 1. kruhová řada: 6 KS do kruhu. 2.kr.ř.: * do prvního KS háčkujeme KS, do následujícího KS háčkujeme 2 KS*, mezi *-* opakujeme = 9 KS. 3.kr.ř.: * do prvních dvou KS háčkujeme KS, do následujícího KS háčkujeme 2 KS*, mezi *-* opakujeme = 12 KS. 4. – 6. kr. ř.: do každého KS háčkujeme KS = 12 KS. Díl položíme a sháčkujeme vždy dva KS proti sobě = 6 KS, práci otočíme a spojíme vždy 2 KS dohromady = 3 KS. Přízi ustřihneme, ucho přišijeme na boční stranu hlavy. Druhé ucho uháčkujeme stejně a přišijeme na protější stranu. MALÉ SRDÍČKO: Háčkem č. 3, červenou barvou přízí Fabel uháčkujeme 2 řo (na klubíčku se pokuste najít žlutou sekvenci vzoru). Do prvního řo od háčku háčkujeme 3 KS, práci otočíme. 1 řo, do každého oka háčkujeme KS = 5 KS (celkový počet zahrnuje i řo na začátku každé řady), práci otočíme. 1 řo, do každého KS háčkujeme KS = 6 KS (celkový počet zahrnuje i řo na začátku každé řady), práci otočíme. 4 řo, do prvního řo DS, do středu srdíčka KS, 4 řo, do prvního řo DS, řadu končíme pevným okem do prvního řo ze začátku řady. Přízi ustřihneme, srdíčko přišijeme na přední díl medvídka. Uháčkujeme ještě jedno srdíčko a přišijeme na záda medvídka. Oči a pusu vyšijeme černou přízí na přední část hlavy. |
|
 |
|
Dokončili jste tento model?Pak označte své fotky tagem #dropspattern #littlebluedreamoverall nebo je pošlete do galerie #dropsfan. Potřebujete s tímto návodem poradit?Otevřete-li si návod na stránce garnstudio.com, najdete tam 24 výukových video-ukázek, Komentáře/Dotazy a další užitečné informace. © 1982-2026 DROPS Design A/S. Vyhrazujeme si veškerá práva. Tento dokument, včetně všech jeho dílčích částí, podléhá autorským právům. Podrobnější komentář k možnostem užití našich návodů najdete dole pod každým návodem na našich stránkách. |
|


V oblasti pletené a háčkované módy působí DROPS Design více než 40 let. Díky tomu vám můžeme nabídnout jednu z nejrozsáhlejších kolekcí modelů s bezplatnými návody dostupnými na internetu - navíc v 17 jazycích. K dnešnímu dni máme na 324 katalogů a 12290 návodů celkem - z nich je už 7602 dostupných v [češtině].
Přidejte komentář k návodu DROPS Baby 20-23
Rádi bychom věděli, co si o tomto modelu myslíte!
Pokud se chcete na něco zeptat, dbejte prosím na to, abyste ve formuláři níže vybrali správnou kategorii - díky tomu se dříve dozvíte, co potřebujete vědět. Povinná pole jsou označena *.