Kommentarer til DROPS 212-43
![]() Nadia wrote:
Nadia wrote:
Wat is de kleurnummer van de wol op de afbeelding?
20.11.2025 kl. 09:34:DROPS Design answered:
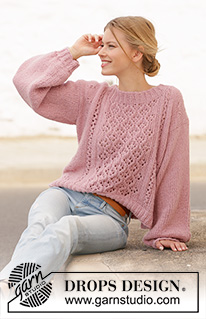
Dag Nadia,
Dit is dezelfde als de aangegeven kleur bij de materialen: kleur 24, pink.
20.11.2025 kl. 22:08:
![]() Vanessa wrote:
Vanessa wrote:
Hello. What is the purpose of decreasing after knitting the jumper rib? It seems very odd to me, and I worry the rib will now flare?
16.06.2025 kl. 11:40:DROPS Design answered:
Hi Vanessa, We recommend extra stitches in the rib so that the rib is not tight, and these extra stitches are then decreased before starting the body. However, feel free to adjust the stitch count on the rib/body if you wish. Regards, Drops Team.
17.06.2025 kl. 06:41:
![]() Vanessa wrote:
Vanessa wrote:
I'd really like the pattern on the back too. Would that work?
15.06.2025 kl. 21:42:DROPS Design answered:
Dear Vanessa, yes, you should be able to work the pattern on the back too. Happy knitting!
16.06.2025 kl. 00:45:
![]() Beate wrote:
Beate wrote:
Je tricote en taille XS. Après avoir rabattu 4 mailles devant pour les emmanchures , comment dois-je tricoter le diagramme A1 ?
14.12.2024 kl. 21:03:DROPS Design answered:
Bonjour Beate, tricotez les mailles de A.1 en jersey de chaque côté de A.2. Bon tricot!
16.12.2024 kl. 10:28:
![]() Geertje Meurs wrote:
Geertje Meurs wrote:
Is de trui met dubbele draad gebreid? Enkele draad is zo dun.
03.12.2024 kl. 11:04:DROPS Design answered:
Dag Geertje,
Nee, het werk wordt met 1 draad DROPS Air gebreid. (Of met 2 draden van een vervangend garen uit garencategorie A.)
04.12.2024 kl. 20:15:
![]() Marianne wrote:
Marianne wrote:
Jeg har problemer med halsenkanten. Har 33 masker på forstykket, samler 36 op på højre skulder, 39 masker på ryggen og samler 36 masker op på venstre skulder. Altså 2x72 masker. Er det rigtigt? Synes nemlig halsudskæringen er meget bred.
19.10.2024 kl. 22:20:DROPS Design answered:
Hei Marianne. Halsen på denne genseren er ganske vid (se gjerne bildene på dropsfan galleriet helt nederst på siden). Når du skal strikke vrangborden vil maskene trekke halskanten sammen, men du kan fint ha det maskeantallet du har og så kan du minske maskeantallet på første omgang til ønsket maskeantall / vidde rundt halsen (bare husk at maskeantallet skal være delelig med 3). mvh DROPS Design
23.10.2024 kl. 10:42:
![]() Alain CHAGOT wrote:
Alain CHAGOT wrote:
Modèle Drop 212-43. Je suis surprise par la dimension des manches. Plus la taille est grande, plus les manches sont courtes. Est-ce normal ? Merci pour votre réponse.
28.12.2023 kl. 12:06:DROPS Design answered:
Bonjour, oui c'est normal. C'est parce que les epaules sont plus larges dans les tailles plus grandes. Vous pouvez bien sur ajuster la longueur des manches a vos besoins. Bon tricot!
28.12.2023 kl. 13:40:
![]() Malgorzata wrote:
Malgorzata wrote:
Co to znaczy 39 oczek srodkowych na nitke na dekold w nastepnym rzedzie na prawej stronie robotki i konczyc kazde ramie osobno
17.09.2023 kl. 10:45:DROPS Design answered:
Witaj, na podanej wysokości przerobić oczka prawego ramienia na prawej stronie robótki. Zdjąć na nitkę 39 o. środkowych na dekolt. Przerabiać najpierw oczka prawego ramienia, czyli w kolejnym rzędzie (na lewej stronie) zamknąć 1 o. na początku rzędu. Przerobić do końca rzędu, przerobić rząd na prawej stronie i w kolejnym rzędzie (na lewej stronie) zamknąć 1 o. na początku rzędu. Przerabiać dalej (bez zamykanie o.) i zakończyć ramię, gdy długość tyłu od rzędu nabierania o. wynosi X cm (patrz cyfrę dla swojego rozmiaru). Teraz przerabiać lewe ramię (dołączyć nową nitkę i zacząć na prawej stronie robótki, czyli od strony dekoltu). Pozdrawiamy!
18.09.2023 kl. 08:30:
![]() Benamer wrote:
Benamer wrote:
Merci pour votre réponse Cordialement
13.02.2023 kl. 13:36:
![]() Benamer Noura wrote:
Benamer Noura wrote:
Bonjour modele 21243 que veut dire A.2 au-dessus des 10 mailles suivantes, A.1 au-dessus des 11 mailles suivantes
11.02.2023 kl. 17:24:DROPS Design answered:
Bonjour Mme Benamer, comme pour A.2 (cf réponse ci-dessous), cela signifie pour A.1 que vous devrez tricoter les 11 mailles suivantes comme indiqué dans le diagramme A.1. Bon tricot!
13.02.2023 kl. 09:09:
![]() Benamer wrote:
Benamer wrote:
Bonjour que veut dire tricoter A.2 au-dessus des 10 mailles suivantes,
11.02.2023 kl. 17:20:DROPS Design answered:
Bonjour Mme Benamer, cela signifie que vous devez tricoter les 10mailles suivantes en suivant le diagramme A.2. Bon tricot!
13.02.2023 kl. 09:08:
![]() Christa Lee wrote:
Christa Lee wrote:
Hi, about the neckline, the instruction says that it needs to be picked up 75 to 96 stitches. But the stitches, front and back, that are on the holders have already made up 70 stitches. How can I just pick up 5 to 26 stitches for the two shoulders, front and back ? Can I pick up more stitches than 96 ? I have counted mine and expected to pick up about 50 stitches without counting those on the holders. So it would be around 120 stitches in total for the neckline. Is it ok ?
03.01.2023 kl. 00:57:DROPS Design answered:
Hi Christa, The stitches around the neck are mainly made up of the front and back pieces, with the 70 stitches on the threads. The remaining stitches are picked up by the shoulder seams, where you don't need many stitches, just enough to avoid holes and make a neat neckline. Happy New Year!
03.01.2023 kl. 06:50:
![]() Diana wrote:
Diana wrote:
Hallo, vielen Dank für die tolle Anleitung! Das Muster ist ganz zauberhaft. Werden die Ärmel nicht in Runden gestrickt? Also, in Hin-und Rückreihen und danach zusammengenäht? Vielen Dank
01.11.2022 kl. 13:32:DROPS Design answered:
Liebe Diana, richtig, die Ärmel werden in Hin- und Rückreihen gestrickt dann zusammengenäht. Viel Spaß beim stricken!
01.11.2022 kl. 15:49:
![]() Rita wrote:
Rita wrote:
Going back to the shoulder Cast off! of the Seaside watcher jumper so, if i am casting off from the wrong side 2 stitches each time , whatever i am left with after the overall length i Just cast off the remaining stitches. Thanks Rita
29.10.2022 kl. 18:36:DROPS Design answered:
Dear Rita, when you have cast off the 37 middle stitches you finish each shoulder separately casting off 1 st at the beginning of next 2 rows from neck (= at the beg. of row from the right side for the left shoulder). Thee are now 17 sts left, cast off these sts when piece measures 50 cm. Work the 2nd shoulder the same way, casting off for the right shoulder 1 stitch at the beginning of next 2 rows from the wrong side. Happy knitting!
31.10.2022 kl. 08:40:
![]() Rita wrote:
Rita wrote:
Hi there Can u clarify the Right Shoulder From the CAST OFF. I'm knitting the back of the jumper Seaside Watcher. Iv casted off the 1 stitch 2 times, leaving 17sts. Prior to that the sentence reads I have 2 cast off on Every Row at the neck side. I do no what this means Exactly. Tks Rjta
26.10.2022 kl. 17:43:DROPS Design answered:
Dear Rita, after you have casting off the middle 37 sts (size M) for neck on back piece, you continue each shoulder separately, then cast off at the beginning of every row from neck 1 stitch 2 times (this means you cast off at the beg of every row from WS for the right shoulder (and then later from RS for the left shoulder), and continue working until piece measures 50 cm then cast off and work 2nd shoulder the same way. Happy knitting!
27.10.2022 kl. 09:43:
![]() Raquel wrote:
Raquel wrote:
Hola!como puedo recoger solo 96 puntos en escote si solo en descanso hay 72? Queda un hueco muy grande de escote por los 12cm de hombros(tallaL). O son 96 delante y 96 detras?
09.04.2022 kl. 18:02:DROPS Design answered:
Hola Raquel, la cantidad de puntos a recoger es aproximada (por eso dice entre 75 y 96 puntos). Dependiendo de la tensión del tejido puedes haber trabajado más o menos vueltas en el escote. Lo importante es que recojas puntos repartidos, que la cenefa del escote no quede tensa y que el número de puntos recogidos en total sea divisible entre 3 (debido al patrón del elástico).
09.04.2022 kl. 18:47:
![]() Ronja Børsting Solberg wrote:
Ronja Børsting Solberg wrote:
Hei! Stemmer det at ermer skal være kortere desto større størrelse du strikker? Ser at hvis du strikker en s så skal ermet være 50cm, men hvis du strikker en xl så skal det være 46cm.
04.03.2022 kl. 18:31:DROPS Design answered:
Hei Ronja, Ermene er kortere i større størrelser pgs videre hals og lengre bærestykke. God fornøyelse!
07.03.2022 kl. 07:11:
![]() Elizabeth wrote:
Elizabeth wrote:
On the front piece in the smallest size, after you have cast off for the armholes there are only 7 stiches left for A-1 pattern instead of 11. How should I work the pattern with the reduced stitches? Or just do stocking stitch for remainder?
03.07.2021 kl. 23:23:DROPS Design answered:
Dear Elizabeth, when -after decreasing- you do not have enough stitches for a pattern repeat, you knit those stitches with stockinett. Happy Kntting!
04.07.2021 kl. 00:46:
![]() Martha wrote:
Martha wrote:
Hi, I really don't understand why you would seam the sleeves first then sew up the side seams of the front and back. I found it difficult to place the sleeves in and then sew up the side seam after I had sewn up the sleeves especially where there was the 5cm allowance for the sleeve. Really difficult to twist and sew in the sides This should have been to sew in the sleeves tops at the shoulders and front and back and then sew up the side seams and sleeve seams all in one go.
23.06.2021 kl. 04:04:DROPS Design answered:
Dear Martha, see previous answer, hope this will help. Happy knitting!
23.06.2021 kl. 08:04:
![]() Martha wrote:
Martha wrote:
Hi, I really don't understand why you would seam the sleeves first then sew up the side seams. I found it difficult to place them in and then sew up the side seam after I had sewn up the sleeves. This should have been to sew in the sleeves at the shoulders first and then sew up the side seams and sleeve seams all in one go.
23.06.2021 kl. 03:56:DROPS Design answered:
Dear Martha, you first sew the shoulders and sew the sleeves; this video shows how to set a sleeve to a yoke/body - in the video the sleeve has been worked in the round, so that you can see how to sew the seamed sleeve on the yoke. But of course feel free to sew the sleeve how you are used to if you rather. Happy assembly!
23.06.2021 kl. 08:03:
![]() Elfrieda wrote:
Elfrieda wrote:
Ik heb een vraag over het voorpand. Ik ben aangekomen bij de armsgaten en ik vroeg me af of ik niet de armsgaten moet afkanten i.p.v. samenbreien zoals gezegd wordt. Voor het achterpand moet er wel afgekant worden, maar voor het voorpand moeten er volgens het patroon 5 steken geminderd worden aan elke kant. Ik ben hierdoor een beetje in de war geraakt.
23.04.2021 kl. 17:22:DROPS Design answered:
Dag Elfrieda,
Ja, er moet denk ik inderdaad afgekant worden in plaats van geminderd. Ik zal het doorgeven aan de ontwerpafdeling ter correctie.
25.04.2021 kl. 18:04:
![]() Nadia wrote:
Nadia wrote:
Buonasera, ho chiesto spiegazioni in riferimento a questa descrizione, "Quando il lavoro misura 30-31-32-33-34-35 cm dal bordo di avvio, diminuire 4-4-4-5-6-6 maglie all’inizio dei 2 ferri successivi per gli scalfi = 69-75-81-85-91-101 maglie." io capisco che bisogna diminuire la mia misura 6 maglie ma tutte in una volta cioè primo ferro diminuisco 6 maglie all\'inizio e secondo ferro rovescio diminuisco altre 6 sempre all\'inizio? È così? Grazie
15.02.2021 kl. 20:56:DROPS Design answered:
Buonasera Nadia, si, esatto, le 6 maglie devono essere diminuite insieme all'inizio dei 2 ferri successivi. Buon lavoro!
16.02.2021 kl. 22:48:
![]() Nadia wrote:
Nadia wrote:
"Quando il lavoro misura 30-31-32-33-34-35 cm dal bordo di avvio, diminuire 4-4-4-5-6-6 maglie all’inizio dei 2 ferri successivi per gli scalfi = 69-75-81-85-91-101 maglie." Io volevo capire esattamente come si lavora la dicitura qui sopra sono principiante e ho paura di non interpretare bene.
08.02.2021 kl. 11:59:DROPS Design answered:
Buonasera Nadia, deve seguire i numeri per la sua taglia e diminuire le maglie indicate. Buon lavoro!
09.02.2021 kl. 21:51:
![]() Mathilde wrote:
Mathilde wrote:
Bonjour, le modèle explique qu'il faut tricoter en aller-retour sur aiguilles circulaires, pensez-vous que je peux réaliser l'ouvrage avec des aiguilles normales ou il faut vraiment des circulaires ? Je vous remercie :)
16.01.2021 kl. 22:25:DROPS Design answered:
Bonjour Mathilde, tout à fait, on utilise ici une aiguille circulaire pour avoir suffisamment de place pour y loger toutes les mailles. Pour le col, vous pourrez coudre d'abord une des épaules, tricoter le col et coudre l'autre épaule et le col. Cette leçon explique comment adapter un modèle sur aiguilles droites. Bon tricot!
18.01.2021 kl. 09:05:
![]() Ashley wrote:
Ashley wrote:
When the it says “when the sleeves measure 8cm to increase” does that mean from cast on edge or after the ribbing? Thanks.
09.01.2021 kl. 00:06:DROPS Design answered:
Dear Ashley, measure the 10 cm (= 4 inches) before increasing from the cast on edge, then work these increases on every 8th cm = first increase will be worked at 10 cm, next at 18 cm, next at 26 cm etc.. Happy knitting!
11.01.2021 kl. 07:51:
![]() Mariann wrote:
Mariann wrote:
Hallo Dropsdesign, Ich habe Schwierigkeiten bei der Halsblende, da ich dem Text nicht entnehmen kann, ob man insgesamt im Ausschnitt 75-96 Maschen aufnehmen soll oder nur vorne? Ich habe vorne 33 Maschen stillgelegt und hinten 39, da ich den Pulli in L stricke. Wieviel Maschen soll ich denn jeweils vorne und hinten noch dazu aufnehmen und dann am Ende insgesamt auf der Nadel haben? Ich hoffe, Sie verstehen meine Frage. LG :)
07.12.2020 kl. 11:27:DROPS Design answered:
Liebe Mariann, Maschen werden Sie auch in den Reihen zwischen den abgekettenen Maschen am Rückenteil und die stillgelegten Maschen vom Vorderteil aufgefassen (siehe Video) - Die Maschenanzahl können Sie immer bei der 1. Runde anpassen, damit die Halsblende nicht zu eng weder nicht zu locker ist, und durch 3 teilbar ist. Viel Spaß beim stricken!
07.12.2020 kl. 15:53:
![]() Kate wrote:
Kate wrote:
Can you please explain why the suggested method here is to knit parts separately? For me it`s much easier to knit circular, devide the work on two pieces and close armholes stitches at the same time. It minimize a number of operations and seems convinient. Thank you for the answer!
26.08.2020 kl. 17:07:DROPS Design answered:
Dear Kate, some people do rather work separate pieces that are sewn together, so that we can have something for everyone - feel free to adapt the pattern if you like to. Happy knitting!
27.08.2020 kl. 09:23:
![]() Christina wrote:
Christina wrote:
Hei kan dere legge ut hjelpevideo som tar for seg hvert tegn i diagrammaet, så det blir demonstrert hvordan vært tegn skal strikkes? Det ville være god hjelp! For det andre dere har lagt ut er desverre ikke nok hjelp. Håper raskt svar tilbake😊
02.08.2020 kl. 08:39:DROPS Design answered:
Hej Christina, det er samme teknikker som går igen, prøv at få hjælp hos din lokale DROPS butik, så er vi sikker på at du kan strikke alle fine hulmønstre fremover. Vi har jo masser af videoer som indeholder disse tegn og som viser hvordan man strikker efter diagram. God fornøjelse!
04.08.2020 kl. 10:35:
![]() Celina wrote:
Celina wrote:
Hola tendrán un video que explique como se tejen los 3 puntos en el mismo punto, del diagrama A1. O me pueden explicar como se hace el tercero? Ya que el primero es de derecho, el segundo es una lazada, entonces el tercero se saca igual que el primero o por atrás del punto.
26.06.2020 kl. 07:59:DROPS Design answered:
Hola Celina. De momento no hay un video para trabajar este diagrama. Los tres puntos se trabajan como sigue: 1 derecho como siempre, una lazada y 1 derecho de la misma manera que el primer derecho. De este modo sale un ojal para el dibujo de calados.
20.12.2020 kl. 13:03:
![]() Marisol wrote:
Marisol wrote:
Al comenzar el dibujo talla “s” con 83 puntos , Como pueden no sobrar puntos, si el dibujo son : 11+10+33+10+11+ 2 de orilló son 77 puntos?, que hago mal? Me sobran 6 Gracias por todo
27.05.2020 kl. 22:24:DROPS Design answered:
Hola Marisol, contemos juntos :) 1+3 (puntos en punto jersey)+11+10+33+10+11+3 (puntos en punto jersey) +1 = 83. Buen trabajo!
20.11.2020 kl. 13:15:
![]() Barbro wrote:
Barbro wrote:
Det står att man ska sticka upp 75-96 maskor runt halsen till halskant. Men jag har ju redan 70 maskor på tråd på fram/bakstycket. Det blir ju bara 5 maskor extra, det kan ju inte stämma. Jag stickar storlek S. Eller ska jag sticka ihop maskor av dem jag har på tråd så det blir 75 maskor totalt?
04.05.2020 kl. 15:25:DROPS Design answered:
Hej Barbro om du stickar upp fler maskor till halskant, så kan du minska jämnt fördelat till önskat halsringning på första varvet. Lycka till :)
05.05.2020 kl. 10:19:
![]() Martina Schmidt wrote:
Martina Schmidt wrote:
Hallo Stimmen die cm Angaben des Vorderteils xxl? Nach 35 cm die Ärmel,ok. Aber nach 44 cm die Halsausschnitt? Am Diagramm ist der Pullover 58 cm lang?
13.04.2020 kl. 11:08:DROPS Design answered:
Liebe Frau Schmidt, die Angaben stimmen, aber gerne können Sie einpaar mehr cm in der Höhe stricken, wenn Sie die Halsausschnitt so weit möchten. Viel Spaß beim stricken!
15.04.2020 kl. 11:25:
![]() Abbie wrote:
Abbie wrote:
I am quite a beginner so this might be a silly question ... but how can the front and back both be some with circular needles, because if they are both circular how do you attach them??
12.04.2020 kl. 23:02:DROPS Design answered:
Dear Abbie, the sweater is knitted in pieces wich are sewn together at the end. We are using circulars because the high number of stitches fit better on them, and also they are easier to move around. happy Knitting!
14.04.2020 kl. 06:23:
![]() Torunn Maurseth wrote:
Torunn Maurseth wrote:
Det må da være noe som mangler i tegnforklaringen i dette mønsteret ?
01.04.2020 kl. 08:39:DROPS Design answered:
Hej Torunn, Hjælp os gerne med at beskrive hvad der mangler, så skal vi fikse det så hurtigt som muligt :)
01.04.2020 kl. 09:27:
![]() Susanne wrote:
Susanne wrote:
Ska jag BÖRJA med TVÅ räta innan resåren ? Visst ska kanterna vara lika? Och baksidan avslutas med TRE maskor???? Det gäller xl
30.03.2020 kl. 15:20:DROPS Design answered:
Hej Är det resåren på bakstycket du ska börja med? Resåren är 2 avigmaskor och 1 rätmaska (med kantmaskor i rätstickning) både på framstycket och bakstycket. Mvh DROPS Design
31.03.2020 kl. 07:42:
![]() Maminko wrote:
Maminko wrote:
Très joli tricot, qui va entrer en concurrence avec le modèle Berry Diamond sur lequel j'avais flashé. Je ne ferai certes pas les manches aussi larges, il y a trop de risques de s'accrocher partout, dans les poignées de portes, par exemple.
01.03.2020 kl. 16:28:
![]() Caroline wrote:
Caroline wrote:
Dans le diagramme A1 il y a une maille que l'on doit tricoter 3fois comme ceci: 1m end+1jeté+1m end, cela signifie que l'on doit refaire cet ensemble (1m end+1jeté+1m end) 3 fois ou que l'on doit juste faire 1fois l'ensemble (m end + jeté + m end)? Merci de votre réponse.
24.02.2020 kl. 22:21:DROPS Design answered:
Bonjour Caroline, vous ne le faites qu'une seule fois, ainsi vous avez 3 mailles tricotées dans 1 seule maille (= 3 mailles au lieu d'1 seule) - ces 2 augmentations sont compensées par la diminution de part et d'autre de cette augmentation. Bon tricot!
25.02.2020 kl. 09:32:
![]() Martina Schmidt wrote:
Martina Schmidt wrote:
Super. Dankeschön für die schnelle Erledigung.
14.02.2020 kl. 20:39:
![]() Martina Schmidt wrote:
Martina Schmidt wrote:
Hallo Sehr schöner Pullover..habe auch schon die Wolle gekauft. Aber bitte wo ist das Diagramm des Lochmusters?
13.02.2020 kl. 16:11:DROPS Design answered:
Liebe Frau Schmidt, Diagramme sind wieder da, und die finden Sie zwischen Diagramtext und Maßskizze nach der schriftlichen Anleitung. Viel Spaß beim stricken!
14.02.2020 kl. 08:03:
![]() Jokima wrote:
Jokima wrote:
Coup de coeur!!!
24.01.2020 kl. 19:29:
![]() Géraldine wrote:
Géraldine wrote:
Très beau
13.01.2020 kl. 22:04:
![]() Michèle wrote:
Michèle wrote:
Woah!!là j'adore
11.01.2020 kl. 18:05:
![]() Kersti H-B Lycke wrote:
Kersti H-B Lycke wrote:
Elegant
02.01.2020 kl. 14:07:
![]() BEAULIEUX C wrote:
BEAULIEUX C wrote:
Joli modèle à l'élégance décontractée
25.12.2019 kl. 19:54:
![]() MCMENEMY Isabelle wrote:
MCMENEMY Isabelle wrote:
Voici un pull parfait pour cacher les rondeurs en attirant l'oeil vers un motif charmant.
12.12.2019 kl. 13:37:
![]() Gransart wrote:
Gransart wrote:
Joli modèle mais Manches exagérément trop larges !
11.12.2019 kl. 09:46:Kommentér oppskrift DROPS 212-43
Vi vil gjerne høre din mening om denne modellen!
Hvis du ønsker å stille et spørsmål, husk å velge riktig kategori i menyen under - det vil sørge for at du får svar raskere.
Din mailadresse vil ikke synes. Obligatoriske felt er markert med *.
Inget bra mönster alls. Ärmhålet och ärmen passar inte ihop. Ärmhål större så stramar jättekonstigt trots att jag strykt och ångat och sträckt. Ärmen är absolut inte ballong. Både kort och tight. Väldigt konstigt också med beskrivning på hals. Man får ta hur många maskor man vill. Tog max antal maskor i beskrivningen, men blev för lite så ser inte snyggt ut.
03.11.2025 kl. 21:58: