
Categorías populares
¿Buscas un hilo?


Aumentos y disminuciones en un gorro de bebé
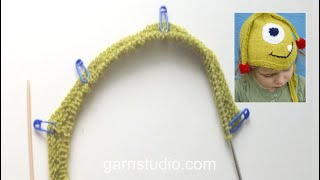
Montar el número de puntos estipulado, incluyendo 1 pt de orillo de cada lado, el cual se teje de derecho en todas las hileras.
Ya hemos tejido 12 hileras, incluyendo los surcos, y hemos colocado 7 marcapuntos.
Empezamos el video mostrando, por el lado derecho (LD), cómo aumentamos en el 1er marcapuntos con una HEB (lazada) y, después, cómo disminuimos en el 2º marcapuntos, disminuyendo 1 pt de cada lado del pt con marcapuntos de esta manera: empezar 1 pt antes del pt con marcapuntos, deslizar 1 pt en una aguja auxiliar hacia atrás de la pieza, deslizar 1 pt (= pt con marcapuntos), tejer juntos de derecho el pt siguiente y el pt en la aguja auxiliar, pasar el pt deslizado por encima. Repetir el aumento con 1 HEB en el 3º, 5º y 7º marcapuntos y repetir la disminución en el 4º y 6º marcapuntos. En el LD, tejer de derecho los pts entre los marcapuntos y terminar la hilera con 1 pt de orillo tejido de derecho. En el LR, tejer 1 pt de orillo de derecho de cada lado, tejer los otros pts de revés, y todas las HEB retorcidas de revés (es decir, insertar la aguja por atrás del pt en vez de por delante) para evitar que se formen agujeros.
Patrones que utilizan esta técnica


Video #401, listado en: Tutoriales de los patrones, Baby & Children, Videos tutoriales de patrones de punto
Nuestros videos no tienen sonido. Somos una empresa internacional y nuestros videos son vistos por personas que hablan diferentes idiomas y muchas de ellas no comprenden el español. Consecuentemente, como no hay un idioma determinado a usar por nosotros, hemos escrito las instrucciones que acompañan el video, y no hay ningún sonido que interfiera mientras se ve el video.
Puedes ajustar la velocidad de este video haciendo clic en el ícono en la barra de reproducción.
Dejar un comentario o pregunta acerca de este video
Tu dirección de email no será publicada. Los campos obligatorios están marcados con un *.
También te podría gustar...


Con más de 40 años en el diseño de modelos de punto y de ganchillo, DROPS Design ofrece una de las más vastas colecciones de patrones gratuitos en el internet - traducidos en 17 idiomas. Al día de hoy, contamos con 325 catálogos y 12298 patrones - de los cuales 11698 están traducidos en español.
Nosotros trabajamos con mucho esmero para brindarte lo mejor que las labores de punto y ganchillo tienen para ofrecer,inspiración y consejos, así como hilos de magnífica calidad a precios increíbles! Te gustaría usar nuestros patrones para otro fin además del uso personal? Puedes leer acerca de lo que estás permitida a hacer en el texto de Copyright en la parte de abajo de todos nuestros patrones. Felices labores!
Is the decrease stitch worked with a third needle called Central Double Decrease? (CDD)
20.06.2021 - 02:56DROPS Design :
Dear Sophia, the decrease is worked here as follows: starting 1 stitch before the stitch with marker, slip 1 stitch on cable needle behind piece, slip 1 st (= st with marker), knit together next stitch and st on cable needle, pass slipped stitch over. Hope this will help. Happy knitting!
21.06.2021 - 09:05Hi - hope you can help I am up to where I am decreasing on RS and it states to decrease at 25th stitch then 59th stitch then 93rd stitch (2nd,4th and 6th marker)so I gather then when I have less than 93 stitches I then only decrease twice in row then when I have less than 59 stitches I decrease only once in row so how do I get down to 15 stitches when I am supposed to decrease on 25th stitch. Thanking You in anticipation. Regards Ann
23.08.2020 - 04:00DROPS Design :
Dear Mrs Plummer, you have to insert the markers between stitches as stated, ie in first size in the 2nd st, then in the 25th st, 48th st etc.. leave the marker in place and decrease/increase before/after markers as explained, the number of stitches between markers will then vary. Happy knitting!
24.08.2020 - 09:27Wie unvorteilhaft, dass hier so dünne Wolle genommen wurde zum Zeigen. Ich kann es nicht erkennen.
23.09.2019 - 19:03The video shows one increase or decrease at each marker only while the directions state 'on each SIDE of the marker'. That would suggest TWO increases/decreases at each marker (one on EACH side of the marker). Have I missed something?
06.10.2018 - 12:41DROPS Design :
Dear Mrs Clifford-Rosengren, the video shows how to increase and decrease in this pattern, ie you inc 1 st after 1st marker and before 7th marker, and then dec 1 st on each side of 2nd, 4th and 6th marker = 2 sts in total at these markers (as under DECREASE TIP) and inc 1 st on each side of 3rd and 5th marker (= 2 sts in total at these markers). Happy knitting!
09.10.2018 - 10:06Tusind tak for tippet, Anne Marie. Og tak til Garnstudio for alle de gode hjælpe videoer.
08.10.2014 - 08:00Det er meget nemmere at strikke Indtagningerne sådan: masken før OG midtermasken tages løs af (som vrangmaske), strik næste ret, træk begge de løse masker over. Voila, resultatet er helt det samme uden ekstrapind mm!
09.08.2014 - 12:09Es fehlt der Ton, Schade :-(
11.11.2013 - 10:16Renate :
Hallo Yvonne, diese Video-Anleitungen sind "stumm" damit jede(r) sie ohne Sprachbarriere verstehen kann. Einfach nur durch sehen bzw. schauen. Man kann sie anhalten oder immer wieder anschauen. Das ist der "Trick" :-)
23.11.2013 - 14:02Leider fehlt die Lautstärke.
11.11.2013 - 10:16Super strona bardzo często z niej korzystam Jadzia
29.09.2013 - 16:50