Kommentit ohjeeseen DROPS 214-41
![]() Denise wrote:
Denise wrote:
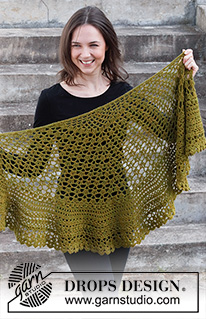
I wish this pattern was written in plain English.Its absolutely beautiful .
08.06.2025 kl. 00:13:
![]() Barbara wrote:
Barbara wrote:
Hello, I'm a bit confused about the row after the one with arrow 4. It looks like I should make 1 single crochet in the back loop, chain 3 and so on. However it doesn't show how many stitches I should skip before placing another single crochet. It looks like I should place it between the groups of three double crochets but it doesn't seem right?
22.12.2024 kl. 23:46:DROPS Design answered:
Dear Barbara, yes, the single crochet is worked between the 3 double crochet clusters. So you work 1 sc, chain 3, skip the 3 double crochets and work 1 single crochet before the next 3 double crochets. Happy crochetting!
23.12.2024 kl. 00:01:
![]() SylvieB93 wrote:
SylvieB93 wrote:
Bonjour, Désolée d'insister, mais dans une réponse à une question précédente posée par une personne nommée Leslie, pour la flèche 1 vous trouvez 48ms, pouvez-vous me confirmer svp ? Je crois que la traduction en français n'est pas correcte et pas compréhensible par tous le monde. Merci pour votre retour. Sylvie
19.12.2024 kl. 18:42:DROPS Design answered:
Bonjour Sylvie, vous avez raisons vous devez augmenter 4 m à chaque marqueur pour augmenter 48 mailles serrées, soit 4 mailles serrées à chacun des 12 marqueurs (2 ms avant + 2 ms après chacun des 12 marqueurs). Bon crochet!
20.12.2024 kl. 07:05:
![]() SylvieB93 wrote:
SylvieB93 wrote:
Bonjour, Je suis ne suis pas sûre d'avoir bien compris au niveau de la flèche 2 ? Faut-il crocheter 2 ms dans une même maille et de chaque côté de notre fil marqueur ? Ce qui fait 2 augmentations ? Merci pour votre confirmation, car quand je vois votre réponse à Leslie pour la flèche 1 je me suis trompée c'était bien 2 augmentations de chaque côté du fil marqueur ce qui fait un total de 4 augmentations, merci pour votre aide. Sylvie
17.12.2024 kl. 14:30:DROPS Design answered:
Bonjour Sylvie, à la flèche 1, on doit augmenter 2 mailles serrées à chaque marqueur soit 1 maille serrée de chaque coté de chaque fil marqueur = 24 augmentations (au lieu de crocheter 3 ms dans l'arceau, on en fera 4); à la flèche 2, on doit crocheter 2 mailles serrées dans 1 maille/autour de la maille en l'air (au lieu d'une seule comme dans le diagramme) de chaque côté de chacun des 12 fils marqueurs, on va ainsi augmenter 24 mailles serrées.
18.12.2024 kl. 07:55:
![]() SylvieB93 wrote:
SylvieB93 wrote:
Bonjour, Même en m'aidant de la liste des symboles, je ne suis pas sûre avoir compris à quoi sert le rond qui se trouve sous un arceau dans le diagramme A1 svp ? Merci pour votre aide. SylvieB93
13.11.2024 kl. 20:07:DROPS Design answered:
Bonjour SylvieB93, ce petit rond sert de repère pour savoir où augmenter au rang suivant, si vous regardez le rang suivant, vous avez 2 mailles serrées séparées de6 mailles en l'air dans ces arceaux alors que dans le autres arceaux, sans ce petit rond, vous n'avez qu'une seule maille serrée. Bon crochet!
14.11.2024 kl. 09:50:
![]() Leslie wrote:
Leslie wrote:
Bonjour, Je suis bloquée au niveau de l'augmentation fléche 1. Je ne comprends pas ce qu'il faut faire. Pouvez vous m'éclairer ? Merci pour votre aide.
07.11.2024 kl. 23:28:DROPS Design answered:
Bonjour Leslie, vous allez maintenant augmenter à intervalles réguliers, aux marqueurs que vous avez placé, à la flèche -1, vous allez crocheter 2 ms dans chacun des 2 arceaux avant et après les fils marqueurs: vous avez 12 fils marqueurs, vous augmentez 4 ms entre chacun des fils marqueurs pour avoir un total de 48 ms augmentées. Bon crochet!
08.11.2024 kl. 08:16:
![]() Bożena wrote:
Bożena wrote:
Dzień dobry, dlaczego nie ma możliwości wydrukowania wzoru? To bardzo utrudnia pracę.
03.11.2024 kl. 10:22:DROPS Design answered:
Witaj Bożenko, na samej górze wzoru, po prawej stronie od tytułu znajdziesz symbol drukarki. Kliknij i zobaczysz 2 opcje - drukowanie wzoru i drukowanie zdjęcia. Serdecznie pozdrawiamy!
04.11.2024 kl. 08:14:
![]() Barbara wrote:
Barbara wrote:
I got to the markers bit and got confused, the description is unclear to me. It says to insert marker in double crochet after 4 chain spaces, but after 4 spaces, counting from either edge it's a single. Similarly it then says to skip 7 chain spaces and insert markers in doubles again but they're not always doubles, sometimes it's singles. I ended up just counting the chain spaces as instructed and ignoring which stitch the marker goes in. That's the only way I'm getting 12 markers in
11.10.2024 kl. 21:18:
![]() Ewa wrote:
Ewa wrote:
You should add a comment on A5b, for the row above increase arrow 4 (row of X + 3 chain) that X should NOT be worked on every "connecting" stitch between previous row little fans, but on every 3rd stitch. This is the difference between getting 58 fans and 66 fans at the end of A5. Because A5b only shows a clean, no-increase column of stitches, it doesn't tell us how to crochet on the "4 stitch fans" in the increase row. This should be explained in writing.
06.10.2024 kl. 00:01:
![]() Barbara wrote:
Barbara wrote:
I'm struggling to understand one part of the diagram, take A.1 as example. There are those little circles that are described as "= around this chain space increase 1 chain space by working 2 chain spaces as shown in diagram" so what does that mean? Where the diagram has 6 chains and this circle do I do 7 chains? Or does this instruction mean something else? I really like this design and it's going to turn out gorgeous I'm sure!
22.09.2024 kl. 23:12:DROPS Design answered:
Dear Barbara, when you see those circles you have to crochet 2 chain spaces in these chain space on next round instead of just 1, see the circles on 2nd round in diagrams, then you can see 1 increase over each of these ch-space. See also this step/diagram included in a similar shawl made as a crochet along here. Happy crocheting!
23.09.2024 kl. 08:47:
![]() Briand wrote:
Briand wrote:
Bonjour Je commence ce châle mais je ne comprend pas ce qu’est le point arceau dans le 2 tour du diagramme A1. Je ne sais pas comment le lire et comment le réaliser Je vous remercie pour votre aide
26.05.2024 kl. 12:10:DROPS Design answered:
Bonjour Mme Briand, lisez les diagrammes de droite à gauche sur l'endroit (en commençant par le rang avec l'étoile) et de gauche à droite sur l'envers, autrement dit, au 2ème tour de A.1 crochetez: 7 mailles en l'air, 1 maille serrée dans le 1er arceau, *6 mailles en l'air, 1 maille serrée autour de l'arceau suivant*, crochetez de*à* encore 2 fois, 3 mailles en l'air, 1 double-bride dans le dernier arceau, tournez et crochetez le rang 3 en lisant de droite à gauche, et ainsi de suite; Bon crochet!
27.05.2024 kl. 08:44:
![]() Laura Da Costa Ludwig wrote:
Laura Da Costa Ludwig wrote:
Tem o passo a passo ou vídeo aula do xale pensamentos da Irlanda??
22.04.2024 kl. 23:27:
![]() Valérie wrote:
Valérie wrote:
Je ne comprends pas du tout ce qu'il faut faire à partir de :Plier le dernier rang de A.5a/A.5b sur l’endroit et crocheter sur l'envers autour du rang avec le carré noir dans A.5b (= rang avec: 1 demi-bride, 3 mailles en l’air, etc.) ainsi: Crocheter le 1er rang de A.6b ainsi (A.6a montre comment commence le rang ... Pourquoi faut-il plier ???
16.01.2024 kl. 18:27:DROPS Design answered:
Bonjour Valérie, dans ce DROPS-Along pour un châle similaire, vous pouvez voir en photos comment crocheter ce rang ici, mais pour A.7b dans cet indice, ou rang 50 dans cette vidéo. Bon crochet!
17.01.2024 kl. 09:11:
![]() Ambra Gregorio wrote:
Ambra Gregorio wrote:
Con tutti gli schemi di tanti scialli che ho fatto, non ne ho mai visto uno come questo, con un GRAFICO e SPIEGAZIONE INDECIFRABILE ! Faccio quasi meno fatica a capire certi passaggi osservando le foto e basandomi sull'esperienza, il che è tutto dire! Peccato, perché lo scialle è bellissimo.
15.09.2023 kl. 13:28:
![]() Nora wrote:
Nora wrote:
Hi, thanks for sharing this beautiful pattern. At the beginning of the work (diagram A.1), it says double crochet around chain, but once I've checked the instruction and the photos of the pattern it's more like a single crochet around chain space! Could you please help me to figure out what is right to do, a single crochet around chain or a double crochet?
12.09.2023 kl. 07:31:DROPS Design answered:
Dear Nora, make sure you are reading the appropriate English pattern as a single crochet in US-English is called a double crochet in UK-English. Click on the dropdown menu below the photos and select appropriate language. Happy crocheting!
12.09.2023 kl. 09:42:
![]() Dimpy wrote:
Dimpy wrote:
5b : 1st row how many bobbles are in this row? I have 82 bobbles 1 chain space ( of 3 chains) at the beginning and end of the row.
09.09.2023 kl. 21:57:DROPS Design answered:
Dear Dimpy, yes, there are 84 chain spaces, so you work 82 bobbles and 1 chain space at the beginning and the end. Happy crocheting!
10.09.2023 kl. 23:29:
![]() Susan wrote:
Susan wrote:
I have made up this shawl three times now and love it. But I couldn't quite work out what might be wrong with the photographs, so I blew them up larger so I could take a closer look. The third photograph is worn with the right side out and clearly shows the edge with the fans overlapping the next rows at A5 (where the fold occurs). But the other photographs are shown from what I think must be the wrong side. Once I realised that, the pattern made more sense to me. Or have I got this wrong?
08.09.2023 kl. 10:06:
![]() Mathilde wrote:
Mathilde wrote:
Bonjour, Après avoir répété les 4 rangs 3 fois et obtenu environ 37cm de hauteur je n’obtiens que 82 arceaux je ne comprend pas pourquoi est-ce qu’il est possible de continuer le châle avec cette base de 82 arceaux? ou bien je dois tout défaire pour trouver mon erreur? Merci d’avance
02.09.2023 kl. 23:44:DROPS Design answered:
Bonjour Mathilde, essayez de bien vérifier chaque partie des diagrammes pour savoir où il va vous manger ces 2 arceaux, placez des marqueurs entre chaque motif répété, ceci peut vous aider. Bonne continuation!
04.09.2023 kl. 08:23:
![]() Claudie wrote:
Claudie wrote:
Bonjour Je trouve moi aussi 19 arceaux après le diagramme A2a A2b A2c au lieu de 17 car sur le dernier rang on fait 2 augmentations. Faut il supprimer ces 2 augmentations . Merci
10.05.2023 kl. 11:14:
![]() Charlene Barnard wrote:
Charlene Barnard wrote:
I know 5a indicates start of each row...and 5b is worked right to left and then left to right. Is this diagram 5b indicating begin and end of each row
12.01.2023 kl. 10:51:DROPS Design answered:
Dear Mrs Barnard, start every row with A.5a, ie the right side as well as the wrong side rows, and ready A.5b right towards the left from the right side and left towards the right from the wrong side. A.6a and A.6b will be worked the same way. Happy crocheting!
12.01.2023 kl. 16:17:
![]() Sandrine Bibes wrote:
Sandrine Bibes wrote:
Bonjour Dans le 5b le rang après la flèche 4 , dans le rang 3 ml 1 ms j'ai 83 mailles en plus comment cela se fait il alors que le rang d'avant j'ai bien les 396 mailles comme indiqué Merci Cordialement
09.01.2023 kl. 17:00:DROPS Design answered:
Bonjour Mme Bibes, si vous avez bien 396 mailles après la flèche 4, vous avez alors 396/12 m par motif de A.5 à répéter = 33 motifs x 4 arceaux au rang suivant (ou celui pour A.6b) = 132 arceaux (+ les 48 arceaux à augmenter, vous aurez 180 arceaux pour A.6b). Bon crochet!
09.01.2023 kl. 17:20:
![]() Sandrine Bibes wrote:
Sandrine Bibes wrote:
Bonjour Pour les augmentations, faut-il déplacer les fils marqueurs ou faire les augmentations au même niveau au fur à mesure que l'ouvrage monte. Car pour le 6b j'ai beaucoup plus d'arceau. Merci Cordialement
09.01.2023 kl. 15:17:DROPS Design answered:
Bonjour Mme Bibes, effectivement, il va falloir faire suivre les fils marqueurs pour bien repérer où faire les augmentations -au rang de A.5 où vous crochetez A.6b vous devez avoir 396 mailles (soit 132 arceaux dans A.5b), vous augmentez 48 arceaux (4 arceaux à chaque marqueur (2 de chaque côté de chacun des 12 marqueurs) = 180 arceaux. Bon crochet!
09.01.2023 kl. 16:56:
![]() Charlene Barnard wrote:
Charlene Barnard wrote:
Not used to only diagram patterns with no additional instructions. Please just explain the first diagram to get me started
04.01.2023 kl. 15:12:DROPS Design answered:
Dear Mrs Barnard, this lesson should help you to understand how to read crochet diagram - a similar shawl was crocheted as crochet-along, and the first step can may be help you, but make sure to follow the correct pattern since there are some differences between both shawls. Happy crocheting!
04.01.2023 kl. 15:17:
![]() Josiane wrote:
Josiane wrote:
Bonjour J'ai un problème concernant le diagramme A5b après la rangée d'augmentation flèche 4. A quels espacements se font les mailles serrées pour obtenir 132 arceaux de 3 mailles en l'air ? Merci
01.01.2023 kl. 14:10:DROPS Design answered:
Bonjour Josiane, après la flèche-4, vous avez 396 mailles et donc suffisamment de mailles pour crocheter 33 fois les 12 mailles de A.5 b. Bon crochet!
02.01.2023 kl. 14:26:
![]() Bibes wrote:
Bibes wrote:
Bonjour cela fait 10 fs que je refais le chale. Pour répéter3 fois le dessin A3c (1èr) 3 fs 3 DB central dernier rg 9 fs 2 DB 1 ml 2 DB. Si je continue(2 fois) jai 9 fs 3 DB central. L'erreur est là car si je continue pour la dernière répétition j'arrive à plus du double d'arceau pour le A4. Comment faut-il faire je vous prie. Merci
06.12.2022 kl. 23:04:DROPS Design answered:
Bonjour Mme Bibes, lorsque vous avez crocheté A.3 la première fois, reprenez les diagrammes comme avant: commencez par A.3a, répétez A.3b jusqu'à la maille centrale du A.3c précédent et crochetez A.3c (1 seule fois en largeur) dans cette maille), puis crochetez A.3b jusqu'à la fin du rang en terminant par A.3d. Ainsi vous augmentez sur le côté droit (A.3a), au milieu (A.3c) et sur le côté gauche (A.3d), et entre chaque, le nombre de A.3b va augmenter. En espérant que ce soit plus clair ainsi. Bon crochet!
07.12.2022 kl. 08:12:
![]() Stephanie Vazquez wrote:
Stephanie Vazquez wrote:
I am making this as a Christmas gift. I have no problems reading the pattern but at the same time I don’t understand the 4 th increase on A.5b/A.5a. I don’t understand working an increase of 2 stitches when the next row is really worked by groups according to the diagram pattern. Instead am I to think it isn’t stitches but rather an extra group per marker?
04.12.2022 kl. 00:44:DROPS Design answered:
Dear Mrs Vazquez, on the row with the 4th arrow, you will have to crochet more than 3 sts around each ch-space on each side of the marker-thread. and work as on 4th row between marker threads to increase only on the markers. Happy knitting!
06.12.2022 kl. 09:14:
![]() Sandrine Bibes wrote:
Sandrine Bibes wrote:
Quand vous dites Quand A.3a à A.3d sont terminés, répéter les 4 derniers rangs des diagrammes encore 3 fois en hauteur. L'ouvrage mesure environ 37 cm à partir du début et le long du milieu du châle. Est ce normal qu'aux extrémités et au centre il y ait des augmentation s? Car pour la suite du diagramme il y a trop d'arceaux j'ai défais tout l'ouvrage. Merci
02.12.2022 kl. 12:57:DROPS Design answered:
Bonjour Mme Bibes, effectivement, on doit continuer à augmenter de chaque côté (A.3a + A.3d et au milieu: A.3c). Bon crochet!
02.12.2022 kl. 15:10:
![]() Sandrine Bibes wrote:
Sandrine Bibes wrote:
Merci pour vos informations. J'ai réussi le A1 où commance le A2a le A2b et le A2c. Je suis désolée je comprends très bien les diagrammes en général mais avec le votre je pêche et bute. Merci
25.11.2022 kl. 19:07:DROPS Design answered:
Bonjour Mme Bibes, A.2 commence par le rang avec l'étoile (cf légende); crochetez ainsi sur l'endroit: A.2a, puis A.2b et terminez par A.2c; sur l'envers, crochetez A.2c, A.2b et A.2a en lisant les diagrammes de gauche à droite. Retrouvez ici d'autres infos sur les diagrammes. Bon crochet!
28.11.2022 kl. 08:42:
![]() Sandrine Bibes wrote:
Sandrine Bibes wrote:
Bonjour A la fin des diagrammes on doit avoir 17 arceaux Hors en suivant toutes les explications et les augmentations j'en ai beaucoup plus. Je ne comprends pas. Merci
25.11.2022 kl. 15:05:DROPS Design answered:
Bonjour Mme Bibes, vous crochetez: A.2a (= 5 arceaux au dernier rang), A.2b (7 arceaux au dernier rang), A.2c (=5 arceaux au dernier rang), ainsi, vous avez bien 5+7+5=17 arceaux. Bon crochet!
25.11.2022 kl. 15:28:
![]() Paulet wrote:
Paulet wrote:
Bonjour, comme la plupart des usagers je bloque sur le rang ou je dois plier le modele. En effet les eventails sont envers sur endroit si je plie ils se retrouvent a l endroit mais la pointe vers le haut. C est a dire en direction de la base du chale alors que sur le modele on voit que les eventails sont vers l exterieur du chale dans le meme sens que le dernier rang. Quant a la photo du chale en entier il est posé a lenvers du coup on ne voit pas le rendu du rang avec la pliure
10.11.2022 kl. 22:13:DROPS Design answered:
Bonjour Mme Paulet, pliez les éventails du dernier rang de A.5a/A.5b sur l'endroit (= endroit contre endroit) et crochetez sur l'envers autour du rang (1 demi-bride, 3 mailles en l'air) vous allez ainsi crocheter comme pour des mailles en relief, les éventails de A.5 seront alors visibles sur l'endroit - avez-vous regardé cette vidéo? Ce châle est similaire, au time code 07:50 environ vous voyez comment on va crocheter ce rang. Bon crochet!
11.11.2022 kl. 08:57:
![]() Elisabeth wrote:
Elisabeth wrote:
Bonjour, je ne comprends pas l'explication du symbole ( le petit rond) que l'on trouve dans le diagramme A1 = autour de cet arceau augmenter 1 arceau en crochetant 2 arceaux comme indiqué dans le diagramme . Merci de votre aide.
17.10.2022 kl. 18:56:DROPS Design answered:
Bonjour Elisabeth, on fait en général 1 seule maille serrée dans chaque arceau, mais dans ceux indiqués par le petit rond, vous allez devoir crocheter 2 mailles serrées, autrement dit, dans le même arceau crochetez: 1 maille serrée, 6 mailles en l'air, 1 maille serrée, avant de continuer avec 6 mailles en l'air et 1 maille serrée dans l'arceau suivant, tout comme le montre le diagramme au 3ème rang par exemple. Bon crochet!
18.10.2022 kl. 09:05:
![]() Kethnaly wrote:
Kethnaly wrote:
Bonjour, je ne comprends pas à la fin de A5, comment « plier A5a/A5b sur l’endroit et crocheter sur l’envers autour du rang avec le carré noir dans A5b… » Je ne comprends pas du tout ce qu’il faut faire. Merci pour votre aide.
06.10.2022 kl. 00:02:DROPS Design answered:
Bonjour Kethnaly, le carré noir concerne uniquement A.6, autrement dit, terminez A.5 puis crochetez le 1er rang de A.6 dans ce rang - un modèle de châle similaire a été réalisé en Crochet-Along - regardez dans cette vidéo, time code 7:50 environ, on montre comment crocheter ce rang, derrière les mailles du rang précédent. En espérant que ceci puisse vous aider. Bono crochet!
06.10.2022 kl. 08:55:
![]() Anju wrote:
Anju wrote:
Hi,I worked till A.4d and it came out well,and next about inserting markers, you said insert marker on treble crochet after 4 chain spaces,but after 4 chain spaces it is the double crochet and after 7 chain spaces it comes the treble crochet,continuing alternatively like that and it end up in a treble crochet with 3 chain spaces remaining on the row as you said,so shall i continue like that?
28.05.2022 kl. 10:29:DROPS Design answered:
Dear Anju, look at A.4a, if you count 7 ch-space, the next stitch is a treble crochet (UK-English); if you count 4 ch-spaces in A.4b, you will have the next stitch be a treble crochet too (as in A.4b). Hope it can help. Happy crocheting!
30.05.2022 kl. 07:54:
![]() Anju wrote:
Anju wrote:
In A1,the diagram shows "o" which means increase 1 chain space by adding 2 chain spaces,what does it mean?now it shows 6 chain spaces so do i have to make it 7 or 8?
24.05.2022 kl. 15:53:DROPS Design answered:
Dear Anju, it each of the chain-spaces shown with a "o" you have to increase 1 chain-space, this means instead of working just 1 dc (Uk-English), you will crochet (1 dc, 6 chains, 1 dc) in that chain space - see on row 3; there are 2 chain-spaces worked in the both ch-spaces with a "o" on row 2. Happy crocheting!
24.05.2022 kl. 16:48:
![]() Marja wrote:
Marja wrote:
Klopt het dat de laatste toer van zowel A.5b als A.6b aan de verkeerde kant gehaakt worden?
28.01.2022 kl. 13:57:DROPS Design answered:
Dag Marja,
Ja, dat klopt, deze worden aan de verkeerde kant gehaakt, zoals beschreven in de laatste paragraaf. Je vouwt het werk met de goede kanten op elkaar en haakt dus aan de verkeerde kant.
30.01.2022 kl. 12:49:
![]() Ann Allatt wrote:
Ann Allatt wrote:
I have never made a drops design pattern as i dont understand the diagrams please can i find help, as would love to make this shawl
15.01.2022 kl. 10:23:DROPS Design answered:
Dear Ann, of course, we have DROPS Lessons and explanation how to read crochet diagrams. Please read this link. Happy crafting!
15.01.2022 kl. 11:38:
![]() Alžběta wrote:
Alžběta wrote:
Hello! I have been working on this piece for couple of weeks now, and have been feeling more and more confused, until I just foud out, that the description of the symbols from diagram is different when I look it on my android phone and on my computer. Eg. x (in phone ) = double crochet, x (on PC) = single crochet. So now I\'am just going to finish this beautiful shawl according to my fantasy.
14.01.2022 kl. 22:08:
![]() Marleen wrote:
Marleen wrote:
A5.b pijl 4: ik heb in de toer ervoor 116 groepen stokjes en lossen. Ik kan in deze lossenlussen zelf meerderen bij pijl 4, maar als de vasten in de toer na pijl 4 tussen de groepen stokjes worden gehaakt kan ik niet meer op 66 waaiers uitkomen. Het aantal herhalingen blijft immers gelijk. Moet ik het aantal groepen stokjes en lossen aanpassen (naar 132) in de toer voorafgaand aan pijl 4, zodat ik verderop goed uitkom, of moet ik in de in de toer na pijl 4 niet tussen de groepen stokjes haken?
14.01.2022 kl. 20:14:DROPS Design answered:
Dag Marleen,
Als je na het meerderen in de toer met pijl 4, 396 stokjes over houdt, heb je 33 herhalingen van patroon A.5b en zou je dus 66 waaiers kunnen maken. Als je de toer na de toer met pijl 4 haakt en steeds 3 stokjes over slaat en daartussen de vaste haakt, dan zou het goed moeten komen.
16.01.2022 kl. 14:36:
![]() Patricia wrote:
Patricia wrote:
Gran trabajo, me encanta. No entiendo la descripción de los marcapuntos después de 4 aros de cadeneta. Salta 7 aros. Muchas gracias y otra vez gran trabajo.
03.11.2021 kl. 18:37:DROPS Design answered:
Hola Patricia, al hablar de los marcapuntos, solo se insertan en ese momento, no se está trabajando la labor. Es decir saltas/ cuentas 7 arcos, ni los estás saltando realmente ni los trabajas.
07.11.2021 kl. 14:04:
![]() Smita Mishra wrote:
Smita Mishra wrote:
Hi, i am not able to understand how to increase 2chain space while doing A. 6b (black square) If I do 3 chain stitches & 1 single crochet on half double crochet of the precious row....(AT THE SAME TIME) as mentioned. Cause there is now arrow in the diagram of A. 6b - A. 6a, so which row exactly. Please explain more clearly Warm Regards Smita.
02.11.2021 kl. 20:04:DROPS Design answered:
Dear Smita, increase by working 2 ch-spaces before and after each marker thread: 3 chains, 1 half double crochet around one half double crochet, 3 chains, 1 half double crochet around the same half double crochet. Happy crocheting!
03.11.2021 kl. 08:18:
![]() Faith Naegle wrote:
Faith Naegle wrote:
"When A.3a to A.3d have been worked vertically, repeat the last 4 rows in diagrams 3 more times vertically. Piece measures approx. 37 cm from beginning and down the middle of shawl." Am I supposed to just keep increasing the rows with the stitches from the A.3b to make up the difference?
28.10.2021 kl. 05:36:DROPS Design answered:
Dear Faith, yes, you should keep increasing as it is shown in the diagrams. Happy Stitching!
28.10.2021 kl. 11:28:
![]() Catharina Ploeg wrote:
Catharina Ploeg wrote:
Kunt u mij vertellen wat u bedoeld met : Vouw de laatste toer in A.5a/A.5b naar beneden zodat de goede kant tegen de goede kant zit en haak op de verkeerde kant rondom de toer met het zwarte vierkant in A.5b als volgt.......Wat is de bedoeling ? Ik snap dit niet zo goed.
13.10.2021 kl. 15:09:DROPS Design answered:
Dag Catharina,
Er wordt als het ware twee keer in dezelfde toer gehaakt. Deze techniek wordt hier uitgelegd (zie de uitleg bij toer 36).
15.10.2021 kl. 17:42:
![]() Valérie Tussiot wrote:
Valérie Tussiot wrote:
Bonjour, Quand je veux imprimer ou télécharger un modèle, il n'y a pas les diagrammes. Comment faire pour les avoir? Merci
03.10.2021 kl. 12:25:DROPS Design answered:
Bonjour Mme Tussiot, nous avons eu quelques soucis d'affichage, mais tout est réglé maintenant, actualisez la page ou nettoyez le cache de votre navigateur si besoin, les images & diagrammes devraient désormais s'afficher. Bon crochet!
04.10.2021 kl. 08:26:
![]() Rosa Maria Bastaros wrote:
Rosa Maria Bastaros wrote:
Felicidades por las lanas y esta web con los patrones gratuitos y la informacion sobre el punto, saludos
18.08.2021 kl. 19:00:
![]() Gabi wrote:
Gabi wrote:
"Die letzte Reihe von A.5a/A.5b nach unten umklappen..." Steht das kleine schwarze Quadrat bei 5 , wo es mit 6a/b weitergeht bei der Reihe mit den festen Maschen und Luftmaschenbogen oder bei der Reihe mit Halbstäbchen und den Luftmaschenbogen?
13.08.2021 kl. 17:23:DROPS Design answered:
Liebe Gabi, bei unserem DROPS Along zeigen wir diese Technik, bzw Reihe 36 hier - siehe auch das Video. ab ca 07.13. Viel Spaß beim häkeln!
16.08.2021 kl. 07:36:
![]() Weronika wrote:
Weronika wrote:
Zakończyłam przedostatni rząd schematu A.5b. Obliczyłam, że mam 116 łuków i w ostatnim rządzie wyjdzie mi 58 wachlarzy. Wg opisu wzoru powinno być 66 wachlarzy. Kilka razy przeliczyłam poprzednie rzędy i wszystko się zgadza. Z moich obliczeń wynika, że nie "zjadłam" niczego po drodze i oczka dodawałam prawidłowo. Mimo to nie mogę się doszukać tego gdzie zrobiłam błąd. Na pewno ma być 66 wachlarzy? Proszę o pomoc.
01.08.2021 kl. 19:26:DROPS Design answered:
Witaj Weroniko, przy dodawaniu oczek w miejscach oznaczonych strzałkami w schemacie A.5b łatwo o pomyłkę. Zobacz jak szal się układa. Jeśli jest ok. to nie ma co się trudzić i poszukiwać błędu. Dodatkowo po blokowaniu powinno się wszystko ładnie wyrównać. Jeśli brzeg robótki ściąga się, to będziemy szukać błędu. Czekam na odpowiedź i pozdrawiam
02.08.2021 kl. 16:17:
![]() Carlos wrote:
Carlos wrote:
Guten Tag! Ich habe ein Problem mit der Anleitung „ Die erste Reihe von A.6b wie folgt häkeln (A.6a zeigt, wie die Reihe beginnt und wird zusätzlich zu A.6b gehäkelt): 4 Luftmaschen, 1 feste Masche um das erste Halbstäbchen, 3 Luftmaschen + 1 feste Masche um das nächste Halbstäbchen – in dieser Weise am ganzen Tuch entlanghäkeln, dabei.“ Wie häkele ich eine Festmasche UM eine Halbstäbchen? Bis jetzt habe ich es nur um Luftmaschenbögen gemacht… Danke im Voraus!
07.06.2021 kl. 07:01:DROPS Design answered:
Lieber Carlos, eine Variante von diesem Tuch habe wir als DROPS-Along gehäkelt, hier wird es gezeigt wie man die 1. Reihe A.6b von diesem Tuch bzw die Reihe 50 in A.7a , wie man die Festmasche um die Maschen von der vorrigen Reihe häkelt (wie Reliefmaschen). Hoffentlich kann es Ihnen weiter helfen. Viel Spaß beim häkeln!
07.06.2021 kl. 08:10:
![]() Carla Moretti M wrote:
Carla Moretti M wrote:
Ma i 17 archi in quanti giri ?io ne ho fatti 16 di giri dai diagrammi non si capisce bene
11.04.2021 kl. 16:27:DROPS Design answered:
Buonasera Carla, i 17 archi di catenelle li ottiene alla fine dei diagrammi A.2a, A.2b e A.2C, poi deve proseguire a lavorare i diagrammi A.3 come indicato. Buon lavoro!
11.04.2021 kl. 20:07:
![]() Carla Moretti wrote:
Carla Moretti wrote:
Perché dite che alla fine dei diagrammi sono 17 archi invece a me ne vengono 33?
11.04.2021 kl. 16:17:DROPS Design answered:
Buonasera Carla, se conta gli archi alla fine dei diagrammi A.2a, A.2b e A.2c sono 17 gli archi di catenelle. Buon lavoro!!
11.04.2021 kl. 16:22:
![]() DURE ANNETTE wrote:
DURE ANNETTE wrote:
Bonjour, je voudrais faire ce châle mais pour une petite fille de 12 ans. Comment puis-je adapter les diagrammes à la taille enfant ? Je pense aussi changer la laine ''alpaca'' par la laine ''Kid-silk''. Est-ce possible ? Si oui dois-je prendre deux brins de laine Kid-Silk ou avec un seul brin est-ce suffisant ? Merci de votre réponse
06.04.2021 kl. 17:34:DROPS Design answered:
Bonjour Mme Dure, Nous ne sommes malheureusement pas en mesure de pouvoir adapter chacun de nos modèles à chaque demande. Merci de bien vouloir contacter votre magasin, même par mail ou téléphone, pour toute assistance complémentaire. Merci pour votre compréhension.
07.04.2021 kl. 07:17:
![]() Jane Martin wrote:
Jane Martin wrote:
Hi, this is a lovely pattern, as they all are, the patterns are written differently compared to english patterns but I usually manage to work out your explanations. However I am struggling with this one at "Fold last row in A.5a/A.5b down so that right side is against right side and work from wrong side around row with black square " can you please give further instructions on how this is done and what stitch I should be crocheting into. Many thanks for you help
23.03.2021 kl. 09:18:DROPS Design answered:
Dear Jane, it simply means, that you fold the edge out, so you can stitch into the row (marked on the diagram with a black square) from the back (WS), thus creating a litle extra edge on the right side. Happy Crafting!
23.03.2021 kl. 12:12:
![]() Lene wrote:
Lene wrote:
Er opskrift kun i diagram?
04.03.2021 kl. 17:00:DROPS Design answered:
Hej Lene, ja og så kan du se videoen vi har lavet til opskriften, den finder du længere nede i opskriften :)
05.03.2021 kl. 08:13:
![]() Maria wrote:
Maria wrote:
Bello scialle. Potete ricontrollare il testo italiano, alle frecce 3 e 4 sono indicate maglie basse ma dovrebbero essere alte come da diagramma. Grazie
20.02.2021 kl. 22:49:DROPS Design answered:
Buonasera Maria, grazie per la segnalazione, abbiamo corretto il testo. Buon lavoro!
20.02.2021 kl. 23:19:
![]() Alex Eddesten wrote:
Alex Eddesten wrote:
Hej! Jag förstår inte hur jag ska göra när cirkeln dyker upp i diagrammet. "om denna luftmaskbågen ökas det 1 luftmaskbåge genom att virka 2 luftmaskbågar som visat i diagrammet" vad betyder det här? Finns det någon bra video eller något som beskriver det?
18.02.2021 kl. 13:34:DROPS Design answered:
Hej Alex, jo som du kan se i feks A.2c hækler du 6 luftmasker og en fastmaske mere i samme luftmaskebue, hvor du i alle de andre buer kun hækler én fastmaske :)
23.02.2021 kl. 10:05:
![]() Solange Lechopier wrote:
Solange Lechopier wrote:
Bonjour, C'est exactement ce que je cherche !!! Il me faut maintenant photocopier votre explication. comment faire?
11.02.2021 kl. 09:36:DROPS Design answered:
Bonjour Solange, cliquez sur l'icone d'imprimante avant les explications (IMPRIMER) pour imprimer les explications. Bon tricot!
11.02.2021 kl. 09:50:
![]() Anna Fringel wrote:
Anna Fringel wrote:
Hur avslutas första varvet på 5b ( muscher) Det blir väldigt konstigt med att genast börja med 5a 1luftmaska och sedan fortsätta?
05.02.2021 kl. 16:02:DROPS Design answered:
Hei Anna. Husk starten på radene er tegnet over hverandre i samme diagram selv om de hekles i vekselvis høyre og venstre side av sjalet og ikke over hverandre. Du starter A.5a med 3 luftmasker, hekle A.5b raden ut. Snu arbeidet og hekle 1 luftmaske (A.5a) og deretter A.5b (3 luftmasker, 1 fastmaske, 3 luftmasker osv), snu. Neste rad begynner med 1 luftmaske (A.5a) og deretter A.5b (fastmasker raden ut/her skal det også økes). Snu og start raden med 3 luftmasker, hekle 4. rad i diagram A.5b. osv. mvh DROPS design
12.02.2021 kl. 10:58:
![]() Kiki Keyzer wrote:
Kiki Keyzer wrote:
Hi, ik ben nu op het punt dat ik de markeerdraden moet aanbrengen, ik heb 84/lossen lussen, als je naar diagram 4a kijkt waar ik ben geeindigd, zie je dat er na 4 lossenlussen niet een stokje maar een vaste zit. Is dit een fout in het patroon of doe ik hier iets helemaal verkeerd?
22.12.2020 kl. 09:22:
![]() Anna wrote:
Anna wrote:
Sorry, but I can't find diagram A.5a, and a black square on the diagram to understand the last paragraph of the pattern.
08.12.2020 kl. 07:09:DROPS Design answered:
Dear Anna, you will find diagram A.5a before A.5b (under A.3d and over A.6) - A.5a shows the beginning of the row - the square on next to last row in A.5a is explained under last diagram key. Hope this will help. Happy crocheting!
08.12.2020 kl. 09:01:
![]() Andreina Dell'Acqua wrote:
Andreina Dell'Acqua wrote:
Bello questo scialle peccato le spiegazioni siano di non facile comprensione. Con diagrammi interi e non spezzettati sarebbe tutto più chiaro anche perché le spiegazioni a parole non aiutano per niente.
08.11.2020 kl. 04:30:
![]() Diane Conroy wrote:
Diane Conroy wrote:
Lovely shawl and I do have one on the hook... BUT 3 out of 4 of your modeled photos are from the wrong side of the shawl? Really doesn’t help me figure out how, why or what to do when folding down that last row on chart A5b…\r\n\r\nAlso, why is there no A5c or A6c chart to show how to end the rows? Your crochet patterns are confusing enough to begin with but this doesn’t help me at all.
25.10.2020 kl. 18:11:
![]() Guadalupe Álvarez Rodríguez wrote:
Guadalupe Álvarez Rodríguez wrote:
Muchas gracias, Dios le dé muchas bendiciones
21.10.2020 kl. 18:38:
![]() Lois Ware wrote:
Lois Ware wrote:
Very pretty
21.10.2020 kl. 17:55:Lisää kommentti ohjeeseen DROPS 214-41
Haluamme mielellämme kuulla mielipiteesi tästä ohjeesta!
Mikäli haluat esittää kysymyksen, valitse oikea kategoria alla olevasta valikosta - tällä tavoin saat vastauksen nopeammin.
Sähköpostiosoitteesi piilotetaan. Pakolliset kentät on merkitty tähdellä *.
I too wish it was a written pattern . It really is beautiful.
20.06.2025 kl. 12:24: