Comments to DROPS 180-1
![]() Manon wrote:
Manon wrote:
Empiècement: placer les manches bâties en circulaire sur la même aiguille circulaire que le dos et le devant , au-dessus des mailles rabattues pour les emmanchures. Je ne suis pas capable de visualiser comment chacune des manches bâtie sur une aiguille circulaire puissent être sur la même aiguille circulaire que le dos et le devant. Pourriez-vous me l’expliquer et de préférence m’envoyer une vidéo. Merci
27.03.2024 kl. 02:36:DROPS Design answered:
Bonjour Manon, dans cette vidéo, nous montrons comment placer une manche sur la même aiguille circulaire que le dos et le devant, au-dessus des mailles rabattues pour les emmanchures; les premiers tours sont parfois un peu difficile, vous pouvez utiliser la technique du magic loop pour vous faciliter le travail, après quelques tours, tout sera plus simple. Bon tricot!
02.04.2024 kl. 10:43:
![]() Ginette Tremblay wrote:
Ginette Tremblay wrote:
Bonjour, J'aimerais savoir si je peux rallonger le patron à partir du bas
10.10.2023 kl. 15:17:DROPS Design answered:
Bonjour Mme Tremblay, probablement, il vous faudra juste prévoir la hauteur supplémentaire dont vous avez besoin, et éventuellement réajuster les diminutions. Prévoyez plus de laine en conséquence. Bon tricot!
10.10.2023 kl. 16:27:
![]() Béatrice wrote:
Béatrice wrote:
Merci beaucoup pour votre réponse. Cordialement Béatrice
29.08.2023 kl. 16:28:
![]() Béatrice wrote:
Béatrice wrote:
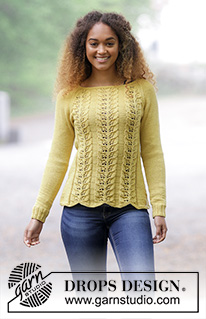
Bonjour et merci pour vos modèles. Sur le schéma du modèle, il semblerait que le dos soit plus haut que le devant de 4 cm, ce qui est normal. Je ne vois pas dans le patron où on le fait. Merci pour votre réponse. Très cordialement Béatrice
28.08.2023 kl. 09:28:DROPS Design answered:
Bonjour Béatrice, effectivement, le schéma utilisé est ici standard, mais l'encolure dos et l'encolure devant seront ici identiques. Bon tricot!
28.08.2023 kl. 16:29:
![]() Eva Nygren wrote:
Eva Nygren wrote:
Hej kan inte tyda detta : "maskorna som inte går upp i diagrammet när det minskas stickas i slätstickning" vid okets beskrivning! Får för många maskor kvar i halsen, hjälp! Eva
10.08.2023 kl. 15:29:DROPS Design answered:
Hej Eva, när du börjar minska till raglan, får du färre maskor som inte räcker till diagrammet, de maskorna stickar du i slätstickning. :)
16.08.2023 kl. 10:41:
![]() Hazel wrote:
Hazel wrote:
Three attempts at starting this but turned out lovely. Knitted it in coral which looked good. Enjoyed knitting it very much. I have photo if you wish to see it. Thank you.
15.11.2022 kl. 14:16:DROPS Design answered:
Dear Hazel, please feel free to share it with us using tags on social media - or submit a link to our dropsfan gallery. Can't wait to see!
15.11.2022 kl. 14:35:
![]() Soffía Reynisdóttri wrote:
Soffía Reynisdóttri wrote:
Hvað þyðir A,3,3 lykkjur 42 lykkjur slétt. Er í kafla fram og afturstykki.
15.03.2021 kl. 11:26:DROPS Design answered:
Blessuð Soffía, takk fyrir ábendinguna. Þetta á að vera A.1, 3 lykkjur brugðið, 34-42-40-50-50-62 lykkjur slétt, 3 lykkjur brugðið, Búið er að lagfæra þetta. Gangi þér vel.
17.03.2021 kl. 10:26:
![]() Quinn wrote:
Quinn wrote:
I found out how the pattern has to be knitted, so no need for help anymore.
20.02.2021 kl. 12:24:
![]() Jet wrote:
Jet wrote:
Inmiddels ben ik zelf uitgekomen. Ik had vooral moeite met de omslagen en hoeveel de steken ertussen moeten, dus hoe je die moet tellen, maar dat weet ik nu. Mooi bladmotief!
20.02.2021 kl. 12:23:
![]() Quinn wrote:
Quinn wrote:
If I try to knit the pattern, it looks quite different from the pattern on the pictures of Lemon Parfait. My question is if the explanation of the stitches is correct. I would like to thank you in advance for your answer.
19.02.2021 kl. 16:02:DROPS Design answered:
Dear Mrs Quinn, diagram text is correct - remember to read diagram from the bottom corner on the right side towards the left on every round - read more about diagrams here. Hope this helps. Happy knitting!
22.02.2021 kl. 07:08:
![]() Jet wrote:
Jet wrote:
Graag hoor ik een reactie.
19.02.2021 kl. 10:09:
![]() Jet wrote:
Jet wrote:
Ter verduidelijking: Ik brei nu de steken samen zoals in de beschrijving staat, maar ik denk nu dat je een kabelsteek moet breien. Mijn vraag is of dit klopt. Alvast bedankt voor het reageren.
18.02.2021 kl. 14:49:DROPS Design answered:
Dag Jet,
Aan je andere opmerking zie ik dat je er al uit gekomen bent. Bedankt voor de terugkoppeling en veel breiplezier!
24.02.2021 kl. 17:52:
![]() Jet wrote:
Jet wrote:
Moet je dan van boven naar beneden lezen?
18.02.2021 kl. 09:17:
![]() Jet wrote:
Jet wrote:
Ik probeer het ajourpatroon te breien, maar het ziet er bij mij heel anders uit. Als ik het telpatroon vergelijk met wat ik heb gebreid moet het kloppen, maar op de foto zie ik iets heel anders. Ik ben inmiddels vrij veel ervaring met breipatronen, dus ik snap er helemaal niets van.
18.02.2021 kl. 09:07:DROPS Design answered:
Dag Jet,
Jammer dat ik niet mee kan kijken hoe het er bij jou uitziet. Lees je het telpatroon van onder naar boven? Zie ook bij veel gestelde vragen; Hoe brei ik volgens een telpatroon.
18.02.2021 kl. 09:15:
![]() Barrie wrote:
Barrie wrote:
I am only 4’11” and petite. Can this pattern be scaled to my size?
27.01.2021 kl. 12:38:DROPS Design answered:
Dear Barrie, probably but we are unfortunately not able to adjust every pattern to every single request. Please contact your yarn store or any knitting forum for any individual assistance; thanks for your comprehension. Happy knitting!
27.01.2021 kl. 13:19:
![]() Lesley Kruijt wrote:
Lesley Kruijt wrote:
Klopt het dat bij het minderen van de pas, de maat small ontbreekt bij bet minderen om de andere naald? Want 18+5 is geen 19, maar dan hou ik ook geen 136 steken over..?
17.01.2021 kl. 16:15:DROPS Design answered:
Dag Lesley,
Je hebt gelijk, er ontbrak een getal in maat S. Ik heb hem nu toegevoegd.
17.01.2021 kl. 19:28:
![]() Michelle wrote:
Michelle wrote:
Bonjour. Ce modèle m interesse... j aimerais savoir si dans le dos vu qu il n y a pas de photo du dos. il y a de la dentelle ou est ce du jersey? merci 😁😁
25.09.2020 kl. 13:13:DROPS Design answered:
Bonjour Michelle, le point fantaisie ajouré est le même dans le dos que devant. Bon tricot!
25.09.2020 kl. 14:38:
![]() Richard wrote:
Richard wrote:
HELP! I am in need of 3 x 50g balls of 'Drops Cotton Merino' - Colour 17- Dye Lot 52848. Any help or suggestions, gratefully received. Also, If I make a hat using Cotton Merino, but the pattern calls for 'Fingering Merino' will it make much difference?? Thank you. Richard.
27.01.2020 kl. 13:12:DROPS Design answered:
Dear Richard, please contact your DROPS store (and more stores if necessary) or even our DROPS Workshop - CottonMerino is a 8 ply/Dk/Worsted yarn - see shadecard - see here all patterns you can use for Cotton Merino. Happy knitting!
27.01.2020 kl. 14:24:
![]() Richard wrote:
Richard wrote:
Sorry, the last comment should read with "I placed the marker to the side (on my RIGHT)!" Thanks.
24.01.2020 kl. 15:28:
![]() Richard wrote:
Richard wrote:
Hi, Thanks for your replies & I've mastered the difficult start - as you say, with double-pointed needles. The raglan decreasing is another matter. As I look at the sleeve (to my left), I have placed a marker on the stitch nearest to the side. I have then placed another marker on the 1st stitch of the side (which is to my left). Now, you say to start 3 stitches before this marker- yes? Where to I start on the sleeve decrease, please.
24.01.2020 kl. 15:25:DROPS Design answered:
Dear Richard, you should have 1 marker between each piece; so if you look at the sleeve, there is 1 marker at the end of body (either back or front piece) = before the first stitch on sleeve and 1 marker at the end of sleeve, after the last stitch on sleeve = before the first stitch on front/back piece. Start 3 sts before the first of these 2 markers, K2 tog, = 1 stitch remain before marker, work this stitch + the next st (= first after marker) and dec = there are 2 sts decreased at the marker and K2 between the dec (with marker in the middle of these K2). Repeat at each marker. Happy knitting!
24.01.2020 kl. 16:04:
![]() Richard wrote:
Richard wrote:
Hi, once more. I've placed markers at the sleeves & sides & now trying to knit the raglan decreases! I understand the pattern for instructions for the sides, but starting 3 stitches before the marker (does this include the marker), I end up, after the decrease, taking the first stitch of the sleeve. Your assistance once again would be very much appreciated. Thank you. Richard.
24.01.2020 kl. 12:29:DROPS Design answered:
Dear Richard, there should be 1 stitch on each side of marker on each piece between the raglan decreases, ie you will work at each transition: K2 tog (1 dec), K2 (= Knit the stitch before marker + the stitch after marker), slip 1 as if to K, K1, psso. So starting at the transition between back and one sleeve, you will start (and end) round with K1, Hope it helps, Happy knitting!
24.01.2020 kl. 14:23:
![]() Richard wrote:
Richard wrote:
Good morning. I have completed the body & both sleeves. But now that I have joined them on one needle, I find that when trying to knit the sleeves, the stitches are stretched (almost impossible to do)! I've had to use double-pointed needles to help me out! I don't remember having this trouble when I made the first one of this pattern (in size medium). Please can you help. Thanks. Richard.
24.01.2020 kl. 10:15:DROPS Design answered:
Dear Richard, that's right, the first few rounds at the beginning of yoke can be somewhat tricky, you can use the double pointed needles or circular needles if you like to, after few rounds, all stitches will have enough place on the circular needle to work them on the round. Happy knitting!
24.01.2020 kl. 14:08:
![]() Richard wrote:
Richard wrote:
Thank you for the reply to my question. I sent a sketch via email, showing how I was knitting the round. So, from what you are saying, I have to knit A1 (1st row), (only for the complete round)! Then for the next round, I have to knit A1 (2nd row), for the complete round! Then 3rd row, 4th row & so on.... This makes sense. Please can you confirm this for me.. Thanks a million. Richard.
13.01.2020 kl. 20:17:DROPS Design answered:
Dear Richard, that's how you should work the diagrams (row 1 in A.1 on all diagrams, then row 2 in A.1 on all diagrams and so on). Happy knitting!
14.01.2020 kl. 07:50:
![]() Richard wrote:
Richard wrote:
Good morning, again. Continuing from the two Ridge rows, I began the round, as per your instructions. But, I find that the *A1* pattern, repeats 3 times (2 with odd row numbers, 1 even row number. in the first half, up to 124 stitches. But for the continuing *A1* pattern, there is only 1 odd number row! But, there are 2 even row numbers! Is this so? Please. Richard. I have made a drawing which explains better. If I may upload it.
13.01.2020 kl. 11:03:DROPS Design answered:
Dear Richard, not sure I'm getting this properly, when working A.1 in the round, you should work same round in each diagram all the round = round 1 A.1 when working round 1 on yoke, then work round 2 in A.1 and so on. What do I misunderstand?
13.01.2020 kl. 11:34:
![]() Richard wrote:
Richard wrote:
Sadly, (Hi again). I'm still struggling after completing the two ridges! It is written that I knit 20, purl 3 (23 stitches), then *A1 (22 stitches, purl 6! (A1 = 10 rows @22 stitches) = 220 stitches. But adding the first 23 stitches to the 220 stitches = 243 stitches? Yet it is written, that I then purl 6! Doing this gives a total of 249 stitches! What am I doing wrong please? Forgive me, I am nearly 78 years old. Have a good day.
09.01.2020 kl. 12:22:DROPS Design answered:
Dear Richard, you should work the 248 sts in size L as follows: knit 20, purl 3, *A.1 (= 22 sts), purl 6*, repeat from *-* a total of 2 times (= 28 sts x 2= 56 sts), A.1 (= 22 sts), purl 3, knit 40 , purl 3, repeat from *-* (= 56 sts), A.1 (= 22 sts), purl 3, knit 20 = 20+3 + 56+22 + 3+40+3 + 56+22 +3+20=248 sts. Try to add markers between each section, it can help you to check the number of stitches. Happy knitting!
09.01.2020 kl. 14:07:
![]() Richard wrote:
Richard wrote:
Hi (once again). This should be the last for awhile. I understand the A1 block now, working from the bottom up! But, please tell me: Do I follow the pattern from left to right or right to left?? I ask this, because, I am reading the block from right to left! I don't believe it makes much difference (but, there again, you are the Expert). Thank you. Richard.
07.01.2020 kl. 22:07:DROPS Design answered:
Dear Richard, diagrams are read bottom up starting from the right corner to the left, ie you will read every row in diagrams from the right towards the left (since you are working in the round) - read more about diagrams here (link is now working). Happy knitting!
08.01.2020 kl. 09:04:
![]() Richard wrote:
Richard wrote:
Hi again. Thanks for the reply to my previous question. But, please can you tell me, if the pattern (A1) is knitted from the bottom up! Then to continue in A1, do I work from the top down (from the chart)? Or from the bottom up? Thanks once more. Richard.
07.01.2020 kl. 12:39:DROPS Design answered:
Dear Richard, diagram A.1 is read bottom up (even if jumper is worked top down). read more about diagrams here. Happy knitting!
07.01.2020 kl. 15:52:
![]() Richard wrote:
Richard wrote:
Hi again. when I work the 'A1' block, do I follow the bloc k from the top to the bottom? Or is it from the bottom to the top? Also, on the 8th & 10th line, where it's shown that you have to knit 3/2 stitches together, but also where you make a stitch between yarns, do I pass the wool over, before knitting the stitches together, to make the stitch? Anticipating your help, thanks. Richard.
07.01.2020 kl. 09:38:DROPS Design answered:
Dear Richard, these informations may help you understanding how to work diagram. In A.1 size L, you will decrease 2 sts compensated by 2 yarn overs in row 1 - and decrease 2 sts x 2 compensated by 4 yarn overs on rows 3,5, 7 and9. Happy knitting!
07.01.2020 kl. 12:10:
![]() Richard wrote:
Richard wrote:
Thanks for your rapid response to my question. Fortunately, with a clear head yesterday, I was able to work it out. I would like to add, that the first one, I made in black, was absolutely stunning. Have a good day. Richard.
06.01.2020 kl. 10:05:
![]() Richard wrote:
Richard wrote:
Part 2 I have completed the two 'ridges', no problem. But now I'm faced with understanding the 'A1' Charts shown. Continuing from the 'Ridges', I'm instructed to knit 20, then purl 3. OK. Then it's written *A.1 (=22 stitches) purl 6*, work from *-* 2 times in total. Where are the purl stitch
05.01.2020 kl. 10:52:DROPS Design answered:
Hi Richard, This means that you work A.1 then purl 6 stitches afterwards, work A1 and purl 6 stitches afterwards. Happy knitting!
06.01.2020 kl. 07:22:
![]() Richard wrote:
Richard wrote:
Part 1. Hi. I knitted this over 18 months ago, in black. Although I struggled at the beginning, the jumper was perfect at the finish. I made it in size 'M'. Now, I'm knitting another one, for a friend, in size 'L'
05.01.2020 kl. 10:50:
![]() Lizzy wrote:
Lizzy wrote:
Please can you explain : "knit the 22 stitches together over the sleeve 2 and 2..." This is to be done towards the end of the yoke pattern. Thanks.
31.08.2019 kl. 12:36:DROPS Design answered:
Hi Lizzy, Each pair of stitches is knitted together - so stitch 1 and 2 are knitted together, stitch 3 and 4 knitted together and so on across the 22 stitches. You are then left with 11 stitches. Happy knitting!
02.09.2019 kl. 07:41:
![]() Louise wrote:
Louise wrote:
Au debut, on fait 20 m. End, 3 m env *A1 donc 22 m de motif, 6 m env et on repete 2 fois au total puis A1, 3 m env, mais que fait-on des 40 suivantes?
18.07.2019 kl. 00:30:DROPS Design answered:
Bonjour Louise, on tricote ces 40 mailles à l'endroit, la correction a été faite, merci! Bon tricot!
18.07.2019 kl. 10:29:
![]() Liesbeth wrote:
Liesbeth wrote:
Voor de maat small staat er bij de minderingen voor de pas : 5 x elke 4 naald en 16 x elke 2 de naald. Dit klopt volgens mij niet. ik denk dat het moet zijn 14 x elke 2de naald. Dan kom je uit op 19 minderingen en 136 steken die overblijven.! trui is heel mooi geworden Hartelijke groeten!
14.06.2019 kl. 21:17:
![]() GoldenEagle1620 wrote:
GoldenEagle1620 wrote:
Sheer elegance - superb! Maximum concentration required, but well worth the effort...
02.04.2018 kl. 16:07:
![]() GoldenEagle1620 wrote:
GoldenEagle1620 wrote:
Hi. I made this for my friend. Such a beautiful jumper, appealing design; to flatter any woman. Very difficult, especially as she wanted in in black! Great concentration was required, for it was very easy to make mistakes in the A1 pattern 'blocks'. Thanks. GoldenEagle1620
02.04.2018 kl. 09:09:
![]() Freja Jensen wrote:
Freja Jensen wrote:
Nu har jeg strikket de første ti cm og selvom jeg har tjekket, flere gange, om jeg nu har forstået denne enkle opskrift rigtigt, så ligner mit resultat ikke det på billedet. I mit hoved giver det mest mening, hvis man ikke skal strikke det samme mønster hver omgang for at få bladmønstret frem...Men det er sådan, jeg forstår opskriften...Please help. Vh Freja.
13.11.2017 kl. 09:14:DROPS Design answered:
Hej Freja, jo du skal vælge diagrammet for din størrelse. Du starter nederst til højre på første pind. Næste pind strikker du vrang tilbage fra vrangen. 3.pind strikker du fra højre mod venstre igen. Sæt gerne en mærketråd på hver side af diagrammet så du får de 2 midterste masker lige over hinanden hele vejen op ifølge diagrammet. God fornøjelse!
13.11.2017 kl. 16:19:
![]() Susanne wrote:
Susanne wrote:
Hej, hvor starter omgangen, efter jeg har sat ærmerne ind på pinden sammen med ryg og forstykke?
03.10.2017 kl. 22:29:DROPS Design answered:
Hej Susanne, du har sikkert tråden i en raglan overgang (altså mellem et ærme og enten ryg eller forstykke) her kan du også starte omgangen. God fornøjelse!
05.10.2017 kl. 09:03:
![]() YM wrote:
YM wrote:
Bonjour, Je suis rendue à l'empiècement dans cet ouvrage. Avant de commencer les diminutions, j'ai une question. À un moment donné, après les 9 1ère diminutions, la 10e va empiéter sur les A1 de chaque côté, comment continuer ces motifs, est-ce que je les arrête et je tricote à leur place du jersey endroit, ou bien je continue le motif, si oui, comment?
01.09.2017 kl. 01:44:DROPS Design answered:
Bonjour Mme YM, tricotez en jersey les mailles de A.1 qui ne peuvent plus se tricoter en point fantaisie pendant les diminutions du raglan - une correction a été apportée, merci. Bon tricot!
01.09.2017 kl. 14:53:
![]() YM wrote:
YM wrote:
Il me semble que les mots »mailles endroit» manque dans la citation plus bas où j'ai mis des XXX à la place »17-21-20-25-25-31 mailles endroit, 3 mailles envers, *A.1 (= 18-18-22-22-26-26 mailles), 6 mailles envers*, répéter de *-* 2 fois au total, A.1, 3 mailles envers, 34-42-40-50-50-62 XXX, 3 mailles envers, » Est-ce que j'ai raison?
19.08.2017 kl. 03:51:DROPS Design answered:
Bonjour. Oui, vous avez raison, les mots mailles endroit manquent. Le texte sera corrigé dès que possible. Merci et bon tricot!
20.08.2017 kl. 09:50:
![]() Joan Orsi wrote:
Joan Orsi wrote:
Never mind the previous comment, I missed the in the round part of the instructions.
03.08.2017 kl. 19:13:Joan Orsi wrote:
In the directions you have: RIDGE/GARTER STITCH (worked in the round): 1 ridge = 2 rounds. Knit 1 round and purl 1 round. Isn't a garter stitch knitted every row whereas a knit 1 row then purl the next would be stockinette?
03.08.2017 kl. 19:12:DROPS Design answered:
Dear Joan, the instructions refer to garter stitch (ridges) knitted in the ROUND. If you knit garter stitch that way you need to knit a round of knit stitch followed by a round of purl to get the same ridged effect you get by knitting every row back and forth. I hope this helps. Happy Knitting!
06.08.2017 kl. 10:26:
![]() Francine Laplante wrote:
Francine Laplante wrote:
Il est magnifique et sûr que je me le ferai quand il sera disponible. Merci pour vos beaux modèle. Le choix est formidable.
05.07.2017 kl. 03:32:
![]() Gabriela wrote:
Gabriela wrote:
Pullis mit Ajourmuster sind immer stylisch!
01.07.2017 kl. 05:32:
![]() Odile Bastien wrote:
Odile Bastien wrote:
Superbe modèle hâte de le réaliser
30.06.2017 kl. 17:25:
![]() Anne wrote:
Anne wrote:
Lovely
30.06.2017 kl. 17:12:
![]() Sonja Buhr wrote:
Sonja Buhr wrote:
Prachtige trui voor nazomer en herfst !
05.06.2017 kl. 22:10:
![]() Susy Caroli wrote:
Susy Caroli wrote:
Un modello semplice ma di sicuro effetto. bello ed elegante.
03.06.2017 kl. 08:35:Camelia wrote:
Love this one, gorgeous 😍😍. Love to make one for me.
02.06.2017 kl. 13:48:
![]() Armelle wrote:
Armelle wrote:
Très jolie modèle.
02.06.2017 kl. 10:32:
![]() Jill Anita wrote:
Jill Anita wrote:
Delikat i lekker blondestrikk! Gleder meg til høsten!! :)
01.06.2017 kl. 17:23:Maria Luisa Machado wrote:
Lindo e delicado!
01.06.2017 kl. 15:06:
![]() Marina Guarneri wrote:
Marina Guarneri wrote:
Un modello semplice ma con un punto che lo rende rifinito ed elegante
01.06.2017 kl. 14:39:Post a comment to pattern DROPS 180-1
We would love to hear what you have to say about this pattern!
If you want to leave a question, please make sure you select the correct category in the form below, to speed up the answering process.
Your email address will not be published. Required fields are marked *.
Merci de m'avoir répondu
14.10.2023 kl. 21:48: