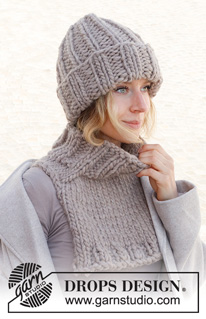
Kommentit ohjeeseen DROPS 225-39
![]() Sharon Hunt wrote:
Sharon Hunt wrote:
Hi I have now inserted all markers. I am now about to increase at the 3. My question is am I supposed to increase then slip the marker or slip the marker then work the increase? Many thanks for your help.
25.02.2023 kl. 14:05:DROPS Design answered:
Dear Sharon, if you increase before the marker, then your increase will be the stitch right before the marker. If you are increasing after the marker, then you slip the marker and increase right after it. You increase BEFORE the markers at the 1st and 3rd markers and AFTER the markers at the 2nd and 4th markers. Happy knitting!
26.02.2023 kl. 20:58:
![]() Sharon Hunt wrote:
Sharon Hunt wrote:
Hi! Am working on the neck warmer in this sett. To place the markers I knitting across the so stitches then placed the markers, this seems logical, but is it correct? I am wondering how would I know the end and beginning of the round? Am assuming the end of the round would be after knitting the 21 stitches which is now increased according to the instructions at the first and 4 marker? This is the first time am making a neck warmer this way so am not sure if what have done so far is correct.
18.02.2023 kl. 15:48:DROPS Design answered:
Dear Sharon, the markers are introduced without working. Start from the beginning of the round (the same beginning as in previous rounds) and introduce the markers as indicated for your size. If you are working the smaller size, insert as follows: 5sts, 1st marker, 7sts, 2nd marker, 11 sts (insert the mid-front marker after the 6th st, then count 5 more), 3rd marker, 7 sts, 4th marker, 6 sts remain until the beginning of the round (= 36 sts). Then, proceed to increase before or after the 4 markers as indicated in the pattern. The mid-front marker is not used for the increases. Happy knitting!
19.02.2023 kl. 22:20:
![]() Sharon Hunt wrote:
Sharon Hunt wrote:
Hi! Could this hat be done in the round?
04.02.2023 kl. 12:35:DROPS Design answered:
Dear Sharon, yes, you could work it in the round; remember to remove the edge stitches. Happy knitting!
05.02.2023 kl. 23:06:
![]() Maggi Vermcrantz wrote:
Maggi Vermcrantz wrote:
I instruktionen står det tex strumpstickor nummer 12. Men i länken har stickorna inget nummer. Skall jag tolka nummer 12 som grovlek 12 mm?
26.12.2022 kl. 22:36:DROPS Design answered:
Hei Maggi. Litt usikker på hva du mener med länken , men halsen strikkes med pinne 12 mm, det brukes både rundpinne og settpinner ( i str. 12 mm, kan også skrives som bare 12). mvh DROPS Design
02.01.2023 kl. 13:11:
![]() Maria Krbalová wrote:
Maria Krbalová wrote:
Dobrý den. Prosím poraďte s určením lícové strany u cepic s ohrnutím: když si zvolím lícovou stranu na ohrnovací části, zbytek čepice je v tomto případě je rubová strana, protože před ohrnutím "lícová" strana ohrnovací části byla na rubové straně. Mám pak potíže si určit, v které řadě a jak mám ujímat. Děkuji
20.11.2022 kl. 13:50:DROPS Design answered:
Dobrý den, Mario, nejsnazší je podívat se na úplný začátek pletení, na nahozenou řadu. Z jedné strany je nahozený okraj tvořený řadou "čárek", z druhé strany má malé hrbolky. Tu stranu práce, která má v první řadě malé hrbolky, si v tomto případě označíme jako lícovou = po ohrnutí se hrbolatý lem schová a na lícu zůstane ten úhledný "čárkovaný" (který máme nyní na rubu) . Hodně zdaru! Hana
08.03.2023 kl. 10:25:Lisää kommentti ohjeeseen DROPS 225-39
Haluamme mielellämme kuulla mielipiteesi tästä ohjeesta!
Mikäli haluat esittää kysymyksen, valitse oikea kategoria alla olevasta valikosta - tällä tavoin saat vastauksen nopeammin.
Sähköpostiosoitteesi piilotetaan. Pakolliset kentät on merkitty tähdellä *.
Merhaba, bu siteden bakarak boyunluğu yaptım. Omuz arttırmayı öğrendim. Birçok proje var ve hepsi harika. Çok teşekkürler...
25.12.2021 kl. 10:22: