DROPS Delight
DROPS Delight
75% Wool, 25% Polyamide
Discontinued
find alternatives
DROPS Nord
DROPS Nord
45% Alpaca, 30% Polyamide, 25% Wool
from 3.85 $ /50g
DROPS SS24

Green Zone

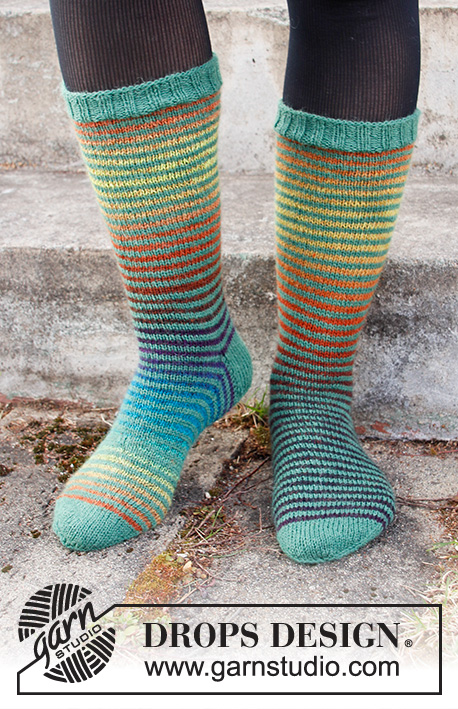
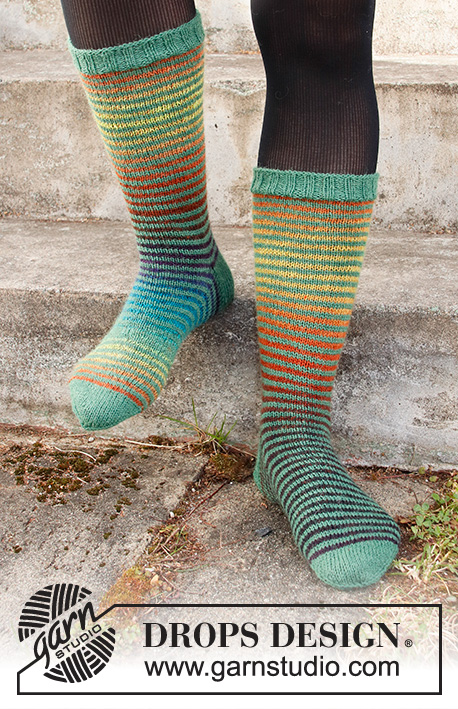
Knitted socks with stripes in DROPS Delight and DROPS Nord. Worked top down. Size 35-43 = 5-10 1/2.

DROPS 214-57
DROPS design: Pattern de-218
Yarn group A
-------------------------------------------------------

SIZE:
US: 5/6 1/2 – 7 1/2/9 – 9 1/2/10 1/2
EU: 35/37 – 38/40 – 41/43
Foot length: 22 – 24 - 27 cm = 8¾" - 9½" - 10⅝"
Sock height down to heel: approx. 26 - 26 - 26 cm = 10¼" – 10¼" – 10¼"

MATERIALS:
DROPS DELIGHT from Garnstudio (belongs to yarn group A)
50-50-50 g color no 10, olive/rust/plum
And use:
DROPS NORD from Garnstudio (belongs to yarn group A)
100-100-100 g color 19, forest green

KNITTING GAUGE:
26 stitches in width and 34 rows vertically in stockinette stitch = 10 x 10 cm = 4" x 4".

NEEDLES:
DROPS DOUBLE POINTED NEEDLES SIZE 2.5 mm = US 1,5
Needle size is only a suggestion! If you have too many stitches on 10 cm = 4" switch to a larger needle size. If you have too few stitches on 10 cm = 4" switch to a smaller needle size.

-------------------------------------------------------

Alternative Yarn – See how to change yarns here
Yarn Groups A to F – Use the same pattern and change the yarn here
Yarn usage using an alternative yarn – Use our yarn converter here

-------------------------------------------------------

DROPS Delight
DROPS Delight
75% Wool, 25% Polyamide
Discontinued
find alternatives
DROPS Nord
DROPS Nord
45% Alpaca, 30% Polyamide, 25% Wool
from 3.85 $ /50g

Pattern instructions

NOTE: This pattern is written in American English. All measurements in charts are in cm. For conversion from inches to cm - click here. There are different terms for crocheting in American and British English. If this pattern includes crochet, click for "crochet terms" here. For this pattern in British English, please click here.
-------------------------------------------------------

EXPLANATION FOR THE PATTERN:

-------------------------------------------------------

DECREASE TIP (= mid back):
Decrease stitches mid back, on every 8th round - adjust to decrease on 1st round of a stripe to get a nice result.
Decrease as follows from beginning of round: Knit 1, knit 2 together, work until 3 stitches remain before marker (= beginning of round). Pass 1 stitch on to right needle purlwise with strand behind piece, knit 1 and pass slipped stitch over stitch worked, knit last stitch on round.

STRIPES:
Work as follows:
* 2 rounds with Delight, 2 rounds with Nord*, work from *-*.

KNITTING TIP-1:
To avoid breaking the stripes when working in the round, work as follows:
Switch to new color and work 1 round. At the end of round with new color, pick up stitch from previous round below next stitch. Pick up in back loop purlwise and slip it onto left needle. Work stitch together with stitch from first round. This way the transition from one round to the next will be less visible.

KNITTING TIP-2 (applies to heel):
To get a stronger heel the entire heel and heel decrease can be worked in 2 strands as follows: Use strand inside and outside of ball and work 1 stitch alternately with one and the other strand. This way you get a thicker heel without working with double strand.

HEEL DECREASE:
ROW 1 (= right side): Knit until 7-8-8 stitches remain, slip next stitch as if to knit, knit 1, pass slipped stitch over stitch knitted, turn piece.
ROW 2 (= wrong side): Purl until 7-8-8 stitches remain, slip next stitch as if to purl, purl 1, pass slipped stitch over stitch purled, turn piece.
ROW 3 (= right side): Knit until 6-7-7 stitches remain, slip next stitch as if to knit, knit 1, pass slipped stitch over stitch knitted, turn piece.
ROW 4 (= wrong side): Purl until 6-7-7 stitches remain, slip next stitch as if to purl, purl 1, pass slipped stitch over stitch purled, turn piece.
Continue decrease like this with 1 stitch less before each decrease until there are 14-14-16 stitches on needle.

DECREASE TIP-2 (applies to toe):
Begin 2 stitches before marker and knit 2 together, marker, slip 1 stitch knitwise, knit 1, pass slipped stitch over stitch worked (= 2 stitches decreased).

-------------------------------------------------------

START THE PIECE HERE:

-------------------------------------------------------

SOCKS - SHORT OVERVIEW OF THE PIECE:
Worked in the round on double pointed needles, top down.

SOCK:
Cast on 72-76-80 stitches on double pointed needles size 2.5 mm = US 1,5 with Nord. Knit 1 round. Then work rib = knit 2/purl 2. Work until rib measures approx. 3 cm = 1⅛" in all sizes.
Knit 1 round with Nord, insert a marker at the beginning of round = the mid back. Read KNITTING TIP-1 and STRIPES in explanation above.
Then continue with stripes, AT THE SAME TIME on 1st round begin decrease at the back of piece - read DECREASE TIP in explanation above. Continue in the round in stockinette stitch and stripes, remember to decrease every 8th round until decrease has been done 9 times in total = 54-58-62 stitches.
REMEMBER THE KNITTING GAUGE!
Work stripes until piece measures approx. 26 cm = 10¼", adjust so that next row worked is in Nord. Work 1 round with Nord. Now slip stitches on a stitch holder (= on top of foot), work heel over the other stitches. Keep the first 13-14-15 stitches on needle for heel, slip the next 28-30-32 stitches on 1 stitch holder (= mid on top of foot) and keep the remaining 13-14-15 stitches on needle for heel = 26-28-30 heel stitches.
Read KNITTING TIP-2 and work in stockinette stitch back and forth with Nord over heel stitches for 5-5½-6 cm = 2"-2⅛"-2⅜".
Insert a marker in the middle of last row, marker should be used later to measure the length of foot.
Now work HEEL DECREASE - read explanation above.

After heel decrease work next round as follows with Nord:
Knit over the 14-14-16 stitches from heel, pick up 13-14-16 stitches along side of heel, slip the 28-30-32 stitches from stitch holder back on needle and knit over these stitches. Pick up 13-14-16 stitches along the other side of heel, and knit until middle of heel stitches = 68-72-80 stitches on needles.
Beginning of round should be under foot. Insert 1 marker on each side of the 28-30-32 stitches on top of foot. Knit 1 round with Delight (so that stripes on top of foot continues as before), then decrease on each side of the 28-30-32 stitches on top of foot every other round - AT THE SAME TIME continue with STRIPES: Knit the last 2 stitches before first marker on top of foot twisted together and knit the 2 stitches after last marker on top of foot together (= 2 stitches decreased). Decrease 8-8-10 times in total = 52-56-60 stitches.
Then continue with stripes as before until piece measures approx. 18-19-21 cm = 7"-7½"-8¼" from marker on heel (approx. 4-5-6 cm = 1½"-2"-2⅜" remain until finished measurements - adjust so that next round is worked with Nord (try the sock on and work to desired length)).
Insert 1 marker in each side so that there are 26-28-30 stitches both on top of foot and under foot.
Switch to Nord on next round decrease for toes on each side of both markers– read DECREASE TIP-2 (= 4 stitches decreased). Decrease like this on every other round a total of 4-7-9 times and then on every round a total of 5-3-2 times = 16 stitches remain on needle in all sizes.
On next round knit all stitches together 2 by 2 = 8 stitches remain in all sizes.
Cut the yarn and pull it through the remaining stitches, tighten together and fasten.
Work the other sock the same way.
Do you have a question? See a list of frequently asked questions (FAQ)

Knitting tension is what determines the final measurements of your work, and is usually measured per 10 x 10 cm. It is provided like so: number of stitches in width x number of rows in height - eg: 19 stitches x 26 rows = 10 x 10 cm.

The knitting tension is very individual; some people knit/crochet loosely while others work tightly. You adjust the knitting tension with the needle size, which is why the suggested needle size only serve as a guide! You need to adjust this (up or down) to ensure that YOUR knitting tension matches the knitting tension provided in the pattern. If you work with a different knitting tension than provided you will have a different yarn consumption, and your work will have different measurements than what the pattern suggests.

The knitting tension also determines which yarns can replace each other. As long as you achieve the same knitting tension you can replace one yarn with another.

See DROPS lesson: How to measure your tension/gauge

See DROPS video: How to make a gauge tension swatch

The required amount of yarn is provided in grams, eg: 450 g. To calculate how many balls you’ll need you first need to know how many grams are in 1 ball (25g, 50g or 100g). This information is available if you click on the individual yarn quality on our pages. Divide the amount required with the amount of each ball. For example, if each ball is 50g (the most common amount), the calculation will be as follows: 450 / 50 = 9 balls.

The important thing when changing from one yarn to another is that the knitting/crochet tension remains the same. This is so that the measurements of the finished piece will be the same as on the sketch provided. It is easier to achieve the same knitting tension using yarns from the same yarn group. It is also possible to work with multiple strands of a thinner yarn to achieve the knitting tension of a thicker one. Please try our yarn converter. We recommend you to always work a test swatch.

Please NOTE: when changing yarn the garment might have a different look and feel to the garment in the photo, due to individual properties and qualities of each yarn.

See DROPS lesson: Can I use a different yarn than the one mentioned in the pattern?

All our yarns are categorised into yarn groups (from A to F) according to thickness and knitting tension – group A contains the thinnest yarns and group F the thickest. This makes it easier for you to find alternative yarns to our patterns, should you wish to switch yarn. All yarns within the same group have a similar knitting tension and can easily replace each other. However, different yarn qualities have different structures and properties which will give the finished work a unique look and feel.

Click here for an overview of the yarns in each yarn group

At the top of all our patterns you’ll find a link to our yarn converter, which is a helpful tool should you wish to use a different yarn than suggested. By filling in the yarn quality you wish to replace, the amount (in your size) and number of strands, the converter will present good alternative yarns with the same knitting tension. Additionally it will tell you how much you’ll require in the new qualities and whether you’ll need to work with multiple strands. Most skeins are 50g (some are 25g or 100g).

If the pattern is worked with multiple colours, every colour will have to be converted separately. Similarly, if the pattern is worked with several strands of different yarns (for example 1 strand Alpaca and 1 strand Kid-Silk) you will have to find alternatives for each, individually.

Click here to see our yarn converter

Since different yarns have different qualities and textures we have chosen to keep the original yarn in our patterns. However, you can easily find options among our available qualities by using our yarn converter, or simply pick a yarn from the same yarn group.

It is possible that some retailers still have discontinued yarns in stock, or that someone has a few skeins at home that they would like to find patterns for.

The yarn converter will provide both alternative yarn as well as required amount in the new quality.

If you think it's hard to decide what size to make, it can be a good idea to measure a garment you own already and like the size of. Then you can pick the size by comparing those measures with the ones available in the pattern's size chart.

You'll find the size chart at the bottom of the pattern.

See DROPS lesson: How to read size chart

The needle size provided in the pattern serves only as a guide, the important thing is to follow the knitting tension. And since knitting tension is very individual, you will have to adjust the needle size to ensure that YOUR tension is the same as in the pattern – maybe you’ll have to adjust 1, or even 2 needle sizes, up or down to achieve the correct tension. For this, we recommend that you work test swatches.

Should you work with a different knitting tension than the one provided, the measurements of the finished garment might deviate from the measurement sketch.

See DROPS lesson: How to measure your tension/gauge

See DROPS video: How to make a gauge tension swatch

Working a garment top-down provides more flexibility and room for personal adjustment. For example it is easier to try the garment on while working, as well as making adjustments to length of yoke and shoulder caps.

The instructions are carefully explaining every step, in the correct order. Diagrams are adjusted to the knitting direction and are worked as usual.

The diagram depicts all rows/rounds, and every stitch seen from the right side. It is read from bottom to top, from right to left. 1 square = 1 stitch.

When working back and forth, every other row is worked from the right side and every other row is worked from the wrong side. When working from the wrong side, the diagram will have to be worked reversed: from left to right, knit stitches are purled, purl stitches are knit etc.

When working in the round every round is worked from the right side and the diagram are worked from right to left on all rounds.

See DROPS lesson: How to read knitting diagrams

The diagram depicts all rows/rounds, and every stitch seen from the right side. It is worked from bottom to top, from right to left.

When working back and forth every other row is worked from the right side: from right to left and every other row is worked from the wrong side: from left to right.

When working in the round, every row in the diagram are worked from the right side, from right to left.

When working a circular diagram you start in the middle and work your way outwards, counter clockwise, row by row.

The rows usually start with a given number of chain stitches (equivalent to the height of the following stitch), this will either be depicted in the diagram or explained in the pattern.

See DROPS lesson: How to read crochet diagrams

Instructions for working several diagrams after each other on the same row/round, will often be written like so: “work A.1, A.2, A.3 a total of 0-0-2-3-4 times". This means you work A.1 once, then A.2 is worked once, and A.3 is repeated (in width) the number of times provided for your size – in this case like so: S = 0 times, M = 0 times, L=2 times, XL= 3 times and XXL = 4 times.

The diagrams are worked as usual: begin with the first row in A.1, then work the first row in A.2 etc.

See DROPS lesson: How to read knitting diagrams

See DROPS lesson: How to read crochet diagrams

The total width of the garment (from wrist-to-wrist) will be larger in the larger sizes, despite the actual sleeves being shorter. The larger sizes have longer sleeve caps and wider shoulders, so there will be a good fit in all sizes.

The measurement sketch/schematic drawing provides information regarding the full length of the garment. If it’s a jumper or a jacket the length is measured from the highest point on the shoulder (usually closest to the neckline), and straight down to the bottom of the garment. It is NOT measured from the tip of shoulder. Similarly, the length of yoke is measured from the highest point on the shoulder and down to where yoke is split into body and sleeves.

See DROPS lesson: How to read a schematic drawing

Diagrams are often repeated on the round or in height. 1 repeat is the diagram the way it appears in the pattern. If it says to work 5 repeats of A.1 in the round, then you work A.1 a total of 5 times after/next to each other in the round. If it says to work 2 repeats of A.1 vertically/in height you work the entire diagram once, then begin again at the start and work the entire diagram one more time.

Chain stitches are slightly narrower than other stitches and to avoid working the cast-on edge too tight, we simply chain more stitches to begin with. The stitch count will be adjusted on the following row to fit the pattern and measurement sketch.

The rib edge is more elastic and will contract slightly compared to, for example, stocking stitch. By increasing before the rib edge, you avoid a visible difference in width between the rib edge and the rest of the body.

It’s very easy to cast off too tightly, and by making yarn overs while casting off (and simultaneously casting these off) you avoid a too tight cast off edge.

See DROPS video: How to bind off with yarn overs (yo)

To achieve an even increase (or decrease) you can increase on, for example: every 3rd and 4th row alternately, like so: work 2 rows and increase on the 3rd row, work 3 rows and increase on the 4th. Repeat this until the increase is complete.

See DROPS lesson: Increase or decrease 1 st on every 3rd and 4th row alternately

Should you prefer to work in the round instead of back and forth, you may of course adjust the pattern. You’ll need to add steeks mid-front (usually 5 stitches), and follow the instructions. When you would normally turn and work from the wrong side, simply work across the steek and continue in the round. At the end you’ll cut the piece open, pick up stitches to work bands, and cover the cut edges.

See DROPS video: How to knit steeks and cut open

Should you prefer to work back and forth instead of in the round, you may of course adjust the pattern so you work the pieces separately and then assemble them at the end. Divide the stitches for the body in 2, add 1 edge stitch in each side (for sewing) and work the front and back pieces separately.

See DROPS lesson: Can I adapt a pattern for circular needles into straight needles?

Pattern repeats can vary slightly in the different sizes, in order to get the correct proportions. If you’re not working the exact same size as the garment in the photo, yours might deviate slightly. This has been carefully developed and adjusted so that the complete impression of the garment is the same in all sizes.

Make sure to follow instructions and diagrams for your size!

If you have found a pattern you like which is available in women’s size it’s not very difficult to convert it to men’s size. The biggest difference will be the length of sleeves and body. Start working on the women size that you think would fit across the chest. The additional length will be worked right before you cast off for the armhole/sleeve cap. If the pattern is worked top-down you can add the length right after the armhole or before the first decrease on sleeve.

Regarding additional yarn amount, this will depend on how much length you add, but it is better with a skein too many than too few.

All yarns will have excess fibres (from production) that might come off as lint or shedding. Brushed yarns (ie hairier yarns) have more of these loose, excess fibres, causing more shedding.

Shedding also depends on what is worn under or over the garment, and whether this pulls at the yarn fibres. It’s therefore not possible to guarantee that there will be no shedding

Below are some tips on how to get the best result when working with hairier yarns:

1. When the garment is finished (before you wash it) shake it vigorously so the looser hairs come off. NOTE: do NOT use a lint roller, brush or any method that pulls at the yarn.

2. Place the garment in a plastic bag and put it in your freezer - the temperature will cause the fibres to become less attached to each other, and excess fibres will come off easier.

3. Leave in the freezer for a few hours before taking it out and shaking it again.

4. Wash the garment according to the instructions on the yarn label.

Pilling is a natural process that happens to even the most exclusive of fibers. It's a natural sign of wear and tear that is hard to avoid, and that is most visible in high friction areas of your garment like a sweater's arms and cuffs.

You can make your garment look as new by removing the pilling, using a fabric comb or a pill/lint remover.

Still can't find the answer you need? Then scroll down and leave your question so one of our experts can try to help you. This will be done normally within 5 to 10 working days.
In the meantime, you can read the questions and answers that others have left to this pattern or join the DROPS Workshop on Facebook to get help from fellow knitters/crocheters!

You might also like...

Post a comment to pattern DROPS 214-57

We would love to hear what you have to say about this pattern!

If you want to leave a question, please make sure you select the correct category in the form below, to speed up the answering process. Required fields are marked *.

Comments / Questions (7)

country flag Inés San Martín Mena wrote:

Excelente patrón!!! Quedan hermosas y cómodas . Lo he tejido 2 veces a mis hijos que suben a las montañas de nuestra Cordillera de Los Andes. Andan felices con sus calcetas exclusivas y sus pies calientitos. Muchas gracias amigos de DROPS Desing ✨🙏😍

02.05.2022 - 15:52

country flag BLASER wrote:

DIMINUTIONS (= milieu dos): JE NE COMPRENDS PAS L EXPLICATION Diminuer au milieu dos, tous les 8 tours – Diminuer ainsi à partir du début du tour: tricoter 1 maille endroit, 2 mailles ensemble à l'endroit, tricoter jusqu'à ce qu'il reste 3 mailles avant le marqueur (= début du tour), glisser 1 maille à l'envers avec le fil derrière l'ouvrage, tricoter 1 maille endroit et passer la maille glissée par-dessus la maille

21.12.2020 - 17:55

DROPS Design answered:

Bonjour Mme Blaser, vous devez diminuer au début et à la fin du tour, au début du tour (= milieu dos de la chaussette), vous tricotez la 1ère maille, puis diminuez 1 maille en tricotant les 2 mailles suivantes ensemble à l'endroit, tricotez jusqu'à ce qu'il reste 3 mailles avant la fin du tour, glissez 1 m à l'envers, tricotez 1 maille endroit, et passez la maille glissée par-dessus la maille tricotée, tricotez la dernière maille du tour = vous avez diminué 1 m au début du tour et 1 maille à la fin du tour (et il y a 2 mailles entre les 2 diminutions). Bon tricot!

22.12.2020 - 09:33

country flag Maria Gjellerup Møller wrote:

Jeg kan ikke se opskriften på dansk?

24.10.2020 - 13:52

DROPS Design answered:

Hei Maria. Dette skal vi få ordnet så fort som mulig mandags morgen (26/10/2020). Takk for at du gjorde oss oppmerksom på dette. mvh DROPS design

25.10.2020 - 20:36

country flag Modile wrote:

Des chaussettes pour Pieds natures

06.06.2020 - 08:40

country flag Strzelecki wrote:

Les chaussettes hautes couleurs licorne 🦄

05.06.2020 - 18:18

country flag Eva Erhard wrote:

So schönes Sockenmuster, ich würde sie Stay at home nennen!!!

04.06.2020 - 20:12

country flag Olena Kostrytsia wrote:

Bright and lovely!

04.06.2020 - 15:36