
Popular categories
Looking for a yarn?


|
|
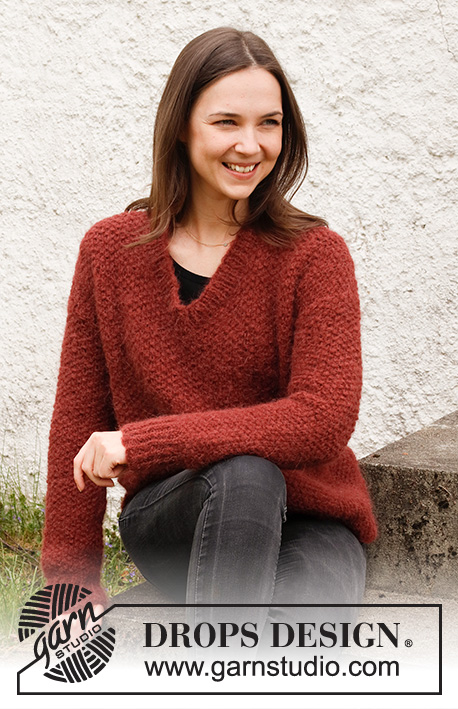
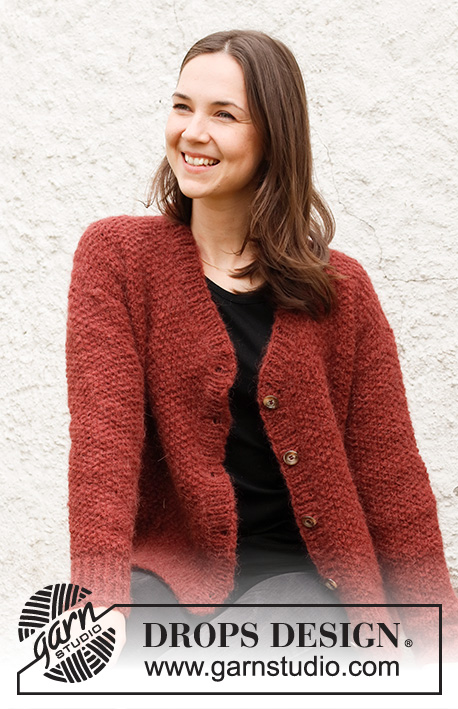
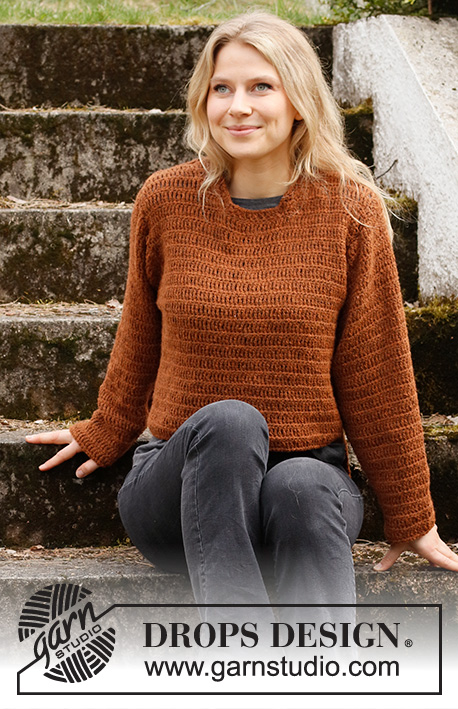
Rustic Rust |
|
 |
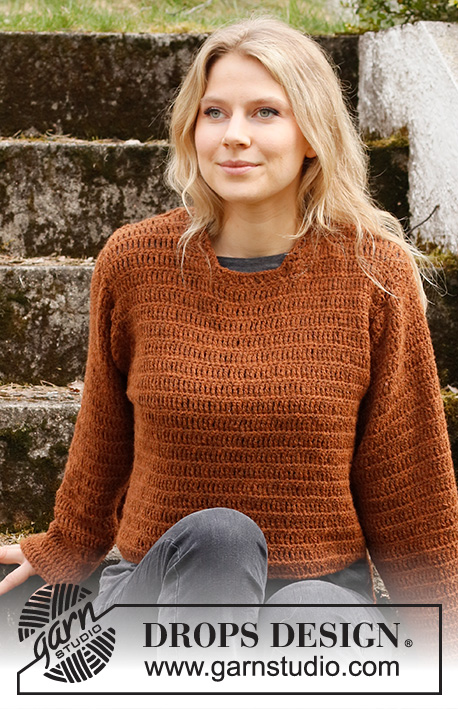 |
Crocheted jumper in DROPS Sky. Piece is crocheted top down. Size: S - XXXL
DROPS 217-28 |
|
|
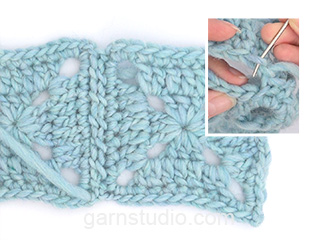
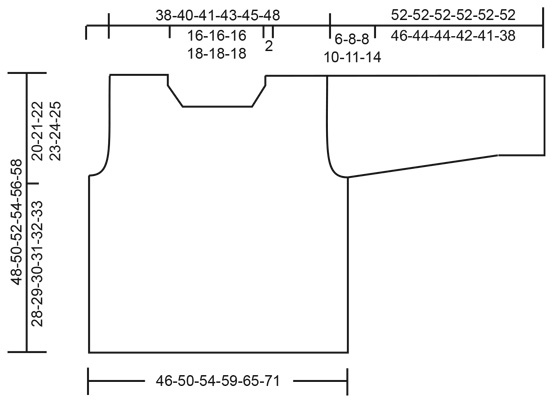
------------------------------------------------------- EXPLANATION FOR THE PATTERN: ------------------------------------------------------- CROCHET TIP FOR CHAIN STITCH: If you work at the end of crochet hook the chain stitch will often be too tight. 1 chain stitch should be just as long as 1 double crochet/double treble crochet is wide. CROCHET INFORMATION: On every row with double crochets, work 1 chain stitch at beginning of row. This chain does not replace first stitch. On every row with double treble crochets, work 4 chain stitches at beginning of row. These 4 chain stitches does not replace first double treble crochet on row. INCREASE TIP: Increase 1 stitch by working 2 stitches in a stitch. DECREASE TIP (applies to sleeves): Work 2 double crochets together into 1 double crochet: Insert hook in next stitch, get yarn *, work from *-* 2 times in total, make 1 yarn over and pull yarn through all 3 loops on hook (= 1 stitch decreased). Work 2 double treble crochets together into 1 double treble crochet: Work 1 double treble crochet but wait with last yarn over and pull through, work 1 double treble crochet more the same way. Make 1 yarn over on hook and pull through all 3 loops on hook (= 1 double treble crochet decreased). ------------------------------------------------------- START THE PIECE HERE: ------------------------------------------------------- JUMPER - SHORT OVERVIEW OF THE PIECE: Piece is work back and forth in parts, top down. Work sleeves back and forth, top down. Sew the parts together when finished. BACK PIECE: Right shoulder: Work 18-20-21-21-23-25 chain stitches - read CROCHET TIP FOR CHAIN STITCH, on hook size 4.5 mm with Sky. Turn and work pattern as follows: ROW 1 (right side): Work 4 chain stitches - read CROCHET INFO, work 1 double treble crochet in every chain stitch = 18-20-21-21-23-25 double treble crochets. ROW 2 (wrong side): Work 1 double crochet in every stitch. Cut the yarn and work left shoulder. REMEMBER THE CROCHET TENSION! Left shoulder: Work 18-20-21-21-23-25 chain stitches - remember CROCHET TIP FOR CHAIN STITCH, on hook size 4.5 mm with Sky. Turn and work pattern as follows: ROW 1 (right side): Work 4 chain stitches - remember CROCHET INFO, work 1 double treble crochet in every chain stitch = 18-20-21-21-23-25 double treble crochets. ROW 2 (wrong side): Work 1 double crochet in every stitch. Now work the 2 parts together as follows: ROW 3: Work 1 double treble crochet in every stitch until 1 stitch remains, work 2 double treble crochets in next stitch, work 24-24-24-26-26-26 loose chain stitches (= neck), then continue over stitch from right shoulder as follows: Work 2 double treble crochets in first stitch, work 1 double treble crochet in each of the remaining 17-19-20-20-22-24 stitches = 62-66-68-70-74-78 stitches. Work back and forth with double treble crochet from right side and double crochets from wrong side. When piece measures 17-17-17-15-14-12 cm from shoulder, begin increase for armhole. Increase 1 stitch by working 2 stitches in edge stitch in each side of piece on every row 2-3-4-6-8-10 times in total in each side = 66-72-76-82-90-98 stitches. At the end of the next 2 rows work 5-5-6-7-8-9 loose chain stitches for armholes = 76-82-88-96-106-116 stitches. Work the new stitches in pattern, i.e. every other row with double crochets and double treble crochets. When piece measures 48-50-52-54-56-58 cm from shoulder, adjust to finish after a row with double crochets. The back piece is finished. Cut and fasten the yarn. FRONT PIECE: Left shoulder: Work 18-20-21-21-23-25 chain stitches - remember CROCHET TIP FOR CHAIN STITCH, on hook size 4.5 mm with Sky. Turn and work pattern as follows: ROW 1 (right side): Work 4 chain stitches - remember CROCHET INFO, work 1 double treble crochet in every chain stitch = 18-20-21-21-23-25 double treble crochets. ROW 2 (wrong side): Work 1 double crochet in every stitch. ROW 3: Work 1 double treble crochet in every stitch. ROW 4: Work 1 double crochet in every stitch. Continue back and forth with double treble crochets from right side and double crochets from wrong side, at the same time from 5th row increase 1 stitch towards the neck by working 2 stitches in second stitch from edge at the beginning of every row with double treble crochets and at the end of every row with double crochets (= in right side of piece seen from right side). Increase like this every row 4 times in total = 22-24-25-25-27-29 stitches. Last row worked is from wrong side. Cut the yarn and work right shoulder. Right shoulder: Work 18-20-21-21-23-25 chain stitches - remember CROCHET TIP FOR CHAIN STITCH, on hook size 4.5 mm with Sky. Turn and work pattern as follows: ROW 1 (right side): Work 4 chain stitches- remember CROCHET INFO, work 1 double treble crochet in every chain stitch = 18-20-21-21-23-25 double treble crochets. ROW 2 (wrong side): Work 1 double crochet in every stitch. ROW 3: Work 1 double treble crochet in every stitch. ROW 4: Work 1 double crochet in every stitch. Continue back and forth with double treble crochets from right side and double crochets from wrong side, at the same time on 5th row increase 1 stitch towards the next by working 2 stitches in second stitch from edge at the end of every row with double treble crochets and at the beginning of every row with double crochets (= in left side of piece seen from right side). Increase like this every row 4 times in total = 22-24-25-25-27-29 stitches. Last row worked is from wrong side. Now work the 2 parts tog as follows from right side: Work 1 double treble crochet in each of the first 20-22-23-23-25-27 stitches, work 2 double treble crochets in next stitch, 1 double treble in next stitch, work 16-16-16-18-18-18 loose chain stitches (= neck), then over right shoulder from right side as follows: Work 1 double treble crochet in next stitch, 2 double treble crochets in next stitch, work 1 double treble crochet in each of the last 20-22-23-23-25-27 stitches = 62-66-68-70-74-78 stitches. Work back and forth with double treble crochet from right side and double crochets from wrong side. When piece measures 17-17-17-15-14-12 cm from shoulder, begin increase for armhole. Increase 1 stitch by working 2 stitches in edge stitch in each side of piece on every row 2-3-4-6-8-10 times in total in each side = 66-72-76-82-90-98 stitches. At the end of the next 2 rows work 5-5-6-7-8-9 loose chain stitches for armholes = 76-82-88-96-106-116 stitches. Work the new stitches in pattern, i.e. every other row with double crochets and double treble crochets. When piece measures 48-50-52-54-56-58 cm from shoulder, adjust to finish after a row with double crochets. The front piece is finished. Cut and fasten the yarn. SLEEVES: Work 40-41-42-42-42-40 chain stitches - remember CROCHET TIP FOR CHAIN STITCH, on hook size 4.5 mm with Sky. Work 1 double treble crochet in every stitch from right side and work 1 double crochet in every stitch from wrong side - remember CROCHET INFO, AT THE SAME TIME increase 1 stitch in each side by working 2 stitches in the edge stitch in each side of sleeve. Continue back and forth and increase like this on every row until 5-6-6-8-9-11 increases have been done in total in each side = 50-53-54-58-60-62 stitches. At the end of the next 2 rows work 5-5-6-7-8-9 loose chain stitches(= armholes) = 60-63-66-72-76-80 stitches. Work the new stitches in pattern, i.e. every other row with double crochets and double treble crochets. When piece measures approx. 3 cm from where 5-5-6-7-8-9 loose chain stitches were worked for armhole in each side, begin decrease in each side of sleeve - read DECREASE TIP. Decrease 1 stitch in each side on every row 2-3-4-8-8-10 times and on every 4th row 6-6-6-4-4-4 times = 44-45-46-48-52-52 stitches. Continue until sleeve measures 52-52-52-52-52-52 cm in total - adjust to finish after a row with double crochets. Fasten off. Work the other sleeve the same way. ASSEMBLY: Sew shoulder seams in one and one stitch to avoid a chunky seam. Sew sleeves in body. Sew seam under sleeves and then down the body. NECK EDGE: Begin mid on top of one shoulder and work as follows: ROUND 1: Fasten yarn with 1 double crochet in shoulder seam, * work 2 chain stitches, skip 1 cm, work 1 double crochet *, work from *-* around the entire neck and finish round with 1 slip stitch in first double crochet. ROUND 2: Work 3 chain stitches, then work 2 treble crochets around every chain space the entire round, finish round with 1 slip stitch in 3rd chain stitch at beginning of round. Cut and fasten the yarn. |
|
|
|
|
Have you made this or any other of our designs? Tag your pictures in social media with #dropsdesign so we can see them! Do you need help with this pattern?You'll find tutorial videos, a Comments/Questions area and more by visiting the pattern on garnstudio.com. © 1982-2024 DROPS Design A/S. We reserve all rights. This document, including all its sub-sections, has copyrights. Read more about what you can do with our patterns at the bottom of each pattern on our site. |
|


With over 40 years in knitting and crochet design, DROPS Design offers one of the most extensive collections of free patterns on the internet - translated to 17 languages. As of today we count 304 catalogues and 11422 patterns - 11422 of which are translated into English (UK/cm).
We work hard to bring you the best knitting and crochet have to offer, inspiration and advice as well as great quality yarns at incredible prices! Would you like to use our patterns for other than personal use? You can read what you are allowed to do in the Copyright text at the bottom of all our patterns. Happy crafting!
Comments / Questions (10)
Bonjour, je ne comprends pas la partie sur les diminutions pour les manches. Au début, je dois en avoir 63 mailles et a la fin en avoir 45.
31.10.2023 - 19:05DROPS Design answered:
Bonjour Mme Randice, en taille M vous avez effectivement 63 mailles et vous diminuez 1 m de chaque côté 3 fois tous les rangs puis 6 fois tous les 4 rangs, autrement dit vous allez avoir: 63 - (3x2) - (6x2) = il reste 45 mailles. Bon crochet!
03.11.2023 - 07:21A quelle partie du dos et du devant doit se coudre la partie de la manche qui fait 41 mailles? Le schéma de la manche me paraît complètement erroné. Sur les dessins de manche a monter, le haut est toujours en arrondi pour suivre l'epaule. Ici il n'y a pas d'arrondi. Je suis complètement coincée. Help !
25.05.2023 - 00:49DROPS Design answered:
Bonjour Mme Veillet, les 41 mailles du début de la manche seront cousues en haut de l'emmanchure, les augmentations suivantes de part et d'autre jusqu'aux 63 mailles finales. Les 5 mailles augmentées de chaque côté seront assemblées aux 5 mailles montées pour les emmanchures du dos et du devant. Bon crochet et bon assemblage!
25.05.2023 - 08:59Je crochète une taille M
22.05.2023 - 15:26Voici ce que j’ai fait : 41 mailles en l’air, puis rang 1triple brides, rang 2 mailles serrées, rang 3 : augmentations de chaque coté jusqu’au rang 8 compris ( il est écrit 6 fois de chaque côté, ce qui fait 6 rangs), ce qui fait un ouvrage d’environ 10 cm. C’est ici que se niche l’erreur, car côté emmanchure dos et devant, elles sont similaires et font 21 cm)
22.05.2023 - 15:24DROPS Design answered:
Bonjour Mme Veillet, vous devez augmenter 6 fois tous les rangs, soit 6 rangs, alternativement (1 rang de double-brides +1 rang de mailles serrées) x 3 = 6 rangs = 7,5 cm soit 8 cm environ comme indiqué dans le schéma. Bon crochet!
22.05.2023 - 16:32Suite : et la correction du 16 mai 2023 n'apporte pas d'éclaircissement....
21.05.2023 - 15:46Je rejoins mme Bruder, quelque chose ne va pas dans les indications concernant les manches. Je viens d'envoyer un message à Kalidou où j'ai commandé la laine. Avec ces indications on se retrouve avec des emmanchures d'environ 10 cm, quand celles du dos et du devant font 21 cm
21.05.2023 - 15:42DROPS Design answered:
Bonjour Mme Veillet, pouvez-vous nous en dire davantage de votre problème? La correction du 16 mai indiquait d'augmenter de chaque côté tous les rangs (important pour la symétrie). N'hésitez pas à nous indiquer la taille que vous réalisez et à quel niveau vous coincez pour que nous puissions vous aider. Bon crochet!
22.05.2023 - 13:15Bonjour, les explications concernant les manches semblent incomplètes. Pourriez vous préciser le nombre de rangs entre chaque augmentation ? en vous remerciant par avance
16.05.2023 - 15:01DROPS Design answered:
Bonjour Mme Bruder, les manches se crochètent de haut en bas; vous augmentez d'abord de chaque côté, 5 à 11 fois tous les rangs, puis montez des chaînettes à la fin des 2 rangs suivants. Bon crochet!
16.05.2023 - 15:59Der som det står \"Når arbeidet måler 17-17-17-15-14-12 cm fra skulderen, starter økningen til ermehull.\" Hvis jeg skal ha størrelse S, skal jeg da hekle til 17 cm eller 12 cm, for det virket bare litt rart om det skulle være 17cm ettersom de større størrelsene ser ut til å være mindre cm da? 😅
23.01.2023 - 13:31Virknål 4,5 16 m ska bli 10x10 varannan fast maska o varannan dubbelstolpe 8 varv men min bredd blir 10 cm o höjd 9 cm vad att göra vill virka rustik rust med mitt ullgarn från våra får.?
08.11.2020 - 20:45DROPS Design answered:
Hei Nanny. I denne modellen er det brukt DROPS Sky, om du ønsker å bruke et annet garn (ullgarn fra Våre Får?) må du sjekke heklefastheten, evnt gå opp eller ned i heklenål størrelse for å få den heklefastheten som er oppgitt i oppskriften. mvh DROPS design
16.11.2020 - 14:25Enkel men ändå effektfull modell
04.06.2020 - 15:49