DROPS Sky
DROPS Sky
74% Alpaca, 18% Polyamide, 8% Wool
from 7.20 $ /50g
Get the yarn to make this pattern from 50.40$.

The yarn cost is calculated from the pattern’s smallest size and the yarn’s cheapest product type. Looking for an even better price? You might find it on the DROPS Deals!

DROPS SS24

Rustic Roots

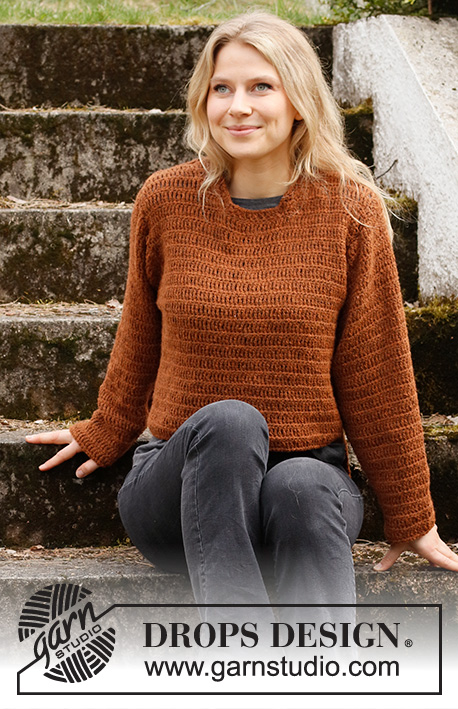
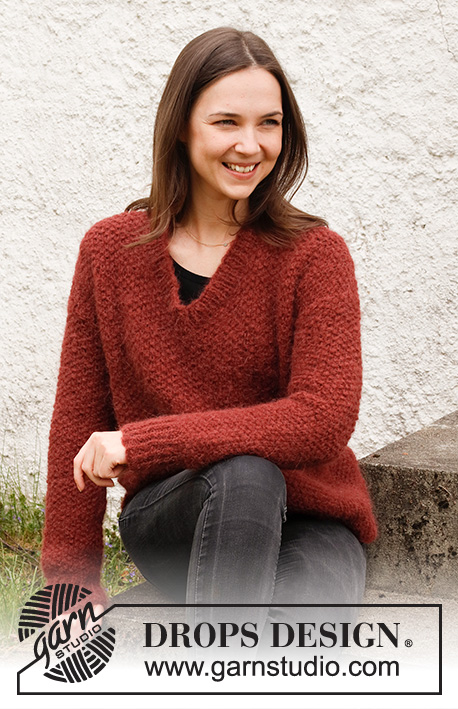
Crocheted sweater in DROPS Sky. Piece is crocheted top down with V-neck and vents in the sides. Size: S - XXXL

DROPS 217-27
DROPS design: Pattern sk-105
Yarn group B
-------------------------------------------------------

SIZE:
S - M - L - XL - XXL – XXXL

Finished measurements:
Chest measurements: 46-50-54-59-65-71 cm = 18"-19¾"-21¼"-23¼"-25½"-28"
Full length: 68-70-72-74-76-78 cm = 26¾"-27½"-28⅜"-29⅛"-29½"-30¾"

All measurements in charts are in cm.

MATERIALS:
DROPS SKY from Garnstudio (belongs to yarn group B)
350-400-400-450-500-550 g color 11, hazelnut

CROCHET GAUGE:
16 stitches in width and 8 rows vertically every other row with single crochets and treble crochets = 10 x 10 cm = 4" x 4".

CROCHET HOOK:
DROPS CROCHET HOOK SIZE 4.5 mm = US 7.
Hook size is only a suggestion! If you have too many stitches on 10 cm = 4" switch to larger hook. If you have too few stitches on 10 cm = 4" switch to smaller hook.

-------------------------------------------------------

Alternative Yarn – See how to change yarns here
Yarn Groups A to F – Use the same pattern and change the yarn here
Yarn usage using an alternative yarn – Use our yarn converter here

-------------------------------------------------------

DROPS Sky
DROPS Sky
74% Alpaca, 18% Polyamide, 8% Wool
from 7.20 $ /50g
Get the yarn to make this pattern from 50.40$.

The yarn cost is calculated from the pattern’s smallest size and the yarn’s cheapest product type. Looking for an even better price? You might find it on the DROPS Deals!

Pattern instructions

NOTE: This pattern is written in American English. All measurements in charts are in cm. For conversion from inches to cm - click here. There are different terms for crocheting in American and British English. If this pattern includes crochet, click for "crochet terms" here. For this pattern in British English, please click here.
-------------------------------------------------------

EXPLANATION FOR THE PATTERN:

-------------------------------------------------------

CROCHET TIP FOR CHAIN STITCH:
If you work at the end of crochet hook the chain stitch will often be too tight.
1 chain stitch should be just as long as 1 single crochet/treble crochet is wide.

CROCHET INFORMATION:
On every row with single crochets, work 1 chain stitch at beginning of row. This chain does not replace first stitch.
On every row with treble crochets, work 4 chain stitches at beginning of row. These 4 chain stitches does not replace first treble crochet but are worked in addition.

INCREASE TIP:
Increase 1 stitch by working 2 stitches in a stitch.

DECREASE TIP (applies to sleeves):
Work 2 single crochets together into 1 single crochet: Insert hook in next stitch, get yarn *, work from *-* 2 times in total, make 1 yarn over and pull yarn through all 3 loops on hook (= 1 stitch decreased).
Work 2 treble crochets together into 1 treble crochet:
Work 1 treble crochet but wait with last yarn over and pull through, work 1 treble crochet more the same way. Make 1 yarn over on hook and pull through all 3 loops on hook (= 1 treble crochet decreased).

-------------------------------------------------------

START THE PIECE HERE:

-------------------------------------------------------

SWEATER - SHORT OVERVIEW OF THE PIECE:
Back piece and front piece is work back and forth in parts, top down. Work sleeves back and forth, top down. Finally sew parts together and crochet an edge around the neck.

BACK PIECE:
Right shoulder:
Work 21-23-23-24-25-27 chain stitches - read CROCHET TIP FOR CHAIN STITCH, on hook size 4.5 mm = US 7 with Sky. Turn and work pattern as follows:
ROW 1 (right side): Work 4 chain stitches - read CROCHET INFO, work 1 treble crochet in every chain stitch = 21-23-23-24-25-27 treble crochets.
ROW 2 (wrong side): Work 1 single crochet in every stitch.
Cut the yarn and work left shoulder. REMEMBER THE CROCHET GAUGE!

Left shoulder:
Work 21-23-23-24-25-27 chain stitches - remember CROCHET TIP FOR CHAIN STITCH, on hook size 4.5 mm = US 7 with Sky. Turn and work pattern as follows:
ROW 1 (right side): Work 4 chain stitches - remember CROCHET INFO, work 1 treble crochet in every chain stitch = 21-23-23-24-25-27 treble crochets.
ROW 2 (wrong side): Work 1 single crochet in every stitch.
Now work the 2 parts together as follows:
ROW 3: Work 1 treble crochet in every stitch until 1 stitch remains on left shoulder, work 2 treble crochets in next stitch, work 18-18-20-20-22-22 loose chain stitches (= neck), then continue over stitches from right shoulder as follows: Work 2 treble crochets in first stitch, work 1 treble crochet in each of the remaining 20-22-22-23-24-26 stitches = 62-66-68-70-74-78 stitches.
Work back and forth with treble crochet from right side and single crochets from wrong side. When piece measures 17-17-17-15-14-12 cm = 6¾"-6¾"-6¾"-6"-5½"-4¾" from shoulder, begin increase for armhole.
Increase 1 stitch by working 2 stitches in edge stitch in each side of piece on every row 2-3-4-6-8-10 times in total in each side = 66-72-76-82-90-98 stitches.
At the end of the next 2 rows work 5-5-6-7-8-9 loose chain stitches for armholes = 76-82-88-96-106-116 stitches. Work the new stitches in pattern, i.e. every other row with single crochets and treble crochets.
When piece measures 68-70-72-74-76-78 cm = 26¾"-27½"-28⅜"-29⅛"-29½"-30¾" from shoulder, adjust to finish after a row with single crochets. The back piece is finished. Cut and fasten the yarn.

FRONT PIECE:
Right shoulder:
Work 21-23-23-24-25-27 chain stitches - remember CROCHET TIP FOR CHAIN STITCH, on hook size 4.5 mm = US 7 with Sky. Turn and work pattern as follows:
ROW 1 (right side): Work 4 chain stitches - remember CROCHET INFO, work 1 treble crochet in every chain stitch = 21-23-23-24-25-27 treble crochets.
ROW 2 (wrong side): Work 1 single crochet in every stitch.
Continue back and forth with treble crochets from right side and single crochets from wrong side, AT THE SAME TIME on next row begin increase for V-neck. Increase 1 stitch by working 2 stitches in the second stitch towards neck on every other row (= every row with treble crochets) 2-2-3-3-4-4 times, then increase 1 stitch the same way on every row (i.e. at the end of every row with treble crochets and beginning of every row with single crochets) 8-8-8-8-8-8 times (= 10-10-11-11-12-12 stitches increased in total for V-neck). AT THE SAME TIME when piece measures 17-17-17-15-14-12 cm = 6¾"-6¾"-6¾"-6"-5½"-4¾" from shoulder, begin increase for armholes. Increase 1 stitch by working 2 stitches in the edge stitch towards the side on every row 2-3-4-6-8-10 times in total, and at the end of next row from wrong side work 5-5-6-7-8-9 loose chain stitches for armhole. When all increases for V-neck and armholes are done, there are 38-41-44-48-53-58 stitches on right shoulder – adjust to finish after a row from right side. Cut the yarn and put piece aside.

Left shoulder:
Work 21-23-23-24-25-27 chain stitches - remember CROCHET TIP FOR CHAIN STITCH, on hook size 4.5 mm = US 7 with Sky. Turn and work pattern as follows:
ROW 1 (right side): Work 4 chain stitches- remember CROCHET INFO, work 1 treble crochet in every chain stitch = 21-23-23-24-25-27 treble crochets.
ROW 2 (wrong side): Work 1 single crochet in every stitch.
Continue back and forth with treble crochets from right side and single crochets from wrong side, AT THE SAME TIME on next row begin increase for V-neck. Increase 1 stitch by working 2 stitch in the second stitch from the neck on every other row (= every row with treble crochets) 2-2-3-3-4-4 times, then increase 1 stitch on every row (i.e. at the beginning of every row with treble crochets and at the end of every row with single crochets) 8-8-8-8-8-8 times (= 10-10-11-11-12-12 stitches increased in total for V-neck). AT THE SAME TIME when piece measures 17-17-17-15-14-12 cm = 6¾"-6¾"-6¾"-6"-5½"-4¾" from shoulder, begin increase for armholes. Increase 1 stitch by working 2 stitches in edge stitch towards the side on every row 2-3-4-6-8-10 times. At the end of next row from right work 5-5-6-7-8-9 loose chain stitches for armhole. When all increases for V-neck and armholes are done, there are 38-41-44-48-53-58 stitches on left shoulder – adjust to finish after a row from right side.
Now work the 2 parts together from wrong side follows: Turn and work as before over stitches on left shoulder, then work over stitches from right shoulder = 76-82-88-96-106-116 stitches. Continue back and forth with every other row with treble crochets and single crochets. When piece measures 68-70-72-74-76-78 cm = 26¾"-27½"-28⅜"-29⅛"-29½"-30¾" from shoulder, adjust to finish after a row with single crochets. The back piece is finished. Cut and fasten the yarn.

SLEEVES:
Work 40-41-42-42-42-40 chain stitches - remember CROCHET TIP FOR CHAIN STITCH, on hook size 4.5 mm = US 7 with Sky. Work 1 single crochet in every stitch from right side and work 1 single crochet in every stitch from wrong side - remember CROCHET INFO, AT THE SAME TIME increase 1 stitch in each side by working 2 stitches in the edge stitch in each side of sleeve. Continue back and forth like this until 5-6-6-8-9-11 stitches have been increased in total in each side = 50-53-54-58-60-62 stitches. At the end of the next 2 rows work 5-5-6-7-8-9 loose chain stitches(= armholes) = 60-63-66-72-76-80 stitches. Work the new stitches in pattern, i.e. every other row with single crochets and treble crochets.
When piece measures approx. 3 cm = 1⅛" from where 5-5-6-7-8-9 loose chain stitches were worked for armhole in each side, begin decrease in each side of sleeve - read DECREASE TIP. Decrease 1 stitch in each side on every row 2-3-4-8-8-10 times and on every 4th row 6-6-6-4-4-4 times = 44-45-46-48-52-52 stitches. Continue until sleeve measures 52-52-52-52-52-52 cm = 20½"-20½"-20½"-20½"-20½"-20½" in total - adjust to finish after a row with single crochets. Fasten off. Work the other sleeve the same way.

ASSEMBLY:
Sew shoulder seams in one and one stitch to avoid a chunky seam. Sew sleeves in body. Sew seam under sleeves and down along body until approx. 17 cm = 6¾" remain (= vent).

NECK EDGE:
Begin tip in V-neck at the front and work from wrong side as follows: Fasten yarn with 1 single crochet in the tip, * work 2 chain stitches, skip 1 cm = ⅜", work 1 single crochet *, work from *-* around the entire neck and adjust to finish with 1 single crochet beside the first single crochet worked in tip on V-neck. Turn and work as follows from right side: Work 3 chain stitches, then work 2 double crochet around every chain space around the neck. Cut the yarn. Place one row with double crochets over the other row with double crochets in the tip on V-neck and sew a couple of invisible stitches to fasten rows together. Fasten off.

Diagram

All measurements in charts are in cm.

diagram measurements
Do you have a question? See a list of frequently asked questions (FAQ)

Knitting tension is what determines the final measurements of your work, and is usually measured per 10 x 10 cm. It is provided like so: number of stitches in width x number of rows in height - eg: 19 stitches x 26 rows = 10 x 10 cm.

The knitting tension is very individual; some people knit/crochet loosely while others work tightly. You adjust the knitting tension with the needle size, which is why the suggested needle size only serve as a guide! You need to adjust this (up or down) to ensure that YOUR knitting tension matches the knitting tension provided in the pattern. If you work with a different knitting tension than provided you will have a different yarn consumption, and your work will have different measurements than what the pattern suggests.

The knitting tension also determines which yarns can replace each other. As long as you achieve the same knitting tension you can replace one yarn with another.

See DROPS lesson: How to measure your tension/gauge

See DROPS video: How to make a gauge tension swatch

The required amount of yarn is provided in grams, eg: 450 g. To calculate how many balls you’ll need you first need to know how many grams are in 1 ball (25g, 50g or 100g). This information is available if you click on the individual yarn quality on our pages. Divide the amount required with the amount of each ball. For example, if each ball is 50g (the most common amount), the calculation will be as follows: 450 / 50 = 9 balls.

The important thing when changing from one yarn to another is that the knitting/crochet tension remains the same. This is so that the measurements of the finished piece will be the same as on the sketch provided. It is easier to achieve the same knitting tension using yarns from the same yarn group. It is also possible to work with multiple strands of a thinner yarn to achieve the knitting tension of a thicker one. Please try our yarn converter. We recommend you to always work a test swatch.

Please NOTE: when changing yarn the garment might have a different look and feel to the garment in the photo, due to individual properties and qualities of each yarn.

See DROPS lesson: Can I use a different yarn than the one mentioned in the pattern?

All our yarns are categorised into yarn groups (from A to F) according to thickness and knitting tension – group A contains the thinnest yarns and group F the thickest. This makes it easier for you to find alternative yarns to our patterns, should you wish to switch yarn. All yarns within the same group have a similar knitting tension and can easily replace each other. However, different yarn qualities have different structures and properties which will give the finished work a unique look and feel.

Click here for an overview of the yarns in each yarn group

At the top of all our patterns you’ll find a link to our yarn converter, which is a helpful tool should you wish to use a different yarn than suggested. By filling in the yarn quality you wish to replace, the amount (in your size) and number of strands, the converter will present good alternative yarns with the same knitting tension. Additionally it will tell you how much you’ll require in the new qualities and whether you’ll need to work with multiple strands. Most skeins are 50g (some are 25g or 100g).

If the pattern is worked with multiple colours, every colour will have to be converted separately. Similarly, if the pattern is worked with several strands of different yarns (for example 1 strand Alpaca and 1 strand Kid-Silk) you will have to find alternatives for each, individually.

Click here to see our yarn converter

Since different yarns have different qualities and textures we have chosen to keep the original yarn in our patterns. However, you can easily find options among our available qualities by using our yarn converter, or simply pick a yarn from the same yarn group.

It is possible that some retailers still have discontinued yarns in stock, or that someone has a few skeins at home that they would like to find patterns for.

The yarn converter will provide both alternative yarn as well as required amount in the new quality.

If you think it's hard to decide what size to make, it can be a good idea to measure a garment you own already and like the size of. Then you can pick the size by comparing those measures with the ones available in the pattern's size chart.

You'll find the size chart at the bottom of the pattern.

See DROPS lesson: How to read size chart

The needle size provided in the pattern serves only as a guide, the important thing is to follow the knitting tension. And since knitting tension is very individual, you will have to adjust the needle size to ensure that YOUR tension is the same as in the pattern – maybe you’ll have to adjust 1, or even 2 needle sizes, up or down to achieve the correct tension. For this, we recommend that you work test swatches.

Should you work with a different knitting tension than the one provided, the measurements of the finished garment might deviate from the measurement sketch.

See DROPS lesson: How to measure your tension/gauge

See DROPS video: How to make a gauge tension swatch

Working a garment top-down provides more flexibility and room for personal adjustment. For example it is easier to try the garment on while working, as well as making adjustments to length of yoke and shoulder caps.

The instructions are carefully explaining every step, in the correct order. Diagrams are adjusted to the knitting direction and are worked as usual.

The diagram depicts all rows/rounds, and every stitch seen from the right side. It is read from bottom to top, from right to left. 1 square = 1 stitch.

When working back and forth, every other row is worked from the right side and every other row is worked from the wrong side. When working from the wrong side, the diagram will have to be worked reversed: from left to right, knit stitches are purled, purl stitches are knit etc.

When working in the round every round is worked from the right side and the diagram are worked from right to left on all rounds.

See DROPS lesson: How to read knitting diagrams

The diagram depicts all rows/rounds, and every stitch seen from the right side. It is worked from bottom to top, from right to left.

When working back and forth every other row is worked from the right side: from right to left and every other row is worked from the wrong side: from left to right.

When working in the round, every row in the diagram are worked from the right side, from right to left.

When working a circular diagram you start in the middle and work your way outwards, counter clockwise, row by row.

The rows usually start with a given number of chain stitches (equivalent to the height of the following stitch), this will either be depicted in the diagram or explained in the pattern.

See DROPS lesson: How to read crochet diagrams

Instructions for working several diagrams after each other on the same row/round, will often be written like so: “work A.1, A.2, A.3 a total of 0-0-2-3-4 times". This means you work A.1 once, then A.2 is worked once, and A.3 is repeated (in width) the number of times provided for your size – in this case like so: S = 0 times, M = 0 times, L=2 times, XL= 3 times and XXL = 4 times.

The diagrams are worked as usual: begin with the first row in A.1, then work the first row in A.2 etc.

See DROPS lesson: How to read knitting diagrams

See DROPS lesson: How to read crochet diagrams

The total width of the garment (from wrist-to-wrist) will be larger in the larger sizes, despite the actual sleeves being shorter. The larger sizes have longer sleeve caps and wider shoulders, so there will be a good fit in all sizes.

The measurement sketch/schematic drawing provides information regarding the full length of the garment. If it’s a jumper or a jacket the length is measured from the highest point on the shoulder (usually closest to the neckline), and straight down to the bottom of the garment. It is NOT measured from the tip of shoulder. Similarly, the length of yoke is measured from the highest point on the shoulder and down to where yoke is split into body and sleeves.

See DROPS lesson: How to read a schematic drawing

Diagrams are often repeated on the round or in height. 1 repeat is the diagram the way it appears in the pattern. If it says to work 5 repeats of A.1 in the round, then you work A.1 a total of 5 times after/next to each other in the round. If it says to work 2 repeats of A.1 vertically/in height you work the entire diagram once, then begin again at the start and work the entire diagram one more time.

Chain stitches are slightly narrower than other stitches and to avoid working the cast-on edge too tight, we simply chain more stitches to begin with. The stitch count will be adjusted on the following row to fit the pattern and measurement sketch.

The rib edge is more elastic and will contract slightly compared to, for example, stocking stitch. By increasing before the rib edge, you avoid a visible difference in width between the rib edge and the rest of the body.

It’s very easy to cast off too tightly, and by making yarn overs while casting off (and simultaneously casting these off) you avoid a too tight cast off edge.

See DROPS video: How to bind off with yarn overs (yo)

To achieve an even increase (or decrease) you can increase on, for example: every 3rd and 4th row alternately, like so: work 2 rows and increase on the 3rd row, work 3 rows and increase on the 4th. Repeat this until the increase is complete.

See DROPS lesson: Increase or decrease 1 st on every 3rd and 4th row alternately

Should you prefer to work in the round instead of back and forth, you may of course adjust the pattern. You’ll need to add steeks mid-front (usually 5 stitches), and follow the instructions. When you would normally turn and work from the wrong side, simply work across the steek and continue in the round. At the end you’ll cut the piece open, pick up stitches to work bands, and cover the cut edges.

See DROPS video: How to knit steeks and cut open

Should you prefer to work back and forth instead of in the round, you may of course adjust the pattern so you work the pieces separately and then assemble them at the end. Divide the stitches for the body in 2, add 1 edge stitch in each side (for sewing) and work the front and back pieces separately.

See DROPS lesson: Can I adapt a pattern for circular needles into straight needles?

Pattern repeats can vary slightly in the different sizes, in order to get the correct proportions. If you’re not working the exact same size as the garment in the photo, yours might deviate slightly. This has been carefully developed and adjusted so that the complete impression of the garment is the same in all sizes.

Make sure to follow instructions and diagrams for your size!

If you have found a pattern you like which is available in women’s size it’s not very difficult to convert it to men’s size. The biggest difference will be the length of sleeves and body. Start working on the women size that you think would fit across the chest. The additional length will be worked right before you cast off for the armhole/sleeve cap. If the pattern is worked top-down you can add the length right after the armhole or before the first decrease on sleeve.

Regarding additional yarn amount, this will depend on how much length you add, but it is better with a skein too many than too few.

All yarns will have excess fibres (from production) that might come off as lint or shedding. Brushed yarns (ie hairier yarns) have more of these loose, excess fibres, causing more shedding.

Shedding also depends on what is worn under or over the garment, and whether this pulls at the yarn fibres. It’s therefore not possible to guarantee that there will be no shedding

Below are some tips on how to get the best result when working with hairier yarns:

1. When the garment is finished (before you wash it) shake it vigorously so the looser hairs come off. NOTE: do NOT use a lint roller, brush or any method that pulls at the yarn.

2. Place the garment in a plastic bag and put it in your freezer - the temperature will cause the fibres to become less attached to each other, and excess fibres will come off easier.

3. Leave in the freezer for a few hours before taking it out and shaking it again.

4. Wash the garment according to the instructions on the yarn label.

Pilling is a natural process that happens to even the most exclusive of fibers. It's a natural sign of wear and tear that is hard to avoid, and that is most visible in high friction areas of your garment like a sweater's arms and cuffs.

You can make your garment look as new by removing the pilling, using a fabric comb or a pill/lint remover.

Still can't find the answer you need? Then scroll down and leave your question so one of our experts can try to help you. This will be done normally within 5 to 10 working days.
In the meantime, you can read the questions and answers that others have left to this pattern or join the DROPS Workshop on Facebook to get help from fellow knitters/crocheters!

You might also like...

Post a comment to pattern DROPS 217-27

We would love to hear what you have to say about this pattern!

If you want to leave a question, please make sure you select the correct category in the form below, to speed up the answering process. Required fields are marked *.

Comments / Questions (9)

country flag Betty wrote:

Bonjour, C'est mon premier "vrai" ouvrage réalisé. Les explications sont claires, même pour une super débutante. Je pense que je le réaliserai à nouveau, mais légèrement cintré à la taille. Merci pour vos modèles et aides à la réalisation.
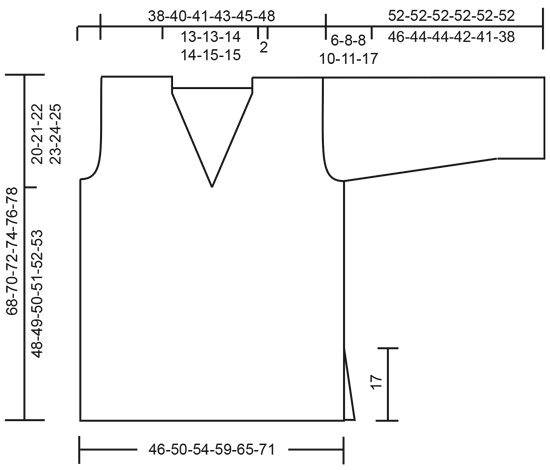
12.12.2023 - 15:40

country flag Christina Laryea wrote:

Hej. Kan i oplyse mål på de forskellige størrelser? Pft og mvh Christina

27.02.2023 - 15:21

DROPS Design answered:

Hej Christina, du finder blusens mål i måleskitsen nederst i opskriften :)

28.02.2023 - 14:43

country flag Anabrlla wrote:

Buongiorno, ho 1 domanda: quando il pattern dice: Aumentare 1 maglia lavorando 2 maglie nella maglia di vivagno verso il lato su ogni riga 2-3-4-6-8-10 volte in totale, il 'verso il lato' si riferisce al lato vivagno o all'interno del maglione Grazie

05.02.2022 - 09:35

DROPS Design answered:

Buonasera Annabella, si fa riferimento proprio all'esterno del lavoro. Buon lavoro!

05.02.2022 - 21:02

country flag Deborah wrote:

Wat word er bedoeld met: hier worden aanvullend dubbele stokjes op gehaakt?

18.03.2021 - 17:32

DROPS Design answered:

Dag Deborah,

Normaal vervangen de 4 lossen het eerste dubbele stokje op de toer, maar nu worden deze 4 lossen er extra bij gehaakt, dus niet in plaats van het eerste dubbele stokje, maar aanvullend.

21.03.2021 - 11:04

country flag Anja wrote:

Hoeveel bollen worden er gebruikt?

18.01.2021 - 14:57

DROPS Design answered:

Dag Anja,

Bovenaan bij de materialenlijst staat per maat aangegeven hoeveel gram je nodig hebt. (Het eerste getal is voor maat S, het tweede getal voor maat M, enzovoort). 1 bol weegt 50 gram, dus als er bijvoorbeeld 400 gram staat heb je 8 bollen nodig.

22.01.2021 - 16:07

country flag Sophie wrote:

Bonjour, il n'ya pas une erreur pour les augmentations de la manche ? Si on les fait sur 11 rang, ça fait une manche courte !

30.11.2020 - 13:16

DROPS Design answered:

Bonjour Sophie, quand les augmentations sont faites 11 fois de chaque côté (XXXL), vous avez crocheté 22 rangs au total et vous montez encore 9 mailles en l'air à la fin des 2 rangs suivants pour les emmanchures. Vous continuez ensuite la partie "longue" de la manche en diminuant de chaque côté. J'espère avoir pu vous débloquer. Bon crochet!

30.11.2020 - 16:09

country flag Annette Labori Brattberg wrote:

Jeg stusser på størrelsen på heklenålen ift bytte til tynnere eller tykkere nål. Er det ikke motsatt?

20.10.2020 - 16:37

country flag VICTORIA wrote:

ESTA PRENDA ES LINDA PARA JOVENES , SUELTA INFORMAL, LINDA

05.08.2020 - 18:36

country flag Kine wrote:

I NEED to make this one!! ❤️Love❤️

04.06.2020 - 20:48