
Popular categories
Looking for a yarn?


|
|
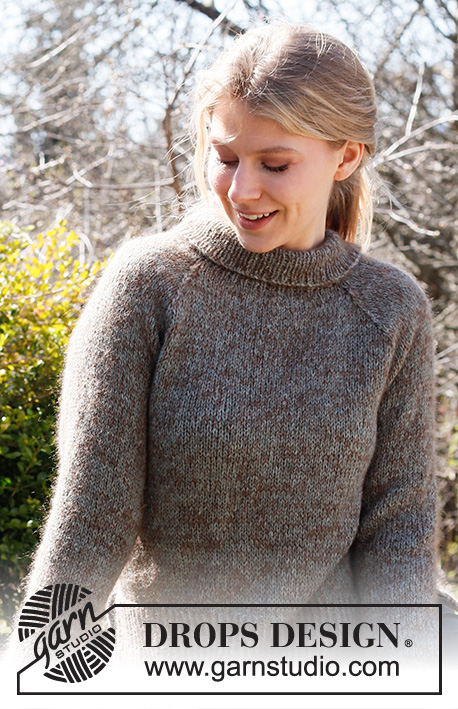
North Woods Sweater |
|
 |
 |
Knitted jumper with raglan in DROPS Sky and DROPS Kid-Silk. Piece is knitted with vents in the sides. Size: S - XXXL
DROPS 216-22 |
|
|
------------------------------------------------------- EXPLANATION FOR THE PATTERN: ------------------------------------------------------- GARTER STITCH (back and forth): Knit all rows. 1 ridge vertically = knit 2 rows. DECREASE TIP (evenly): To calculate how to decrease evenly, use the number of stitches decreases are done over (e.g. 89 stitches) , and divide stitches by number of decreases to be done (e.g. 16) = 5.6. In this example decrease by knitting alternately approx. every 4th and 5th stitch and every 5th and 6th stitch together. INCREASE TIP (applies to sleeves): Work until 2 stitches remain before marker thread, 1 yarn over, knit 4 (marker thread is in the middle of these stitches), 1 yarn over. On next round knit yarn overs twisted to avoid holes. Then work the new stitches in stocking stitch. RAGLAN: Decrease like this in every transition between body and sleeves: Work until 1 stitch remains before stitch with marker, slip 2 stitches as if knitted together, knit 1, pass the 2 slipped stitches over stitch worked. Repeat at every marker (= 8 stitches decreased on round). CAST-OFF TIP: To avoid a tight cast-off edge you may use a larger needle size. If this also is too tight, work a 1 yarn over after approx. every 4th stitch while casting off (cast off yarn overs as regular stitches). ------------------------------------------------------- START THE PIECE HERE: ------------------------------------------------------- JUMPER - SHORT OVERVIEW OF THE PIECE: Work front and back piece back and forth separately until rib and vent in each side are done. Then slip parts on to same circular needle and work in the round up to armholes. Sleeves are worked in the round on double pointed needles/a short circular needle up to armhole. Then slip sleeves on to same circular needle as body and work yoke in the round. Work neck edge in the round on a short circular needle at the end. BACK PIECE: Cast on 91-101-109-117-129-141 stitches (including 1 edge stitch in garter stitch in each side) on circular needle size 4 mm with 1 strand Sky and 1 strand Kid-Silk (= 2 strands). Purl 1 row from wrong side. Then work rib as follows: ROW 1 (= right side): 1 edge stitch in GARTER STITCH - read explanation above, * knit 1 twisted, purl 1 *, work from *-* until 2 stitches remain on needle, knit 1 twisted and finish with 1 edge stitch in garter stitch. ROW 2 (= wrong side): 1 edge stitch in garter stitch, * purl 1 twisted, knit 1 *, work from *-* until 2 stitches remain on row, purl 1 twisted and finish with 1 edge stitch in garter stitch. Repeat 1st and 2nd row until rib measures 15 cm. Put piece aside and work the front piece. FRONT PIECE: Cast on and work the same way as back piece until rib measures 15 cm - adjust so that next row is worked from right side. BODY: Knit 1, knit the next 89-99-107-115-127-139 stitches and decrease at the same time 16-20-22-22-24-26 stitches evenly – read DECREASE TIP, knit last stitch on front piece together with first stitch on back piece (= 1 stitch decreased), insert a marker thread here (= in the side), knit the next 89-99-107-115-127-139 stitches on back piece and decrease at the same time 16-20-22-22-24-26 stitches evenly, knit last stitch on back piece together with first stitch on front piece, insert a marker thread here (= in the side and this is beginning of round). There are now 148-160-172-188-208-228 stitches on round. Switch to circular needle size 5.5 mm. Work in stocking stitch in the round. REMEMBER THE KNITTING TENSION! When piece measures 33-33-34-34-34-34 cm, cast off 8-8-10-10-12-12 stitches for armholes in each side (i.e. 4-4-5-5-6-6 stitches on each side of marker thread in each side) = 66-72-76-84-92-102 stitches for front and back piece. Put piece aside and work the sleeves. SLEEVES: Cast on 46-48-50-52-52-56 stitches on double pointed needles size 4 mm with 1 strand Sky and 1 strand Kid-Silk (= 2 strands). Now work in the round as follows: Knit 1 round. Then work rib (= knit 1 twisted/purl 1) in the round for 5 cm. Knit 1 round while decreasing 8-8-8-8-8-10 stitches evenly – remember DECREASE TIP = 38-40-42-44-44-46 stitches. Switch to double pointed needles size 5.5 mm. Insert a marker thread at beginning of round (= mid under sleeve). Move the marker thread when working; it is used for increase under sleeve later. Work in stocking stitch in the round. When piece measures 8-8-7-8-8-8 cm from cast-on edge, increase 1 stitch on each side of marker thread - read INCREASE TIP. Increase like this approx. every 3-3-2½-2-1½-1½ cm 10-10-12-13-15-15 times in total = 58-60-66-70-74-76 stitches. When sleeve measures 39-38-37-35-34-32 cm, cast off the middle 8-8-10-10-12-12 stitches under sleeve (i.e. 4-4-5-5-6-6 stitches on each side of marker thread) = 50-52-56-60-62-64 stitches. Put piece aside and knit another sleeve the same way. YOKE: Slip sleeves on to same circular needle as body where armholes were cast off = 232-248-264-288-308-332 stitches. Insert a marker thread mid back on back piece (= 33-36-38-42-46-51 stitches on each side of marker thread on back piece). This is now the beginning of round. Insert a marker in the outermost stitch in each side of back piece and front piece (= 64-70-74-82-90-100 stitches between stitches with marker on front piece and back piece and 50-52-56-60-62-64 stitches on sleeves). Use markers later when decreasing for raglan. Work in stocking stitch in the round. When yoke measures 3-4-3-3-3-4 cm, begin decrease for RAGLAN – read explanation above. Decrease like this every other round 18-19-21-23-25-26 times in total = 88-96-96-104-108-124 stitches. When all decreases are done, the piece should measure 21-23-24-26-28-30 cm if the knitting tension is maintained vertically. Knit 1 round while decreasing 14-20-16-20-20-32 stitches evenly = 74-76-80-84-88-92 stitches. NECK EDGE: Switch to a short circular needle size 4 mm. Work rib (knit 1 twisted/purl 1) in the round for 10 cm. Cast off with knit over knit and purl over purl - read CAST-OFF TIP. The neck edge can be folded outwards, or it can be folded inwards and fasten to form a double neck edge as follows: Fold rib at the top of neck down on the inside of garment. Fasten rib to form a folding edge. To avoid a tight neck edge and avoiding the edge to tip outwards, it is important to make the seam elastic. ASSEMBLY: Sew the openings under the sleeves together. |
|
|
|
|
Have you made this or any other of our designs? Tag your pictures in social media with #dropsdesign so we can see them! Do you need help with this pattern?You'll find tutorial videos, a Comments/Questions area and more by visiting the pattern on garnstudio.com. © 1982-2024 DROPS Design A/S. We reserve all rights. This document, including all its sub-sections, has copyrights. Read more about what you can do with our patterns at the bottom of each pattern on our site. |
|


With over 40 years in knitting and crochet design, DROPS Design offers one of the most extensive collections of free patterns on the internet - translated to 17 languages. As of today we count 304 catalogues and 11422 patterns - 11422 of which are translated into English (UK/cm).
We work hard to bring you the best knitting and crochet have to offer, inspiration and advice as well as great quality yarns at incredible prices! Would you like to use our patterns for other than personal use? You can read what you are allowed to do in the Copyright text at the bottom of all our patterns. Happy crafting!
Comments / Questions (11)
Hei, stemmer det at str XXl bare skal strikkes til 34 cm på armene? Det står: "Når ermet måler 39-38-37-35-34-32 cm" Jeg kan ikke forstå at et erme i stor størrelse skal være kortere enn i str S. Blir de ikke alt for korte? Håper på svar raskt - jeg har sendt tilsvarende spørsmål til Garnius men de svarer ikke (eller det tar 16 dager +). Med hilsen Camilla Nygren
13.03.2024 - 14:40DROPS Design answered:
Hei Camilla, Det er kortere ermer i større størrelsene pga videre skuldervidde og lengre bærestykke. Du kan allikevel justere ermelengden hvis du vil, ved å strikke lengre før man feller av til ermetoppen. God fornøyelse!
14.03.2024 - 12:36Hvorfor står det ikke mål i oppskriften, som overvidde, lengde m.m...?
15.07.2023 - 22:14DROPS Design answered:
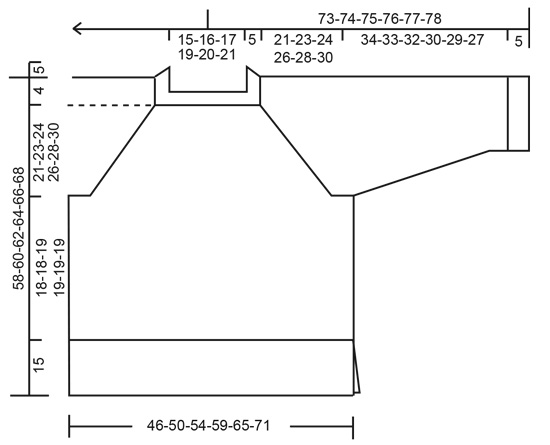
Hei Anne, Du finner en målskisse på bunnen av oppskriften, med alle mål til alle størrelser. God fornøyelse!
17.07.2023 - 07:41Als je mindert voor de raglan zoals in dit patroon beschreven, waar blijft dan de markeerdraad? De markeerdraad zit in de 2e steek die wordt afgehaald en over de volgende wordt gehaald, dus dan verdwijnt hij toch als het ware in de overhaling?
01.12.2022 - 16:04DROPS Design answered:
Dag Jetje,
De steek die je op de rechter naald hebt na het minderen (dus de steek waar je de 2 afgehaalde steken overheen haalt), die kun je gebruiken om de markeerdraad weer in te zetten.
04.12.2022 - 16:28I have Sky wool in pale blue,which colour would you suggest for the alpaca silk?
16.09.2022 - 07:39DROPS Design answered:
Dear Mrs Mikha, for any assistance choosing the best matching colour, please contact your DROPS Store, it will be much easier for them to help you - even per mail or telephone Happy knitting!
16.09.2022 - 09:55Lower section of this jumper seems complicated. Where can I find a pattern for a bottom-up jumper with raglan sleeves?
16.03.2022 - 13:13DROPS Design answered:
Dear Charlene, you will find some of our jumpers worked bottom up with raglan sleeves here. Happy knitting!
16.03.2022 - 13:38Why are the stitches in the rib knitted from the back? Could I just knit them normally or would this affect the result greatly? Also: I have quite big holes whenever I increase using the "yarn over" method. Is there a better way for increasing? (Maybe I knit too loosely.)
08.02.2022 - 23:21DROPS Design answered:
Hi Imogen, The ribbing kan be worked as normal if you wish. It won't make much difference to the overall look of the jumper. When working the yarn overs after an increase, work them twisted (work in the back loop) to avoid holes. Happy knitting!
09.02.2022 - 07:48Hei! Dette står om økning i antall masker i ermene: "Når arbeidet måler 8-8-7-8-8-8 cm fra oppleggskanten, økes det 1 maske på hver side av merketråden." Jeg lurer på hva oppleggskant er. Er det selve starten på ermet eller er det linjen når vrangbord går over til glattstrikk?
09.04.2021 - 10:34DROPS Design answered:
Hei Gordana, Det er begynnelsen på ermet. God fornøyelse!
12.04.2021 - 07:01I do not know how to explain it i need a tutorial on how to cast off stiches for an armhole, when i finish the round there is one extra and it is in the middle of the gap, sjall i send a photo ?
10.03.2021 - 22:19DROPS Design answered:
Hi Beata, please send a photo to poland@dropsproject.com. Kind regards
11.03.2021 - 07:27I do not know how to cast off stiche for armholes, that is my right question, because when I have made a round and come to the place when I started casting off ( the first 4 stiches) and when I ended with casting four ( the other side of the back) it seems there is one stich right in the middle.
10.03.2021 - 16:44DROPS Design answered:
Witaj Beato, nie wiem czy dobrze zrozumiałam - czy po zamknięciu oczek na podkroje rękawów zostaje ci nadplanowe oczko?
10.03.2021 - 20:37Salve, c'è una tabella per le misure? La misura M e la misura L a quanti cm di cirf. seno corrispondono? Grazie anticipatamente
07.12.2020 - 19:13DROPS Design answered:
Buonasera Anita, in fondo alle spiegazioni può trovare il diagramma con le misure: le confronti con un capo di simile vestibilità per trovare la sua taglia. Buon lavoro!
07.12.2020 - 21:13