
Popular categories
Looking for a yarn?


|
|||||||||||||||||||
Lantern River |
|||||||||||||||||||
 |
 |
||||||||||||||||||
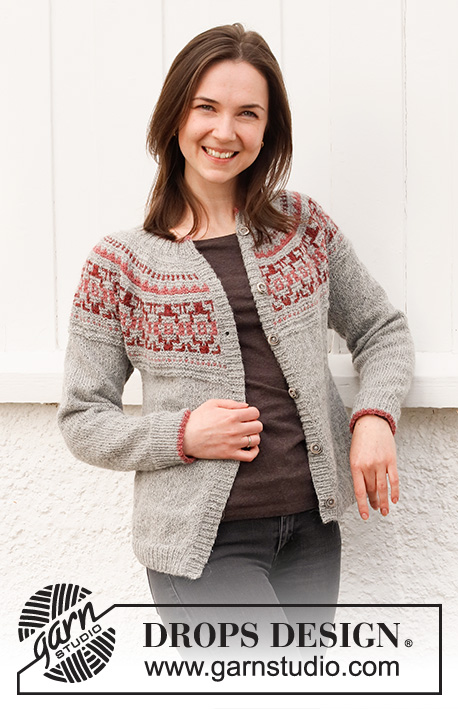
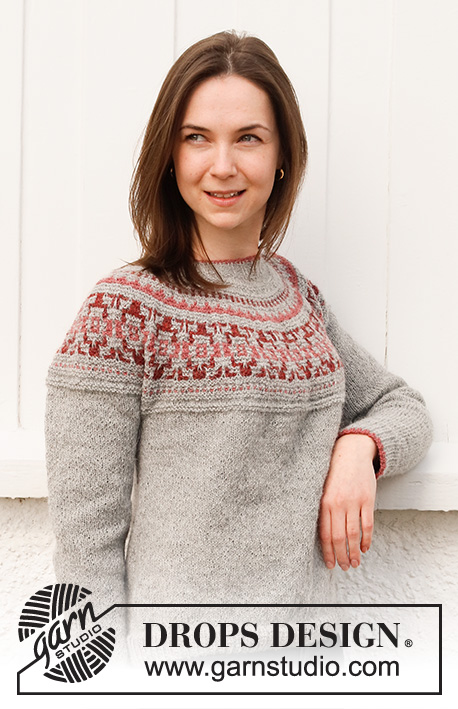
Knitted jumper in DROPS Alpaca. The piece is worked top down with round yoke and mosaic pattern in garter stitch on the yoke. Sizes S - XXXL.
DROPS 217-20 |
|||||||||||||||||||
|
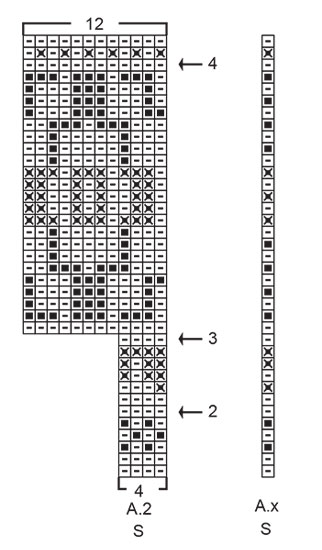
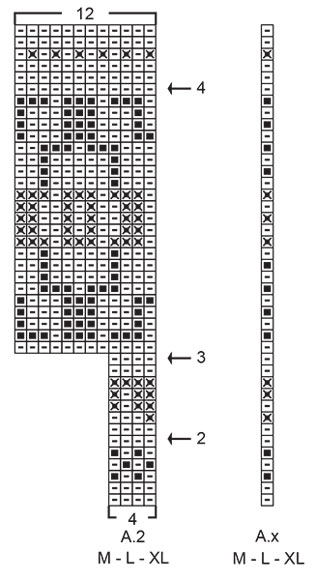
------------------------------------------------------- EXPLANATIONS FOR THE PATTERN: ------------------------------------------------------- RIDGE/GARTER STITCH (worked back and forth): Knit all rows. 1 ridge in height = Knit 2 rows. INCREASE TIP-1 (evenly spaced): All increases worked from the right side! To work out how to increase evenly, count the total number of stitches on the needle (e.g. 107 stitches) minus the edge stitches (e.g. 2 stitches) and divide the remaining stitches by the number of increases to be made (e.g. 35) = 3. In this example, increase by making 1 yarn over after each 3rd stitch. Do not increase over the edge stitches. On the next row knit the yarn overs twisted to avoid holes. INCREASE TIP-2 (for sides of body): All increases are worked from the right side! Start 3 stitches before the marker thread, make 1 yarn over, knit 6 (marker thread sits between these 6 stitches) make 1 yarn over (= 2 stitches increased at each marker thread). On the next round knit the yarn overs twisted to avoid holes. Then work the new stitches in stocking stitch. DECREASE TIP (for mid under sleeve): Start 3 stitches before the marker thread, knit 2 together, knit 2 (marker thread sits between these 2 stitches), slip 1 stitch as if to knit, knit 1 and pass the slipped stitch over the knitted stitch (= 2 stitches decreased). CASTING-OFF TIP: To avoid the cast-off edge being tight you can cast off with a larger size needle. If the edge is still tight, make 1 yarn over after approx. each 4th stitch at the same time as casting off; the yarn overs are cast off as normal stitches. PATTERN: See diagrams A.1 to A.3. Choose diagram for your size (applies to A.x and A.2). NOTE: The mosaic patterns (A.x and A.2) have their own description below. MOSAIC PATTERN: See diagrams A.x and A.2 and read the technique below. Each row in A.x and A.2 represents 2 rows; i.e. from the right side, the diagram is worked from right to left and from the wrong side the SAME row is worked from left to right = 1 ridge. On all rows from the right side, keep the strand at the back of the piece (on the wrong side) when a stitch is slipped. On all rows from the wrong side, keep the strand in front of the piece (on the wrong side) when a stitch is slipped. It is important that the strands are not tight at the back of the piece – rather allow them to be a little loose. To keep better control of the pattern, you can insert a marker between each pattern-repeat of A.2. A.x = help square – this square is not worked, but shows how the pattern-row is to be worked (read more below). A.2 = 1 pattern-repeat On the 1-coloured rows in the diagram, work 1 ridge back and forth over all stitches without slipping any of the stitches. On each pattern-row in A.2 which has a black square in A.x (light maroon), all light maroon stitches in A.2 are knitted and all light grey stitches are slipped as described above. On each pattern-row in A.2 which has a small line in A.x (light grey), all light grey stitches in A.2 are knitted and all light maroon/old rose stitches are slipped as described above. On each pattern-row in A.2 which has an x in A.x (old rose), all old rose stitches in A.2 are knitted and all light grey stitches are slipped as described above. ------------------------------------------------------- START THE PIECE HERE: ------------------------------------------------------- JUMPER – SHORT OVERVIEW OF THE PIECE: Due to the mosaic pattern, the neck and yoke are worked back and forth with circular needle, top down (from the back of the right shoulder). It is important to follow the diagrams carefully. The whole pattern is worked in garter stitch, but not in normal garter stitch; the coloured pattern is achieved by slipping stitches. Read description in MOSAIC PATTERN before starting! The yoke is divided for the body and sleeves and the body continued in the round with circular needle. The sleeves are worked in the round with double pointed needles/short circular needle, top down. NECK: Cast on 107-113-116-119-125-131 stitches (including 1 edge stitch on each side towards mid front) with circular needle size 3 mm and old rose. Purl 1 row (wrong side). The next row is worked as follows from the right side: 1 edge stitch in GARTER STITCH – read description above, * knit 1, purl 2 *, work from *-* until there is 1 stitch left on the row and finish with 1 edge stitch in garter stitch. Change to light grey and continue the rib until the neck measures 3 cm. Knit 1 row from the right side where you increase 35-37-38-43-49-51 stitches evenly spaced– read INCREASE TIP-1. Purl 1 row from the wrong side (edge stitches worked in garter stitch as before and yarn overs purled twisted to avoid holes). Insert 1 marker at the beginning of the row, inside the edge stitch; the yoke is measured from this marker. YOKE: Change to circular needle size 3.5 mm. Start from the right side and work A.1 back and forth with with 1 edge stitch in garter stitch on each side. REMEMBER THE KNITTING TENSION! AT THE SAME TIME on the row marked with arrow-1 in A.1, increase 44-44-48-52-56-64 stitches evenly spaced = 186-194-202-214-230-246 stitches. When A.1 has been completed, work MOSAIC PATTERN – read description above, as follows from the right side: Work 1 edge stitch in garter stitch with light grey, see symbol in A.x (the symbol explains how to work the colours on the row – the symbol is not to be worked itself), work A.2 until there is 1 stitch left on the row (= 46-48-50-53-57-61 repeats of 4 stitches) and finish with 1 edge stitch in garter stitch in light grey. Continue this pattern; remember that 1 row in the diagram represents 1 ridge (2 rows; 1 row from the right side and 1 row from the wrong side). AT THE SAME TIME on each row marked with an arrow in A.2, increase stitches evenly spaced as described below – remember INCREASE TIP-1. Arrow-2: Increase 44-48-52-56-60-64 stitches evenly spaced = 230-242-254-270-290-310 stitches (there is now room for 57-60-63-67-72-77 repeats of A.2 with 4 stitches). Arrow-3: Increase 36-48-60-68-72-76 stitches evenly spaced = 266-290-314-338-362-386 stitches (there is now room for 22-24-26-28-30-32 repeats of A.2 with 12 stitches). Arrow-4: Increase 40-40-44-52-56-62 stitches evenly spaced = 306-330-358-390-418-448 stitches. When A.2 has been completed, work the rest of the piece with light grey. Work A.3 with 1 edge stitch in garter stitch on each side – AT THE SAME TIME on the row marked with arrow-5 in A.3 increase 24-24-28-36-36-42 stitches evenly spaced = 330-354-386-426-454-490 stitches. When A.3 has been completed, work stocking stitch with 1 edge stitch in garter stitch on each side. When the yoke measures 20-22-24-25-27-29 cm from the marker on the neck, divide it for the body and sleeves on the next row from the right side as follows: Cast off 1 stitch (= edge stitch for the seam), place the stitch from the right needle and the next 67-71-79-87-91-95 stitches on 1 thread for the sleeve (= 68-72-80-88-92-96 stitches) and cast on 6-6-8-8-10-10 new stitches on the needle (= in side under the sleeve), work 96-104-112-124-134-148 stitches in stocking stitch (= front piece), place the next 68-72-80-88-92-96 stitches on 1 thread for the sleeve and cast on 6-6-8-8-10-10 new stitches on the needle (= in side under the sleeve), work 96-104-112-124-134-148 stitches in stocking stitch (= back piece) and cast off the last stitch (= edge stitch for the seam). Cut the strand. Body and sleeves are finished separately. THE PIECE IS NOW MEASURED FROM HERE! BODY: = 204-220-240-264-288-316 stitches. Insert 1 marker thread in each side, in the middle of the 6-6-8-8-10-10 stitches cast on under the sleeves. Allow the threads to follow your work onwards; they will be used when increasing in the sides. Start at the one marker thread and work stocking stitch in the round. When the piece measures 5 cm from the division, increase 1 stitch on each side of both marker threads – read INCREASE TIP-2 (= 4 stitches increased). Increase like this every 6 cm a total of 4 times = 220-236-256-280-304-332 stitches. Continue working until the piece measures 27 cm from the division in all sizes. There is approx. 4 cm left to finished length; you can try the jumper on and work to desired length. Knit 1 round where you increase 65-70-74-83-89-97 stitches evenly spaced = 285-306-330-363-393-429 stitches. NOTE: This is done to avoid the rib being tight. Change to circular needle size 3 mm and work rib (= knit 1, purl 2) for 4 cm. Cast off with knit over knit and purl over purl – read CASTING-OFF TIP! The jumper measures approx. 54-56-58-60-62-64 cm from the shoulder down. SLEEVE: Place the 68-72-80-88-92-96 stitches from the thread on the one side of the piece on double pointed needles/short circular needle size 3.5 mm and knit up 1 stitch in each of the 6-6-8-8-10-10 stitches cast on under the sleeve = 74-78-88-96-102-106 stitches. Insert a marker thread in the middle of the 6-6-8-8-10-10 stitches under the sleeve. Allow the thread to follow your work onwards; it will be used when decreasing under the sleeve. Start at the marker thread and work stocking stitch in the round. When the piece measures 3-3-3-3-2-1 cm from the division, decrease 2 stitches mid under the sleeve – read DECREASE TIP. Decrease like this every 3-2½-2-1½-1½-1½ cm a total of 12-13-16-19-21-21 times = 50-52-56-58-60-64 stitches. Continue working until the sleeve measures 38-37-35-35-33-32 cm from the division. There is approx. 6 cm left to finished length; you can try the jumper on and work to desired length. NOTE: Shorter measurements in larger sizes due to wider shoulders and longer yoke. Knit 1 round where you increase 13-14-16-17-18-20 stitches evenly spaced = 63-66-72-75-78-84 stitches. Change to double pointed needles size 3 mm and work rib (= knit 1, purl 2) for 5½ cm. Change to old rose and work 2 more rounds of rib. Cast off with knit over knit and purl over purl – remember CASTING-OFF TIP! The sleeve measures approx. 44-43-41-41-39-38 cm from the division. Work the other sleeve in the same way. ASSEMBLY: Sew the side seams on the neck and yoke, inside the 1 edge stitch. |
|||||||||||||||||||
Diagram explanations |
|||||||||||||||||||
|
|||||||||||||||||||
|
|||||||||||||||||||
|
|||||||||||||||||||

|
|||||||||||||||||||

|
|||||||||||||||||||
|
Have you made this or any other of our designs? Tag your pictures in social media with #dropsdesign so we can see them! Do you need help with this pattern?You'll find tutorial videos, a Comments/Questions area and more by visiting the pattern on garnstudio.com. © 1982-2024 DROPS Design A/S. We reserve all rights. This document, including all its sub-sections, has copyrights. Read more about what you can do with our patterns at the bottom of each pattern on our site. |
|||||||||||||||||||


With over 40 years in knitting and crochet design, DROPS Design offers one of the most extensive collections of free patterns on the internet - translated to 17 languages. As of today we count 304 catalogues and 11422 patterns - 11422 of which are translated into English (UK/cm).
We work hard to bring you the best knitting and crochet have to offer, inspiration and advice as well as great quality yarns at incredible prices! Would you like to use our patterns for other than personal use? You can read what you are allowed to do in the Copyright text at the bottom of all our patterns. Happy crafting!
Comments / Questions (17)
Danke für die schnelle Antwort, aber was ist dann in der 4. Reihe? Wenn ich in der 3. Die erste Masche abgehoben habe, dann ist diese in der 4. ja grau. Wie kann die dann zu rot werden? Ich hab in dem Strickmuster zu der Jacke mit demselben Muster gesehen, dass ich da nicht 202, sondern 203 Maschen auf der Nadel hätte, und man erstmal zwei Maschenn abstrickt, so dass dann die Maschen in derselben Farbe übereinander zu liegen kommen. Müsste das nicht hier auch so sein?
22.03.2024 - 07:51DROPS Design answered:
Liebe Merline, diese Diagramme zeigen nur die Hin-Reihen die Rückereihen stricken Sie genauch so gleich aber sie werden nur links nach rechts gelesen, so die 1. Reihe mit Farben = 6. Reihe im Diagram (1 M abheben, 1 M mit rot stricken) von (bis) wiederholen; bei der 7. Reihe stricken Sie (1 M mit Rot stricken, 1 M abheben). Lesen Sie MOSAIKMUSTER: am Anfang der Anleitung und schauen Sie dieses Video - beide werden helfen. Viel Spaß beim Stricken!
22.03.2024 - 15:09Ich versteh schon den Anfang von A2 nicht. Wenn ich in der dritten Reihe mit einer grauen Hebemasche anfange, wo kriege ich dann in der vierten Reihe die rote Hebemasche her? Müssten die gleichfarbigen Maschen nicht übereinander liegen?
21.03.2024 - 22:21DROPS Design answered:
Liebe Merline, die 3. Reihe in A.2 stricken Sie mit rot (siehe A.x und Erklärung unter MOSAIKMUSTER, so stricken Sie: 1 M abheben, 1 M mit rot stricken, 1 M abheben, 1 M mit rot stricken, usw. Viel Spaß beim Stricken!
22.03.2024 - 07:34Hej Är halsringningen lika djup på fram- och baksidan? Finns det en tydlig fram- och baksida på tröjan?
13.03.2023 - 22:18DROPS Design answered:
Hej Sophie, nej der er ikke forskel på fram och baksidan på denne model :)
15.03.2023 - 10:25På A2 rad 9. Hvordan er det mulig å ta løst av 3 mørke blush farge og strikke 1 grå? Raden før er jo 3 grå og 1 blush. Da er det vel sånn at rad 9 (x2) skal bare strikkes rett?
21.12.2022 - 18:52Got to this point Cast off 1 stitch (= edge stitch for the seam), place the stitch from the right needle onto thread along with next 79 stitches. Does this mean that I cast off as normal but then when I pull the first stitch over the second I use that as the first stitch on my thread . Just struggling a little
19.09.2022 - 09:45DROPS Design answered:
Dear Gina, cast off the first stitch (the edge stitch), 1 stitch remain on your right needle, slip this stitch + the next 79 stitches on the round onto a thread (first sleeve) and cast on 8 new stitches (for the side, under the sleeve), then work the back piece, etc. Happy knitting!
19.09.2022 - 11:27Hallo. Is het mogelijk dit patroon in tricotsteek te breien in plaats van ribbels? \r\nVriendelijk dank.
20.01.2022 - 22:08Zouden jullie de teltekening nog een keer goed willen bekijken? Zoals al eerder gemeld in deze rubriek klopt het gewoonweg niet. Dat ben ik niet gewend van Drops patronen.
07.12.2021 - 22:46Hallo,\r\nim Diagramm A2 ist tatsächlich ein Fehler: in der 17. Zeile von unten (entspr. 33. Reihe) wird mit weinrot gestrickt, die 1. Masche darf nicht wie im Diagramm angegeben in grau abgehoben werden, sondern muss in weinrot gestrickt werden, damit dann in der folgenden Rippe (Reihe 35) 2 Maschen in weinrot abgehoben werden können.\r\nich bin noch nicht so weit, aber wahrscheinlich muss das Muster im spiegelbildlichen Abschnitt entspr. geändert werden.
01.11.2021 - 21:00Er staat :brei 1 ribbel heen en weer over alle steken ZONDER steken van de naald af te laten glijden. Hoe doe ik dat .
24.10.2021 - 12:04DROPS Design answered:
Dag Antsje,
Het staat er inderdaad foutief, er wordt mee bedoeld dat je alle steken moet breien, dus geen steken afhalen, zoals bij het mozaiëkpatroon, zoals uitgelegd in de tekst die daarop volgt. Hopelijk is het zo duidelijk. Ik zal de tekst aanpassen.
26.10.2021 - 10:58Hallo, wie soll ich bei dem Mosaikmuster, Größe M, in Reihe 17 mit grau Stricken und als erstes zwei Maschen rot abheben? Die erste Masche in Reihe 16 ist grau, dann kann ich sie nicht in Reihe 17 mit grauem Faden rot bekommen. In Reihe 18 habe ich das gleiche Problem. Da soll ich mit rotem Faden Stricken und die 7. Masche grau Stricken obwohl sie in der Reihe darunter rot ist. Das verstehe ich nicht.
20.10.2021 - 18:15DROPS Design answered:
Liebe Anke, die 17. Reihe in M wird mit weinrot (siehe A.x) gestrickt; die Maschen im hellgrau im Diagram sollen abgehoben werden, nur die Maschen im weinrot sollen gestrickt. Die erste M wird abgehoben, dann (1 M stricken, 3 M abheben, 3 M stricken, 3 M abheben, 1 M stricken) von *-* wiederholen. Viel Spaß beim stricken!
21.10.2021 - 07:00