
Popular categories
Looking for a yarn?


|
|||||||||||||||||||
Grey Owl |
|||||||||||||||||||
 |
 |
||||||||||||||||||
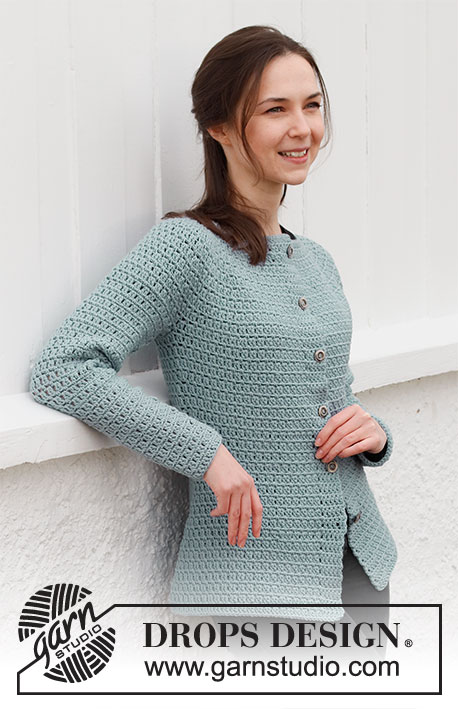
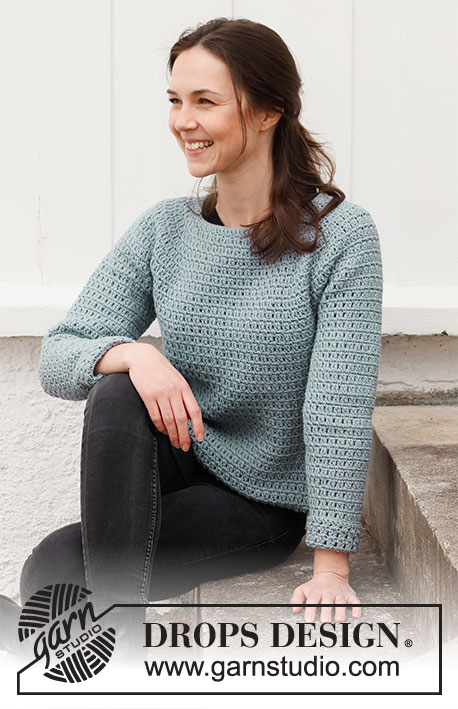
Crocheted jumper in DROPS Karisma. The piece is worked top down with round yoke, lace pattern and treble crochets. Sizes S - XXXL.
DROPS 216-32 |
|||||||||||||||||||
|
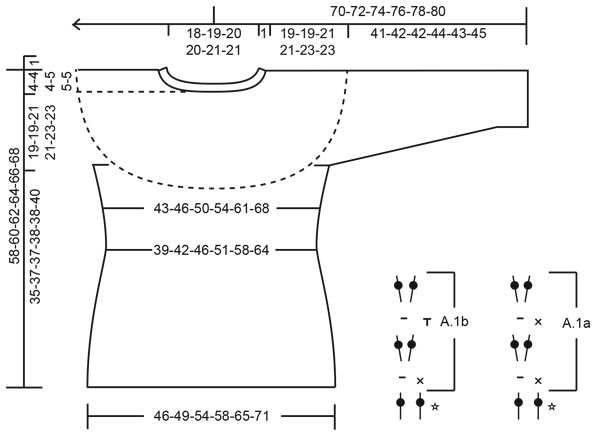
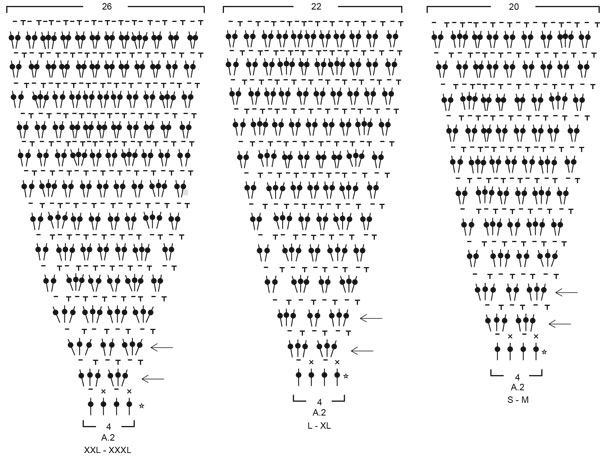
------------------------------------------------------- EXPLANATIONS FOR THE PATTERN: ------------------------------------------------------- CROCHET-TIP FOR CHAIN STITCH: If you work outermost on the hook the chain stitch will often be too tight; 1 chain stitch should be as long as 1 double/treble crochet is wide. CROCHET INFORMATION: Each round of double crochets starts with 1 chain stitch (replaces the first double crochet) and finishes with 1 slip stitch in the first chain stitch at the beginning of the round. Each round of treble crochets starts with 3 chain stitches (replaces the first treble crochet) and finishes with 1 slip stitch in the 3rd chain stitch at the beginning of the round. PATTERN: See diagrams A.1 and A.2. Choose diagram for your size. INCREASE TIP (for sides of body): Adjust so the next round is a round of treble crochets. Work 2 treble crochets in the first 2 chain stitches after the marker thread, work 3 treble crochets around the next chain stitch = 1 stitch increased by the marker thread. Work as before until 3 chain stitches and 3 double crochets remain before the marker thread, work 3 treble crochets around the next chain stitch, work as before until there has been worked 2 treble crochets around each of the 2 first chain stitches after the marker thread, work 3 treble crochets around the next chain stitch = 2 stitches increased by the marker thread. Work as before until 3 chain stitches and 3 double crochets remain before marker thread, work 3 treble crochets around next chain stitch, work as before to the marker thread = 1 treble crochet increased by the marker thread = a total of 4 treble crochets increased on the round. Continue the pattern as before. Each time you increase, A.1b is repeated 2 more times in width on the round. DECREASE TIP-1 (for sides of body): Adjust so the next round is a round of treble crochets. Work 2 treble crochets around the 2 first chain stitches after the marker thread, * work 1 treble crochet around next chain stitch, but wait with the last pull through, work 1 more treble crochet around the same chain stitch and on the final pull-through, pull through all loops on the hook * = 1 treble crochet decreased by the marker thread. Work as before until 3 chain stitches and 3 double crochets remain before marker thread, work from *-* around the next chain stitch, work as before until there has been worked 2 treble crochets around each of the first 2 chain stitches after the marker thread, work from *-* around the next chain stitch (i.e. on the other side of the marker thread) = 2 treble crochets decreased by the marker thread. Work as before until 3 chain stitches and 3 double crochets remain before marker thread, work from *-* around the next chain stitch = 1 treble crochet decreased by the marker thread = a total of 4 treble crochets decreased on the round. Continue the pattern as before. Each time you decrease, A.1b is repeated 2 times less in width on the round. DECREASE TIP-2 (for sleeves): Adjust so the next round is a round of treble crochets. * Work 1 treble crochet around the first/next chain stitch, but wait with the last pull-through, work 1 more treble crochet around the same chain stitch, and on the last pull-through, pull through all loops on the hook (= 1 treble crochet decreased) *, work from *-* around the next chain stitch = 2 treble crochets decreased. Each time you decrease, A.1b is repeated 1 time less in width. Decrease alternately at the beginning and end of the round (i.e. when decreasing at the end, work as before until there are 2 chain stitches left on the round). ------------------------------------------------------- START THE PIECE HERE: ------------------------------------------------------- JUMPER – SHORT OVERVIEW OF THE PIECE: The neck and yoke are worked in the round, top down. The yoke is divided for the body and sleeves and the body continued in the round from the side. The sleeves are worked in the round, top down. NECK: Work 84-86-90-96-98-104 chain stitches with hook size 4.5 mm and Karisma – read CROCHET-TIP FOR CHAIN STITCH, and form them into a ring with 1 slip stitch in the first chain stitch. Work 3 chain stitches (equivalent to 1 treble crochet) – read CROCHET INFORMATION, then 1 treble crochet in every chain stitch = 84-86-90-96-98-104 treble crochets. Insert 1 marker at the beginning of the round (= mid-back). The yoke is measured from this marker. YOKE: Work 2nd round in the pattern as follows: Work A.1a over the first 2 treble crochets, A.1b over the next 8-8-10-10-10-12 treble crochets (= 4-4-5-5-5-6 times in width), A.2 over the next 8 treble crochets (= 2 times in width), A.1b over the next 6-6-6-8-8-8 treble crochets (= 3-3-3-4-4-4 times in width), A.2 over the next 8 treble crochets (= 2 times in width), A.1b over the next 20-22-22-24-26-28 treble crochets (= 10-11-11-12-13-14 times in width), A.2 over the next 8 treble crochets (= 2 times in width), A.1b over the next 6-6-6-8-8-8 treble crochets (= 3-3-3-4-4-4 times in width), A.2 over the next 8 treble crochets (= 2 times in width) and finish with A.1b over the last 10-10-12-12-12-14 treble crochets (= 5-5-6-6-6-7 times in width). Continue this pattern, repeating the last 2 rows in A.1a and A.1b and increasing as shown in A.2 – AT THE SAME TIME increase as described below: Work 3rd round in the pattern AT THE SAME TIME as increasing evenly as follows: Work A.1a over the first 2 stitches, A.1b over the next 8-8-10-10-10-12 stitches and increase 0-2-2-4-4-4 treble crochets evenly spaced, A.2 as before (= 2 times in width), A.1b over the next 6-6-6-8-8-8 stitches and increase 0-4-4-4-4-4 treble crochets evenly spaced, A.2 as before (= 2 times in width), A.1b over the next 20-22-22-24-26-28 stitches and increase 0-4-4-6-6-8 treble crochets evenly spaced, A.2 as before (= 2 times in width), A.1b over the next 6-6-6-8-8-8 stitches and increase 0-4-4-4-4-4 treble crochets evenly spaced, work A.2 as before (= 2 times in width), finish with A.1b over the last 10-10-12-12-12-14 stitches and increase 0-2-2-4-4-4 treble crochets evenly spaced = 100-118-122-134-136-144 treble crochets (including the increases in A.2). REMEMBER THE CROCHET TENSION! Work 4th round of pattern as follows: A.1a over the first 2 treble crochets, A.1b over the next 8-10-12-14-14-16 treble crochets, A.2 as before (= 2 times in width), A.1b over the next 6-10-10-12-12-12 treble crochets, A.2 as before (= 2 times in width), A.1b over the next 20-26-26-30-32-36 treble crochets, A.2 as before (= 2 times in width), A.1b over the next 6-10-10-12-12-12 treble crochets, A.2 as before (= 2 times in width) and finish with A.1b over the last 10-12-14-16-16-18 treble crochets. Work 5th round in the pattern, AT THE SAME TIME as increasing as follows: Work A.1a over the first 2 stitches, A.1b over the next 8-10-12-14-14-16 stitches and increase 0-0-0-0-2-4 treble crochets evenly spaced, A.2 as before (= 2 times in width), A.1b over the next 6-10-10-12-12-12 stitches and increase 0-2-4-4-0-0 treble crochets evenly spaced, A.2 as before (= 2 times in width), A.1b over the next 20-26-26-30-32-36 stitches and increase 0-0-2-4-4-8 treble crochets evenly spaced, A.2 as before (= 2 times in width), A.1b over the next 6-10-10-12-12-12 stitches and increase 0-2-4-4-0-0 treble crochets evenly spaced, A.2 as before (= 2 times in width), finish with A.1b over the last 10-12-14-16-16-18 stitches and increase 0-0-0-0-2-4 treble crochets evenly spaced = 116-138-148-162-160-176 treble crochets (including the increases in A.2). Continue with this pattern and increases in A.2. When the last round in A.2 remains, the piece measures approx. 18-18-19-19-21-21 cm from the marker on the neck and there are 212-234-260-274-304-320 treble crochets on the round. Work the last round in A.2 as follows: A.1a over the first 2 treble crochets, A.1b over the next 8-10-12-14-16-20 treble crochets, A.2 over the next 20-20-22-22-26-26 treble crochets (= 1 time in width), 8-8-8-10-10-12 chain stitches, skip the next 46-52-58-60-64-64 treble crochets (i.e. skip 20-20-22-22-26-26 treble crochets in A.2, 6-12-14-16-12-12 treble crochets in A.1b and 20-20-22-22-26-26 treble crochets in A.2 for the sleeve), work A.2 over the next 20-20-22-22-26-26 treble crochets (= 1 time in width), A.1b over the next 20-26-28-34-36-44 treble crochets, A.2 over the next 20-20-22-22-26-26 treble crochets (= 1 time in width), 8-8-8-10-10-12 chain stitches, skip the next 46-52-58-60-64-64 treble crochets (i.e. skip 20-20-22-22-26-26 treble crochets in A.2, 6-12-14-16-12-12 treble crochets in A.1b and 20-20-22-22-26-26 treble crochets in A.2 for the sleeve), work A.2 over the next 20-20-22-22-26-26 treble crochets (= 1 time in width) and finish with A.1b over the last 10-12-14-16-18-22 treble crochets = 136-146-160-174-196-216 stitches on the round. The next round is worked as follows: A.1a over the first 2 stitches, A.1b over the next 28-30-34-36-42-46 stitches, 1 treble crochet in each of the 8-8-8-10-10-12 chain stitches under the sleeve, insert 1 marker thread in the middle of these 8-8-8-10-10-12 stitches, A.1b over the next 60-66-72-78-88-96 stitches, 1 treble crochet in each of the 8-8-8-10-10-12 chain stitches under the sleeve, insert 1 marker thread in the middle of these 8-8-8-10-10-12 stitches and work A.1b over the last 30-32-36-38-44-48 stitches. Cut and fasten the strand. Body and sleeves are finished separately. THE PIECE IS NOW MEASURED FROM HERE! BODY: = 136-146-160-174-196-216 stitches. Allow the marker threads to follow your work onwards; they will be used when decreasing and increasing in the sides. Start on one side of the body, just after the marker thread, as follows: Work A.1a over the first 2 treble crochets, repeat A.1b over the next 134-144-158-172-194-214 treble crochets. Continue this pattern in the round as follows. When the piece measures 4 cm from the division, decrease 2 treble crochets at both marker threads – read DECREASE TIP-1! Decrease like this every 3½-4-4½-5-5-5½ cm a total of 3 times = 124-134-148-162-184-204 treble crochets. When the piece measures 14-16-17-18-18-19 cm from the division, increase 2 treble crochets at both marker threads – read INCREASE TIP! Increase like this every 2½ cm a total of 6 times = 148-158-172-186-208-228 treble crochets. Continue working until the body measures 35-37-37-38-38-40 cm from the division, or to desired length – finish after a round of treble crochets. Cut and fasten the strand. The jumper measures approx. 58-60-62-64-66-68 cm from the shoulder down. SLEEVE: = 46-52-58-60-64-64 treble crochets + 8-8-8-10-10-12 chain stitches under the sleeve. Start mid under the sleeve as follows: Work 1 double crochet in the 5th-5th-5th-6th-6th-7th chain stitch under the sleeve, then 1 chain stitch (= 1 double crochet), 1 double crochet in each of the next 3-3-3-4-4-5 chain stitches, A.1b (i.e. 1 round of double crochets and chain stitches) over the next 46-52-58-60-64-64 treble crochets and finish with 1 double crochet in each of the remaining 4-4-4-5-5-6 chain stitches under the sleeve = 54-60-66-70-74-76 stitches. Insert 1 marker at the beginning of the round – in the middle of the 8-8-8-10-10-12 stitches under the sleeve. Work A.1b in the round. When the sleeve measures 3 cm from the division, decrease 2 treble crochets under the sleeve – read DECREASE TIP-2. Decrease like this every 3-2½-2-2-2-2 cm a total of 11-13-15-17-18-18 times = 32-34-36-36-38-40 stitches. Continue working until the sleeve measures 41-42-42-44-43-45 cm from the division, or to desired length – finish after a round of treble crochets. Cut and fasten the strand. Work the other sleeve in the same way. |
|||||||||||||||||||
Diagram explanations |
|||||||||||||||||||
|
|||||||||||||||||||
|
|||||||||||||||||||
|
|||||||||||||||||||
|
Have you made this or any other of our designs? Tag your pictures in social media with #dropsdesign so we can see them! Do you need help with this pattern?You'll find tutorial videos, a Comments/Questions area and more by visiting the pattern on garnstudio.com. © 1982-2024 DROPS Design A/S. We reserve all rights. This document, including all its sub-sections, has copyrights. Read more about what you can do with our patterns at the bottom of each pattern on our site. |
|||||||||||||||||||


With over 40 years in knitting and crochet design, DROPS Design offers one of the most extensive collections of free patterns on the internet - translated to 17 languages. As of today we count 304 catalogues and 11422 patterns - 11422 of which are translated into English (UK/cm).
We work hard to bring you the best knitting and crochet have to offer, inspiration and advice as well as great quality yarns at incredible prices! Would you like to use our patterns for other than personal use? You can read what you are allowed to do in the Copyright text at the bottom of all our patterns. Happy crafting!
Comments / Questions (13)
Hvordan kommer jeg videre efter 5. række? Har prøvet mange forskellige ting, men det kommer ikke til at passe med maskeantallet (260 m i str. L) efter 23. række. Jeg har bl.a. prøvet at følge hhv. lige og ulige rækker i beskrivelsen, men da udtagene er forskellige i alle rækker, er det ikke muligt at følge disse rækker.
31.01.2024 - 14:39DROPS Design answered:
Hei Sonja. Etter 5. omgang har du 148 masker og nå skal du bare øke etter diagram A.2. Diagram A.1a og A.1b har et stabilt maskeantell, 28 masker x 2 = 56 masker (foran og bak) og 14 x 2 = 28 masker over ermene, mens over A.2 øker maskeantallet til 44 masker x 4 = 176 masker = 176 + 56 + 28 = 260 masker. Bruk maskemarkører / merketråder mellom overgangene mellom diagrammene, da har du en lettere oversikt over hvor det skal økes. mvh DROPS Design
09.02.2024 - 10:41Bonjour, je ne comprends pas ce qu'il faut faire dès le 2eme tour. Les motifs sont sur combien de rangs? Possibilités d'avoir un schéma du col et des 1ers rangs? Merci.
21.11.2023 - 22:11DROPS Design answered:
Bonjour Delphine, le col se crochète simplement en brides (1 rang de brides), puis pour l'empiècement, crochetez les diagrammes dans l'ordre indiqué, quand le 1er tour des diagrammes est fait, crochetez le 2ème tour des diagrammes dans le même ordre que précédemment et ainsi de suite jusqu'à c que les diagrammes soit fait, attention, il faudra en même temps augmenter à intervalles réguliers dans les diagrammes A.1b, le nombre de mailles de A.2b va augmenter lui progressivement. Bon crochet!
22.11.2023 - 09:05Hej. Har kämpat i dagar med att förstå virkmönstret till Grey owl tröjan. Tror att det efter varv 5 är något tokigt i A2. Om man ska virka det 2 ggr som det står, så blir det alldeles för många maskor, med dom ökningarna.Börjar bli väldigt frustrerad över att inte komma vidare. Stickar storlek medium, har just nu 138 m inför nästa varv. Så långt är det rätt. Väldigt fin tröja, jag vill verkligen få svar på detta. Med vänlig hälsning, Carina
07.10.2023 - 16:26DROPS Design answered:
Hej Carina, kan det være lettere at sætte 1 mærke på hver side af rapporten? A.2 skal virkas totalt 2x4= 8 gange. Så du på pil 2 får mærke 3 st, 2 st, 3 st mærke 3 st, 2 st, 3 st mærke och det virkar du i 4 "hörn" :)
17.10.2023 - 11:54Ik kom niet verder dan toer 6. Toer 7 zoals toer 5 met de meerderheden van A2. Hoe ik het ook doe, ik kom niet uit met mijn aantal steken tot op het einde van de toer. Het patroon gevolgd en dan houd ik nog 12 steken (6 vaste en 6 losse) over tot aan het eind-/beginpunt. Kan u mij helpen?
21.08.2023 - 15:03DROPS Design answered:
Dag E Mourik,
Als je de paragraaf waarin toer 5 beschreven staat gedaan hebt, kun je daarna gewoon verder het telpatroon volgen. De meerderingen zijn al opgenomen in het telpatroon, dus je maakt geen extra meerderingen. Wanneer je gemeerderd hebt over A.1b (zoals beschreven in toer 5), haak je ook A.1b over de gemeerderde steken
22.08.2023 - 20:23Hallo, Ik loop direct vast bij het tellen van de steken (maat M): je start met 86 stokjes. Voor zover ik het begrijp wordt er in de tweede toer niet gemeerderd. Klopt dat? Aan het einde van de derde toer staat dat er 118 stokjes moeten zijn. Maar volgens mij wordt er maar gemeerderd tot 102 (2+4+4+4+2+86). Waar doe ik het fout?
25.06.2023 - 22:43DROPS Design answered:
Dag Marieke,
Nee, de eerste toer van A.1a staat een sterretje voor en deze toer sla je dus over als je begint met A.1a. Deze toer staat erbij zodat je kunt zien hoe de steken in de voorgaande toer gehaakt moeten worden. In de tweede toer wordt er over elke herhaling van A.2 gemeerderd van 4 naar 6 stokjes, dat is 16 stokjes en daarnaast meerder je verdeeld over de toer nog eens 16 stokjes in totaal zoals beschreven. Dan kom je op 118 steken.
26.06.2023 - 21:31Goeiedag, Ik heb veel moeite bij het minderen van het lijf van de maat s-m ik hoop dat u mij verder kan helpen
20.10.2021 - 17:51DROPS Design answered:
Dag Cielle,
Je mindert op een toer van stokjes en niet op een toer van vasten. Als je mindert haak je 2 stokjes samen om de 2 eerste lossen na de markeerdraad. Dit doe je door te wachten met de laatste doorhaling van het eerste stokje. Je haakt het tweede stokje en als je de laatste doorhaling maakt, haal je de draad zowel door het tweede als het eerste stokje. Lees ook de 'tip voor het minderen' bij de instructies voor het patroon.
22.10.2021 - 15:15I can't figure out how increases happen in the smallest size, as it is always indicated as "0". Please advise, Thank you!! (If you do a search on the word "increase," you'll see that the first number of six given to show increases for different sizes is always "0"). How should increases be done for size "small?"
15.03.2021 - 21:56DROPS Design answered:
Dear Amy, when you see "0" increase, this means that in your size you will not have to increase, ie you just work as explained but without increasing any stitch - just work diagram as shown. Happy crocheting!
16.03.2021 - 08:40Ich habe nun ab Reihe 6 Gr. L wie folgt gehäkelt: A1a 2M, A1b 2M dann A2 dann wieder A1a 2M, A1b 2M dann A2. Nun habe ich in der letzten Runde von A2 320 Maschen statt 260 Maschen. Bitte wo ist der Fehler. Ich verzweifle langsam an dieser Anleitung! Ich trenne nun zum zweiten mal alles auf. Ich bin kein Anfänger und habe schon einige Drops Anleitungen nachgehäkelt und auch gestrickt.aber hier komme ich überhaupt nicht klar.
07.02.2021 - 15:44DROPS Design answered:
Liebe Sabine, wenn Sie die 5. Runde gehäkelt haben, haben Sie 148 Maschen, jetzt werden Sie nur in A.2 zunehmen (keine Zunahmen mehr in A.1), so daß die Arbeit sieht bei der letzte Reihe so aus: A.1a (= 2 M), A.1b (= 12 M), A.2 (= 2 x 22 M), A.1b (14 M), A.2 (= 2 x 22 M), A.1b (28 M), A.2 (2 x 22 M), A.1b (= 14 M), A.2 (= 2 x 22 M), A.1b (= 14 M) = 2+12+44+14+44+28+44+14+44+14=260 M. Viel Spaß beim häkeln!
08.02.2021 - 10:12Hallo, In der Anleitung steht (ab Reihe 6) : Im Muster und mit den Zunahmen in A2 weiterhäkeln. Beginne und beende ich die Reihen direkt mit A2 oder beginne ich die Reihen mit A1a und beende sie mit A1b.
30.01.2021 - 19:21DROPS Design answered:
Liebe Sabine, es wird wie zuvor mit A.1a und A.1b sowie A.2 gehäkelt, aber jetzt wird es nur in A.2 zugenommen, also wie im Diagram A.2 gezeigt, A.1a und A.1b häkeln Sie wie zuvor (ohne Zunahmen mehr). Viel Spaß beim häkeln!
01.02.2021 - 09:01Bonjour, je ne comprend pas le 3eme tour de l'empiècement. En taille M, on a 102 B au tour précédent. On doit augmenter de 2 B sur chacun des 8 A2 et en même temps augmenter de 16 B sur les A1b, soit au total 32 augmentations sur le tour. On devrait donc avoir 134 B à la fin du tour. Or les instructions indiquent 118 N à la fin du tour. Comment est ce possible ?
29.01.2021 - 22:03DROPS Design answered:
Bonjour Béatrice, au 2ème tour vous crochetez les diagrammes sur 86 mailles: A.1a(2m), A.1b (8m), A.2 (8m), A.1b (6m), A.2(8m), A.1b (22m), A.2 (8m), A.1b (6m) A.2 (8m) et A.1b (10 m) - au 3ème rang, vous aurez 6 x2 m dans chaque A.2 (soit 12 m au total) et vous augmentez dans A.1b, autrement dit vous aurez: A.1a(2m), A.1b (10m), A.2 (12m), A.1b (10m), A.2(12m), A.1b (26m), A.2 (12m), A.1b (10m) A.2 (12m) et A.1b (12 m)= 2+10+12+10+12+26+12+10+12+12= 118 brides. Bon crochet!
01.02.2021 - 08:13