
Popular categories
Looking for a yarn?


|
||||||||||
Autumn Excursion |
||||||||||
 |
 |
|||||||||
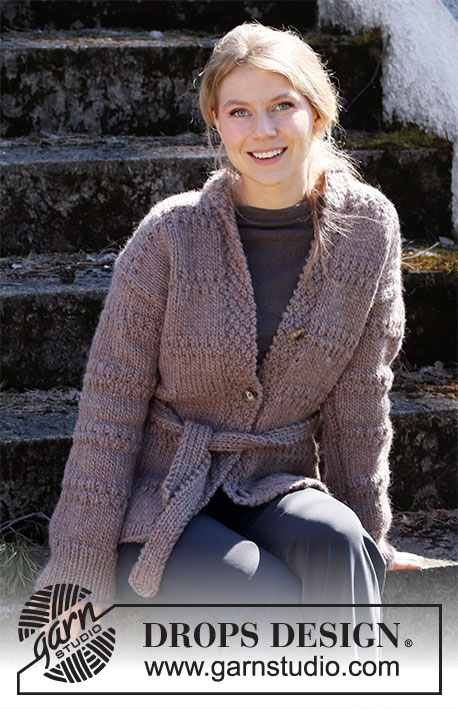
Knitted jacket with belt in DROPS Snow or Wish. Piece is knitted in stockinette stitch with stripes in textured pattern and a simple shawl collar. Size: S - XXXL
DROPS 216-20 |
||||||||||
|
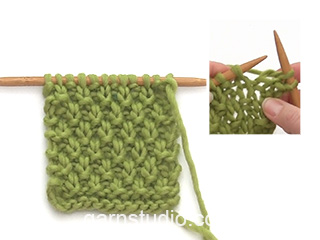
------------------------------------------------------- EXPLANATION FOR THE PATTERN: ------------------------------------------------------- GARTER STITCH (back and forth): Knit all rows. 1 ridge vertically = knit 2 rows. PATTERN: See diagrams A.1 to A.3. Diagrams show all rows in pattern seen from the right side. A.1 is stripe pattern on back piece, front pieces and sleeves. A.2 and A.3 are bands on front pieces. DECREASE/INCREASE TIP (evenly): To calculate how to decrease/increase evenly use the total number of stitches on row (e.g. 57 stitches), minus edge stitches (e.g. 2 stitches) and divide the remaining 55 stitches by number of decrease/increases to be done (e.g. 4) = 13.8. In this example decrease by knitting approx. every 13th and 14th stitch together, and do not decrease of edge stitches. When increasing make in this example 1 yarn over after approx. every 14th stitch. On next row work yarn overs twisted to avoid holes. INCREASE TIP (applies to sides of sleeves): Increase 1 stitch inside 1 edge stitch in garter stitch by making 1 yarn over. On next row work yarn overs twisted to avoid holes. Work the increased stitches in stockinette stitch/pattern. BUTTONHOLES: Decrease for buttonholes on right band (when garment is worn). 1 BUTTONHOLE = knit second and third stitch from edge together (seen from right side), and make 1 yarn over. On next row (wrong side) knit or purl the yarn over shown in diagram (= hole). Decrease for buttonholes when piece measures: S: 16, 25, 34 and 43 cm = 6¼", 9¾", 13⅜" and 17" M: 17, 26, 35 and 44 cm = 6¾", 10¼", 13¾" and 17¼" L: 18, 27, 36 and 45 cm = 7", 10⅝", 14¼" and 17¾" XL: 16, 26, 36 and 46 cm = 6¼", 10¼", 14¼" and 18" XXL: 17, 27, 37 and 47 cm = 6¾", 10⅝", 14½" and 18½" XXXL: 18, 28, 38 and 48 cm = 7", 11", 15" and 19" ------------------------------------------------------- START THE PIECE HERE: ------------------------------------------------------- JACKET - SHORT OVERVIEW OF THE PIECE: Work back piece, front pieces and sleeves back and forth on circular needle, bottom up until finished measurements. Sew piece together as explained in pattern. BACK PIECE: Cast on 55-59-65-69-75-83 stitches on circular needle size 7 mm = US 10,75 with Snow or Wish. Purl 1 row (= wrong side). Work next row as follows from right side: 3 edge stitches in GARTER STITCH for vent - read explanation above, * knit 1, purl 1 *, work from *-* until 4 stitches remain, knit 1 and finish with 3 edge stitches in garter stitch for vent. Work 4 rows in rib in total like this. Switch to circular needle size 8 mm = US 11 and work next row from right side as follows: 3 edge stitches in garter stitch, work A.1 until 4 stitches remain on row, work first stitch in A.1 (so that pattern begins and ends the same way in each side), and finish with 3 edge stitches in garter stitch. Continue pattern back and forth like this. REMEMBER THE KNITTING GAUGE! When piece measures 13 cm = 5⅛", finish vent and cast on 1 new stitch in each side (= edge stitches for seam) = 57-61-67-71-77-85 stitches. Continue pattern back and forth as before but work 2 ridges over the outermost 4 stitches in each side (over vent). When these 2 ridges are done, continue A.1 as before with 1 edge stitch in garter stitch in each side. When piece measures approx. 28-28-29-29-30-30 cm = 11"-11"-11⅜"-11⅜"-11¾"-11¾" from cast-on edge, decrease 4 stitches evenly – read DECREASE/INCREASE TIP, but adjust to decrease in a section with stockinette stitch in A.1 = 53-57-63-67-73-81 stitches on needle. Repeat decrease when piece measures approx. 32-32-33-33-34-34 cm = 12½"-12½"-13"-13"-13⅜"-13⅜" = 49-53-59-63-69-77 stitches. When piece measures approx. 38-38-39-39-40-40 cm = 15"-15"-15¼"-15¼"-15¾"-15¾" from cast-on edge, increase 2 stitches evenly – read DECREASE/INCREASE TIP, but adjust to increase in a section with stockinette stitch in A.1 = 51-55-61-65-71-79 stitches. Repeat increase when piece measures 42-42-44-44-46-46 cm = 16½"-16½"-17¼"-17¼"-18"-18" = 53-57-63-67-73-81 stitches. When piece measures 46-47-48-49-50-51 cm = 18"-18½"-19"-19¼"-19¾"-20", bind off 4-5-6-7-9-12 stitches for armholes at the beginning of the next two rows = 45-47-51-53-55-57 stitches remain. When piece measures 64-66-68-70-72-74 cm = 25¼"-26"-26¾"-27½"-28⅜"-29⅛" from cast-on edge, bind off the middle 9-9-11-11-11-11 stitches for neck and finish each shoulder separately. Then work as before and bind off 1 stitch on next row from the neck = 17-18-19-20-21-22 stitches remain on shoulder. Bind off by knitting from right side when back piece measures 66-68-70-72-74-76 cm = 26"-26¾"-27½"-28⅜"-29⅛"-29½" from cast-on edge. Work the other shoulder the same way. RIGHT FRONT PIECE: Cast on 34-36-38-40-44-48 stitches (including 6 band stitches towards mid front) on circular needle size 7 mm = US 10,75 with Snow or Wish. Purl 1 row (= wrong side). Work next row as follows from the right side (i.e. from mid front): Work A.2 (= 6 stitches), * knit 1, purl 1 *, repeat from *-* until 4 stitches remain on needle, knit 1 and finish with 3 edge stitches in garter stitch towards the side for vent. Work 4 rows in rib in total like this. Switch to circular needle size 8 mm = US 11 and work next row from right side as follows: Continue A.2 over the first 6 stitches (= band), work A.1 until 4 stitches remain on row, work first stitch in A.1 (so that pattern begins and ends the same way in each side), and finish with 3 edge stitches in garter stitch towards the side. Continue pattern back and forth like this. When piece measures 13 cm = 5⅛", finish vent and cast on 1 new stitch at end of row towards the side (= edge stitches for seam) = 35-37-39-41-45-49 stitches. Continue pattern back and forth as before but work 2 ridges over the outermost 4 stitches towards the side (over vent). When these 2 ridges are done, continue pattern as before with A.2 over band, A.1 until 1 stitch remains towards the side and 1 edge stitch in garter stitch towards the side. Remember BUTTONHOLES on band - read explanation above. When piece measures approx. 28-28-29-29-30-30 cm = 11"-11"-11⅜"-11⅜"-11¾"-11¾" from cast-on edge, decrease 2 stitches evenly - remember DECREASE/INCREASE TIP = 33-35-37-39-43-47 stitches. Repeat decrease when piece measures 32-32-33-33-34-34 cm = 12½"-12½"-13"-13"-13⅜"-13⅜" = 31-33-35-37-41-45 stitches. When piece measures 38-38-39-39-40-40 cm = 15"-15"-15¼"-15¼"-15¾"-15¾" from cast-on edge, increase 1 stitch on needle – remember DECREASE/INCREASE TIP = 32-34-36-38-42-46 stitches. Repeat increase when piece measures 42-42-44-44-46-46 cm = 16½"-16½"-17¼"-17¼"-18"-18" = 33-35-37-39-43-47 stitches. When piece measures 46-47-48-49-50-51 cm = 18"-18½"-19"-19¼"-19¾"-20", bind off 4-5-6-7-9-12 stitches for armholes at the beginning of next row from wrong side = 29-30-31-32-34-35 stitches remain. Work until front piece measures 66-68-70-72-74-76 cm = 26"-26¾"-27½"-28⅜"-29⅛"-29½" from cast-on edge. On next row from wrong side work as follows: Bind off 17-18-19-20-21-22 stitches on shoulder, and work as before over the remaining 12-12-12-12-13-13 stitches (= collar). Finish collar as explained below. RIGHT COLLAR: Begin from right side and work short rows over the 12-12-12-12-13-13 collar stitches as follows: * Work 2 rows back and forth over the outermost 8-8-8-8-9-9 stitches, 2 rows back and forth over all stitches *, work from *-* until collar measures approx. 7-7-8-8-9-9 cm = 2¾"-2¾"-3⅛"-3⅛"-3½"-3½" on the inside on the most narrow part. NOTE! To avoid holes in the piece when working short rows it is important to tighten the yarn when turning mid piece. Work 1 row from right side over all stitches. Bind off by purling from wrong side. LEFT FRONT PIECE: Cast on 34-36-38-40-44-48 stitches (including 6 band stitches towards mid front) on circular needle size 7 mm = US 10,75 with Snow or Wish. Purl 1 row (= wrong side). Work next row as follows from the right side (i.e. from the side): 3 edge stitches in garter stitch, * knit 1, purl 1 *, repeat from *-* until 7 stitches remain on needle, knit 1 and finish with A.3 (= 6 stitches). Work 4 rows in rib in total like this. Switch to circular needle size 8 mm = US 11 and work next row from right side as follows: 3 edge stitches in garter stitch, work A.1 until 7 stitches remain on row, work first stitch in A.1 (so that pattern begins and ends the same way in each side), and finish with A.3 over the last 6 stitches (= band). Continue pattern back and forth like this. When piece measures 13 cm = 5⅛", finish vent and cast on 1 new stitch at end of row towards the side (= edge stitches for seam) = 35-37-39-41-45-49 stitches. Continue pattern back and forth as before but work 2 ridges over the outermost 4 stitches towards the side (over vent). When these 2 ridges are done, continue pattern as before with 1 edge stitch in garter stitch towards the side, A.1 until 6 stitches remain towards mid front and A.3 over band. When piece measures 28-28-29-29-30-30 cm = 11"-11"-11⅜"-11⅜"-11¾"-11¾" from cast-on edge, decrease 2 stitches evenly = 33-35-37-39-43-47 stitches. Repeat decrease when piece measures 32-32-33-33-34-34 cm = 12½"-12½"-13"-13"-13⅜"-13⅜" = 31-33-35-37-41-45 stitches. When piece measures 38-38-39-39-40-40 cm = 15"-15"-15¼"-15¼"-15¾"-15¾" from cast-on edge, increase 1 stitch on needle = 32-34-36-38-42-46 stitches. Repeat increase when piece measures 42-42-44-44-46-46 cm = 16½"-16½"-17¼"-17¼"-18"-18" = 33-35-37-39-43-47 stitches. When piece measures 46-47-48-49-50-51 cm = 18"-18½"-19"-19¼"-19¾"-20", bind off 4-5-6-7-9-12 stitches for armholes at the beginning of next row from right side = 29-30-31-32-34-35 stitches remain. Work until front piece measures 66-68-70-72-74-76 cm = 26"-26¾"-27½"-28⅜"-29⅛"-29½" from cast-on edge. On next row from right side work as follows: Bind off 17-18-19-20-21-22 stitches on shoulder, and work as before over the remaining 12-12-12-12-13-13 stitches (= collar). Finish collar as explained below. LEFT COLLAR: Begin from wrong side and work short rows over the 12-12-12-12-13-13 collar stitches as follows: * Work 2 rows back and forth over the outermost 8-8-8-8-9-9 stitches, 2 rows back and forth over all stitches *, work from *-* until collar measures approx. 7-7-8-8-9-9 cm = 2¾"-2¾"-3⅛"-3⅛"-3½"-3½" on the inside on the most narrow part. NOTE! To avoid holes in the piece when working short rows it is important to tighten the yarn when turning mid piece. Knit 1 row from wrong side over all stitches. Bind off knitting from right side. SLEEVE: Work sleeves back and forth on circular needle, bottom up. Cast on 38-40-42-44-46-48 stitches (including 1 edge stitch in each side) on circular needle size 7 mm = US 10,75 with Snow or Wish. Purl 1 row (= wrong side). Work next row as follows from right side: 1 edge stitch in garter stitch, * knit 1, purl 1 *, repeat from *-* until 1 stitch remains on needle and finish with 1 edge stitch in garter stitch. Continue rib like this for 10 cm = 4". Switch to circular needle size 8 mm = US 11. Knit 1 row from right side while decreasing 4 stitches evenly = 34-36-38-40-42-44 stitches. Then work A.1 with 1 edge stitch in garter stitch in each side. When piece measures 30-29-28-28-26-23 cm = 11¾"-11⅜"-11"-11"-10¼"-9" (shorter measurements in the larger sizes because of wider shoulders and longer sleeve cap), increase 1 stitch in each side– read INCREASE TIP. Increase like this every 4 cm = 1½" 5 times in total in each side = 44-46-48-50-52-54 stitches. When sleeve measures 50-49-48-48-46-43 cm = 19¾"-19¼"-19"-19"-18"-17", insert 1 marker in each side. These markers show where bottom of armhole begins. Measure sleeve caps from these markers. Work until piece measures ½-1-2-3-5-7 cm = ⅛"-⅜"-¾"-1⅛"-2"-2¾" from markers. Then work 4 rows in stockinette stitch back and forth while binding off 5 stitches at the beginning of these 4 rows. Bind off the remaining 24-26-28-30-32-34 stitches. Sleeve measures approx. 53 cm = 21" in all sizes from top and down. Work the other sleeve the same way. BELT: Cast on 7 stitches on needle size 8 mm = US 11 with Snow or Wish. Purl 1 row. Work next row as follows from right side: 1 edge stitch in garter stitch, * knit 1, purl 1 *, repeat from *-* 2 times in total, knit 1 and finish with 1 edge stitch in garter stitch. Continue rib back and forth like this until belt measures approx. 150 = 59" to 190 cm = 74⅞" or desired length. Bind off knitting from right side. ASSEMBLY: Sew shoulder seams inside bind-off edge. Sew in sleeves inside 1 edge stitch in garter stitch and fasten at the bottom of armhole - see chart. Markers inserted on sleeves should fit the sides of body. Sew underarm and side seams in one inside 1 edge stitch down to vent in each side. Sew collar together mid back inside bind off edge but make sure that seam is turned inwards when collar is folded down. Sew collar to neckline in the back of neck. Sew the buttons on to the left band. |
||||||||||
Diagram explanations |
||||||||||
|
||||||||||

|
||||||||||

|
||||||||||
|
Have you made this or any other of our designs? Tag your pictures in social media with #dropsdesign so we can see them! Do you need help with this pattern?You'll find tutorial videos, a Comments/Questions area and more by visiting the pattern on garnstudio.com. © 1982-2024 DROPS Design A/S. We reserve all rights. This document, including all its sub-sections, has copyrights. Read more about what you can do with our patterns at the bottom of each pattern on our site. |
||||||||||


With over 40 years in knitting and crochet design, DROPS Design offers one of the most extensive collections of free patterns on the internet - translated to 17 languages. As of today we count 304 catalogs and 11422 patterns - 11417 of which are translated into English (US/in).
We work hard to bring you the best knitting and crochet have to offer, inspiration and advice as well as great quality yarns at incredible prices! Would you like to use our patterns for other than personal use? You can read what you are allowed to do in the Copyright text at the bottom of all our patterns. Happy crafting!
Comments / Questions (6)
Hej! Jag undrar över färgen, står att det är Snow mix mullvad nr 23, finns ingen färg som heter mullvad, är det färgen bark ? Jag undrar också om ni tycker det är lämpligt att sticka koftan i Drops Alpacka garnet, man måste ju använda 4 trådar då. Vänliga hälsningar Lena Öberg
26.03.2024 - 11:09DROPS Design answered:
Hej Lena. Ja det är färg nr 23 bark koftan är stickad i. Du kan sticka denna i 4 trådar alpaca utan problem. Om du tycker det är mycket att sticka den med 4 trådar så kan du välja 2 trådar av ett garn i garngrupp C, som t.ex. DROPS Nepal. Mvh DROPS Design
27.03.2024 - 14:07Fråga från en nybörjare: När det står ”när arbetet mäter…” osv ska man då mäta med maskorna man har på stickan också, eller ska man mäta arbetet under stickan?
05.10.2022 - 02:19DROPS Design answered:
Hei Emilie. Mål med maskene på pinne også. mvh DROPS Design
09.10.2022 - 13:35Mag ik vragen of je dit vest ook kan breien van een combi tussen katoen en acryl? En hoeveel heb ik daar dan van nodig voor maat 42/44? Ik kan niet tegen wol dat jeukt. En welke zou u dan adviseren? Liefst 1 die mooi blijft want het word een heel project aangezien ik fybromyailgi heb. En zit er toevallig 1 in de uitverkoop ?
01.02.2021 - 10:05DROPS Design answered:
Dag Maureen,
Zolang je garen hebt met dezelfde stekenverhouding (maak altijd even een proeflapje) kun je gewoon het patroon volgen. Wij hebben geen garens met acryl in het assortiment. Wel garens met katoen en merino; deze beide garens zijn geschikt als je allergisch bent voor wol of als het kriebelt. Om op een garendikte van categorie E te komen, kun je bijvoorbeeld 2 draden van categorie C nemen. Zie hier voor meer info over het vervangen van garens.
06.02.2021 - 12:21Is al bekend hoeveel Eskimo-garen hiervoor nodig is? Ik heb nog een partijtje liggen en als het genoeg is, wacht ik op dit patroon.
21.08.2020 - 17:26Enkel med fina detaljer! 👍🏻
10.08.2020 - 09:26Hyggelig!
07.06.2020 - 18:20