DROPS Alpaca
DROPS Alpaca
100% Alpaca
from 4.85 $ /50g
DROPS Delight
DROPS Delight
75% Wool, 25% Polyamide
Discontinued
find alternatives
DROPS SS24

Touch of Mystery

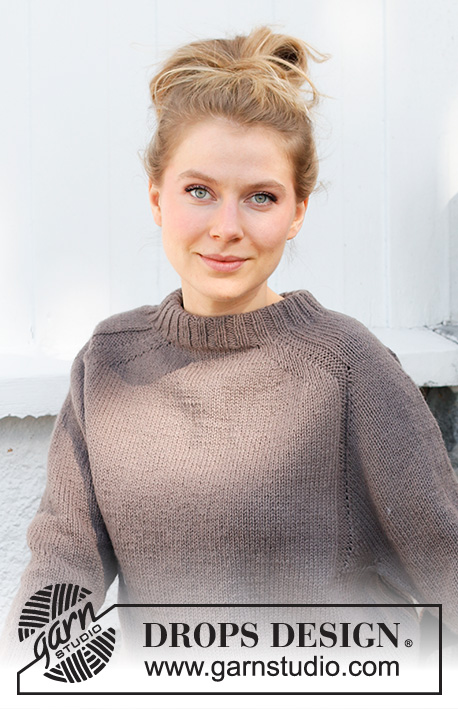
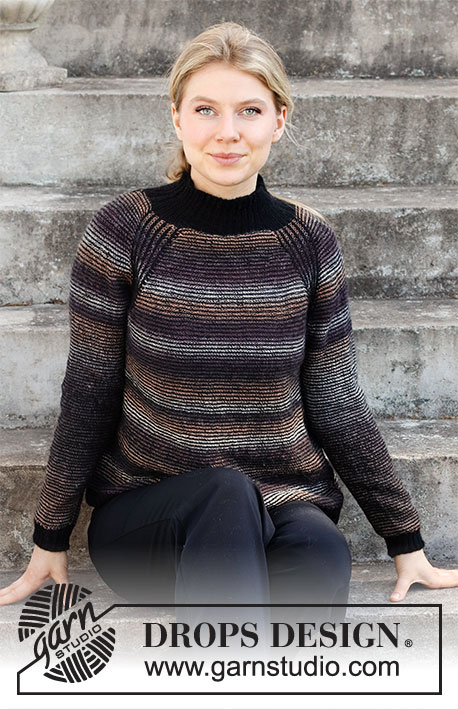
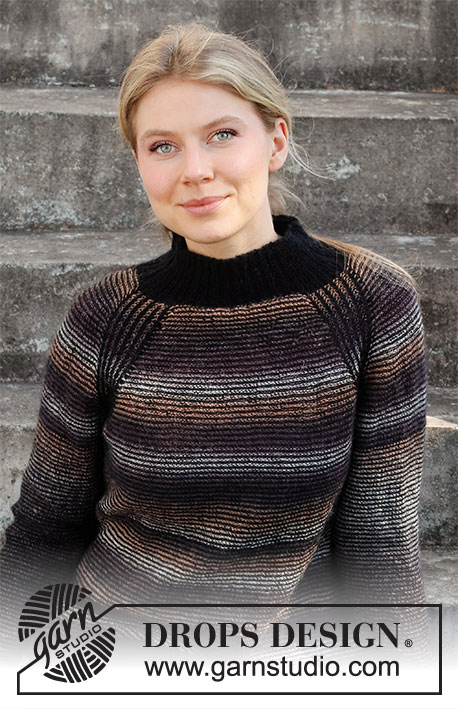
Knitted sweater in DROPS Delight and DROPS Alpaca. The piece is worked top down with raglan, stripes and English rib. Sizes S - XXXL.

DROPS 216-37
DROPS Design: Pattern no de-215
Yarn group A
-------------------------------------------------------

SIZES:
S - M - L - XL - XXL – XXXL

Finished measurements:
Chest measurements: 82-92-100-110-122-134 cm = 32¼"-36¼"-39⅜"-43⅜"-48"-52¾"
Full length: 56-58-60-62-64-66 cm = 22"-22¾"-23⅝"-24⅜"-25¼"-26"

All measurements in charts are in cm.

MATERIALS:
DROPS ALPACA from Garnstudio (belongs to yarn group A)
200-200-250-250-300-300 g color 8903, black
and use:
DROPS DELIGHT from Garnstudio (belongs to yarn group A)
150-150-150-200-200-200 g color 02, plum/beige/heather

KNITTING GAUGE:
24 stitches in width and 32 rows in height with stockinette stitch = 10 x 10 cm = 4" x 4".

NEEDLES:
DROPS DOUBLE POINTED NEEDLES SIZE 3 MM = US 2,5.
DROPS CIRCULAR NEEDLE SIZE 3 MM = US 2,5: Length 40 cm. =16" and 80 cm = 32" for stockinette stitch.
DROPS DOUBLE POINTED NEEDLES SIZE 2.5 MM = US 1,5.
DROPS CIRCULAR NEEDLE SIZE 2.5 MM = US 1,5: Length 40 cm = 16" and 80 cm = 32" for rib.
Needle size is only a guide. If you get too many stitches on 10 cm = 4", change to a larger needle size. If you get too few stitches on 10 cm = 4", change to a smaller needle size.

-------------------------------------------------------

Alternative Yarn – See how to change yarns here
Yarn Groups A to F – Use the same pattern and change the yarn here
Yarn usage using an alternative yarn – Use our yarn converter here

-------------------------------------------------------

DROPS Alpaca
DROPS Alpaca
100% Alpaca
from 4.85 $ /50g
DROPS Delight
DROPS Delight
75% Wool, 25% Polyamide
Discontinued
find alternatives

Pattern instructions

NOTE: This pattern is written in American English. All measurements in charts are in cm. For conversion from inches to cm - click here. There are different terms for crocheting in American and British English. If this pattern includes crochet, click for "crochet terms" here. For this pattern in British English, please click here.
-------------------------------------------------------

EXPLANATIONS FOR THE PATTERN:

-------------------------------------------------------

PATTERN:
See diagrams A.1 and A.2. A.1 is worked along the raglan-lines and A.2 down the sides of the body and under the sleeves.

STRIPES (in the round):
Raglan-lines are worked in English rib as shown in diagram A.2. The other stitches on the yoke are purled from the right side. When you work the body, the piece is turned inside-out and knitted from the wrong side.
Alternate stripes of 1 round Alpaca and 1 round Delight.

INCREASE TIP (evenly spaced):
To work out how to increase evenly, divide the number of stitches to be increased over (e.g. 23 stitches) by the number of increases to be made (e.g. 3) = 7.7.
In this example, increase by making 1 yarn over after alternately each 7th and 8th stitch. On the next round, purl the yarn overs twisted to avoid holes.

INCREASE TIP-2 (for raglan):
Increase on each round of Alpaca (every 2nd round), by making 1 yarn over on each side of each A.1 (= 8 stitches increased on the round). The yarn overs are worked twisted on the next round. The new stitches are purled.

INCREASE TIP-3 (sides of body):
All increases are worked on a round of Alpaca.
Work until there is 1 stitch left before A.2, make 1 yarn over, knit 1, A.2, knit 1, 1 yarn over (= a total of 4 stitches increased on the round). The yarn overs are worked twisted on the next round to avoid holes! The new stitches are knitted.

DECREASE TIP (for sleeves):
Decrease 1 stitch on each side of A.2 as follows: Work until there are 3 stitches left before A.2, knit 2 together, knit 1, work A.2, knit 1, slip 1 stitch as if to knit, knit 1 and pass the slipped stitch over the knitted stitch.

BINDING-OFF TIP:
To avoid the bind-off edge being tight you can bind off with a larger size needle. If the edge is still tight, make 1 yarn over after approx. each 4th stitch at the same time as binding off; the yarn overs are bind off as normal stitches.

-------------------------------------------------------

START THE PIECE HERE:

-------------------------------------------------------

SWEATER – SHORT OVERVIEW OF THE PIECE:
The neck and yoke are worked in the round with circular needle, top down from mid back. The yoke is divided for body and sleeves and the body continued inside-out and in the round. The sleeves are worked in the round with double pointed needles, top down.

NECK:
Cast on 109-121-121-133-133-145 stitches with circular needle size 2.5 mm = US 1,5 and Alpaca. Knit 1 round.
The next round is worked as follows:
Half back piece: * Purl 2, knit 1 *, work from *-* over 12-15-15-18-18-21 stitches, purl 2.
Raglan-line: * Knit 1, purl 1 *, work from *-* over 10 stitches, knit 1.
Sleeve: * Purl 2, knit 1 *, work from *-* over 6-6-6-6-6-6 stitches, purl 2.
Raglan-line: * Knit 1, purl 1 *, work from *-* over 10 stitches, knit 1.
Front piece: * Purl 2, knit 1 *, work from *-* over 21-27-27-33-33-39 stitches, purl 2.
Raglan-line: * Knit 1, purl 1 *, work from *-* over 10 stitches, knit 1.
Sleeve: * Purl 2, knit 1 *, work from *-* over 6-6-6-6-6-6 stitches, purl 2.
Raglan-line: * Knit 1, purl 1 *, work from *-* over 10 stitches, knit 1.
Half back piece: * Purl 2, knit 1 *, work from *-* over 12-15-15-18-18-21 stitches.
Continue like this for 7 cm = 2¾". Change to circular needle size 3 mm = US 2,5.
Insert 1 marker at the beginning of the round, mid-back; the yoke is measured from this marker!

YOKE:
The next round is worked as follows:
Half back piece: Purl 14-17-17-20-20-23 and increase 0-0-1-0-3-3 stitches evenly spaced – read INCREASE TIP.
Sleeve: Work A.1 (11 stitches = raglan-line), purl 8-8-8-8-8-8, work A.1 (= raglan-line).
Front piece: Purl 23-29-29-35-35-41 and increase 3-5-7-3-11-11 stitches evenly spaced.
Sleeve: Work A.1 (raglan-line), purl 8-8-8-8-8-8, work A.1 (= raglan-line).
Half back piece: Purl 12-15-15-18-18-21 and increase 0-2-3-0-5-5 stitches evenly spaced = 112-128-132-136-152-164 stitches.
Now continue with STRIPES – read description above.
REMEMBER THE KNITTING GAUGE!
On round 3 in A.1 start to increase to raglan as follows:
Increase 1 stitch on each side of each A.1 every 2nd round a total of 26-28-32-36-40-44 times – read INCREASE TIP-2 = 320-352-388-424-472-516 stitches.
When A.1 has been worked 1 time in height, continue with A.1a.
When the piece measures 19-21-22-24-26-28 cm = 7½"-8¼"-8¾"-9½"-10¼"-11" from the marker (adjust so the next round is worked with Delight), divide the yoke for body and sleeves as follows:
Purl 47-52-57-63-70-77 (= half back piece), place the next 68-72-80-88-96-104 stitches on 1 thread for the sleeve, cast on 7 stitches under the sleeve, purl 92-104-114-124-140-154 (= front piece), place the next 68-72-80-88-96-104 stitches on 1 thread for the sleeve, cast on 7 stitches under the sleeve and purl 45-52-57-61-70-77 (= half back piece).

BODY:
= 198-222-242-262-294-322 stitches. Turn the piece inside-out, so you now knit from the wrong side: Insert 1 marker thread in each side, in the middle stitch cast on under each sleeve. Continue knitting all stitches, apart from the 2 stitches with marker threads which are worked with A.2. When A.2 has been completed 1 time in height, continue with A.2a.
When the piece measures 5 cm = 2" from the division, increase 1 stitch on each side of each A.2 – read INCREASE TIP-3.
Increase like this every 3 cm = 1⅛" a total of 7 times = 226-250-270-290-322-350 stitches.
When the piece measures 30-30-31-31-31-31 cm = 11¾"-11¾"-12¼"-12¼"-12¼"-12¼" from the division (adjust so the next round is worked with Delight) increase evenly spaced as follows:
Knit 57-62-67-73-80-87 and increase 0-1-2-2-1-0 stitches, A.2a as before, knit 112-124-134-144-160-174 and increase 1-1-0-2-1-2 stitches, A.2a as before, knit 55-62-67-71-80-87 and increase 1-0-1-0-0-2 stitches = 228-252-273-294-324-354 stitches.
Change to circular needle size 2.5 mm = US 1,5 and finish the piece with Alpaca.
* Purl 1, knit 2 *, work from *-* over all stitches (A.2a purled).
Work this rib for 4 cm = 1½". Bind off with purl from the wrong side – read BINDING-OFF TIP.

SLEEVE:
Place the 68-72-80-88-96-104 stitches from the thread on the one side of the piece on double pointed needles size 3 mm = US 2,5 and knit up 1 stitch in each of the 7 stitches cast on under the sleeve = 75-79-87-95-103-111 stitches.
Turn the piece inside-out, so you now knit from the wrong side.
Work A.2 over the middle stitch under the sleeve; the other stitches are knitted in stripes.
When A.2 has been worked 1 time in height, continue with A.2a.
When the piece measures 3 cm = 1⅛", decrease 1 stitch on each side of A.2a – read DECREASE TIP!
Decrease like this every 2½-2½-1½-1½-1-1 cm = 1"-1"1/2"-½"-⅜"-⅜" a total of 12-13-17-20-22-23 times = 51-53-53-55-59-65 stitches. When the sleeve measures 41-40-39-38-36-35 cm = 16⅛"-15¾"-15¼"-15"-14¼"-13¾" from the division, change to double pointed needles size 2.5 mm = US 1,5. Knit 1 round and increase 0-1-1-2-1-1 stitches = 51-54-54-57-60-66 stitches. Finish the sleeve with Alpaca. Work rib (knit 2, purl 1), adjust so the English rib stitch under the sleeve is purled (you are still working from the wrong side). Bind off with purl when the rib measures 4 cm = 1½". Work the other sleeve in the same way.

ASSEMBLY:
Turn the sweater back to the right side.

Diagram

All measurements in charts are in cm.

symbols = knit
symbols = make 1 yarn over, slip 1 stitch as if to purl
symbols = knit together the yarn over and stitch
symbols = purl together the yarn over and stitch, from the wrong side
symbols = purl
symbols = round worked with Alpaca
symbols = round worked with Delight
diagram

Each of our patterns has specific tutorial videos to help you.

Do you have a question? See a list of frequently asked questions (FAQ)

Knitting tension is what determines the final measurements of your work, and is usually measured per 10 x 10 cm. It is provided like so: number of stitches in width x number of rows in height - eg: 19 stitches x 26 rows = 10 x 10 cm.

The knitting tension is very individual; some people knit/crochet loosely while others work tightly. You adjust the knitting tension with the needle size, which is why the suggested needle size only serve as a guide! You need to adjust this (up or down) to ensure that YOUR knitting tension matches the knitting tension provided in the pattern. If you work with a different knitting tension than provided you will have a different yarn consumption, and your work will have different measurements than what the pattern suggests.

The knitting tension also determines which yarns can replace each other. As long as you achieve the same knitting tension you can replace one yarn with another.

See DROPS lesson: How to measure your tension/gauge

See DROPS video: How to make a gauge tension swatch

The required amount of yarn is provided in grams, eg: 450 g. To calculate how many balls you’ll need you first need to know how many grams are in 1 ball (25g, 50g or 100g). This information is available if you click on the individual yarn quality on our pages. Divide the amount required with the amount of each ball. For example, if each ball is 50g (the most common amount), the calculation will be as follows: 450 / 50 = 9 balls.

The important thing when changing from one yarn to another is that the knitting/crochet tension remains the same. This is so that the measurements of the finished piece will be the same as on the sketch provided. It is easier to achieve the same knitting tension using yarns from the same yarn group. It is also possible to work with multiple strands of a thinner yarn to achieve the knitting tension of a thicker one. Please try our yarn converter. We recommend you to always work a test swatch.

Please NOTE: when changing yarn the garment might have a different look and feel to the garment in the photo, due to individual properties and qualities of each yarn.

See DROPS lesson: Can I use a different yarn than the one mentioned in the pattern?

All our yarns are categorised into yarn groups (from A to F) according to thickness and knitting tension – group A contains the thinnest yarns and group F the thickest. This makes it easier for you to find alternative yarns to our patterns, should you wish to switch yarn. All yarns within the same group have a similar knitting tension and can easily replace each other. However, different yarn qualities have different structures and properties which will give the finished work a unique look and feel.

Click here for an overview of the yarns in each yarn group

At the top of all our patterns you’ll find a link to our yarn converter, which is a helpful tool should you wish to use a different yarn than suggested. By filling in the yarn quality you wish to replace, the amount (in your size) and number of strands, the converter will present good alternative yarns with the same knitting tension. Additionally it will tell you how much you’ll require in the new qualities and whether you’ll need to work with multiple strands. Most skeins are 50g (some are 25g or 100g).

If the pattern is worked with multiple colours, every colour will have to be converted separately. Similarly, if the pattern is worked with several strands of different yarns (for example 1 strand Alpaca and 1 strand Kid-Silk) you will have to find alternatives for each, individually.

Click here to see our yarn converter

Since different yarns have different qualities and textures we have chosen to keep the original yarn in our patterns. However, you can easily find options among our available qualities by using our yarn converter, or simply pick a yarn from the same yarn group.

It is possible that some retailers still have discontinued yarns in stock, or that someone has a few skeins at home that they would like to find patterns for.

The yarn converter will provide both alternative yarn as well as required amount in the new quality.

If you think it's hard to decide what size to make, it can be a good idea to measure a garment you own already and like the size of. Then you can pick the size by comparing those measures with the ones available in the pattern's size chart.

You'll find the size chart at the bottom of the pattern.

See DROPS lesson: How to read size chart

The needle size provided in the pattern serves only as a guide, the important thing is to follow the knitting tension. And since knitting tension is very individual, you will have to adjust the needle size to ensure that YOUR tension is the same as in the pattern – maybe you’ll have to adjust 1, or even 2 needle sizes, up or down to achieve the correct tension. For this, we recommend that you work test swatches.

Should you work with a different knitting tension than the one provided, the measurements of the finished garment might deviate from the measurement sketch.

See DROPS lesson: How to measure your tension/gauge

See DROPS video: How to make a gauge tension swatch

Working a garment top-down provides more flexibility and room for personal adjustment. For example it is easier to try the garment on while working, as well as making adjustments to length of yoke and shoulder caps.

The instructions are carefully explaining every step, in the correct order. Diagrams are adjusted to the knitting direction and are worked as usual.

The diagram depicts all rows/rounds, and every stitch seen from the right side. It is read from bottom to top, from right to left. 1 square = 1 stitch.

When working back and forth, every other row is worked from the right side and every other row is worked from the wrong side. When working from the wrong side, the diagram will have to be worked reversed: from left to right, knit stitches are purled, purl stitches are knit etc.

When working in the round every round is worked from the right side and the diagram are worked from right to left on all rounds.

See DROPS lesson: How to read knitting diagrams

The diagram depicts all rows/rounds, and every stitch seen from the right side. It is worked from bottom to top, from right to left.

When working back and forth every other row is worked from the right side: from right to left and every other row is worked from the wrong side: from left to right.

When working in the round, every row in the diagram are worked from the right side, from right to left.

When working a circular diagram you start in the middle and work your way outwards, counter clockwise, row by row.

The rows usually start with a given number of chain stitches (equivalent to the height of the following stitch), this will either be depicted in the diagram or explained in the pattern.

See DROPS lesson: How to read crochet diagrams

Instructions for working several diagrams after each other on the same row/round, will often be written like so: “work A.1, A.2, A.3 a total of 0-0-2-3-4 times". This means you work A.1 once, then A.2 is worked once, and A.3 is repeated (in width) the number of times provided for your size – in this case like so: S = 0 times, M = 0 times, L=2 times, XL= 3 times and XXL = 4 times.

The diagrams are worked as usual: begin with the first row in A.1, then work the first row in A.2 etc.

See DROPS lesson: How to read knitting diagrams

See DROPS lesson: How to read crochet diagrams

The total width of the garment (from wrist-to-wrist) will be larger in the larger sizes, despite the actual sleeves being shorter. The larger sizes have longer sleeve caps and wider shoulders, so there will be a good fit in all sizes.

The measurement sketch/schematic drawing provides information regarding the full length of the garment. If it’s a jumper or a jacket the length is measured from the highest point on the shoulder (usually closest to the neckline), and straight down to the bottom of the garment. It is NOT measured from the tip of shoulder. Similarly, the length of yoke is measured from the highest point on the shoulder and down to where yoke is split into body and sleeves.

See DROPS lesson: How to read a schematic drawing

Diagrams are often repeated on the round or in height. 1 repeat is the diagram the way it appears in the pattern. If it says to work 5 repeats of A.1 in the round, then you work A.1 a total of 5 times after/next to each other in the round. If it says to work 2 repeats of A.1 vertically/in height you work the entire diagram once, then begin again at the start and work the entire diagram one more time.

Chain stitches are slightly narrower than other stitches and to avoid working the cast-on edge too tight, we simply chain more stitches to begin with. The stitch count will be adjusted on the following row to fit the pattern and measurement sketch.

The rib edge is more elastic and will contract slightly compared to, for example, stocking stitch. By increasing before the rib edge, you avoid a visible difference in width between the rib edge and the rest of the body.

It’s very easy to cast off too tightly, and by making yarn overs while casting off (and simultaneously casting these off) you avoid a too tight cast off edge.

See DROPS video: How to bind off with yarn overs (yo)

To achieve an even increase (or decrease) you can increase on, for example: every 3rd and 4th row alternately, like so: work 2 rows and increase on the 3rd row, work 3 rows and increase on the 4th. Repeat this until the increase is complete.

See DROPS lesson: Increase or decrease 1 st on every 3rd and 4th row alternately

Should you prefer to work in the round instead of back and forth, you may of course adjust the pattern. You’ll need to add steeks mid-front (usually 5 stitches), and follow the instructions. When you would normally turn and work from the wrong side, simply work across the steek and continue in the round. At the end you’ll cut the piece open, pick up stitches to work bands, and cover the cut edges.

See DROPS video: How to knit steeks and cut open

Should you prefer to work back and forth instead of in the round, you may of course adjust the pattern so you work the pieces separately and then assemble them at the end. Divide the stitches for the body in 2, add 1 edge stitch in each side (for sewing) and work the front and back pieces separately.

See DROPS lesson: Can I adapt a pattern for circular needles into straight needles?

Pattern repeats can vary slightly in the different sizes, in order to get the correct proportions. If you’re not working the exact same size as the garment in the photo, yours might deviate slightly. This has been carefully developed and adjusted so that the complete impression of the garment is the same in all sizes.

Make sure to follow instructions and diagrams for your size!

If you have found a pattern you like which is available in women’s size it’s not very difficult to convert it to men’s size. The biggest difference will be the length of sleeves and body. Start working on the women size that you think would fit across the chest. The additional length will be worked right before you cast off for the armhole/sleeve cap. If the pattern is worked top-down you can add the length right after the armhole or before the first decrease on sleeve.

Regarding additional yarn amount, this will depend on how much length you add, but it is better with a skein too many than too few.

All yarns will have excess fibres (from production) that might come off as lint or shedding. Brushed yarns (ie hairier yarns) have more of these loose, excess fibres, causing more shedding.

Shedding also depends on what is worn under or over the garment, and whether this pulls at the yarn fibres. It’s therefore not possible to guarantee that there will be no shedding

Below are some tips on how to get the best result when working with hairier yarns:

1. When the garment is finished (before you wash it) shake it vigorously so the looser hairs come off. NOTE: do NOT use a lint roller, brush or any method that pulls at the yarn.

2. Place the garment in a plastic bag and put it in your freezer - the temperature will cause the fibres to become less attached to each other, and excess fibres will come off easier.

3. Leave in the freezer for a few hours before taking it out and shaking it again.

4. Wash the garment according to the instructions on the yarn label.

Pilling is a natural process that happens to even the most exclusive of fibers. It's a natural sign of wear and tear that is hard to avoid, and that is most visible in high friction areas of your garment like a sweater's arms and cuffs.

You can make your garment look as new by removing the pilling, using a fabric comb or a pill/lint remover.

Still can't find the answer you need? Then scroll down and leave your question so one of our experts can try to help you. This will be done normally within 5 to 10 working days.
In the meantime, you can read the questions and answers that others have left to this pattern or join the DROPS Workshop on Facebook to get help from fellow knitters/crocheters!

You might also like...

Post a comment to pattern DROPS 216-37

We would love to hear what you have to say about this pattern!

If you want to leave a question, please make sure you select the correct category in the form below, to speed up the answering process. Required fields are marked *.

Comments / Questions (7)

country flag Claudia wrote:

Es heißt in der Anleitung, dass die Raglanlinie in Vollpatent gestrickt wird. Und A.1a ist die Strickschrift dafür, richtig? Leider ist A1.a die Strickschrift für ein Halbpatent. Frage ist nun: wie soll die Raglanlinie gestrickt werden? In Vollpatent oder Halbpatent?

25.09.2022 - 13:01

DROPS Design answered:

Liebe Claudia, die Raglanlinien werden gestrickt wie im A.1 gezeigt; dann stricken Sie diese Maschen nach der Verteilung wie im A.2 gezeigt. Viel Spaß beim stricken!

26.09.2022 - 09:32

country flag Neige wrote:

Hallo, warum muss man die Abtei wenden und dann Rechts weiterschicken? Welchen Effekt hat das? Kann ich auch bis zum Ende links auf der richtigen Seite Stricken? Vielen Dank für ein Feedback

25.01.2022 - 21:33

DROPS Design answered:

Liebe Neige, also mange Strickerinnen stricken lieber mit rechten Maschen als mit nur linken Maschen in der Runde, deshalb wird die Arbeit gewendet und nur mit rechten Maschen gestrickt- wenn Sie immer noch bei Hinreihen /von der Vorderseite stricken, sollen Sie dann A.2 anpassen. Viel Spaß beim stricken!

26.01.2022 - 08:53

country flag Helga Ternes wrote:

In der Anleitung ist von Diagramm A.1 und A.2 die Rede. Fehlt das Diagramm in der Anleitung?

11.10.2021 - 08:21

DROPS Design answered:

Liebe Frau Ternes, A.1 und A.2 finden Sie neben der Maßskizze, können Sie sie sehen? Viel Spaß beim stricken!

11.10.2021 - 08:44

country flag Lil wrote:

Are the amounts correct? It would appear to me that the black colour is the lesser amount, however in the pattern it is stated as almost twice as much as the colour used in the body and sleeves. Please let me know as I just got started on this and would like to know very soon!

31.12.2020 - 04:12

DROPS Design answered:

Dear Lil, you need more of the black yarn = Alpaca than the Delight (stripes colour) since you will require black Alpaca for neck, sleeve edges and bottom edge on sweater. Make sure your tension is correct in both Alpaca and Delight. Happy knitting!

04.01.2021 - 13:31

country flag Elena Petto wrote:

The increase for the raglan. Is it part of the raglan stitches so you increase the English rib part. Or is it either side of the of the A1 section. Thus increasing the sleeve , back front etc. I've increased in the raglan and I think this is wrong.

03.12.2020 - 00:45

DROPS Design answered:

Dear Mrs Petto, A.1 is worked at each raglan line and you will increase on either side of A.1 - see RAGLAN, the number of sts in A.1 (= English rib) won't increase, you will increase the number of sts between A.1 = sleeves, front and back piece. Happy knitting!

03.12.2020 - 09:02

country flag Christiane wrote:

Hallo, die Raglanschrägen werden im Vollpatent gestrickt, der Rest der Runden in Linksreihen. Durch das Vollpatent erreichen die Raglanschrägen nicht die gleiche Höhe wie die Linksreihen. Ich habe schon versucht, das Vollpatent lockerer zu stricken als das Vorder-/Rückenteil u. die Ärmel. Trotzdem kräuselt sich der Übergang zwischen den Raglanschrägen und dem Vorder- bzw. Rückenteil und den Ärmeln. Wie kann man das vermeiden? Danke und Gruß

28.10.2020 - 08:37

DROPS Design answered:

Liebe Christiane, das Vollpatent sollte die gleiche Höhe haben, die Maschen im Vollpatent sind über 2 Reihen gestrickt, und diese 2 Reihen werden überall anders glatt links gestrickt, versuchen Sie die Umschläge vom Vollpattent nicht zu locker zu stricken - beim spannen/1. Waschen kann auch die Arbeit mehr regelmäßig werden. Ihr DROPS Laden hat vielleicht noch einige Tipps für Sie, gerne bekommen Sie dort Hilfe. Viel Spaß beim stricken!

28.10.2020 - 15:22

country flag MARIA ANTONIA HERRERO wrote:

Bonito contraste con el cuello y los puños. Resalta el rostro. Ideal si tienes algo de peso extra.

05.08.2020 - 11:36