DROPS Nepal
DROPS Nepal
65% Wool, 35% Alpaca
from 2.40 £ /50g
Get the yarn to make this pattern from 24.00£.

The yarn cost is calculated from the pattern’s smallest size and the yarn’s cheapest product type. Looking for an even better price? You might find it on the DROPS Deals!

DROPS Super Sale

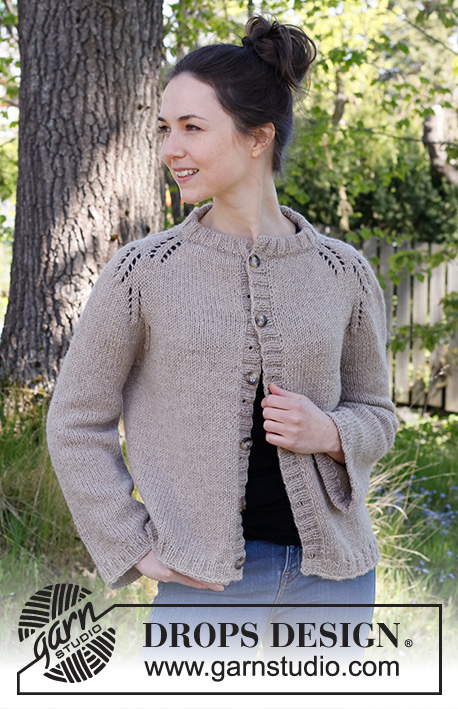
Country Life Cardigan

Knitted jacket in DROPS Nepal. Piece is knitted top down with shoulder increase for saddle shoulder and lace pattern. Size: S - XXXL 

DROPS 218-13
DROPS design: Pattern ne-338
Yarn group C or A + A
-------------------------------------------------------

SIZE: 
S - M - L - XL - XXL - XXXL

MATERIALS: 
DROPS NEPAL from Garnstudio (belongs to yarn group C)
500-550-600-700-750-800 g colour no 0300, beige

KNITTING TENSION:
16 stitches in width and 20 rows vertically in stocking stitch = 10 x 10 cm.

NEEDLES:
DROPS DOUBLE POINTED NEEDLES SIZE 5.5 mm
DROPS CIRCULAR NEEDLE SIZE 5.5 mm: Length 60 or 80 cm for stocking stitch.
DROPS DOUBLE POINTED NEEDLES SIZE 4.5 mm
DROPS CIRCULAR NEEDLE SIZE 4.5 mm: Length 60 or 80 cm for rib. 
Needle size is only a suggestion! If you have too many stitches on 10 cm switch to a larger needle size. If you have too few stitches on 10 cm switch to a smaller needle size.

DROPS BUTTON, Marble NR 629: 6-6-7-7-7-7 pieces

-------------------------------------------------------

Alternative Yarn – See how to change yarns here
Yarn Groups A to F – Use the same pattern and change the yarn here
Yarn usage using an alternative yarn – Use our yarn converter here

-------------------------------------------------------

DROPS Nepal
DROPS Nepal
65% Wool, 35% Alpaca
from 2.40 £ /50g
Get the yarn to make this pattern from 24.00£.

The yarn cost is calculated from the pattern’s smallest size and the yarn’s cheapest product type. Looking for an even better price? You might find it on the DROPS Deals!

DROPS Super Sale

SAVE 30% on 6 cotton favourites!
Valid until 12.04.2024

Pattern instructions

NOTE: This pattern is written in British English. All measurements in charts are in cm. For conversion from cm to inches - click here. There are different terms for crocheting in British and American English. If this pattern includes crochet, click for "crochet terms" here. For this pattern in American English, please click here.
-------------------------------------------------------

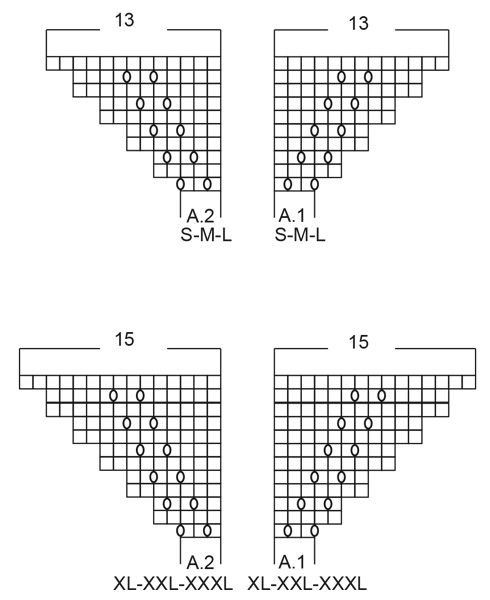
EXPLANATION FOR THE PATTERN:

-------------------------------------------------------

GARTER STITCH (back and forth): 
Knit all rows.  
1 ridge vertically = knit 2 rows.

PATTERN: 
See diagrams A.1 and A.2. Choose diagram for your size.

DECREASE TIP (applies to sleeves in size L-XL-XXL-XXXL): 
Decrease 1 stitch on each side of marker as follows: Work until 3 stitches remain before marker, knit 2 together, knit 2 (marker is between these stitches), slip 1 stitch knitwise, knit 1, pass slipped stitch over stitch worked.

BUTTONHOLES:
Decrease for 6-6-7-7-7-7 buttonholes on right band.
1 buttonhole = work 2 stitches together, make 1 yarn over - NOTE: It will look nicer if you decrease for buttonhole by purling 2 together in a section with 2 purl stitches (seen from right side). On next row knit yarn over to make holes.
Bottom buttonhole should be approx. 4 cm from bottom edge, and top buttonhole approx. 1 cm from neck edge. Place the remaining 4-4-5-5-5-5 buttonholes evenly, approx. 9-9½-8½-8½-9-9½ cm between each buttonhole.

CAST-OFF TIP:
To avoid a tight cast-off edge you may use a larger needle size. If this also is too tight, work a 1 yarn over after approx. every 4th stitch while casting off (cast off yarn overs as regular stitches).

-------------------------------------------------------

START THE PIECE HERE:

-------------------------------------------------------

JACKET - SHORT OVERVIEW OF THE PIECE:
Worked in one piece from the top down. Fold neck edge double during assembly. Increase out for shoulder and sleeve cap. Now divide yoke for body and sleeves. Work body back and forth on circular needle. Work sleeves in the round on double pointed needles/a short circular needle.

NECK EDGE:
Cast on 82-86-90-94-98-102 stitches (including 5 band stitches in each side towards mid front) on circular needle size 4.5 mm with Nepal. Purl 1 row from wrong side
Then work rib from right side as follows: Work 1 stitch in GARTER STITCH - read explanation above, knit 1, purl 2, * knit 2, purl 2 *, repeat from *-* until 2 stitches remain, finish with knit 1 and 1 stitch in garter stitch. 
Continue rib like this for 6 cm. 
On next row from right side cast off the 5 first stitches, work in stocking stitch and increase 4-8-16-12-24-30 stitches evenly until 5 stitches remain, knit 2, purl 2 and 1 stitch in garter stitch over the last 5 stitches. 
On next row from wrong side cast off the first 5 stitches work in stocking stitch the rest of row. 
= 76-84-96-96-112-122 stitches.
Switch to circular needle size 5.5 mm. Insert 1 marker at the beginning of row mid front, measure yoke from this marker!

YOKE:
Now increase stitches on shoulder as follows:

SHOULDER INCREASE:
Work next row as follows from right side: 
Work 1 edge stitch in garter stitch, 15-17-20-20-25-27 stitches in stocking stitch (= left front piece), A.1 (= 3 stitches), A.2 (= 3 stitches = left shoulder), 32-36-42-42-48-54 stitches in stocking stitch (= back piece), A.1 over 3 stitches, A.2 over 3 stitches (= right shoulder), 15-17-20-20-25-27 stitches in stocking stitch and finish with 1 edge stitch in garter stitch (= right front piece). 
REMEMBER THE KNITTING TENSION
When A.1 and A.2 have been worked 1 time vertically, there are 116-124-136-144-160-170 stitches on needle. 
Work next row as follows from right side: 
Work 1 edge stitch in garter stitch, 25-27-30-32-37-39 stitches in stocking stitch (= left front piece), A.1 over 3 stitches, A.2 over 3 stitches (= left shoulder), 52-56-62-66-72-78 stitches in stocking stitch (= back piece), A.1 over 3 stitches, A.2 over 3 stitches (= right shoulder), 25-27-30-32-37-39 stitches in stocking stitch and finish with 1 edge stitch in garter stitch (= right front piece).
When A.1 and A.2 have been worked 1 time vertically (i.e. 2 times in total vertically), there are 156-164-176-192-208-218 stitches on needle. 
Piece now measures 10-10-10-12-12-12 cm from marker.

SLEEVE INCREASE:
Now increase stitches for sleeve cap on next row from right side as follows:
Work 1 edge stitch in garter stitch, 25-27-30-32-37-39 stitches in stocking stitch (= left front piece), A.1 over 3 stitches, 20-20-20-24-24-24 stitches in stocking stitch, A.2 over 3 stitches (= left sleeve), 52-56-62-66-72-78 stitches in stocking stitch (= back piece), A.1 over 3 stitches, 20-20-20-24-24-24 stitches in stocking stitch, A.2 over 3 stitches (= right sleeve), 25-27-30-32-37-39 stitches in stocking stitch and finish with 1 edge stitch in garter stitch (= right front piece).
When A.1 and A.2 have been worked 1 more time vertically (i.e. 3 times in total including shoulder), there are 196-204-216-240-256-266 stitches on needle. 
Work next row as follows from right side: 
Work 1 edge stitch in garter stitch, 25-27-30-32-37-39 stitches in stocking stitch, A.1 over 3 stitches, 40-40-40-48-48-48 stitches in stocking stitch, A.2 over 3 stitches, 52-56-62-66-72-78 stitches in stocking stitch, A.1 over 3 stitches, 40-40-40-48-48-48 stitches in stocking stitch, A.2 over 3 stitches, 25-27-30-32-37-39 stitches in stocking stitch and finish with 1 edge stitch in garter stitch. 
When A.1 and A.2 have been worked 4 times in total vertically (i.e. 2 times on shoulder and 2 times when increasing for sleeve), there are 236-244-256-288-304-314 stitches on needle. 
Piece measures approx. 20-20-20-24-24-24 cm from after neck edge. 
Now work piece in stocking stitch with 1 edge stitch in garter stitch in each side of piece.
Increase is now done in size S-M-L-XL-XXL, but continue as follows size XXXL:

SIZE XXXL:
Insert 1 marker between the 2 stitches between yarn overs in each A.1 and A.2 (= 4 markers). On next row increase 1 stitch in each side of every marker as follows:
Work until 1 stitch remains before marker, 1 yarn over (= 1 stitch increased), work 2 stitches in stocking stitch (marker is between these stitches), 1 yarn over (= 1 stitch increased = 8 stitches increased in total on row). Knit yarn overs twisted on next row to avoid holes. 
Increase like this every row from right side 2 times in total = 330 stitches.

ALL SIZES:
= 236-244-256-288-304-330 stitches.
Then work in stocking stitch with 1 edge stitch in garter stitch in each side of piece.
When piece measures 20-22-23-25-27-29 cm from after neck edge, divide piece for body and sleeves as follows:
Work 1 edge stitch in garter stitch, 36-37-38-43-46-51 stitches in stocking stitch, slip the next 45-46-50-57-58-62 stitches on a stitch holder for sleeve and cast on 6-8-10-10-12-12 stitches under sleeve, 72-76-78-86-94-102 stitches in stocking stitch, slip the next 45-46-50-57-58-62 stitches on a stitch holder for sleeve and cast on 6-8-10-10-12-12 stitches under sleeve, work 36-37-38-43-46-51 stitches in stocking stitch and finish with 1 edge stitch in garter stitch.

BODY:
= 158-168-176-194-212-230 stitches.
Then work in stocking stitch and 1 edge stitch in garter stitch in each side of piece.
When piece measures 25-25-26-26-26-26 cm from where body was divided (or to desired length, approx. 4 cm remain), increase 2-0-0-2-0-2 stitches evenly on next row from wrong side = 160-168-176-196-212-232 stitches.
Switch to circular needle size 4.5 mm and work rib as follows, begin from right side:
Work 1 edge stitch in garter stitch, * knit 2, purl 2 *, repeat from *-* until 3 stitches remain, finish with knit 2 and 1 edge stitches in garter stitch. 
Continue like this until rib measures 4 cm. Cast off by knitting - read CAST-OFF TIP. Jacket measures approx. 52-54-56-58-60-62 cm from shoulder. 

SLEEVES:
Slip the 45-46-50-57-58-62 stitches from stitch holder in one side of piece double pointed needles/a short circular needle size 5.5 mm and pick in addition up 1 stitch in each of the 6-8-10-10-12-12 new stitches cast on under sleeve = 51-54-60-67-70-74 stitches.  
Work in stocking stitch in the round.
In size L-XL-XXL-XXXL decreasing as follows:

SIZE L-XL-XXL-XXXL:
Insert 1 marker in the middle of the 10-10-12-12 stitches cast on under each sleeve. Decrease stitches on each side of this marker later.
When sleeve measures 3 cm from division, decrease 1 stitch on each side of marker - read DECREASE TIP. Decrease like this every 12-12-7-5 cm 1-3-4-5 times in total = 58-61-62-64 stitches.

ALL SIZES:
= 51-54-58-61-62-64 stitches.
Work in stocking stitch until piece measures 40-38-37-37-35-33 cm (or desired length, approx. 3 cm remain). 
On next round increase 13-14-14-11-14-12 stitches evenly = 64-68-72-72-76-76 stitches. Switch to double pointed needles/short circular needle size 4.5 mm. 
Work rib (= knit 2/purl 2) over all stitches. 
Cast off by knitting when rib measures 3 cm. 
Work the other sleeve the same way.

LEFT BAND:
Begin at the top of neck (i.e. from where stitches on neck edge were cast off) on left front piece, pick up stitches inside 1 edge stitch in garter stitch. Pick up approx. 79-99 stitches (adjust to that number of stitches is divisible by 4 + 3) from right side on circular needle 4.5 mm with Nepal.
Work rib, begin from wrong side as follows: 2 stitches in garter stitch, * purl 2, knit 2 *, repeat from *-* until 1 stitch remains, and finish with 1 stitch in garter stitch. Continue rib like this until band measures approx. 3 cm (adjust measurement with stitches cast off on neck edge). Cast off stitches with knit over knit and purl over purl.

RIGHT BAND:
Begin at the bottom of jacket on right front piece and pick up stitches inside 1 edge stitch in garter stitch. Pick up same number of stitches that were picked up on left band from right side on circular needle size 4.5 mm with Nepal.
Work rib, begin from wrong side as follows: Work 1 stitch in garter stitch, * knit 2, purl 2 *, work from *-* until 2 stitches remain, and work 2 stitches in garter stitch. When rib measures approx. 1½ cm, decrease for BUTTONHOLES - see explanation above. Continue rib until band measures 3 cm, adjust measurement with left band. Cast off stitches with knit over knit and purl over purl.

ASSEMBLY:
Fold rib at the top of neck down on the inside of garment. Fasten rib to form a double folding edge. To avoid a tight neck edge and avoiding the edge to tip outwards, it is important to make the seam elastic. Sew together opening towards mid front on bands with small stitches. Sew the buttons on to the left band.

This pattern has been corrected.

Updated online: 05.02.2021
SLEEVE INCREASE:
... Work 1 edge stitch in garter stitch, 36-37-38-43-46-51 stitches in stocking stitch, slip the next 45-46-50-57-58-62 stitches on a stitch holder for sleeve...

Diagram

symbols = knit from the right side, purl from the wrong side
symbols = between 2 stitches make 1 yarn over
symbols = knitting direction
diagram
diagram
diagram

Each of our patterns has specific tutorial videos to help you.

Do you have a question? See a list of frequently asked questions (FAQ)

Knitting tension is what determines the final measurements of your work, and is usually measured per 10 x 10 cm. It is provided like so: number of stitches in width x number of rows in height - eg: 19 stitches x 26 rows = 10 x 10 cm.

The knitting tension is very individual; some people knit/crochet loosely while others work tightly. You adjust the knitting tension with the needle size, which is why the suggested needle size is only meant as a guide! You need to adjust this (up or down) to ensure that YOUR knitting tension matches the knitting tension provided in the pattern. If you work with a different knitting tension than provided you will have a different yarn consumption, and your work will have different measurements than what the pattern suggests.

The knitting tension also determines which yarns can replace each other. As long as you achieve the same knitting tension you can replace one yarn with another.

See DROPS lesson: How to measure your tension/gauge

See DROPS video: How to make a gauge tension swatch

The required amount of yarn is provided in grams, eg: 450 g. To calculate how many balls you’ll need you first need to know how many grams are in 1 ball (25g, 50g or 100g). This information is available if you click on the individual yarn quality on our pages. Divide the amount required with the amount of each ball. For example, if each ball is 50g (the most common amount), the calculation will be as follows: 450 / 50 = 9 balls.

The important thing when changing from one yarn to another is that the knitting/crochet tension remains the same. This is so that the measurements of the finished piece will be the same as on the sketch provided. It is easier to achieve the same knitting tension using yarns from the same yarn group. It is also possible to work with multiple strands of a thinner yarn to achieve the knitting tension of a thicker one. Please try our yarn converter. We recommend you to always work a test swatch.

Please NOTE: when changing yarn the garment might have a different look and feel to the garment in the photo, due to individual properties and qualities of each yarn.

See DROPS lesson: Can I use a different yarn than the one mentioned in the pattern?

All our yarns are categorised into yarn groups (from A to F) according to thickness and knitting tension – group A contains the thinnest yarns and group F the thickest. This makes it easier for you to find alternative yarns to our patterns, should you wish to switch yarn. All yarns within the same group have a similar knitting tension and can easily replace each other. However, different yarn qualities have different structures and properties which will give the finished work a unique look and feel.

Click here for an overview of the yarns in each yarn group

At the top of all our patterns you’ll find a link to our yarn calculator, which is a helpful tool should you wish to use a different yarn than suggested. By filling in the yarn quality you wish to replace, the amount (in your size) and number of strands, the calculator will present good alternative yarns with the same knitting tension. Additionally it will tell you how much you’ll require in the new qualities and whether you’ll need to work with multiple strands. Most skeins are 50g (some are 25g or 100g).

If the pattern is worked with multiple colours, every colour will have to be calculated separately. Similarly, if the pattern is worked with several strands of different yarns (for example 1 strand Alpaca and 1 strand Kid-Silk) you will have to find alternatives for each, individually.

Click here to see our yarn calculator

Since different yarns have different qualities and textures we have chosen to keep the original yarn in our patterns. However, you can easily find options among our available qualities by using our yarn calculator, or simply pick a yarn from the same yarn group.

It is possible that some retailers still have discontinued yarns in stock, or that someone has a few skeins at home that they would like to find patterns for.

The yarn calculator will provide both alternative yarn as well as required amount in the new quality.

If you think it's hard to decide what size to make, it can be a good idea to measure a garment you own already and like the size of. Then you can pick the size by comparing those measures with the ones available in the pattern's size chart.

You'll find the size chart at the bottom of the pattern.

See DROPS lesson: How to read size chart

The needle size provided in the pattern serves only as a guide, the important thing is to follow the knitting tension. And since knitting tension is very individual, you will have to adjust the needle size to ensure that YOUR tension is the same as in the pattern – maybe you’ll have to adjust 1, or even 2 needle sizes, up or down to achieve the correct tension. For this, we recommend that you work test swatches.

Should you work with a different knitting tension than the one provided, the measurements of the finished garment might deviate from the measurement sketch.

See DROPS lesson: How to measure your tension/gauge

See DROPS video: How to make a tension/gauge swatch

Working a garment top-down provides more flexibility and room for personal adjustment. For example it is easier to try the garment on while working, as well as making adjustments to length of yoke and shoulder caps.

The instructions are carefully explaining every step, in the correct order. Diagrams are adjusted to the knitting direction and are worked as usual.

The diagram depicts all rows/rounds, and every stitch seen from the right side. It is read from bottom to top, from right to left. 1 square = 1 stitch.

When working back and forth, every other row is worked from the right side and every other row is worked from the wrong side. When working from the wrong side, the diagram will have to be worked reversed: from left to right, knit stitches are purled, purl stitches are knit etc.

When working in the round every round is worked from the right side and the diagram are worked from right to left on all rounds.

See DROPS lesson: How to read knitting diagrams

The diagram depicts all rows/rounds, and every stitch seen from the right side. It is worked from bottom to top, from right to left.

When working back and forth every other row is worked from the right side: from right to left and every other row is worked from the wrong side: from left to right.

When working in the round, every row in the diagram are worked from the right side, from right to left.

When working a circular diagram you start in the middle and work your way outwards, counter clockwise, row by row.

The rows usually start with a given number of chain stitches (equivalent to the height of the following stitch), this will either be depicted in the diagram or explained in the pattern.

See DROPS lesson: How to read crochet diagrams

Instructions for working several diagrams after each other on the same row/round, will often be written like so: “work A.1, A.2, A.3 a total of 0-0-2-3-4 times". This means you work A.1 once, then A.2 is worked once, and A.3 is repeated (in width) the number of times provided for your size – in this case like so: S = 0 times, M = 0 times, L=2 times, XL= 3 times and XXL = 4 times.

The diagrams are worked as usual: begin with the first row in A.1, then work the first row in A.2 etc.

See DROPS lesson: How to read knitting diagrams

See DROPS lesson: How to read crochet diagrams

The total width of the garment (from wrist-to-wrist) will be larger in the larger sizes, despite the actual sleeves being shorter. The larger sizes have longer sleeve caps and wider shoulders, so there will be a good fit in all sizes.

The measurement sketch/schematic drawing provides information regarding the full length of the garment. If it’s a jumper or a jacket the length is measured from the highest point on the shoulder closest to the neckline, and straight down to the bottom of the garment. It is NOT measured from the tip of shoulder. Similarly, the length of yoke is measured from the highest point on the shoulder and down to where yoke is split into body and sleeves.

On a jacket measures are never taken along bands, unless specifically stated. Always measure inside band stitches when measuring the length.

See DROPS lesson: How to read a schematic drawing

Diagrams are often repeated on the round or in height. 1 repeat is the diagram the way it appears in the pattern. If it says to work 5 repeats of A.1 in the round, then you work A.1 a total of 5 times after/next to each other in the round. If it says to work 2 repeats of A.1 vertically/in height you work the entire diagram once, then begin again at the start and work the entire diagram one more time.

Chain stitches are slightly narrower than other stitches and to avoid working the cast-on edge too tight, we simply chain more stitches to begin with. The stitch count will be adjusted on the following row to fit the pattern and measurement sketch.

The rib edge is more elastic and will contract slightly compared to, for example, stocking stitch. By increasing before the rib edge, you avoid a visible difference in width between the rib edge and the rest of the body.

It’s very easy to cast off too tightly, and by making yarn overs while casting off (and simultaneously casting these off) you avoid a too tight cast off edge.

See DROPS video: How to bind off with yarn overs (yo)

To achieve an even increase (or decrease) you can increase on, for example: every 3rd and 4th row alternately, like so: work 2 rows and increase on the 3rd row, work 3 rows and increase on the 4th. Repeat this until the increase is complete.

See DROPS lesson: Increase or decrease 1 st on every 3rd and 4th row alternately

Should you prefer to work in the round instead of back and forth, you may of course adjust the pattern. You’ll need to add steeks mid-front (usually 5 stitches), and follow the instructions. When you would normally turn and work from the wrong side, simply work across the steek and continue in the round. At the end you’ll cut the piece open, pick up stitches to work bands, and cover the cut edges.

See DROPS video: How to knit steeks and cut open

Should you prefer to work back and forth instead of in the round, you may of course adjust the pattern so you work the pieces separately and then assemble them at the end. Divide the stitches for the body in 2, add 1 edge stitch in each side (for sewing) and work the front and back pieces separately.

See DROPS lesson: Can I adapt a pattern for circular needles into straight needles?

Pattern repeats can vary slightly in the different sizes, in order to get the correct proportions. If you’re not working the exact same size as the garment in the photo, yours might deviate slightly. This has been carefully developed and adjusted so that the complete impression of the garment is the same in all sizes.

Make sure to follow instructions and diagrams for your size!

If you have found a pattern you like which is available in women’s size it’s not very difficult to convert it to men’s size. The biggest difference will be the length of sleeves and body. Start working on the women size that you think would fit across the chest. The additional length will be worked right before you cast off for the armhole/sleeve cap. If the pattern is worked top-down you can add the length right after the armhole or before the first decrease on sleeve.

Regarding additional yarn amount, this will depend on how much length you add, but it is better with a skein too many than too few.

All yarns will have excess fibres (from production) that might come off as lint or shedding. Brushed yarns (ie hairier yarns) have more of these loose, excess fibres, causing more shedding.

Shedding also depends on what is worn under or over the garment, and whether this pulls at the yarn fibres. It’s therefore not possible to guarantee that there will be no shedding

Below are some tips on how to get the best result when working with hairier yarns:

1. When the garment is finished (before you wash it) shake it vigorously so the looser hairs come off. NOTE: do NOT use a lint roller, brush or any method that pulls at the yarn.

2. Place the garment in a plastic bag and put it in your freezer - the temperature will cause the fibres to become less attached to each other, and excess fibres will come off easier.

3. Leave in the freezer for a few hours before taking it out and shaking it again.

4. Wash the garment according to the instructions on the yarn label.

Pilling is a natural process that happens to even the most exclusive of fibers. It's a natural sign of wear and tear that is hard to avoid, and that is most visible in high friction areas of your garment like a sweater's arms and cuffs.

You can make your garment look as new by removing the pilling, using a fabric comb or a pill/lint remover.

Still can't find the answer you need? Then scroll down and leave your question so one of our experts can try to help you. This will be done normally within 5 to 10 working days.
In the meantime, you can read the questions and answers that others have left to this pattern or join the DROPS Workshop on Facebook to get help from fellow knitters/crocheters!

You might also like...

Post a comment to pattern DROPS 218-13

We would love to hear what you have to say about this pattern!

If you want to leave a question, please make sure you select the correct category in the form below, to speed up the answering process. Required fields are marked *.

Comments / Questions (1)

country flag Emma Lindberg wrote:

Hvorfor kan jeg ikke printe en gratis opskrift ud på papir, men kun gemme den som fil?

29.10.2020 - 15:58

DROPS Design answered:

Hei Emma. Du skal fint kunne printe ut oppskriften på papir. Trykk på skriver ikonet under oppskrift. Om du fremdeles har problemer, sjekk innstillingene til din printer. mvh DROPS design

02.11.2020 - 10:58