
Popular categories
Looking for a yarn?


|
|
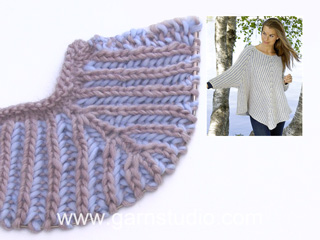
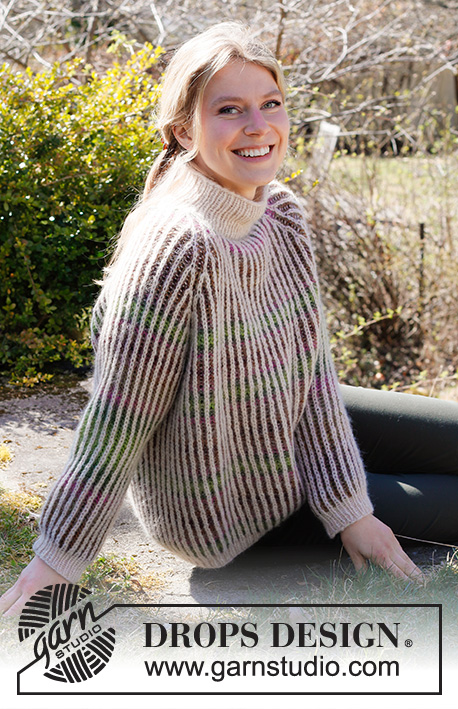
Dancing Aurora Jacket |
|
 |
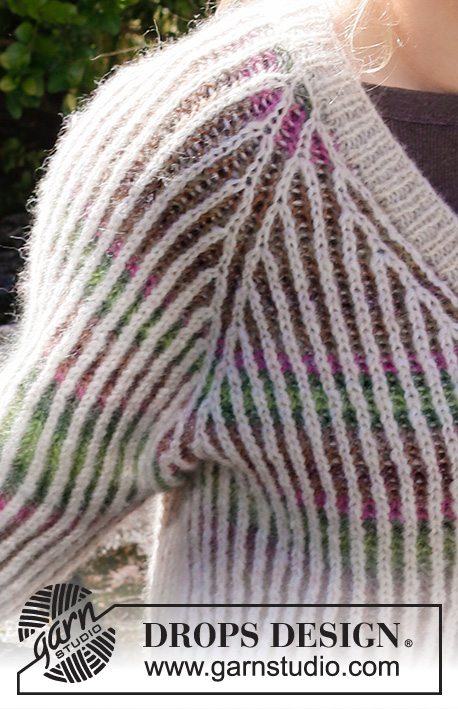 |
Knitted jacket in DROPS Big Delight and DROPS Air. Piece is knitted top down with English rib in 2 colours. Size: S - XXXL
DROPS 218-25 |
|
|
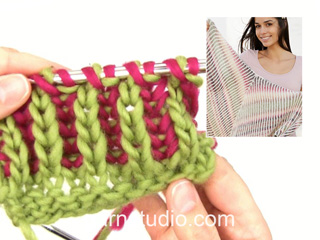
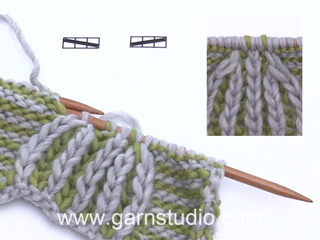
------------------------------------------------------- EXPLANATION FOR THE PATTERN: ------------------------------------------------------- ENGLISH RIB (back and forth): ROW 1 (wrong side): Worked with Air: Work 1 stitch in garter stitch, * make 1 yarn over, slip 1 stitch purlwise, knit 1 *, work from *-* until 2 stitches remain, make 1 yarn over, slip 1 stitch purlwise, work 1 stitch in garter stitch. Turn piece. ROW 2 (right side): Worked with Air: Work 1 stitch in garter stitch, * knit yarn over and slipped stitch together, make 1 yarn over, slip 1 stitch purlwise, work from *-* until 2 stitches remain, knit yarn over and slipped stitch together and work 1 stitch in garter stitch. Push stitches back to the other side of circular needle (without turning the piece), to work from the same side as previous row. Switch colour( read KNITTING TIP). ROW 3 (right side): Worked with Big Delight: Work 1 stitch in garter stitch, * make 1 yarn over, slip 1 stitch purlwise, purl together yarn over and slipped stitch *, work from *-* until 2 stitches remain, make 1 yarn over, slip 1 stitch purlwise, work 1 stitch in garter stitch. Turn piece. ROW 4 (wrong side): Worked with Air: Work 1 stitch in garter stitch, * purl yarn over and slipped stitch together, make 1 yarn over, slip 1 stitch purlwise, work from *-* until 2 stitches remain, purl yarn over and slipped stitch together and work 1 stitch in garter stitch. Push stitches back to the other side of circular needle (without turning the piece), to work from the same side as previous row. Switch colour. ROW 5 (wrong side): Worked with Big Delight: Work 1 stitch in garter stitch, * make 1 yarn over, slip 1 stitch purlwise, knit together yarn over and slipped stitch *, work from *-* until 2 stitches remain, make 1 yarn over, slip 1 stitch purlwise, work 1 stitch in garter stitch. Turn piece. Repeat rows 2-5 upwards. KNITTING TIP: If you are in doubt of what colour next row should be worked with, see what colour the previous row was worked with on the colour of edge stitch. ENGLISH RIB (in the round - applies to sleeves): ROUND 1: Worked with Big Delight. * Purl together yarn over and slipped stitch, 1 yarn over, slip 1 stitch purlwise *, repeat from *-* the rest of round - read KNITTING TIP. ROUND 2: Worked with Air. * Make 1 yarn over, slip 1 stitch purlwise, knit together yarn over and slipped stitch *, repeat from *-* the rest of round (note that the last yarn over on needle does not look like a yarn over, but thread with Big Delight is at the front of piece, place thread over to make a yarn over). Repeat rounds 1 and 2. INCREASE TIP-1: All increases are done with DROPS Air. Increase from the right side as follows. Increase 2 stitches in knit stitch and yarn over by working 3 stitches in stitch and yarn over as follows: Knit stitch and yarn over together but wait to pass stitch and yarn over worked on to right needle, make 1 yarn over on right needle and knit same stitch and yarn over together one more time (= 2 stitches increased). Then work the new stitches in English rib but note that purl stitches is purled without yarn over because there is no yarn over. INCREASE TIP-2 (applies only in size XXL and XXXL): All increases are done with Air. When increasing from the wrong side, increase in the purl stitch and the yarn over on each side of the 4 raglan stitches (this is the knit stitch seen from the right side). Increase from the wrong side as follows: Increase 2 stitches in the purl stitch and yarn over by working 3 stitches in the stitch and yarn over as follows: purl stitch and yarn over together, but wait to pass stitch and yarn over worked on to right needle, make 1 yarn over on right needle and purl the same stitch and yarn over together one more time (= 2 stiches increased). Then work the new stitches in English rib, but note that the knit stitches are knitted without yarn over because there is yarn over. DECREASE TIP (applies to mid under sleeves): Decrease under sleeves on each side of 3 stitches mid under sleeve (= 1 purl stitch + 1 English rib stitch (= stitch with marker) + 1 purl stitch). All decreases are done on a round where yarn over and knit stitch are knitted together (= a round worked with Air). DECREASE 2 STITCHES TOWARDS THE LEFT AS FOLLOWS (i.e. begin right after first purl stitch after stitch with marker): Slip first knit stitch and yarn over on to right needle knitwise, knit the next 2 stitches together (i.e. 1 purl + knit stitch and yarn over), then slip the loose stitch and yarn over over stitches worked together (= 2 stitches decreased). DECREASE 2 STITCHES TOWARDS THE RIGHT AS FOLLOWS (i.e. begin 4 stitches + 2 yarn overs before stitch with marker): Slip first knit stitch and yarn over loosely on to right needle knitwise, purl 1, pass slipped stitch and yarn over over purl stitch, slip stitch back on left needle, pass slipped stitch and yarn over closest to purl stitch over stitch place back on left needle, slip the remaining stitch over on to right needle (= 2 stitches decreased). CAST-OFF TIP: To avoid a tight cast-off edge you may use a larger needle size. If this also is too tight, work a 1 yarn over after approx. every 4th stitch while casting off (cast off yarn overs as regular stitches). BUTTONHOLES (applies to right band when garment is worn): Decrease for 5 buttonholes on right band. 1 buttonhole = work 2 stitches together and make 1 yarn over. On next row knit yarn over to make hole. Bottom buttonhole should be approx. 2 cm from bottom edge, and top buttonhole where V-neck begins. Place the remaining 4 buttonholes evenly, approx. 8 cm between each buttonhole. ------------------------------------------------------- START THE PIECE HERE: ------------------------------------------------------- JACKET - SHORT OVERVIEW OF THE PIECE: Work yoke back and forth on circular needle from mid front, work top down. AT THE SAME TIME increase V-neck and raglan. Work sleeves in the round on double pointed needles/a short circular needle. Work body back and forth on circular needle. At the end work a neck edge/band around the opening on jacket. Work yoke, body and sleeves in 2 coloured English rib with Air visible on right side and Big Delight visible on wrong side. Work neck edge, bands and rib at the bottom of sleeves and body with Air. NOTE! All numbers of given when working English rib is without yarn overs because yarn overs are counted as 1 stitch together with slipped stitch. YOKE: Cast on 53-55-61-61-61-61 stitches on circular needle size 5 mm with Air. Work 1st row in ENGLISH RIB (back and forth) - read explanation above – from wrong side. When 1st row has been worked, insert 4 markers in the piece without working the stitches, as follows: Count 2 stitches (= front piece), insert 1 marker in next stitch (= raglan stitch), count 11-11-13-13-13-11 stitches (= sleeve), insert 1 marker in next stitch (= raglan stitch), count 23-25-27-27-27-31 stitches (= back piece), insert 1 marker in next stitch (= raglan stitch), count 11-11-13-13-13-11 stitches (= sleeve), insert 1 marker in next stitch (= raglan stitch). 2 stitches remain on front piece after last marker. Continue from 2nd row in ENGLISH RIB (back and forth), AT THE SAME TIME increase for RAGLAN and V-NECK as explained below. REMEMBER THE KNITTING TENSION! RAGLAN: When 5-5-5-5-5-5 rows have been worked in total back and forth with English rib (and next row is worked from right side), increase 2 stitches in knit stitch and yarn over on each side of each of the 4 raglan stitches with marker – read INCREASE TIP-1 (= 16 stitches increase on increase row). Increase like this every 8th-8th-8th-8th-6th-6th row (i.e. every 4th-4th-4th-4th-3rd-3rd row with visible English rib stitches vertically) 8-9-10-11-13-14 times in total vertically. Note that you increase alternately from the right side and from the wrong side in size XXL and XXXL – read INCREASE TIP-2; V-NECK: AT THE SAME TIME when increasing for raglan the 2nd time vertically - increase for V-neck on the same row as the increases for the raglan, begin increase for V-neck. Increase 2 stitches in each side towards mid front - read INCREASE TIP-1 and INCREASE TIP-2 (= 4 stitches increased on every increase row). Do first increase in the 2nd stitch and in the next to last stitch on the row i.e. the first stitch in English rib (knit stitch + yarn over) inside 1 edge stitch in garter stitch towards mid front seen from the right side, - remember the increases are worked alternately from the right side and from the wrong side in size XXL and XXXL. Insert 2 markers between 2 stitches as follows: the first marker after the 3 stitches (including yarn over) at the beginning of the row and 2nd marker before the 3 last stitches (including yarn over) at the end of the row. Let the marker follow piece upwards. Then always increase for v-neck in the 1st stitch inside marker (ie the 4th stitch from the beginning and from the end of row) – so that there is 1 English rib stitch (knit stitch + yarn over) between increase for V-neck and edge stitch towards mid front, seen from the right side. Increase for V-neck 5-5-6-6-6-7 times in total (when increase for V-neck is done, 2-3-3-4-6-6 increases for raglan remain). When all increases for raglan and V-neck are done, there are 201-219-245-261-293-313 stitches on row. Then continue in English rib and 1 edge stitch in garter stitch in each side towards mid front until piece measures 18-20-22-24-26-28 cm from cast-on edge (piece measures approx. 22-24-26-28-30-32 cm from shoulder). Now divide yoke for body and sleeves. I.e. work next row from wrong side as follows: Work 28-30-34-36-40-44 stitches as before (= front piece), slip the next 45-49-55-59-67-69 stitches on 1 stitch holder for sleeve, cast on 9 new stitches on row (= in the side under sleeve), work 55-61-67-71-79-87 stitches as before (= back piece), slip the next 45-49-55-59-67-69 stitches on 1 stitch holder for sleeve, cast on 9 new stitches on row (= in the side under sleeve) and work the 28-30-34-36-40-44 stitches as before (= front piece). Finish body and sleeves separately. NOW MEASURE PIECE FROM HERE! BODY: = 129-139-153-161-177-193 stitches. Continue back and forth in English rib and 1 edge stitch in garter stitch in each side towards mid front as before. Work until piece measures 30 cm from division in all sizes. Switch to circular needle size 4 mm and work with Air until finished measurements. Work rib back and forth (= knit 1/purl 1) with 1 edge stitch in garter stitch in each side as before - on first row knit yarn overs and knit stitches together. When rib measures 4 cm, loosely cast off with knit over knit and purl over purl - read CAST-OFF TIP! Jacket measures approx. 56-58-60-62-64-66 cm from shoulder and down. SLEEVE: Slip the 45-49-55-59-67-69 stitches from stitch holder in one side of piece on double pointed needles or a short circular needle size 5 mm, and pick in addition up 1 stitch in each of the 9 stitches cast on under sleeve = 54-58-64-68-76-78 stitches. Insert 1 marker in the middle of the 9 stitches that were cast on under sleeve. Move the marker upwards when working; it should be used for decrease mid under sleeve. Work ENGLISH RIB (in the round) - read explanation above - and make sure to begin on correct round in pattern so that round with Air is most visible from right side the same way as on yoke. AT THE SAME TIME on 6th round (i.e. on 3rd visible round with English rib stitch) decrease 4 stitches mid under sleeve - read DECREASE TIP (decrease 2 stitches towards the left after stitch with marker, and decrease 2 stitches towards the right before stitch with marker). Decrease like this every 8th-8th-8th-8th-6th-6th round (i.e. every 4th-4th-4th-4th-3rd-3rd visible round with English rib stitch) 4-4-5-6-6-6 times in total vertically = 38-42-44-44-52-54 stitches. Work until sleeve measures 41-40-38-37-36-35 cm from division (approx. 4 cm remain until finished measurements, try the jacket on and work to desired length). Switch to double pointed needles size 4 mm and work with Air until finished measurements. Work rib in the round (= knit 1/purl 1) - on first round knit yarn overs together with knit stitches. When rib measures 4 cm, cast off with knit over knit and purl over purl - remember CAST-OFF TIP! Sleeve measures approx. 45-44-42-41-40-39 cm from division. Work the other sleeve the same way. BAND + NECK EDGE: Insert 1 marker mid back of neck on back piece, marker is used to calculate half the stitches on band/neck edge. Pick up band inside 1 edge stitch in garter stitch on front pieces, and in the 1st row worked around the neck. Begin at the bottom on right front piece from right side with circular needle size 4 mm and pick up approx. 119-125-131-137-143-149 stitches along the entire front edge up to marker in the neck. Continue to pick up approx. 120-126-132-138-144-150 stitches along the entire front edge on left front piece, total number of stitches should be divisible by 2 + 1 = approx. 239-251-263-275-287-299 stitches. It is important that the rib is not too loose with too many stitches but it should not be too tight either with tight front edges. Work next row as follows from wrong side: 2 stitches in garter stitch, * purl 1, knit 1 *, repeat from *-* until 3 stitches remain, purl 1 and finish with 2 stitches in garter stitch. Continue rib like this. When piece measures 1½ cm, decrease for BUTTONHOLES on right band - read explanation above. Continue like this until rib measures 3 cm. Loosely cast off with knit over knit and purl over purl - remember CAST-OFF TIP. ASSEMBLY: Sew the buttons on to the left band. |
|

|
|
|
Have you made this or any other of our designs? Tag your pictures in social media with #dropsdesign so we can see them! Do you need help with this pattern?You'll find tutorial videos, a Comments/Questions area and more by visiting the pattern on garnstudio.com. © 1982-2024 DROPS Design A/S. We reserve all rights. This document, including all its sub-sections, has copyrights. Read more about what you can do with our patterns at the bottom of each pattern on our site. |
|


With over 40 years in knitting and crochet design, DROPS Design offers one of the most extensive collections of free patterns on the internet - translated to 17 languages. As of today we count 304 catalogues and 11422 patterns - 11422 of which are translated into English (UK/cm).
We work hard to bring you the best knitting and crochet have to offer, inspiration and advice as well as great quality yarns at incredible prices! Would you like to use our patterns for other than personal use? You can read what you are allowed to do in the Copyright text at the bottom of all our patterns. Happy crafting!
Comments / Questions (7)
Can I do the double knitted band for this pattern?
07.03.2024 - 06:30DROPS Design answered:
Dear Maryam, probably if you are familiar to this technique you might be able to adapt it to this pattern, otherwise rather work the bands as explained here. Happy knitting!
07.03.2024 - 08:14Så jag har tolkat mönstret. Lägg upp maskor sticka helpatent VARV 1-5 och börja öka för Raglan på varv 6 ( dvs. VARV 2 I helpatentmönsteret) försökt räkna på olika sätt och finner mönstret något oklart. För de större storlekarna borde man då sticka VARV 1-4, sen VARV 5 och öka på 6e. På de mindre stickar man ett varv mindre... annars får man ju vänta tills varv 10 innan man börjar med Raglan. Får se hur det går...ser ut som bilden än så länge i alla fall.
24.02.2023 - 22:10Ref mitt og Marits spørsmål, så tror jeg det står litt feil, eller misvisende, i teksten. I påvente av svar testet jeg etter min forståelse, altså at når det står "6 pinner frem og tilbake" ble "frem og tilbake" telt som 1 pinne, altså 12 pinner og det ble seende ut som bildet i oppskriften.. Dersom man teller 6 enkle pinner får man problemet Marit beskriver, at man noen ganger må øke på en vrangpinne. I tillegg vil økningene bli for ofte i forhold til hvordan bildet ser ut.
03.09.2022 - 08:58Hei! Bare for å være HELT sikker: Når dere skriver under RAGLAN: Når det er strikket totalt 6-6-6-6-4-4 pinner frem og tilbake med helpatent, så teller frem og tilbake som 1, slik at det da strikkes 12 eller 8 pinner totalt, 6 og 4 av hvert garn? Må ha dette inn med teskje når man skal holde styr på alle økningene :)
01.09.2022 - 11:18DROPS Design answered:
Hej Birgitte, nej du tæller hver pind, så skriver vi 6 pinde så er det 6 pinde :)
02.09.2022 - 14:28Det står at alle økninger skal gjøres fra retten. Samtidig står det for det største størrelsene at man skal øke på hver 6. pinne (dvs på hver 3. pinne med synlige patentmasker i høyden). Betyr ikke dette at man må øke på vrangsiden annenhver gang?
05.02.2021 - 17:01DROPS Design answered:
Hei Marit, Økningene er alltid fra retten, hver 6. pinne. Det med synlige patentmasker er fordi med patentstrikk synes ikke radene på samme måten som i vanlig glattstrikk. Håper dette hjelper og god fornøyelse!
09.02.2021 - 07:47Beste lezer heel fijn zijn de videoinstructies die ik echt nodig had bij het patroon. Wat lastig was voor mij, en wellicht voor veel Nederlandse breisters is dat de videoinstructies van de engelsepatensteek allemaal worden uitgevoerd door breisters die een andere dan de nederlandse manier van breien hebben. Ze hebben de draad waarmee je breit over de links ipv rechtse hand. Dit maakt het begrijpen van de video's ( rondbreien, meerderen en minderen engelsepatensteek ) lastig voor mij
24.01.2021 - 13:27Jeg har nettopp startet å strikke Dancing Aurora jacket. Jeg lurer på hvordan de fire merkemaskene skal strikkes?
21.12.2020 - 15:24