DROPS Air
DROPS Air
65% Alpaca, 28% Polyamide, 7% Wool
from 6.45 $ /50g
DROPS Brushed Alpaca Silk
77% Alpaca, 23% Silk
from 3.95 $ /25g
Get the yarn to make this pattern from 52.00$.

The yarn cost is calculated from the pattern’s smallest size and the yarn’s cheapest product type. Looking for an even better price? You might find it on the DROPS Deals!

DROPS SS24

Birch Grove

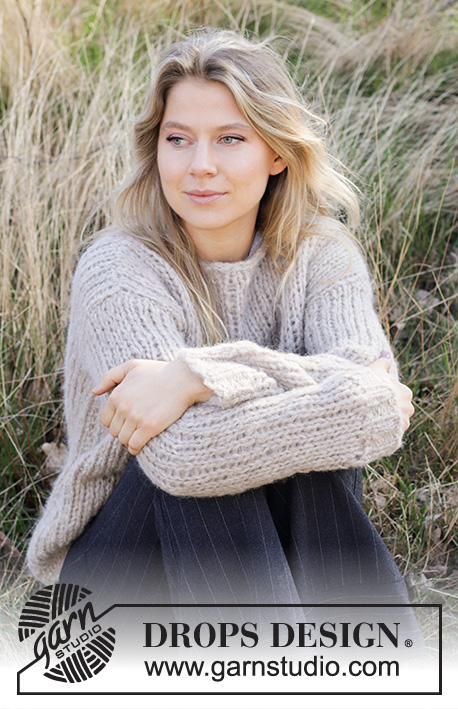
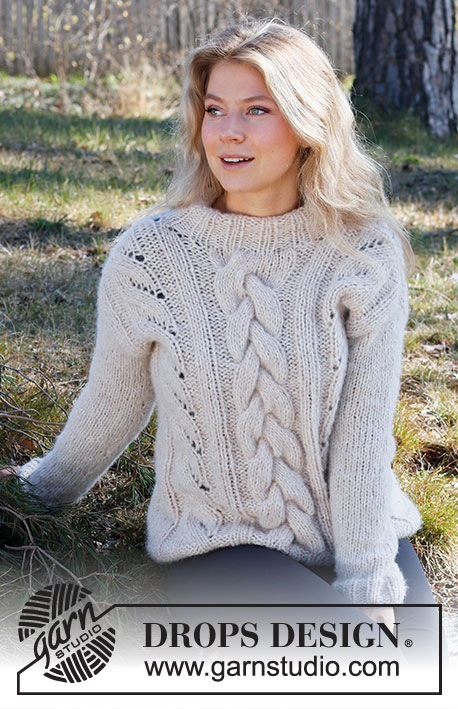
Knitted sweater in DROPS Air and DROPS Brushed Alpaca Silk. The piece is worked with cables and rib. Sizes S - XXXL.

DROPS 218-34
DROPS Design: Pattern no ai-284
Yarn group C + C or E
-------------------------------------------------------

SIZES:
S - M - L - XL - XXL – XXXL

Finished measurements:
Chest measurements: 100-110-116-126-138-150 cm = 39 3/8”-43 3/8”-45 3/4”-49 1/2”-54 1/4”-59”
Full length: 58-60-62-64-66-68 cm = 22 3/4"-23 5/8"-24 3/8"-25 1/4"-26"-26 3/4"

All measurements in charts are in cm.

MATERIALS:
DROPS AIR from Garnstudio (belongs to yarn group C)
250-250-250-300-300-350 g color 02, wheat
and use:
DROPS BRUSHED ALPACA SILK from Garnstudio (belongs to yarn group C)
125-150-150-175-200-200 g color 04, light beige

KNITTING GAUGE:
11 stitches in width and 15 rows in height with stockinette stitch and 1 strand in each quality (= 2 strands) = 10 x 10 cm = 4” x 4”.

NEEDLES:
DROPS DOUBLE POINTED NEEDLES SIZE 8 MM = US 11.
DROPS CIRCULAR NEEDLE SIZE 8 MM = US 11: Length 40 cm = 16” and 60 cm = 24” or 80 cm = 32” for stockinette stitch.
DROPS DOUBLE POINTED NEEDLES SIZE 7 MM = US 10,75.
DROPS CIRCULAR NEEDLE SIZE 7 MM = US 10,75: Length 40 cm = 16” and 80 cm = 32” for rib.
DROPS CABLE NEEDLE – for cables.
Needle size is only a guide. If you get too many stitches on 10 cm = 4”, change to a larger needle size. If you get too few stitches on 10 cm = 4”, change to a smaller needle size.

-------------------------------------------------------

Alternative Yarn – See how to change yarns here
Yarn Groups A to F – Use the same pattern and change the yarn here
Yarn usage using an alternative yarn – Use our yarn converter here

-------------------------------------------------------

DROPS Air
DROPS Air
65% Alpaca, 28% Polyamide, 7% Wool
from 6.45 $ /50g
DROPS Brushed Alpaca Silk
77% Alpaca, 23% Silk
from 3.95 $ /25g
Get the yarn to make this pattern from 52.00$.

The yarn cost is calculated from the pattern’s smallest size and the yarn’s cheapest product type. Looking for an even better price? You might find it on the DROPS Deals!

Pattern instructions

NOTE: This pattern is written in American English. All measurements in charts are in cm. For conversion from inches to cm - click here. There are different terms for crocheting in American and British English. If this pattern includes crochet, click for "crochet terms" here. For this pattern in British English, please click here.
-------------------------------------------------------

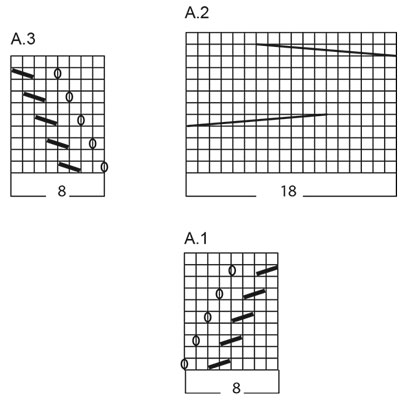
EXPLANATIONS FOR THE PATTERN:

-------------------------------------------------------

RIDGE/GARTER STITCH (worked back and forth):
Knit all rows.
1 ridge in height = Knit 2 rows.

PATTERN:
See diagrams A.1, A.2 and A.3.

KNITTING TIP:
When binding off for the armholes it is important to bind off on an odd row in the diagram; this avoids having to work cables from the wrong side when working the piece back and forth.

DECREASE TIP (for sleeve):
Decrease 1 stitch on either side of the marker thread as follows: Work until there are 3 stitches left before the marker thread, knit 2 together, knit 2 (marker thread sits between these 2 stitches), slip 1 stitch as if to knit, knit 1 and pass the slipped stitch over the knitted stitch.

-------------------------------------------------------

START THE PIECE HERE:

-------------------------------------------------------

SWEATER – SHORT OVERVIEW OF THE PIECE:
The body is worked in the round with circular needle, bottom up as far as the armholes. Stitches are bind off for the armholes. Then the front and back pieces are finished separately, back and forth with circular needle. The shoulder seams are sewn and stitches knitted up around the armholes for the sleeves. The sleeves are worked in the round, top down. The neck is worked to finish. The whole garment is worked with 1 strand Air and 1 strand Brushed Alpaca Silk.

BODY:
Cast on 120-120-136-136-152-168 stitches with circular needle size 7 mm = US 10,75 and 1 strand Air and 1 strand Brushed Alpaca Silk. Knit 1 round, then work rib in the round as follows: Knit 1, * purl 2, knit 2 *, repeat from *-* over the next 4-4-8-8-12-16 stitches, purl 3, knit 2, purl 4, knit 2, purl 3, knit 3, purl 3, knit 2, purl 2, knit 2, purl 2, knit 2, purl 3, knit 3, purl 3, knit 2, purl 4, knit 2, purl 3, * knit 2, purl 2 *, repeat from *-* over the next 8-8-16-16-24-32 stitches, knit 2, purl 3, knit 2, purl 4, knit 2, purl 3, knit 3, purl 3, knit 2, purl 2, knit 2, purl 2, knit 2, purl 3, knit 3, purl 3, knit 2, purl 4, knit 2, purl 3, * knit 2, purl 2 *, repeat from *-* over the next 4-4-8-8-12-16 stitches, knit 1. Continue this rib for 6 cm = 2 3/8”, change to circular needle size 8 mm = US 11 and continue as follows: Stockinette stitch over the first 5-5-9-9-13-17 stitches, AT THE SAME TIME as the number of stitches is adjusted to 3-5-7-10-13-16 stitches, purl 3, A.1 (= 8 stitches), purl 3, knit 3, purl 3, work A.2 (= 18 stitches) over the next 10 stitches, AT THE SAME TIME as you increase 8 stitches evenly over these stitches, purl 3, knit 3, purl 3, A.3 (= 8 stitches), purl 3, stockinette stitch over the next 10-10-18-18-26-34 stitches, AT THE SAME TIME as the number of stitches is adjusted to 6-10-14-20-26-32 stitches, purl 3, A.1 (= 8 stitches), purl 3, knit 3, purl 3, work A.2 (= 18 stitches) over the next 10 stitches, AT THE SAME TIME as you increase 8 stitches evenly over these stitches, purl 3, knit 3, purl 3, A.3 (= 8 stitches), purl 3, stockinette stitch over the next 5-5-9-9-13-17 stitches, AT THE SAME TIME as the number of stitches is adjusted to 3-5-7-10-13-16 stitches = 128-136-144-156-168-180 stitches. Continue this pattern until the piece measures 40-41-42-43-44-45 cm = 15 3/4”-16 1/8”-16 1/2”-17”-17 1/4”-17 3/4”. REMEMBER THE KNITTING GAUGE!
Now bind off for the armholes; remember to do this on an odd round in A.1, A.2 and A.3 – read KNITTING TIP; work the next round as follows:
Bind off 2 stitches for the armhole, work as before over the next 60-64-68-74-80-86 stitches, bind off 4 stitches for the armhole, continue as before over the next 60-64-68-74-80-86 stitches and bind off the last 2 stitches for the armhole. Cut the strand.
The back and front pieces are finished separately, back and forth on the needle.

BACK PIECE:
= 60-64-68-74-80-86 stitches. Start from the wrong side and continue the pattern back and forth with 1 edge stitch in GARTER STITCH on each side – read description above.
When the piece measures 54-56-58-60-62-64 cm = 21 1/4"-22"-22 3/4"-23 5/8"-24 3/8"-25 1/4", decrease 8 stitches evenly over the 18 stitches in A.2 = 52-56-60-66-72-78 stitches left. On the next row bind off the middle 16-18-18-18-20-20 stitches for the neck and each shoulder is finished separately. Continue the pattern and bind off 1 stitch on the next row from the neck = 17-18-20-23-25-28 stitches left on the shoulder. Continue working until the piece measures 58-60-62-64-66-68 cm = 22 3/4"-23 5/8"-24 3/8"-25 1/4"-26"-26 3/4". Loosely bind off with knit from the right side. Work the other shoulder in the same way.

FRONT PIECE:
= 60-64-68-74-80-86 stitches. Start from the wrong side and continue the pattern back and forth with 1 edge stitch in garter stitch on each side.
When the piece measures 52-54-56-58-60-62 cm = 20 1/2"-21 1/4"-22"-22 3/4"-23 5/8"-24 3/8", decrease 8 stitches evenly over the 18 stitches in A.2 = 52-56-60-66-72-78 stitches left. On the next row place the middle 10-12-12-12-14-14 stitches on 1 thread for the neck and each shoulder is finished separately. Continue the pattern and bind off for the neck at the beginning of each row from the neck as follows: Bind off 2 stitches 1 time and 1 stitch 2 times = 17-18-20-23-25-28 stitches left on the shoulder. Continue working until the piece measures 58-60-62-64-66-68 cm = 22 3/4"-23 5/8"-24 3/8"-25 1/4"-26"-26 3/4". Loosely bind off with knit from the right side. Work the other shoulder in the same way.

ASSEMBLY:
Sew the shoulder seams inside the bind-off edge.

SLEEVE:
Knit up stitches around the one armhole, starting where stitches were bind off for the armhole. Knit up from the right side 40-42-44-46-48-50 stitches inside the 1 stitch, with circular needle size 8 mm = US 11, 1 strand Air and 1 strand Brushed Alpaca Silk. Insert 1 marker thread mid under the sleeve. Work stockinette stitch in the round. When the sleeve measures 2-2-2-3-3-3 cm = 3/4”-3/4”-3/4”-1 1/8”-1 1/8”-1 1/8”, decrease 2 stitches mid under the sleeve – read DECREASE TIP. Decrease like this every 8-6-5½-6-5-5 cm = 3 1/8”-2 3/8”-2 1/8”-2 3/8”-2”-2” a total of 6-7-8-7-8-7 times = 28-28-28-32-32-36 stitches.
Continue working until the sleeve measures 46-45-44-42-41-39 cm = 18”-17 3/4”-17 1/4”-16 1/2”-16 1/8”-15 1/4”, (there is approx. 4 cm = 1 1/2” left to finished length; you can try the sweater on and work to desired length).
Change to double pointed needles size 7 mm = US 10,75 and work rib (= knit 2 / purl 2) for 4 cm = 1 1/2”. Loosely bind off with knit. The sleeve measures approx. 50-49-48-46-45-43 cm = 19 3/4”-19 1/4”-19”-18”-17 3/4”-17” from where you knitted up stitches. Work the other sleeve in the same way.

NECK:
Knit up from the right side approx. 40 to 52 stitches around the neck (including the stitches from the thread in front) with short circular needle size 7 mm = US 10,75, 1 strand Air and 1 strand Brushed Alpaca Silk. Work rib in the round (= knit 2 / purl 2) for 12 cm = 4 3/4”. Bind off with knit over knit and purl over purl. Fold the top of the neck to the wrong side and sew down, so there is a folded edge. To avoid the folded edge being tight and rolling down, it is important that the seam is elastic.

Diagram

All measurements in charts are in cm.

symbols = knit from the right side, purl from the wrong side
symbols = between 2 stitches make 1 yarn over
symbols = knit 2 together
symbols = slip 1 stitch as if to knit, knit 1 and pass the slipped stitch over the knitted stitch
symbols = place 6 stitches on cable needle at the back of piece, knit 6 and knit 6 from cable needle
symbols = place 6 stitches on cable needle in front of piece, knit 6 and knit 6 from cable needle
diagram
diagram

Each of our patterns has specific tutorial videos to help you.

Do you have a question? See a list of frequently asked questions (FAQ)

Knitting tension is what determines the final measurements of your work, and is usually measured per 10 x 10 cm. It is provided like so: number of stitches in width x number of rows in height - eg: 19 stitches x 26 rows = 10 x 10 cm.

The knitting tension is very individual; some people knit/crochet loosely while others work tightly. You adjust the knitting tension with the needle size, which is why the suggested needle size only serve as a guide! You need to adjust this (up or down) to ensure that YOUR knitting tension matches the knitting tension provided in the pattern. If you work with a different knitting tension than provided you will have a different yarn consumption, and your work will have different measurements than what the pattern suggests.

The knitting tension also determines which yarns can replace each other. As long as you achieve the same knitting tension you can replace one yarn with another.

See DROPS lesson: How to measure your tension/gauge

See DROPS video: How to make a gauge tension swatch

The required amount of yarn is provided in grams, eg: 450 g. To calculate how many balls you’ll need you first need to know how many grams are in 1 ball (25g, 50g or 100g). This information is available if you click on the individual yarn quality on our pages. Divide the amount required with the amount of each ball. For example, if each ball is 50g (the most common amount), the calculation will be as follows: 450 / 50 = 9 balls.

The important thing when changing from one yarn to another is that the knitting/crochet tension remains the same. This is so that the measurements of the finished piece will be the same as on the sketch provided. It is easier to achieve the same knitting tension using yarns from the same yarn group. It is also possible to work with multiple strands of a thinner yarn to achieve the knitting tension of a thicker one. Please try our yarn converter. We recommend you to always work a test swatch.

Please NOTE: when changing yarn the garment might have a different look and feel to the garment in the photo, due to individual properties and qualities of each yarn.

See DROPS lesson: Can I use a different yarn than the one mentioned in the pattern?

All our yarns are categorised into yarn groups (from A to F) according to thickness and knitting tension – group A contains the thinnest yarns and group F the thickest. This makes it easier for you to find alternative yarns to our patterns, should you wish to switch yarn. All yarns within the same group have a similar knitting tension and can easily replace each other. However, different yarn qualities have different structures and properties which will give the finished work a unique look and feel.

Click here for an overview of the yarns in each yarn group

At the top of all our patterns you’ll find a link to our yarn converter, which is a helpful tool should you wish to use a different yarn than suggested. By filling in the yarn quality you wish to replace, the amount (in your size) and number of strands, the converter will present good alternative yarns with the same knitting tension. Additionally it will tell you how much you’ll require in the new qualities and whether you’ll need to work with multiple strands. Most skeins are 50g (some are 25g or 100g).

If the pattern is worked with multiple colours, every colour will have to be converted separately. Similarly, if the pattern is worked with several strands of different yarns (for example 1 strand Alpaca and 1 strand Kid-Silk) you will have to find alternatives for each, individually.

Click here to see our yarn converter

Since different yarns have different qualities and textures we have chosen to keep the original yarn in our patterns. However, you can easily find options among our available qualities by using our yarn converter, or simply pick a yarn from the same yarn group.

It is possible that some retailers still have discontinued yarns in stock, or that someone has a few skeins at home that they would like to find patterns for.

The yarn converter will provide both alternative yarn as well as required amount in the new quality.

If you think it's hard to decide what size to make, it can be a good idea to measure a garment you own already and like the size of. Then you can pick the size by comparing those measures with the ones available in the pattern's size chart.

You'll find the size chart at the bottom of the pattern.

See DROPS lesson: How to read size chart

The needle size provided in the pattern serves only as a guide, the important thing is to follow the knitting tension. And since knitting tension is very individual, you will have to adjust the needle size to ensure that YOUR tension is the same as in the pattern – maybe you’ll have to adjust 1, or even 2 needle sizes, up or down to achieve the correct tension. For this, we recommend that you work test swatches.

Should you work with a different knitting tension than the one provided, the measurements of the finished garment might deviate from the measurement sketch.

See DROPS lesson: How to measure your tension/gauge

See DROPS video: How to make a gauge tension swatch

Working a garment top-down provides more flexibility and room for personal adjustment. For example it is easier to try the garment on while working, as well as making adjustments to length of yoke and shoulder caps.

The instructions are carefully explaining every step, in the correct order. Diagrams are adjusted to the knitting direction and are worked as usual.

The diagram depicts all rows/rounds, and every stitch seen from the right side. It is read from bottom to top, from right to left. 1 square = 1 stitch.

When working back and forth, every other row is worked from the right side and every other row is worked from the wrong side. When working from the wrong side, the diagram will have to be worked reversed: from left to right, knit stitches are purled, purl stitches are knit etc.

When working in the round every round is worked from the right side and the diagram are worked from right to left on all rounds.

See DROPS lesson: How to read knitting diagrams

The diagram depicts all rows/rounds, and every stitch seen from the right side. It is worked from bottom to top, from right to left.

When working back and forth every other row is worked from the right side: from right to left and every other row is worked from the wrong side: from left to right.

When working in the round, every row in the diagram are worked from the right side, from right to left.

When working a circular diagram you start in the middle and work your way outwards, counter clockwise, row by row.

The rows usually start with a given number of chain stitches (equivalent to the height of the following stitch), this will either be depicted in the diagram or explained in the pattern.

See DROPS lesson: How to read crochet diagrams

Instructions for working several diagrams after each other on the same row/round, will often be written like so: “work A.1, A.2, A.3 a total of 0-0-2-3-4 times". This means you work A.1 once, then A.2 is worked once, and A.3 is repeated (in width) the number of times provided for your size – in this case like so: S = 0 times, M = 0 times, L=2 times, XL= 3 times and XXL = 4 times.

The diagrams are worked as usual: begin with the first row in A.1, then work the first row in A.2 etc.

See DROPS lesson: How to read knitting diagrams

See DROPS lesson: How to read crochet diagrams

The total width of the garment (from wrist-to-wrist) will be larger in the larger sizes, despite the actual sleeves being shorter. The larger sizes have longer sleeve caps and wider shoulders, so there will be a good fit in all sizes.

The measurement sketch/schematic drawing provides information regarding the full length of the garment. If it’s a jumper or a jacket the length is measured from the highest point on the shoulder (usually closest to the neckline), and straight down to the bottom of the garment. It is NOT measured from the tip of shoulder. Similarly, the length of yoke is measured from the highest point on the shoulder and down to where yoke is split into body and sleeves.

See DROPS lesson: How to read a schematic drawing

Diagrams are often repeated on the round or in height. 1 repeat is the diagram the way it appears in the pattern. If it says to work 5 repeats of A.1 in the round, then you work A.1 a total of 5 times after/next to each other in the round. If it says to work 2 repeats of A.1 vertically/in height you work the entire diagram once, then begin again at the start and work the entire diagram one more time.

Chain stitches are slightly narrower than other stitches and to avoid working the cast-on edge too tight, we simply chain more stitches to begin with. The stitch count will be adjusted on the following row to fit the pattern and measurement sketch.

The rib edge is more elastic and will contract slightly compared to, for example, stocking stitch. By increasing before the rib edge, you avoid a visible difference in width between the rib edge and the rest of the body.

It’s very easy to cast off too tightly, and by making yarn overs while casting off (and simultaneously casting these off) you avoid a too tight cast off edge.

See DROPS video: How to bind off with yarn overs (yo)

To achieve an even increase (or decrease) you can increase on, for example: every 3rd and 4th row alternately, like so: work 2 rows and increase on the 3rd row, work 3 rows and increase on the 4th. Repeat this until the increase is complete.

See DROPS lesson: Increase or decrease 1 st on every 3rd and 4th row alternately

Should you prefer to work in the round instead of back and forth, you may of course adjust the pattern. You’ll need to add steeks mid-front (usually 5 stitches), and follow the instructions. When you would normally turn and work from the wrong side, simply work across the steek and continue in the round. At the end you’ll cut the piece open, pick up stitches to work bands, and cover the cut edges.

See DROPS video: How to knit steeks and cut open

Should you prefer to work back and forth instead of in the round, you may of course adjust the pattern so you work the pieces separately and then assemble them at the end. Divide the stitches for the body in 2, add 1 edge stitch in each side (for sewing) and work the front and back pieces separately.

See DROPS lesson: Can I adapt a pattern for circular needles into straight needles?

Pattern repeats can vary slightly in the different sizes, in order to get the correct proportions. If you’re not working the exact same size as the garment in the photo, yours might deviate slightly. This has been carefully developed and adjusted so that the complete impression of the garment is the same in all sizes.

Make sure to follow instructions and diagrams for your size!

If you have found a pattern you like which is available in women’s size it’s not very difficult to convert it to men’s size. The biggest difference will be the length of sleeves and body. Start working on the women size that you think would fit across the chest. The additional length will be worked right before you cast off for the armhole/sleeve cap. If the pattern is worked top-down you can add the length right after the armhole or before the first decrease on sleeve.

Regarding additional yarn amount, this will depend on how much length you add, but it is better with a skein too many than too few.

All yarns will have excess fibres (from production) that might come off as lint or shedding. Brushed yarns (ie hairier yarns) have more of these loose, excess fibres, causing more shedding.

Shedding also depends on what is worn under or over the garment, and whether this pulls at the yarn fibres. It’s therefore not possible to guarantee that there will be no shedding

Below are some tips on how to get the best result when working with hairier yarns:

1. When the garment is finished (before you wash it) shake it vigorously so the looser hairs come off. NOTE: do NOT use a lint roller, brush or any method that pulls at the yarn.

2. Place the garment in a plastic bag and put it in your freezer - the temperature will cause the fibres to become less attached to each other, and excess fibres will come off easier.

3. Leave in the freezer for a few hours before taking it out and shaking it again.

4. Wash the garment according to the instructions on the yarn label.

Pilling is a natural process that happens to even the most exclusive of fibers. It's a natural sign of wear and tear that is hard to avoid, and that is most visible in high friction areas of your garment like a sweater's arms and cuffs.

You can make your garment look as new by removing the pilling, using a fabric comb or a pill/lint remover.

Still can't find the answer you need? Then scroll down and leave your question so one of our experts can try to help you. This will be done normally within 5 to 10 working days.
In the meantime, you can read the questions and answers that others have left to this pattern or join the DROPS Workshop on Facebook to get help from fellow knitters/crocheters!

You might also like...

Post a comment to pattern DROPS 218-34

We would love to hear what you have to say about this pattern!

If you want to leave a question, please make sure you select the correct category in the form below, to speed up the answering process. Required fields are marked *.

Comments / Questions (17)

country flag Laura wrote:

Thank you for the response I understand where I went wrong. Last question; we only increase A.2 by 8 stitches on that first time around? For subsequent rounds we should ignore the ‘At the same time’ instructions?

19.02.2024 - 00:12

DROPS Design answered:

Hi Laura, Yes, you only do the extra increases on the first round of the pattern, then continue without further increases as described in the text. Happy knitting!

19.02.2024 - 06:48

country flag Laura wrote:

Hello! I just finished the first round of the body section where I’m now at 128 stitches. But I have 14 of those stitches past my initial round-start stitch marker…in other words…114 stitches gets me to my starter stitch marker, and the other 14 stitches are past my stitch marker into the next round. Is that right? I’ve never knitted a patterned Jumper before so not sure.

18.02.2024 - 04:25

DROPS Design answered:

Dear Laura, you should have 128 stitches in the round, not 114 and 14 extra. Remember than when working the round if it says: "Stocking stitch over the first 5-5-9-9-13-17 stitches, AT THE SAME TIME as the number of stitches is adjusted to 3-5-7-10-13-16 stitches" it means that you work 2 decreases in the next 5 stitches, so you should have 3 stitches in stocking stitch remaining. The same would happen if you increase AT THE SAME TIME: "work A.2 (= 18 stitches) over the next 10 stitches, AT THE SAME TIME as you increase 8 stitches evenly over these stitches" means that you increase 8 stitches in order to work A.2. Happy knitting!

18.02.2024 - 23:04

country flag Aurélie Labrecque wrote:

Bonjour, J’ai une question concernant les jetés présents sur les diagrammes. Lorsqu’on fait un jeté entre 2, est-ce qu’on tricote le jeté sur le tour suivant? Si oui, on le tricote à l’endroit ou à l’envers. Aussi, j’ai l’impression que ça aurait comme incidence de décaler les diagrammes et que ma lecture de ces derniers ne sera pas exacte. Merci!

08.07.2023 - 00:08

DROPS Design answered:

Bonjour Aurelie, en travaillant en rond (le debut de votre ouvrage): au tour suivant, les jetes sont tricotes normallement (pas torse) a l'endroit (il y a un trou bien visible). Si vous travaillez en allers et retours (dos et devant separement), les jetes sont tricotes normallement (pas torse) a l'envers, au rang suivant (sur l'envers). Bon tricot!

25.07.2023 - 12:38

country flag CMJI De Veer wrote:

Het is gelukt. Voor de kleinste maat S hoef je geen herhaling te breien. Het wordt erg mooi.

11.02.2021 - 14:08

country flag CMJI De Veer wrote:

Uit het Franse antwoord maak ik op dat er geen herhaling in zit maar dat je bij maat S het moet lezen als “breien “ ipv “herhalen” en dan klopt het precies. Ik heb alle aantallen steken onder elkaar gezet als hulpmiddel. De rest van het patroon ook gepuzzeld. Daar waar TEGELIJKERTIJD tijd staat moet je het letter doen. Rugpand en voorpand: aan het eind en begin 2 steken minderen en aan beide kanten in het midden 8 steken meerderen voor het kabel patroon. Ook dat klopt helemaal.

07.02.2021 - 00:51

country flag CMJI De Veer wrote:

120 steken opzetten. Als je de boordsteek van het lijf volgt en alle steken telt dan zijn dat veel meer steken dan 120. Wat moet het zijn?

06.02.2021 - 17:02

DROPS Design answered:

Dag CMJI De Veer,

Heb het nageteld en ik kom precies op 120 steken. Er staat 3 keer iets tussen sterretjes wat je moet herhalen. Het aantal herhalingen is het totaal, dus als er staat dat je 2 averecht, 2 recht moet breien en dit 4 keer moet herhalen, dan doe je het in totaal 4 keer en niet 6 keer. Misschien dat dit het verschil maakt.

11.02.2021 - 13:52

country flag Loredana wrote:

Buongiorno, mi sembra di capire che il treccione va eseguito anche sul dietro, è esatto? Grazie

30.12.2020 - 12:02

DROPS Design answered:

Buongiorno Loredana, esatto: il motivo A.2 è lavorato sia sul davanti che sul dietro. Buon lavoro!

30.12.2020 - 12:13

country flag Nina Wiggen Skaret wrote:

Jeg forstår vrangborden nå.. Hadde det med gjentagelsene vært skrevet på en annen måte hadde det vært lettere å forstå 😊 Hverken jeg eller mormor, som har strikket i mange år forstår ikke helt det som står videre på bolen

23.11.2020 - 13:21

country flag Nina Wiggen Skaret wrote:

Jeg har justert maskeantallet på vrangborden etter mønsteret og får da 164 masker (XXL) vrangborden er ferdig, men jeg forstår ikke helt mønsteret videre. Hva menes med å justere maskeantallet? Og skal det økes 8 masker hver runde, blir den ikke veldig vid til slutt da? Mønsteret videre har liksom ingen sammenheng med vrangborden, får ingenting til å stemme..

22.11.2020 - 20:44

DROPS Design answered:

Hei Nina, Justering varierer avhengig av størrelsen. Din størrelse, strikker du: Glattstrikk over 13 masker (ingen endring), 3 vrang, A.1, 3 vrang, 3 rett, 3 vrang, A.2, over 10 masker, som økes til 18, 3 vrang, 3 rett, 3 vrang, A.3, 3 vrang, glattstrikk over 26 masker (ingen endring), 3 vrang, A.1, 3 vrang, 3 rett, 3 vrang, A.2, over 10 masker, som økes til 18, 3 vrang, 3 rett, 3 vrang, A.3, 3 vrang, glattstrikk over 13 masker, (ingen endring). Håper dette hjelper og god fornøyelse!

23.11.2020 - 13:32

country flag Jennifer wrote:

Bonjour, j’ai un souci à la réalisation de ce magnifique pull. Je fais le modèle en M (120 mailles pour dos et devant). Lorsque que je compte le nombre de mailles pour le motif des cotes je trouve 132 mailles à tricoter... je ne comprends pas... y aurait-il une erreur ? Merci de vos explications. Hâte de me remettre à l’ouvrage. Cordialement Jennifer

20.11.2020 - 22:57

DROPS Design answered:

Bonjour Jennifer, le mot "répéter" a été modifié par "tricoter", en fait vous devez tricoter soit 1 fois *2 m end, 2 m env* au-dessus des 4 mailles suivantes soit 2 fois *2 m end, 2 m env* au-dessus des 8 mailles suivantes, ainsi, vous aurez bien 120 et non 132 m. Bon tricot!

23.11.2020 - 11:08