
Popular categories
Looking for a yarn?


|
||||||||||||||||||||||||||||
Columns of Valhalla Jacket |
||||||||||||||||||||||||||||
 |
 |
|||||||||||||||||||||||||||
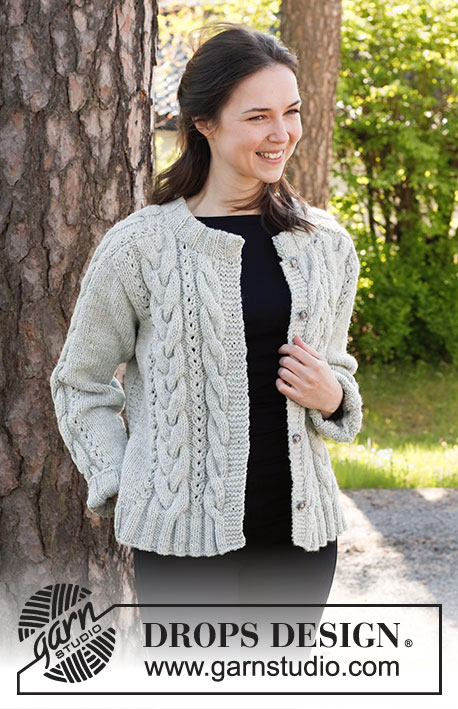
Knitted jacket in DROPS Alaska. The piece is worked with saddle shoulders, cables and split in the sides. Sizes S - XXXL.
DROPS 217-16 |
||||||||||||||||||||||||||||
|
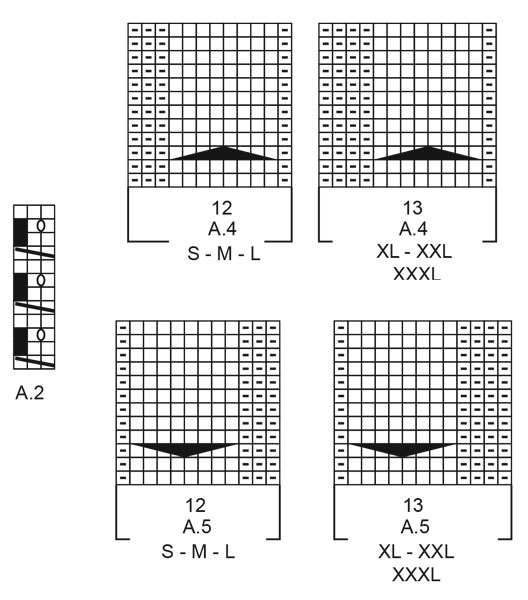
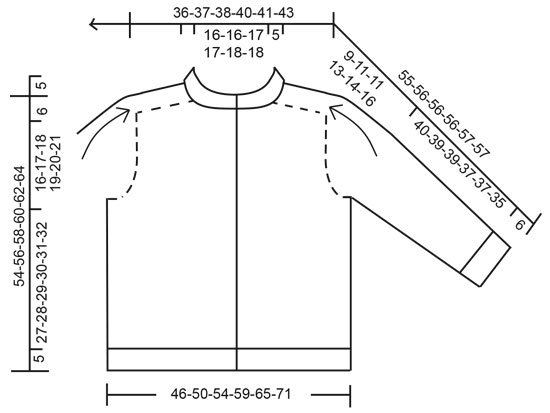
------------------------------------------------------- EXPLANATIONS FOR THE PATTERN: ------------------------------------------------------- RIDGE/GARTER STITCH (worked back and forth): Knit all rows. 1 ridge in height = Knit 2 rows. PATTERN: See diagrams A.1 to A.5. Choose diagram for your size (applies to A.3, A.4 and A.5). A.1 applies to sizes XL, XXL and XXXL. DECREASE TIP (evenly spaced): To work out how to decrease evenly, count the number of stitches to be decreased over (e.g. 14 stitches) and divide by the number of decreases to be made (e.g. 3) = 4.6. In this example decrease by knitting together alternately each 3rd and 4th and each 4th and 5th stitch (approx.). INCREASE TIP: Increase 1 stitch on each side of the marker thread as follows: Work until there are 2 stitches left before the marker thread, make 1 yarn over, knit 4 (marker thread sits in the middle of these 4 stitches), 1 yarn over. On the next round knit the yarn overs twisted to avoid holes. BUTTONHOLES: Work buttonholes on the right band. 1 BUTTONHOLE = Knit together the third and fourth stitch from the edge and make 1 yarn over. On the next row knit the yarn over = hole. Work buttonholes when the piece measures: S: 7, 16, 26, 35 and 45 cm = 2¾", 6¼", 10¼", 13¾" and 17¾". M: 7, 17, 27, 37 and 47 cm = 2¾", 6¾", 10⅝", 14½" and 18½". L: 6, 14, 23, 31, 40 and 48 cm = 2⅜", 5½", 9", 12¼", 15¾" and 19". XL: 5, 14, 23, 32, 41 and 50 cm = 2", 5½", 9", 12½", 16⅛" and 19¾". XXL: 6, 15, 24, 33, 42 and 51 cm = 2⅜", 6", 9½", 13", 16½" and 20". XXXL: 6, 15, 25, 34, 44 and 53 cm = 2⅜", 6", 9¾", 13⅜", 17¼" and 21". ------------------------------------------------------- START THE PIECE HERE: ------------------------------------------------------- JACKET – SHORT OVERVIEW OF THE PIECE: The piece is worked in sections which are sewn together to finish. The front and back pieces are worked back and forth with circular needle. The sleeves are worked in the round with double pointed needles/short circular needle as far as the armholes. The rest of the sleeve is worked back and forth. A double neck is worked back and forth to finish. BACK PIECE: Cast on 107-121-135-141-141-155 stitches with circular needle size 4.5 mm = US 7 and Alaska. Purl 1 row (= wrong side). Then work rib in the different sizes as follows: Sizes S, M and L: Work 3 stitches in GARTER STITCH – read description above, work rib (= knit 3, purl 4) until there are 6 stitches left, knit 3 and work 3 garter stitches. Continue back and forth like this for 5 cm = 2", then change to circular needle size 5.5 mm = US 9. Work the next row from the right side as follows: 3 garter stitches, knit 7-14-21 and decrease at the same time 0-3-7 stitches evenly spaced over these stitches (= 7-11-14 stitches), knit over knit and purl over purl the next 87-87-87 stitches and decrease, at the same time, all purl-4 sections to purl-3 by purling 2 together (= 12-12-12 stitches decreased), knit 7-14-21 and decrease at the same time 0-3-7 stitches evenly spaced over these stitches and work 3 garter stitches = 95-103-109 stitches. Work back with knit over knit, purl over purl and 3 garter stitches on each side. Sizes XL, XXL and XXXL: Work 3 stitches in GARTER STITCH – read description above, work rib (= knit 3, purl 4) over the next 21-21-28 stitches, A.1 over the next 90 stitches (= 3 repeats of 30 stitches), rib (= knit 3 / purl 4) over the next 21-21-28 stitches, knit 3 and work 3 garter stitches. Continue back and forth like this. When the rib measures 5 cm = 2", change to circular needle size 5.5 mm = US 9. Work the next row from the right side as follows: 3 garter stitches, knit 21-21-28 and decrease at the same time 6-2-4 stitches evenly spaced over these stitches (= 15-19-24 stitches), knit 3, knit over knit and purl over purl the next 87-87-87 stitches and decrease, at the same time, 1 stitch in all purl sections by purling 2 together (i.e. all purl-4 sections become purl-3 and all purl-5 sections become purl-4 = 12-12-12 stitches decreased), knit 3, knit 21-21-28 and decrease at the same time 6-2-4 stitches evenly spaced over these stitches (= 15-19-24 stitches), 3 garter stitches = 117-125-135 stitches. Work back with knit over knit, purl over purl and 3 garter stitches on each side. All sizes: Now work pattern as follows: 3 garter stitches, stockinette stitch over the next 7-11-14-15-19-24 stitches, * A.2, A.3 (choose diagram for your size) *, work from *-* 3 times, A.2, knit the next 7-11-14-15-19-24 stitches and work 3 garter stitches. Continue this pattern back and forth. REMEMBER THE KNITTING GAUGE! When the piece measures 32-33-34-35-36-37 cm = 12½"-13"-13⅜"-13¾"-14¼"-14½", bind off for the armholes on both sides as follows: Bind off 4-4-5-5-6-6 stitches 1 time, 3 stitches 0-1-1-1-1-2 times, 2 stitches 1-1-1-2-3-3 times and 1 stitch 1-1-2-3-3-3 times (= 7-10-12-15-18-21 stitches bind off for each armhole) = 81-83-85-87-89-93 stitches. Continue back and forth with pattern as before over the middle 75-75-75-81-81-81 stitches, 1 edge stitch in garter stitch on each side, and the remaining stitches in stockinette stitch (= 2-3-4-2-3-5 stockinette stitches between the pattern and the edge stitches). When the piece measures 48-50-52-54-56-58 cm = 19"-19¾"-20½"-21¼"-22"-22¾" – adjust so the next row is worked from the right side (the armhole measures 16-17-18-19-20-21 cm = 6¼"-6¾"-7"-7½"-8"-8¼"), work as follows: 1 edge stitch in garter stitch, knit over knit and purl over purl until there is 1 stitch left and, at the same time, decrease 22 stitches evenly over the knitted sections in the large cables, 1 edge stitch in garter stitch = 59-61-63-65-67-71 stitches. Bind off. RIGHT FRONT PIECE: Cast on 60-67-74-77-77-84 stitches with circular needle size 4.5 mm = US 7 and Alaska. Purl 1 row (= wrong side). Then work rib in the different sizes as follows: Sizes S, M and L: Work 5 band stitches in garter stitch, work rib (= knit 3, purl 4) until there are 6 stitches left, knit 3 and 3 stitches in garter stitch. Continue back and forth like this for 5 cm = 2". Remember BUTTONHOLES – read description above. The next row is worked as follows from the right side: 5 band stitches in garter stitch, knit over knit and purl over purl for the next 45-45-45 stitches and decrease, at the same time, 1 stitch in each purled section (= 6 stitches decreased), knit 7-14-21 and decrease, at the same time 0-3-7 stitches evenly over these stitches, 3 stitches in garter stitch = 54-58-61 stitches. Work back with knit over knit, purl over purl and garter stitch over garter stitch. Change to circular needle size 5.5 mm = US 9. Sizes XL, XXL and XXXL: Work 5 band stitches in garter stitch, knit 3, purl 4, knit 3, purl 5, knit 3, purl 5, (knit 3, purl 4) over the next 14 stitches, knit 3, purl 5, knit 3, (purl 4, knit 3) over the next 21-21-28 stitches and 3 stitches in garter stitch. Continue back and forth like this for 5 cm = 2". The next row is worked as follows from the right side: 5 band stitches in garter stitch, knit over knit and purl over purl for 48-48-48 stitches and decrease, at the same time, 1 stitch in each purled section (= 6 stitches decreased), knit 21-21-28 and decrease, at the same time, 6-2-4 stitches evenly over these stitches, 3 stitches in garter stitch = 65-69-74 stitches. Work back with knit over knit, purl over purl and garter stitch over garter stitch. Change to circular needle size 5.5 mm = US 9. All sizes: Now work pattern as follows: 5 band stitches in garter stitch, A.4 (choose diagram for your size) over the next 12-12-12-13-13-13 stitches, A.2 over the next 3 stitches, A.3 (choose diagram for your size) over the next 21-21-21-23-23-23 stitches, A.2 over the next 3 stitches, stockinette stitch over the next 7-11-14-15-19-24 stitches and 3 stitches in garter stitch. Continue this pattern back and forth. When the piece measures 32-33-34-35-36-37 cm = 12½"-13"-13⅜"-13¾"-14¼"-14½", bind off stitches at the beginning of each row from the wrong side for the armhole as follows: Bind off 4-4-5-5-6-6 stitches 1 time, 3 stitches 0-1-1-1-1-2 times, 2 stitches 1-1-1-2-3-3 times and 1 stitch 1-1-2-3-3-3 times = 47-48-49-50-51-53 stitches. Continue from the right side as follows: 5 band stitches in garter stitch, pattern as before over the next 39-39-39-42-42-42 stitches, stockinette stitch until there is 1 stitch left (= 2-3-4-2-3-5 stockinette stitches between the pattern and the edge stitch) and 1 edge stitch in garter stitch. When the piece measures 45-47-48-50-51-53 cm = 17¾"-18½"-19"-19¾"-20"-21" – adjust so the next row is from the right side, work as follows: 5 band stitches in garter stitch, knit over knit and purl over purl for the next 12-12-13-13-14-14 stitches and decrease, at the same time, 3 stitches evenly over the cable (i.e. A.4 and 12-12-13-13-14-14 stitches have been decreased to 9-9-10-10-11-11 stitches), place these 14-14-15-15-16-16 stitches on a thread for the neck and work the last 30-31-31-32-32-34 stitches as before. Continue the pattern back and forth and bind off on each row from the neck as follows: Bind off 2 stitches 2 times and 1 stitch 1 time = 25-26-26-27-27-29 stitches. Continue working until the piece measures 48-50-52-54-56-58 cm = 19"-19¾"-20½"-21¼"-22"-22¾" – adjust so the next row is from the right side (armhole measures 16-17-18-19-20-21 cm = 6¼"-6¾"-7"-7½"-8"-8¼"). Work 1 row with knit over knit and purl over purl where you decrease 8 stitches evenly on the knitted sections = 17-18-18-19-19-21 stitches. Bind off. LEFT FRONT PIECE: Cast on 60-67-74-77-77-84 stitches with circular needle size 4.5 mm = US 7 and Alaska. Purl 1 row (= wrong side). Then work rib in the different sizes as follows: Sizes S, M and L: Work 3 stitches in garter stitch, (knit 3, purl 4) until there are 8 stitches left, knit 3 and 5 band stitches in garter stitch. Continue back and forth like this for 5 cm = 2". The next row is worked as follows from the right side: 3 stitches in garter stitch, knit 7-14-21 and decrease, at the same time 0-3-7 stitches over these stitches, knit over knit and purl over purl for the next 45-45-45 stitches and decrease, at the same time, 1 stitch in each purled section (= 6 stitches decreased), 5 band stitches in garter stitch = 54-58-61 stitches. Work back with knit over knit, purl over purl and garter stitch over garter stitch. Change to circular needle size 5.5 mm = US 9. Sizes XL, XXL and XXXL: Work 3 stitches in garter stitch, (knit 3, purl 4) over the next 21-21-28 stitches, knit 3, purl 5, (knit 3, purl 4) over the next 14 stitches, knit 3, purl 5, knit 3, purl 5, knit 3, purl 4, knit 3 and 5 band stitches in garter stitch. Continue back and forth like this for 5 cm = 2". The next row is worked as follows from the right side: 3 stitches in garter stitch, knit 21-21-28 stitches and decrease, at the same time, 6-2-4 stitches evenly spaced over these stitches, knit over knit and purl over purl for the next 48-48-48 stitches and decrease, at the same time, 1 stitch in all purled sections (= 6 stitches decreased), 5 band stitches in garter stitch = 65-69-74 stitches. Work back with knit over knit, purl over purl and garter stitch over garter stitch. Change to circular needle size 5.5 mm = US 9. All sizes: Now work pattern as follows: 3 stitches in garter stitch, stockinette stitch over the next 7-11-14-15-19-24 stitches, A.2 over the next 3 stitches, A.3 over the next 21-21-21-23-23-23 stitches, A.2 over the next 3 stitches, A.5 (choose diagram for your size) over the next 12-12-12-13-13-13 stitches and 5 band stitches in garter stitch. Continue this pattern back and forth. When the piece measures 32-33-34-35-36-37 cm = 12½"-13"-13⅜"-13¾"-14¼"-14½", bind off stitches for the armhole at the beginning of each row from the right side as follows: Bind off 4-4-5-5-6-6 stitches 1 time, 3 stitches 0-1-1-1-1-2 times, 2 stitches 1-1-1-2-3-3 times and 1 stitch 1-1-2-3-3-3 times = 47-48-49-50-51-53 stitches. Continue from the right side as follows: 1 edge stitch in garter stitch, knit 2-3-4-2-3-5, pattern as before over the next 39-39-39-42-42-42 stitches and 5 band stitches in garter stitch. When the piece measures 45-47-48-50-51-53 cm = 17¾"-18½"-19"-19¾"-20"-21" – adjust so the next row is from the right side, work as follows: Work until there are 17-17-18-18-19-19 stitches left, knit over knit and purl over purl for the next 12-12-13-13-14-14 stitches and, at the same time, decrease 3 stitches evenly spaced over the cable (i.e. A.5 and 12-12-13-13-14-14 stitches are decreased to 9-9-10-10-11-11 stitches) and 5 band stitches in garter stitch. Turn and work the first 14-14-15-15-16-16 stitches, before placing these stitches on a thread and work the rest of the row as before. Continue the pattern back and forth and bind off on each row from the neck as follows: Bind off 2 stitches 2 times and 1 stitch 1 time = 25-26-26-27-27-29 stitches. Continue working until the piece measures 48-50-52-54-56-58 cm = 19"-19¾"-20½"-21¼"-22"-22¾"– adjust so the next row is from the right side (armhole measures 16-17-18-19-20-21 cm = 6¼"-6¾"-7"-7½"-8"-8¼"). Work 1 row with knit over knit and purl over purl where you decrease 8 stitches evenly on the knitted sections = 17-18-18-19-19-21 stitches. Bind off. RIGHT SLEEVE: Cast on 46-52-52-58-58-58 stitches with double pointed needles size 4.5 mm = US 7 and Alaska. Knit 1 round. Insert a marker thread at the beginning of the round. Then work rib as follows: (Purl 3, knit 3) over the first 12-18-18-24-24-24 stitches, purl 3, (knit 3, purl 4) over the next 28 stitches, knit 3. Continue this rib in the round for 6 cm = 2⅜". The next round is worked as follows: Knit 15-21-21-27-27-27 and at the same time decrease 1-5-1-7-7-5 stitches evenly over these stitches, knit over knit and purl over purl for the next 31 stitches and decrease in the different sizes as follows: Sizes S, M and L: Decrease 1 stitch in each of the purl-4 sections (= 4 stitches decreased). Sizes XL, XXL and XXXL: Decrease 1 stitch in the 2 middle purled sections (= 2 stitches decreased). There are now 41-43-47-49-49-51 stitches on the round. Change to double pointed needles size 5.5 mm = US 9. Knit 7-8-10-10-10-11 stitches. Insert a marker thread here (= this marks mid-under the sleeve and the new beginning of the round). The marker thread follows your work onwards, and will be used when increasing under the sleeve. Now work pattern as follows: Knit 7-8-10-10-10-11, work A.2 over the next 3 stitches, A.3 (choose diagram for your size) over the next 21-21-21-23-23-23 stitches, A.2 over the next 3 stitches and knit 7-8-10-10-10-11. Continue like this in the round. When the sleeve measures 11-10-10-7-11-8 cm = 4⅜"-4"-4"-2¾"-4⅜"-3⅛", increase 1 stitch on each side of marker thread – read INCREASE TIP. Increase like this every 2-2-2-2-1½-1½ cm = ¾"-¾"-¾"-¾"-1/1"-½" a total of 16-16-16-17-19-21 times = 73-75-79-83-87-93 stitches. Continue working until the sleeve measures 46-45-45-43-43-41 cm = 18"-17¾"-17¾"-17"-17"-16⅛" from the cast-on edge. Now bind off the middle 8-8-10-10-12-12 stitches under the sleeve for the armhole (= 4-4-5-5-6-6 stitches on each side of the marker thread) = 65-67-69-73-75-81 stitches. Continue back and forth with pattern as before and 1 edge stitch in garter stitch on each side. At the beginning of each row bind off stitches for the sleeve cap on each side as follows: Bind off 3 stitches 1-1-2-2-2-2 times, 2 stitches 7-6-5-4-4-5 times and 1 stitch 1-4-4-7-8-9 times (= a total of 18-19-20-21-22-25 stitches bind off on each side) = 29-29-29-31-31-31 stitches. The sleeve measures approx. 9-11-11-13-14-16 cm = 3½"-4⅜"-4⅜"-5⅛"-5½"-6¼" from the bind-off stitches. Insert a marker. THE PIECE IS NOW MEASURED FROM HERE. Continue back and forth with 1 edge stitch in garter stitch on each side until the sleeve measures 10-11-11-12-12-13 cm = 4"-4⅜"-4⅜"-4¾"-4¾"-5⅛" – adjust so the next row is from the right side. Knit over knit and purl over purl the first 23-23-23-25-25-25 stitches and, at the same time, knit together (2 and 2) the first 14 knitted stitches in A.3, (= 7 stitches decreased), knit the next 2 stitches together (= 1 stitch decreased), work pattern as before over the last 4 stitches = 21-21-21-23-23-23 stitches. Turn and work pattern as before over the first 5 stitches, then purl the remaining stitches. Turn and bind off the first 16-16-16-18-18-18 stitches and insert a marker at the end of row (marker marks which side of the sleeve will later be sewn to the back piece). Then work back and forth with A.2 and 1 edge stitch in garter stitch on each side over the remaining 5 stitches until the piece measures 8-8-8-8-9-9 cm = 3⅛"-3⅛"-3⅛"-3⅛"-3½"-3½". Bind off. The sleeve measures a total of 73-75-76-77-78-79 cm = 28¾"-29½"-29½"-30⅜"-30¾"-31". LEFT SLEEVE: Work in the same way as the right sleeve, but when the sleeve cap is finished and the sleeve measures 19-22-22-15-16-29 cm = 7½"-8¾"-8¾"-6"-6¼"-11⅜" from the bind-off stitches, work the next row from the right side as follows: Work the first 4 stitches as before, knit 2 together (= 1 stitch decreased), knit over knit and purl over purl the last 23-23-23-25-25-25 stitches and, at the same time knit together (2 and 2) the last 14 knitted stitches in A.3 (= 7 stitches decreased) = 21-21-21-23-23-23 stitches. Turn and bind off the first 16-16-16-18-18-18 stitches and insert a marker at the end of row (marker marks which side of the sleeve will later be sewn to the back piece). Then work back and forth with A.2 and 1 edge stitch in garter stitch on each side over the remaining 5 stitches until the piece measures 8-8-8-8-9-9 cm = 3⅛"-3⅛"-3⅛"-3⅛"-3½"-3½". Bind off. The sleeve measures a total of 73-75-76-77-78-79 cm = 28¾"-29½"-29½"-30⅜"-30¾"-31". ASSEMBLY: Sew sleeves to front pieces and back piece inside 1 edge stitch/bind off edge as follows: Sew one sleeve to back piece by sewing seam from armhole and up along the shoulder to mid back of back piece. Repeat on the other sleeve, and finish by sewing the bind off edges on sleeves (= the last 5 stitches that were bind off on sleeves) mid back. Sew left sleeve to left front piece from armhole and up along shoulder to neck. Repeat on right sleeve and right front piece. Sew the side seams in the outermost loop of the outermost stitch top down leaving 17 cm = 6¾" at the bottom (= split). DOUBLE NECK: Knit up 83 to 95 stitches (including the stitches on the threads) inside the 1 edge stitch, from the right side with Alaska and circular needle size 4.5 mm = US 7. The number of stitches must be divisible by 6 + 5. Starting from the wrong side, work as follows: 1 edge stitch in garter stitch, rib (= purl 3, knit 3) until there are 4 stitches left, purl 3 and 1 edge stitch in garter stitch. Continue this rib for 10-11 cm = 4"-4⅜". Bind off with knit over knit and purl over purl. Fold the neck double to the wrong side and sew down. To avoid the neck being tight and rolling outwards it is important the seam is elastic. Sew together the edges of the neck mid front, using small stitches. |
||||||||||||||||||||||||||||
Diagram explanations |
||||||||||||||||||||||||||||
|
||||||||||||||||||||||||||||

|
||||||||||||||||||||||||||||
|
||||||||||||||||||||||||||||
|
||||||||||||||||||||||||||||
|
Have you made this or any other of our designs? Tag your pictures in social media with #dropsdesign so we can see them! Do you need help with this pattern?You'll find tutorial videos, a Comments/Questions area and more by visiting the pattern on garnstudio.com. © 1982-2024 DROPS Design A/S. We reserve all rights. This document, including all its sub-sections, has copyrights. Read more about what you can do with our patterns at the bottom of each pattern on our site. |
||||||||||||||||||||||||||||


With over 40 years in knitting and crochet design, DROPS Design offers one of the most extensive collections of free patterns on the internet - translated to 17 languages. As of today we count 304 catalogs and 11422 patterns - 11417 of which are translated into English (US/in).
We work hard to bring you the best knitting and crochet have to offer, inspiration and advice as well as great quality yarns at incredible prices! Would you like to use our patterns for other than personal use? You can read what you are allowed to do in the Copyright text at the bottom of all our patterns. Happy crafting!
Comments / Questions (17)
Hi, I have knitted fronts and back without any problem, but have just started the sleeve and the cuff seems so large, the 58sts cast on (XL) have produced a cuff that is 12" circumference! I am using a 4mm circular needle (80cm) and the magic loop technique. Any idea what is happening ?
25.10.2023 - 22:47DROPS Design answered:
Dear Mrs Wroe, if your tension is correct, then measurements will be right too, you will work rib for the wrist and you need then more stitches with smaller needles and rib than for the pattern and larger needle where you will have 49 sts after decreasing at the end of wrist. Happy knitting!
26.10.2023 - 07:00En los gráficos de A4- A5 no aparece más que el primer cruce de puntos, cada cuantas vueltas se debe repetir?
27.09.2023 - 12:15DROPS Design answered:
Hola Marisa, A.4 y A.5 muestran el patrón de trenzas completo, que se repite en vertical a medida que avanzas con la labor. Una vez hayas trabajado la última fila de los diagramas (la fila superior), comienzas de nuevo desde la fila inferior, por lo que la trenza se irá repitiendo cada vez que repitas A.4 y A.5 en vertical.
30.09.2023 - 20:26Possible avoir les explications du pull 92-3 en français merci
24.02.2023 - 17:53DROPS Design answered:
Bonjour Mme Moreau, tout à fait, tous nos modèles sont disponibles en français, cliquez sur le menu déroulant sous la photo et sélectionnez "français" pour changer la langue. Bon tricot!
27.02.2023 - 09:11Werden die Abnahmen für die Armkugel in jeder Reihe vorgenommen?
08.02.2023 - 17:45DROPS Design answered:
Liebe Bettina, also bis die Armkugel ca 9-11-11-13-14-16 cm ab die ersten 8-10-12 abgekettenen Maschen misst, werden die Maschen beidseitig, am Anfang jeder Reihe, dh HIn- sowie Rück-Reihe abgkettet, damit sie symmetrisch werden sein. Dann werden den rechten und den linken Ärmel anders abgekettet und nicht symmetrisch (für Sattelschulter). Viel spaß beim stricken!
09.02.2023 - 09:45Bonjour j'aimerai réalisé ce modèle avec des aiguilles ordinaires. Beaucoup de modèles me plaisent mais réalisés en aiguille circulaire . Comment faire svp? Meri pour votre réponse
13.01.2023 - 13:41DROPS Design answered:
Bonjour Mme Termolle, certains modèles se tricotent en rangs sur aiguille circulaire, juste pour avoir suffisamment de place pour y loger toutes les mailles, sinon, vous pourrez vous aider de cette leçon pour adapter les explications. Il peut être parfois plus simple d'apprendre à "dompter" les aiguilles circulaires, nombreuses sont celles qui les ont finalement adoptées après avoir essayé. Bon tricot!
13.01.2023 - 15:20Dopo le diminuzioni per gli scalfi nelle maniche le spiegazioni dicono che restano 29 maglie, e infatti è così. Ma dopo 11 cm. si dice di lavorare le prime 23 maglie come si presentano, poi 2 a 2 14 maglie, 2 insieme a dritto e poi le rimanenti 4 maglie: sarebbero 43 maglie. Com'è possibile?
31.12.2022 - 15:43DROPS Design answered:
Buonasera Judith, mentre lavorare le maglie delle maniche deve lavorare insieme 2 a 2 a diritto le maglie lavorate in A.3 poi fare un'altra diminuzione, arrivando a 21 maglie. Buon lavoro!
01.01.2023 - 21:44I have been knitting for over 60 years, and have failed with thi pattern, the sleeve attatchment to the shoulders are square set and look dreadful, so I am redoing the whole sleeve thin and shoulder joint my way.
23.10.2022 - 12:36Im doing the sleeve but.....why am i only increasing on one side of the pattern it the pattern it going straight up the centre of the sleeve....im confused......thank you
10.08.2022 - 16:09DROPS Design answered:
Dear Mrs O'Neill, you increase 1 stitch on both side of the marker thread - see INCREASE TIP:, this means you increase 1 stitch before the end of the round + 1 stitch at the beginning of next round. The pattern will go straight upwards in the middle of sleeve as before, you increase the number of stitches in stocking stitch on either side. Happy knitting!
11.08.2022 - 10:30Jeg er ved at "kæmpe" mig gennem Columns of Valhalla Jacket. Er kommet til ærmerne. Her står bl.a., at: Når ærmet måler 11-10-10-7-11-8 cm, tages der 1 maske ud på hver side af mærketråden . Dette lyder helt forkert for mig. Det er det første ærme jeg er i gang med. Hvordan skal jeg forstå disse tal?? Hvorfra er ærmet målt? Jeg strikke i en XL, dvs at jeg skal strikke ærmet og når det måler 7 cm, skal der tages ind. ???
11.03.2021 - 13:06DROPS Design answered:
Hej Lene, jo men det stemmer, når ærmet måler 7 cm (fra du slog op) tager du ud midt under ærmet på hver side af mærket og det gør du på hver 2. cm 17 gange. God fornøjelse!
12.03.2021 - 09:03Es ist leichter, wenn man mit dem li Vorderteil beginnt, die Seite ohne Knopflöcher. Man kann beim re Vorderteil genau gucken, wo man die Knopflöcher in gleichmäßigen Abständen setzt. Bei den Vorderteilen in Größe L hat sich ein Fehler eingeschlichen: Die Zopfmuster A4 u. A5 werden im Text mit 13 Maschen statt mit 12 Maschen angegeben und 9 statt 10 als Rest??: \"...und dabei gleichzeitig 3 Maschen gleichmäßig verteilt über dem Zopf abnehmen (d.h. über A.4, die 12-12-13
19.02.2021 - 18:33