
Popular categories
Looking for a yarn?


|
|
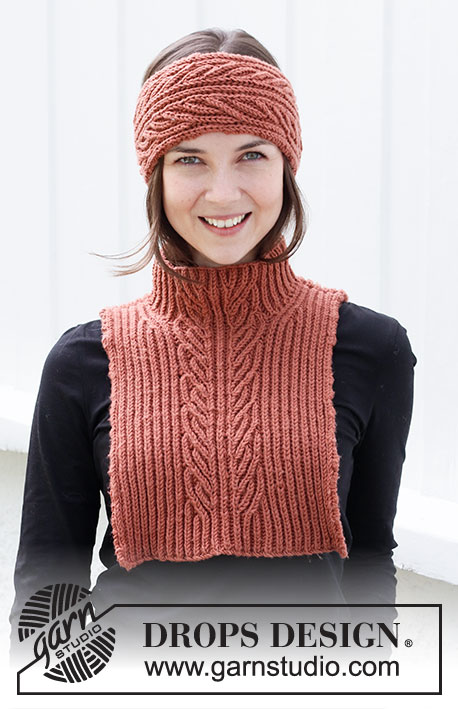
Celtic Poetry |
|
 |
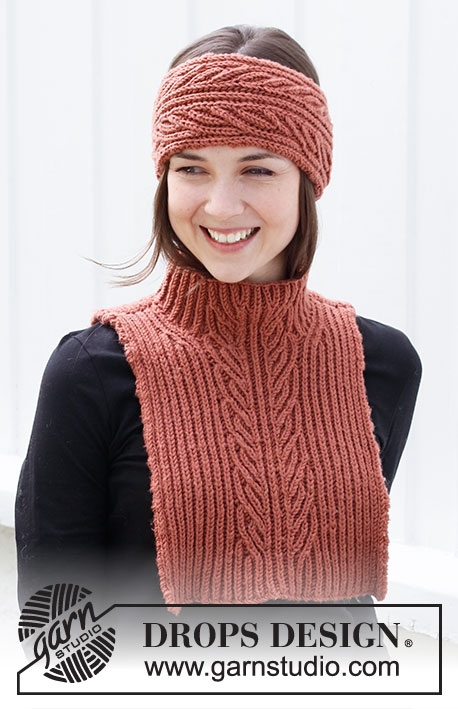 |
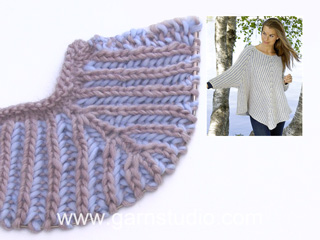
Knitted head band and neck warmer in DROPS Merino Extra Fine. The piece is worked in English rib.
DROPS 214-12 |
|
|
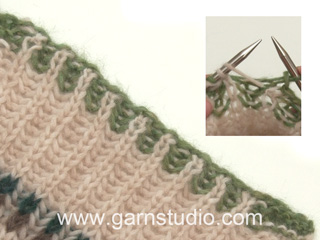
------------------------------------------------------- EXPLANATIONS FOR THE PATTERN: ------------------------------------------------------- RIDGE/GARTER STITCH (worked back and forth): Knit all rows. 1 ridge in height = Knit 2 rows. ENGLISH RIB: ROW 1 (right side): 1 stitch in garter stitch, * knit 2 together, 1 yarn over, slip 1 stitch as if to purl *, work from *-* until there are 3 stitches left, knit 2 together, 1 stitch in garter stitch. ROW 2 (wrong side): 1 stitch in garter stitch, * 1 yarn over, slip 1 stitch as if to purl, knit the yarn over and slipped stitch together *, work from *-* until there are 2 stitches left, 1 yarn over, slip 1 stitch as if to purl and 1 stitch in garter stitch. ROW 3 (right side): 1 stitch in garter stitch, * knit the yarn over and slipped stitch together, 1 yarn over, slip 1 stitch as if to purl *, work from *-* until there is 1 yarn over and 2 stitches left, knit the yarn over and slipped stitch together, 1 stitch in garter stitch. Repeat rows 2 and 3 onwards. DECREASE TIP: All decreases are worked from the right side! Decrease to the right of the mid-stitch: Knit together the next 3 stitches + their respective yarn overs (= 2 stitches decreased). Decrease to the left of the mid-stitch: Slip the knitted stitch (+ yarn over) as if to knit, knit together the next 2 stitches (+ yarn over), pass the slipped stitch (+ yarn over) over the knitted together stitches (= 2 stitches decreased). INCREASE TIP: All increases are worked from the right side! Increase 2 stitches in the knitted stitch + yarn over on each side of the mid-stitch with the marker (= 4 stitches increased on row), as follows: Knit together the stitch and yarn over but do not slip them from the left needle, make 1 yarn over and knit together the same stitch and the yarn over one more time (= 2 stitches increased), work pattern as before over the next 3 stitches (middle of these = mid-stitch), knit together the stitch and yarn over but do not slip them from the left needle, make 1 yarn over and knit together the same stitch and the yarn over one more time (= 2 stitches increased). Then work the new stitches in English rib – be aware that on the first row after increasing, the increased stitches will be knitted without their yarn overs (as they have not yet been made). ------------------------------------------------------- START THE PIECE HERE: ------------------------------------------------------- HEAD BAND – SHORT OVERVIEW OF THE PIECE: The piece is worked back and forth with circular needle and sewn together mid-back. HEAD BAND: Cast on 34 stitches with circular needle size 3.5 mm and Merino Extra Fine. Work row 1 in ENGLISH RIB – see description above = 23 stitches. Insert 1 marker in the middle stitch on the row (knitted stitch from the right side). Continue repeating rows 2 and 3 in English rib, AT THE SAME TIME when you have worked 6 rows (i.e. 3 visible knitted stitches in height on the right side), work PATTERN-1 and PATTERN-2 from the right side as follows: PATTERN-1: Work PATTERN-1 over a total of 8 rows as follows: Work English rib as before over the first 5 stitches, decrease 2 stitches – read DECREASE TIP, work English rib until there are 8 stitches left on the row, AT THE SAME TIME increase 2 stitches on each side of the mid-stitch – read INCREASE TIP (= 4 stitches increased), decrease 2 stitches and work the last 5 stitches as before. Work 1 row of English rib back from the wrong side. REMEMBER THE KNITTING TENSION! Continue back and forth with English rib for 6 more rows (i.e. 3 visible knitted stitches in height on the right side). PATTERN-2: Work PATTERN-2 over a total of 8 rows as follows: Work English rib as before over the first 3 stitches, decrease 2 stitches, work English rib until there are 6 stitches left on the row, AT THE SAME TIME increase 2 stitches on each side of the mid-stitch (= 4 stitches increased), decrease 2 stitches and work the last 3 stitches as before. Work 1 row of English rib back from the wrong side. Continue back and forth with English rib for 6 more rows (i.e. 3 visible knitted stitches in height on the right side). Continue back and forth with alternately PATTERN-1 and PATTERN-2. When the piece measures approx. 49 cm (or desired length) cast off with knit. To avoid the edge being tight, cast off the yarn overs as normal stitches. Cut the strand leaving enough length to sew the seam with. Sew together mid-back in each and every stitch inside the cast-on/cast-off edges. ------------------------------------------------------- NECK WARMER – SHORT OVERVIEW OF THE PIECE: The piece is worked back and forth with circular needle in sections, which are sewn together at the shoulder. The neck is worked to finish. BACK PIECE: Cast on 76-88 stitches with circular needle size 4 mm and Merino Extra Fine. Work row 1 in ENGLISH RIB – read description above = 51-59 stitches. Insert 1 marker in the middle stitch on the row (knitted stitch from right side). Continue repeating rows 2 and 3 in English rib. REMEMBER THE KNITTING TENSION! When the piece measures 5 cm – adjust so the next row is from the right side, work PATTERN-1 as follows: PATTERN-1: Work PATTERN-1 over a total of 8 rows as follows: Work English rib as before until there are 6 stitches left before the mid-stitch, decrease 2 stitches – read DECREASE TIP, work the next stitch as before, increase 2 stitches on each side of the mid-stitch – read INCREASE TIP, work the next stitch as before, decrease 2 stitches, work to the end of the row as before. Work 1 row of English rib back from the wrong side. Continue back and forth with English rib for 6 more rows (i.e. 3 visible knitted stitches in height on the right side). PATTERN-2: Work PATTERN-2 over a total of 8 rows as follows: Work English rib as before until there are 8 stitches left before the mid-stitch, decrease 2 stitches, work the next 11 stitches as before, AT THE SAME TIME increase 2 stitches on each side of the mid-stitch, decrease 2 stitches and, work to the end of the row as before. Work 1 row of English rib back from the wrong side. Continue back and forth with English rib for 6 more rows (i.e. 3 visible knitted stitches in height on the right side). Continue back and forth with alternately PATTERN-1 and PATTERN-2. When the piece measures 28-30 cm, work the next row from the right side as follows: Work the first 13-17 stitches before placing them on a thread (= right shoulder), cast off the next 25-25 stitches (+ yarn overs) – to avoid the cast-off edge being tight cast off the yarn overs as normal stitches (= neck), work the next 13-17 stitches (= left shoulder). Each shoulder is finished separately. Continue with English rib and 1 edge stitch in garter stitch on each side until the piece measures 30-32 cm. Cast off with knit but, to avoid the cast-off edge being tight, cast off the yarn overs as normal stitches. Work the other shoulder in the same way. FRONT PIECE: Cast on and work English rib and PATTERN-1 and PATTERN-2 in the same way as the back piece. When the piece measures 24-26 cm, work the next row from the right side as follows: Work the first 17-21 stitches as before and place them on a thread for the left shoulder, work the next 17 stitches as before and place them on a new thread for the neck, work the last 17-21 stitches as before for right shoulder. Each shoulder is finished separately. Right shoulder: Continue with English rib and 1 edge stitch in garter stitch on each side, AT THE SAME TIME on the next row from the right side begin to decrease for the neck as follows: Work 1 edge stitch in garter stitch, work the next 2 stitches as before, slip the knitted stitch (+ yarn over) as if to knit, knit together the next 2 stitches (+ yarn over) and pass the slipped stitch (+ yarn over) over the knitted together stitches (= 2 stitches decreased), work to the end of the row as before. Repeat this decrease every 6th row (i.e. 3 visible knitted stitches in height on the right side) a total of 2 times = 13-17 stitches left on the shoulder. When the piece measures 6 cm from where you placed stitches on the thread for the neck (the piece measures approx. 30-32 cm), cast off with knit but, to avoid the cast-off edge being tight, cast off the yarn overs as normal stitches. Left shoulder: Start from the wrong side (i.e. from the neck) and work English rib as before with 1 edge stitch in garter stitch on each side, AT THE SAME TIME on the next row from the right side begin to decrease for the neck as follows: Work until there are 6 stitches left on the row, knit together the next 3 stitches + their respective yarn overs (= 2 stitches decreased). Repeat this decrease every 6th row (i.e. 3 visible knitted stitches in height on the right side) a total of 2 times = 13-17 stitches left on the shoulder. When the piece measures 6 cm from where you placed stitches on the thread for the neck (the piece measures approx. 30-32 cm), cast off with knit but, to avoid the cast-off edge being tight, cast off the yarn overs as normal stitches. ASSEMBLY: Sew the shoulder seams inside the cast-off edge – make sure the seam is not tight! NECK: Start middle back of the neck with Merino Extra Fine and short circular needle size 4 mm. Work from the right side as follows: Knit up 25 stitches before the thread mid front (knit up 1 stitch in each stitch on the neck and knit up the rest inside the 1 edge stitch), work PATTERN-1 and PATTERN-2 as before over the 17 stitches from the thread, knit up 24 stitches after the thread (knit up 1 stitch in each stitch on the neck and knit up the rest inside the 1 edge stitch) = 66 stitches. Using the above numbers when knitting up stitches allows the English rib to fit nicely on the neck. ROUND 1: * Make 1 yarn over, slip 1 stitch as if to purl, knit 1 *, work from *-* to end of round, but over the 17 stitches from the thread work pattern as before. The English rib should fit all the way round. ROUND 2: * Purl together the yarn over and the slipped stitch, make 1 yarn over, slip 1 stitch as if to purl *, work from *-* to end of round, working pattern as before over the 17 stitches mid front. ROUND 3: * Make 1 yarn over, slip 1 stitch as if to purl, knit together the yarn over and the slipped stitch *, work from *-* to end of round, working pattern as before over the 17 stitches mid front. Repeat rounds 2 and 3 until the neck measures 7 cm. Cast off with knit over knit and purl over purl but, to avoid the cast-off edge being tight, cast off the yarn overs as normal stitches. |
|
|
Have you made this or any other of our designs? Tag your pictures in social media with #dropsdesign so we can see them! Do you need help with this pattern?You'll find tutorial videos, a Comments/Questions area and more by visiting the pattern on garnstudio.com. © 1982-2024 DROPS Design A/S. We reserve all rights. This document, including all its sub-sections, has copyrights. Read more about what you can do with our patterns at the bottom of each pattern on our site. |
|


With over 40 years in knitting and crochet design, DROPS Design offers one of the most extensive collections of free patterns on the internet - translated to 17 languages. As of today we count 304 catalogues and 11422 patterns - 11422 of which are translated into English (UK/cm).
We work hard to bring you the best knitting and crochet have to offer, inspiration and advice as well as great quality yarns at incredible prices! Would you like to use our patterns for other than personal use? You can read what you are allowed to do in the Copyright text at the bottom of all our patterns. Happy crafting!
Comments / Questions (13)
Thank you for this lovely pattern. I got stuck on the very first line of the pattern where it said to cast on 88 stitches and work row 1 of English rib = 59. Just wanted to clarify, in case it helps someone else as well, that this total count does not include the yarnovers.
30.11.2023 - 10:44No estan los diagramas
07.03.2022 - 21:45DROPS Design answered:
Hola Margarita, parece que hay un error en este patrón. Trataremos de resolverlo lo antes posible.
08.03.2022 - 21:44Hvorfor står der i opskriften til bagstykket at der skal slås 76 m op når arbejdet kun strikkes over 51 m. Det kan tælles på billedet. Vh Anne Hermann
02.12.2021 - 15:05DROPS Design answered:
Hej Anne När du har stickat första pind i helpatent har du 51 masker. Mvh DROPS Design
03.12.2021 - 12:18Jeg lurer på hva jeg gjør gal. Jeg er ikke fornøyd med kantene. Jeg følger å strikke rille med først og siste maskene men de blir ujevnt. Er det noe du kan anbefale? Strikker jeg kanskje for stramt?
12.04.2021 - 22:50DROPS Design answered:
Hei Ana. Om du ser på bildet er den kanten også litt ujevn. Prøv evnt å løfte 1. maske fra retten (den som strikkes i rille) over til høyre pinne istedenfor å strikke den (bare pass på at det ikke blir for stramt). Se om du syns det blir penere. mvh DROPS design
26.04.2021 - 11:43Jeg finner ikke mønster diagram her..
17.03.2021 - 00:12DROPS Design answered:
Hei Cathrine, Det finnes ikke diagram fordi mønstrene er beskrevet i teksten på toppen av oppskriften. God fornøyelse!
17.03.2021 - 07:58Oppskrift Celtic Poetry Jeg har spørsmål ang Pannebåndet. Man skal legge opp 34 masker. Strikk 1. pinne hel patent. - les forklaring over = 23 masker. Jeg skjønner ikke disse 23 maskene. Er det riktig antall eller feil i oppskrifta?
16.03.2021 - 22:12DROPS Design answered:
Hei Bodil, Når man strikker helpatent er det laget kast annenhver pinne som er ikke telt som masker. Disse blir strikket sammen med løse maskene på neste pinne. Når du teller masker er det kun ordentlige masker som telles. God fornøyelse!
17.03.2021 - 08:08Hi ! Est ce que le 1er maille (celui au point mousse) compte dans les 5 premièrs mailles à faire dans le PT fantaisie 1 ou les 5 1er mailles correspondent à 2 mailles ensemble à l'endroit, 1 jeté et une maille envers, et re 2 mailles ensemble à l'endroit ? Les jetés font bien partie de la maille envers donc on ne les compte pas ? Merci
19.02.2021 - 16:47DROPS Design answered:
Bonjour Thadee, tout à fait, la maille lisière appartient aux 5 premières mailles du rang - et les jetés ne comptent effectivement pas comme des mailles car ils appartiennent à la maille glissée. Bon tricot!
22.02.2021 - 07:10Bonjour, merci pour votre réponse précédente. Je reprends seulement mon tricot et me voilà face au point fantaisie. Je me perds un peu dans les étapes à faire en même temps pour les augmentations et diminutions, pourriez-vous tenter de me réexpliquer s'il vous plaît ? Merci par avance !!
28.01.2021 - 18:02DROPS Design answered:
Bonjour Cla, pour tricoter le point fantaisie-1 procédez ainsi: tricotez les 5 premières mailles comme avant, puis diminuez 2 m (= cf DIMINUTIONS à droite de la m centrale), continuez comme avant jusqu'avant la m centrale, augmentez 2 m de chaque côté de la m centrale, cf AUGMENTATIONS. Tricotez jusqu'à ce qu'il reste 8 m, diminuez 2 m (= cf DIMINUTIONS après la maille centrale) et terminez votre rang. N'hésitez pas, si besoin, à vous entrainer sur un échantillon à faire les diminutions et les augmentations Bon tricot!
29.01.2021 - 07:27I am checking knitting tension and wondering why I am knitting 18 stitches in width but 24 rows in height with English rib in area of 10 x 10 cm using 3.75mm circular needle. Is there any possibility that there is a mistake in this pattern or do I have to change the needles? Now I have used Novita wooden 3.5mm and ChiaoGoo 3.75mm needles.
14.01.2021 - 18:37DROPS Design answered:
Dear Mrs Laaksonen, you should have 18 sts and 44 rows or 17 sts x 42 rows worked in English rib, ie there should be only 22 or 21 knitted stitches visibile in height - read more about DROPS Merino Extra Fine here. Happy knitting!
15.01.2021 - 06:42Bonjour,\r\n\r\nJe ne comprends pas comment au rang 1 on passe de 34 à 23 mailles alors que la maille sur l\'vers est glissée est non tricotée avec le jeté (d\'après le texte). \r\nPourriez-vous me donner plus de précisions s\'il vous plaît ?\r\n\r\nCordialement\r\nCh
13.01.2021 - 12:17DROPS Design answered:
Bonjour Cla, au tout premier rang des côtes anglaises, on diminue 11 mailles en tricotant ainsi: 1 maille au point mousse, *2 mailles ensemble à l'endroit (= 1 diminution), 1 jeté, glisser 1 maille à l'envers (le jeté appartient à la maille envers et ne compte pas comme une maille*, répéter de *-* jusqu'à ce qu'il reste 3 mailles (= 10 fois = on diminue 10 mailles), tricotez 2 mailles ensemble à l'endroit (= 1 diminution) et 1 maille au point mousse. Il vous reste 23 mailles. Cette vidéo montre comment tricoter des côtes anglaises avec jetés. Bon tricot!
13.01.2021 - 12:31