DROPS Alpaca
DROPS Alpaca
100% Alpaca
from 3.65 € /50g
Get the yarn to make this pattern from 69.35€.

The yarn cost is calculated from the pattern’s smallest size and the yarn’s cheapest product type. Looking for an even better price? You might find it on the DROPS Deals!

DROPS SS24

Sun Baked Tiles

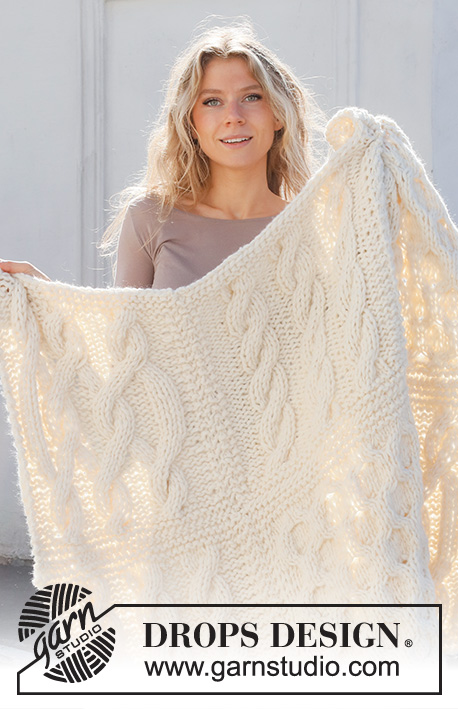
Crochet blanket in 2 strands DROPS Alpaca. Piece consists of crochet squares.

DROPS 214-10
DROPS design: Pattern z-907
Yarn group A + A or C
-------------------------------------------------------

SIZE:
Piece measures approx. (including edge at the edge): Width = 92 cm Length = 136 cm
1 square measures approx. 22 x 22 cm.

MATERIALS:
DROPS ALPACA from Garnstudio (belongs to yarn group A)
250 g colour 607, light brown
100 g colour 9025, hazelnut
100 g colour 9026, blush
100 g colour no 9024, dark blush
100 g colour 5565, bordeaux
100 g colour 3650, maroon
100 g colour 3969, red/purple
100 g colour 618, nougat

CROCHET TENSION:
16 double treble crochets in width and 6 rows vertically with 2 strands = 10 x 10 cm.

CROCHET HOOK:
DROPS CROCHET HOOK SIZE 4.5 mm.
Hook size is only a suggestion! If you have too many stitches on 10 cm switch to larger hook. If you have too few stitches on 10 cm switch to smaller hook.

-------------------------------------------------------

Alternative Yarn – See how to change yarns here
Yarn Groups A to F – Use the same pattern and change the yarn here
Yarn usage using an alternative yarn – Use our yarn converter here

-------------------------------------------------------

DROPS Alpaca
DROPS Alpaca
100% Alpaca
from 3.65 € /50g
Get the yarn to make this pattern from 69.35€.

The yarn cost is calculated from the pattern’s smallest size and the yarn’s cheapest product type. Looking for an even better price? You might find it on the DROPS Deals!

Pattern instructions

NOTE: This pattern is written in British English. All measurements in charts are in cm. For conversion from cm to inches - click here. There are different terms for crocheting in British and American English. If this pattern includes crochet, click for "crochet terms" here. For this pattern in American English, please click here.
-------------------------------------------------------

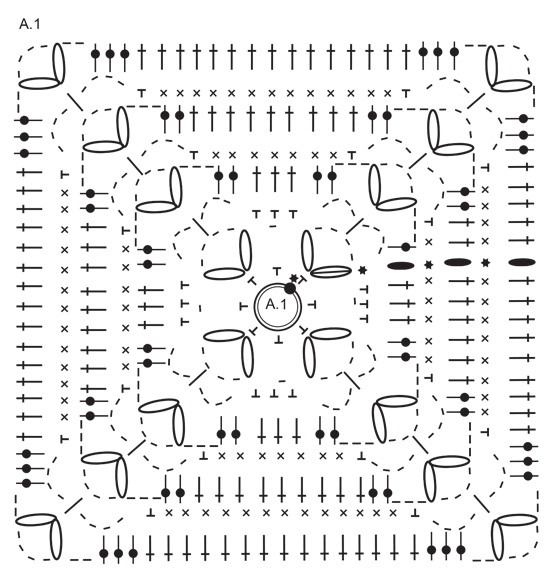
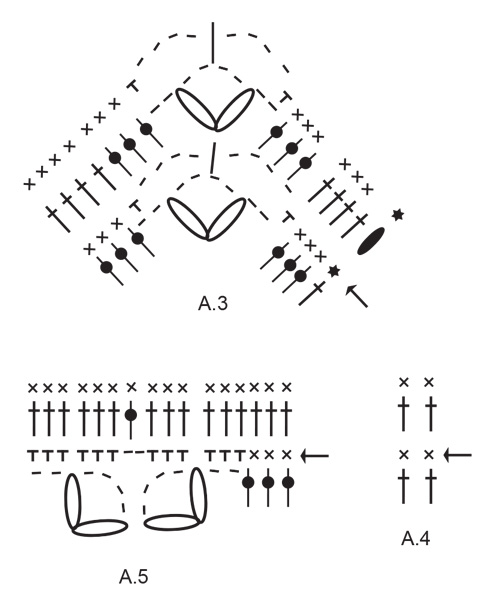
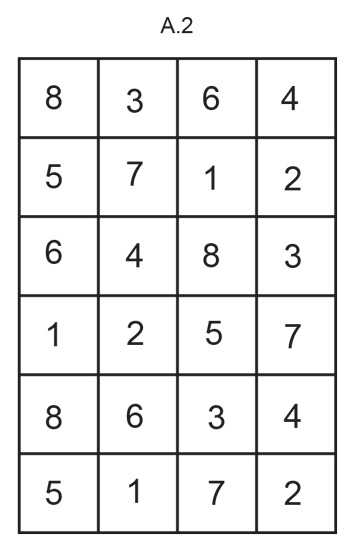
EXPLANATION FOR THE PATTERN:

-------------------------------------------------------

CROCHET INFO:
Work piece back and forth but work piece together at the end of every row as follows:
Begin every row with double crochets (= from wrong side) with 1 chain stitch (replace first double crochet), and finish with 1 slip stitch in first chain stitch at beginning of row, turn piece and work next row from right side.
Begin every row double treble crochets (= from right side) with 4 chain stitches (replace first double treble crochet) and finish with 1 slip stitch in 4th chain stitch at the beginning of row, turn piece and work next row and work from wrong side.

PATTERN: 
See diagrams A.1 to A.5. A.1 shows the square, A.2 shows how squares are worked together, and A.3 to A.5 shows edge around the blanket.

-------------------------------------------------------

START THE PIECE HERE:

-------------------------------------------------------

BLANKET - SHORT OVERVIEW OF THE PIECE:
Work piece in crochet square that are worked together. Work an edge around the entire blanket. Work 3 squares in every colour = 24 squares.

CROCHET SQUARE:
Work 4 chain stitches on hook size 4.5 mm with 2 strands Alpaca and form a ring with 1 slip stitch in first chain stitch made. Work A.1 back and forth (first row = wrong side) but work every row together – read CROCHET INFO!
REMEMBER THE CROCHET TENSION! When entire diagram has been worked vertically, crochet square measures approx. 22 x 22 cm. Work 2 squares more with the same colour.

ASSEMBLY:
Place squares as shown in diagram A.2:
colour 1 = 9025, hazelnut
colour 2 = 9026, blush
colour 3 = 9024, dark blush
colour 4 = 5565, bordeaux
colour 5 = 3650, maroon
colour 6 = 3969, red/purple
colour 7 =, 607 light brown
colour 8 = 618, nougat

Work together squares with light brown first in width, then in length:

Place 2 squares together, wrong side against wrong side and work squares together from right side and through both layers as follows:
Fasten with 1 double crochet around chain space in corner, * work 3 double crochets around same chain space, 3 double crochets around next chain stitch, work 1 double crochet in back loop of each of the next stitches until next chain space, work 3 double crochets around next chain space, work 3 double crochets around next chain space, work 2 chain stitches (= in transition between the next crochets squares) *, work from *-* but on last square finish with 3 double crochets in chain space. Repeat along each of the remaining rows in width. Then work squares together the same way in length.

CROCHET BORDER:
Work border with light brown from right side as follows:
ROUND 1: Fasten strand with 1 slip stitch in 4th double treble crochet before first chain space before one corner. Work from round with arrow in diagrams as follows: * Work A.3 in corner, A.4 over double treble crochets until next corner, but in transition between squares worked as shown in A.5 *, work from *-* around the entire blanket.
ROUND 2-3: Work the last rounds in A.3 to A.5 around the blanket. Fasten off.

Diagram

symbols = Begin here - this chain stitch ring is explained in pattern Continue on symbol over point on circle and work towards the left.
symbols = 1 double treble crochet in stitch
symbols = 1 double treble crochet around chain space
symbols = 1 double crochet around chain space/chain stitch ring
symbols = 1 double crochet in stitch
symbols = 1 chain stitch - if you work at the end of crochet hook the chain stitch will often be too tight 1 chain stitch should be just as long as 1 double crochet/treble crochet/double treble crochet is wide.
symbols = Bubble: Work 1 double treble crochet in double crochet/half treble crochet below but wait with last pull through (= 2 stitches on hook), work 2 double treble crochets in same stitch the same way, pull yarn through all 4 stitches on hook
symbols = Bubble: Work 4 chain stitches, 1 double treble crochet in first double crochet but wait with last pull through (= 2 stitches on hook), work 1 double treble crochet in same double crochet the same way, pull yarn through all 3 stitches on hook. Finish round with 1 slip stitch at the top of bobble.
symbols = 1 half treble crochet around chain space
symbols = At the beginning of round work 1 chain stitch. Finish round with 1 slip stitch in 1st double crochet at beginning of round.
symbols = At beginning of round work 4 chain stitches. Finish round with 1 slip stitch in 4th chain stitch.
diagram
diagram
diagram
Do you have a question? See a list of frequently asked questions (FAQ)

Knitting tension is what determines the final measurements of your work, and is usually measured per 10 x 10 cm. It is provided like so: number of stitches in width x number of rows in height - eg: 19 stitches x 26 rows = 10 x 10 cm.

The knitting tension is very individual; some people knit/crochet loosely while others work tightly. You adjust the knitting tension with the needle size, which is why the suggested needle size is only meant as a guide! You need to adjust this (up or down) to ensure that YOUR knitting tension matches the knitting tension provided in the pattern. If you work with a different knitting tension than provided you will have a different yarn consumption, and your work will have different measurements than what the pattern suggests.

The knitting tension also determines which yarns can replace each other. As long as you achieve the same knitting tension you can replace one yarn with another.

See DROPS lesson: How to measure your tension/gauge

See DROPS video: How to make a gauge tension swatch

The required amount of yarn is provided in grams, eg: 450 g. To calculate how many balls you’ll need you first need to know how many grams are in 1 ball (25g, 50g or 100g). This information is available if you click on the individual yarn quality on our pages. Divide the amount required with the amount of each ball. For example, if each ball is 50g (the most common amount), the calculation will be as follows: 450 / 50 = 9 balls.

The important thing when changing from one yarn to another is that the knitting/crochet tension remains the same. This is so that the measurements of the finished piece will be the same as on the sketch provided. It is easier to achieve the same knitting tension using yarns from the same yarn group. It is also possible to work with multiple strands of a thinner yarn to achieve the knitting tension of a thicker one. Please try our yarn converter. We recommend you to always work a test swatch.

Please NOTE: when changing yarn the garment might have a different look and feel to the garment in the photo, due to individual properties and qualities of each yarn.

See DROPS lesson: Can I use a different yarn than the one mentioned in the pattern?

All our yarns are categorised into yarn groups (from A to F) according to thickness and knitting tension – group A contains the thinnest yarns and group F the thickest. This makes it easier for you to find alternative yarns to our patterns, should you wish to switch yarn. All yarns within the same group have a similar knitting tension and can easily replace each other. However, different yarn qualities have different structures and properties which will give the finished work a unique look and feel.

Click here for an overview of the yarns in each yarn group

At the top of all our patterns you’ll find a link to our yarn calculator, which is a helpful tool should you wish to use a different yarn than suggested. By filling in the yarn quality you wish to replace, the amount (in your size) and number of strands, the calculator will present good alternative yarns with the same knitting tension. Additionally it will tell you how much you’ll require in the new qualities and whether you’ll need to work with multiple strands. Most skeins are 50g (some are 25g or 100g).

If the pattern is worked with multiple colours, every colour will have to be calculated separately. Similarly, if the pattern is worked with several strands of different yarns (for example 1 strand Alpaca and 1 strand Kid-Silk) you will have to find alternatives for each, individually.

Click here to see our yarn calculator

Since different yarns have different qualities and textures we have chosen to keep the original yarn in our patterns. However, you can easily find options among our available qualities by using our yarn calculator, or simply pick a yarn from the same yarn group.

It is possible that some retailers still have discontinued yarns in stock, or that someone has a few skeins at home that they would like to find patterns for.

The yarn calculator will provide both alternative yarn as well as required amount in the new quality.

If you think it's hard to decide what size to make, it can be a good idea to measure a garment you own already and like the size of. Then you can pick the size by comparing those measures with the ones available in the pattern's size chart.

You'll find the size chart at the bottom of the pattern.

See DROPS lesson: How to read size chart

The needle size provided in the pattern serves only as a guide, the important thing is to follow the knitting tension. And since knitting tension is very individual, you will have to adjust the needle size to ensure that YOUR tension is the same as in the pattern – maybe you’ll have to adjust 1, or even 2 needle sizes, up or down to achieve the correct tension. For this, we recommend that you work test swatches.

Should you work with a different knitting tension than the one provided, the measurements of the finished garment might deviate from the measurement sketch.

See DROPS lesson: How to measure your tension/gauge

See DROPS video: How to make a tension/gauge swatch

Working a garment top-down provides more flexibility and room for personal adjustment. For example it is easier to try the garment on while working, as well as making adjustments to length of yoke and shoulder caps.

The instructions are carefully explaining every step, in the correct order. Diagrams are adjusted to the knitting direction and are worked as usual.

The diagram depicts all rows/rounds, and every stitch seen from the right side. It is read from bottom to top, from right to left. 1 square = 1 stitch.

When working back and forth, every other row is worked from the right side and every other row is worked from the wrong side. When working from the wrong side, the diagram will have to be worked reversed: from left to right, knit stitches are purled, purl stitches are knit etc.

When working in the round every round is worked from the right side and the diagram are worked from right to left on all rounds.

See DROPS lesson: How to read knitting diagrams

The diagram depicts all rows/rounds, and every stitch seen from the right side. It is worked from bottom to top, from right to left.

When working back and forth every other row is worked from the right side: from right to left and every other row is worked from the wrong side: from left to right.

When working in the round, every row in the diagram are worked from the right side, from right to left.

When working a circular diagram you start in the middle and work your way outwards, counter clockwise, row by row.

The rows usually start with a given number of chain stitches (equivalent to the height of the following stitch), this will either be depicted in the diagram or explained in the pattern.

See DROPS lesson: How to read crochet diagrams

Instructions for working several diagrams after each other on the same row/round, will often be written like so: “work A.1, A.2, A.3 a total of 0-0-2-3-4 times". This means you work A.1 once, then A.2 is worked once, and A.3 is repeated (in width) the number of times provided for your size – in this case like so: S = 0 times, M = 0 times, L=2 times, XL= 3 times and XXL = 4 times.

The diagrams are worked as usual: begin with the first row in A.1, then work the first row in A.2 etc.

See DROPS lesson: How to read knitting diagrams

See DROPS lesson: How to read crochet diagrams

The total width of the garment (from wrist-to-wrist) will be larger in the larger sizes, despite the actual sleeves being shorter. The larger sizes have longer sleeve caps and wider shoulders, so there will be a good fit in all sizes.

The measurement sketch/schematic drawing provides information regarding the full length of the garment. If it’s a jumper or a jacket the length is measured from the highest point on the shoulder closest to the neckline, and straight down to the bottom of the garment. It is NOT measured from the tip of shoulder. Similarly, the length of yoke is measured from the highest point on the shoulder and down to where yoke is split into body and sleeves.

On a jacket measures are never taken along bands, unless specifically stated. Always measure inside band stitches when measuring the length.

See DROPS lesson: How to read a schematic drawing

Diagrams are often repeated on the round or in height. 1 repeat is the diagram the way it appears in the pattern. If it says to work 5 repeats of A.1 in the round, then you work A.1 a total of 5 times after/next to each other in the round. If it says to work 2 repeats of A.1 vertically/in height you work the entire diagram once, then begin again at the start and work the entire diagram one more time.

Chain stitches are slightly narrower than other stitches and to avoid working the cast-on edge too tight, we simply chain more stitches to begin with. The stitch count will be adjusted on the following row to fit the pattern and measurement sketch.

The rib edge is more elastic and will contract slightly compared to, for example, stocking stitch. By increasing before the rib edge, you avoid a visible difference in width between the rib edge and the rest of the body.

It’s very easy to cast off too tightly, and by making yarn overs while casting off (and simultaneously casting these off) you avoid a too tight cast off edge.

See DROPS video: How to bind off with yarn overs (yo)

To achieve an even increase (or decrease) you can increase on, for example: every 3rd and 4th row alternately, like so: work 2 rows and increase on the 3rd row, work 3 rows and increase on the 4th. Repeat this until the increase is complete.

See DROPS lesson: Increase or decrease 1 st on every 3rd and 4th row alternately

Should you prefer to work in the round instead of back and forth, you may of course adjust the pattern. You’ll need to add steeks mid-front (usually 5 stitches), and follow the instructions. When you would normally turn and work from the wrong side, simply work across the steek and continue in the round. At the end you’ll cut the piece open, pick up stitches to work bands, and cover the cut edges.

See DROPS video: How to knit steeks and cut open

Should you prefer to work back and forth instead of in the round, you may of course adjust the pattern so you work the pieces separately and then assemble them at the end. Divide the stitches for the body in 2, add 1 edge stitch in each side (for sewing) and work the front and back pieces separately.

See DROPS lesson: Can I adapt a pattern for circular needles into straight needles?

Pattern repeats can vary slightly in the different sizes, in order to get the correct proportions. If you’re not working the exact same size as the garment in the photo, yours might deviate slightly. This has been carefully developed and adjusted so that the complete impression of the garment is the same in all sizes.

Make sure to follow instructions and diagrams for your size!

If you have found a pattern you like which is available in women’s size it’s not very difficult to convert it to men’s size. The biggest difference will be the length of sleeves and body. Start working on the women size that you think would fit across the chest. The additional length will be worked right before you cast off for the armhole/sleeve cap. If the pattern is worked top-down you can add the length right after the armhole or before the first decrease on sleeve.

Regarding additional yarn amount, this will depend on how much length you add, but it is better with a skein too many than too few.

All yarns will have excess fibres (from production) that might come off as lint or shedding. Brushed yarns (ie hairier yarns) have more of these loose, excess fibres, causing more shedding.

Shedding also depends on what is worn under or over the garment, and whether this pulls at the yarn fibres. It’s therefore not possible to guarantee that there will be no shedding

Below are some tips on how to get the best result when working with hairier yarns:

1. When the garment is finished (before you wash it) shake it vigorously so the looser hairs come off. NOTE: do NOT use a lint roller, brush or any method that pulls at the yarn.

2. Place the garment in a plastic bag and put it in your freezer - the temperature will cause the fibres to become less attached to each other, and excess fibres will come off easier.

3. Leave in the freezer for a few hours before taking it out and shaking it again.

4. Wash the garment according to the instructions on the yarn label.

Pilling is a natural process that happens to even the most exclusive of fibers. It's a natural sign of wear and tear that is hard to avoid, and that is most visible in high friction areas of your garment like a sweater's arms and cuffs.

You can make your garment look as new by removing the pilling, using a fabric comb or a pill/lint remover.

Still can't find the answer you need? Then scroll down and leave your question so one of our experts can try to help you. This will be done normally within 5 to 10 working days.
In the meantime, you can read the questions and answers that others have left to this pattern or join the DROPS Workshop on Facebook to get help from fellow knitters/crocheters!

You might also like...

Post a comment to pattern DROPS 214-10

We would love to hear what you have to say about this pattern!

If you want to leave a question, please make sure you select the correct category in the form below, to speed up the answering process. Required fields are marked *.

Comments / Questions (12)

country flag Françoise wrote:

Bonjour Merci pour votre réponse . Cordialement. Françoise

22.02.2024 - 13:06

country flag Françoise wrote:

Bonjour Pour la bordure extérieure je constate une incohérence entre A3 et A5. Au 1er rg A3 indique de faire 1 ms dans le 1er arceau des 2 ml avant le coin alors qu'au même endroit A5 indique de faire 3 ms. Que dois-je faire? Merci de votre réponse. Cordialement. Françoise

21.02.2024 - 23:30

DROPS Design answered:

Bonjour Françoise, le diagramme A.5 montre comment crocheter à la transition entre les 2 carrés, autrement dit, vous aurez 3 mailles serrées autour de chaque arceau; le diagramme A.3 montre comment crocheter les 4 coins de la couverture, là, vous ne crochetez qu'1 maille serrée dans l'arceau, puis 4 ml, 1 demi-bride dans l'arceau suivant, 4 ml et 1 maille serrée dans l'arceau suivant. Bon crochet!

22.02.2024 - 09:16

country flag Nena wrote:

I love your patterns ( and your yarns) but I would find it very helpful if you could do a video of the whole square alongside the diagrams - so the reader could see how they fit together. I am sure you would find many more people would use your patterns. You do great work in so many languages, and this would really help.

12.12.2022 - 03:09

country flag Linda Rossi wrote:

Really love this pattern, trouble is. Would really love a written pattern to follow to make it as I don't know how to follow the diagram pattern Is there a written pattern available?

12.08.2022 - 21:17

country flag Robin wrote:

Are there written directions for this pattern please?

31.07.2022 - 18:07

DROPS Design answered:

Dear Robin, the only format of the pattern available is the one published online, with both diagrams and written instructions mixed. If you have problems reading the crochet diagrams, you can read the following lesson to help you: https://www.garnstudio.com/lesson.php?id=69&cid=19. Happy crocheting!

31.07.2022 - 18:57

country flag Françoise wrote:

Bonsoir Merci pour votre réponse, mais je n'ai toujours pas compris comment faire des allers retours dans un rond. Merci de votre aide. Cordialement

14.12.2021 - 17:23

DROPS Design answered:

Bonjour Françoise, vous terminez votre tour par 1 maille coulée, et au lieu de continuer du même côté, vous tournez votre carré pour tricoter sur l'autre face. Peut-être que cette vidéo vous permettra de visualiser comment faire, elle montre comment crocheter un carré type granny en allers et retours. Tenez-nous au courant. Bon crochet!

15.12.2021 - 07:53

country flag Françoise wrote:

Bonjour Le début du carré est fait de 4 ml dans un rond, et à partir du 2 ème rg vous indiquez de faire des allers retours. Comment fait- on des allers retours dans un rond sauf à séparer en 2 parties ? Pourquoi ne pas continuer en rond puisque de toutes façons il y a des angles et que le carré sera quand même formé et le travail plus joli. Tout à l'endroit et non endroit/envers. Merci de votre réponse. Cordialement

14.12.2021 - 14:51

DROPS Design answered:

Bonjour Françoise, on va simplement crocheter alternativement sur l'envers (1er rang) et sur l'endroit (2ème rang), en joignant chaque rang par 1 mc comme indiqué dans le diagramme, vous allez donc lire alternativement dans un sens et dans l'autre pour pouvoir continuer le diagramme sur l'endroit et sur l'envers - les carrés sont ainsi réversibles sans vraie face endroit/envers. Bon tricot!

14.12.2021 - 17:07

country flag Renate Jähnert wrote:

Hallo, ist es möglich eine Farbkarte der Drops Alpaka Garne mix und uni zu erhalten? Ich plane eine große, bunte Mosaikdecke. Nachdem die Farben in Wirklichkeit häufig anders ausschauen, als am Bildschirm, wäre das unglaublich hilfreich. Vielen Dank und viele Grüße aus Deutschland! Renate Jähnert

09.04.2021 - 12:38

DROPS Design answered:

Liebe Frau Jähnert, die Farbkarte von DROPS Alpaca finden Sie hier auf unserer Website - wenn Sie Hilfe mit den Farben brauchen, fragen Sie bitte Ihr DROPS Laden - auch telefonisch oder per E-Mail wird man Ihnen dort gerne helfen. Viel Spaß beim stricken!

09.04.2021 - 13:11

country flag Sarah wrote:

Ik begrijp de beschrijving van het vierkant niet. Hoezo heen en terug haken, en verkeerde kant? Het is toch gewoon rond haken tot het eind. Zoals een grannie scuare?

23.10.2020 - 15:39

DROPS Design answered:

Dag Sarah,

Na elk rondje op de granny sluit je de toer en haak je de volgende toer weer in tegenovergestelde richting terug. Daardoor blijft het vierkant beter in vorm.

25.10.2020 - 19:18

country flag Esperanza wrote:

Me parece una manta muy bonita, tengo muchas ganas de poder hacerla🤗

21.09.2020 - 14:35