
Popular categories
Looking for a yarn?


|
|||||||||||||||||||||||||||||||
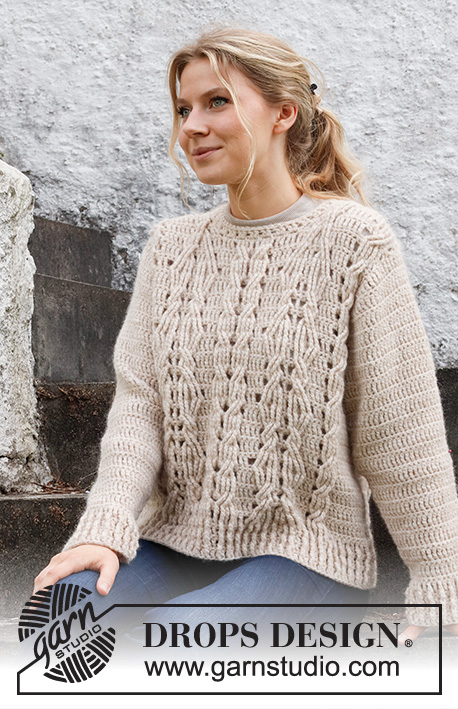
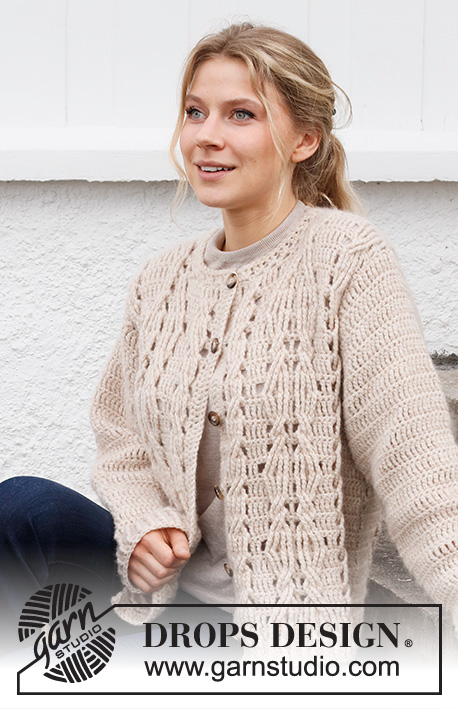
Enchanted Underwood Jacket |
|||||||||||||||||||||||||||||||
 |
 |
||||||||||||||||||||||||||||||
Crocheted jacket in DROPS Air. The piece is worked top down with cables and relief stitches. Sizes XS - XXL.
DROPS 218-31 |
|||||||||||||||||||||||||||||||
|
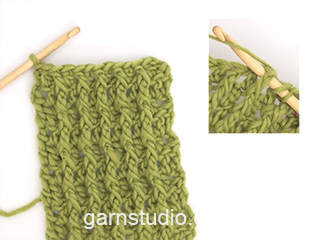
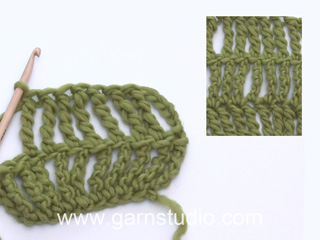
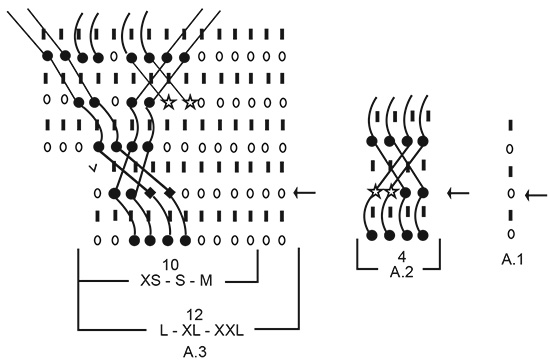
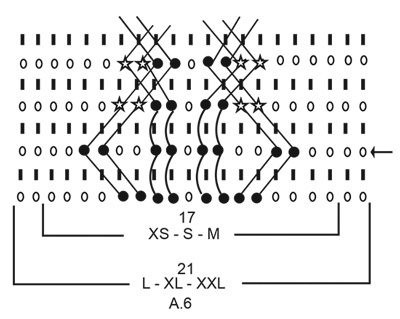
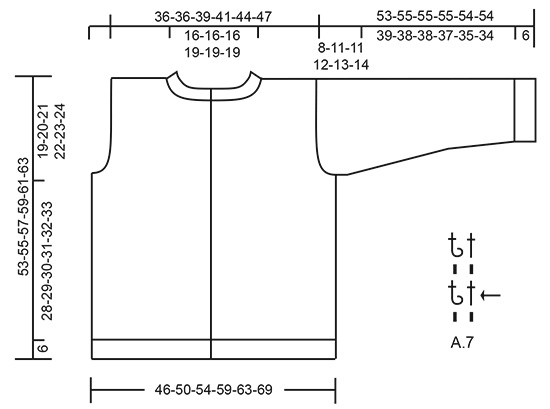
------------------------------------------------------- EXPLANATIONS FOR THE PATTERN: ------------------------------------------------------- CHAIN STITCH: If you work outermost on the hook the chain stitch will often be too tight; 1 chain stitch should be as long as 1 double crochet/double-treble crochet is wide. CROCHET INFORMATION: At the beginning of each row of double-treble crochets work 4 chain stitches; these chain stitches do not replace the first double-treble crochet. At the beginning of each row of double crochets work 1 chain stitch; this chain stitch does not replace the first double crochet. PATTERN: See diagrams A.1 to A.9. Find your size in the diagrams (applies to A.3, A.4, A.6, A.8 and A.9). INCREASE TIP (for armholes): Increase 2 stitches by working 3 stitches in the outermost stitch towards the armhole. DECREASE TIP: Decrease 1 stitch on each side of the piece by working together the first 2 stitches and the last 2 stitches on the row as follows: Work 1 double crochet but wait with the last yarn over and pull-through (= 2 loops on the hook), work 1 double crochet in the next stitch and pull the last yarn over through all 3 loops on the hook (= 1 stitch decreased). ------------------------------------------------------- START THE PIECE HERE: ------------------------------------------------------- JACKET – SHORT OVERVIEW OF THE PIECE: The piece is worked top down and back and forth in sections, which are crocheted/sewn together to finish. BACK PIECE: Left shoulder: Work 15-15-17-17-19-21 chain stitches – read CHAIN STITCH, with hook size 5 mm and Air. Turn and work the first row from the right side as follows: 1 double-treble crochet in each chain stitch – read CROCHET INFORMATION = 15-15-17-17-19-21 double-treble crochets. Then work a row with 1 double crochet in each double-treble crochet. Now work pattern (starting on the row with the arrow) from the right side as follows: A.1 over the first 1-1-3-1-3-5 stitches, A.2 over the next 4 stitches, A.3 over the next 10-10-10-12-12-12 stitches (find your size in the diagram). When you have worked the row with the arrow, cut the strand and lay the piece to one side. Right shoulder: Work 15-15-17-17-19-21 chain stitches – remember CHAIN STITCH, with hook size 5 mm and Air. Turn and work the first row from the right side as follows : 1 double-treble crochet in each chain stitch – remember CROCHET INFORMATION = 15-15-17-17-19-21 double-treble crochets. Then work a row with 1 double crochet in each double-treble crochet. Now work pattern (starting on the row with the arrow) from the right side as follows: Work A.4 over the first 10-10-10-12-12-12 stitches (find your size in the diagram), A.5 over the next 4 stitches, A.1 over the last 1-1-3-1-3-5 stitches. When you have worked the row with the arrow, continue with the next row in the diagram (= 1 stitch increased towards the neck), then work 20-20-20-24-24-24 loose chain stitches (= neck) and continue this row over the left shoulder as follows: A.3 over the first 10-10-10-12-12-12 stitches (= 1 stitch increased towards the neck), A.2 over the next 4 stitches, A.1 over the last 1-1-3-1-3-5 stitches = 52-52-56-60-64-68 stitches. REMEMBER THE CROCHET TENSION! Continue with the next 2 rows in the pattern and over the chain stitches on the neck work 1 double-treble crochet in each stitch from the right side and 1 double crochet in each stitch from the wrong side. Now work pattern as before over the first 22-22-24-26-28-30 stitches, A.2 over the next 4 stitches, A.5 over the next 4 stitches (make sure that A.2 and A.5 start on the same row on each side of the back piece), work pattern as before over the last 22-22-24-26-28-30 stitches. When A.3 and A.4 have been completed in height, work pattern as before over the first 5-5-7-5-7-9 stitches, A.6 over the next 17-17-17-21-21-21 stitches, A.2 and A.5 as before, A.6 over the next 17-17-17-21-21-21 stitches and work as before over the last 5-5-7-5-7-9 stitches. Continue this pattern back and forth. Repeat the diagrams from the rows with the arrows. When the piece measures 17-16-17-18-19-19 cm, increase 2 stitches on each side for the armholes – read INCREASE TIP. Increase like this every row a total of 2-3-3-3-3-4 times on each side = 60-64-68-72-76-84 stitches. At the end of the next 2 rows work 3-4-5-6-7-7 loose chain stitches for both armholes = 66-72-78-84-90-98 stitches. The new stitches are worked in A.1. Continue back and forth until the piece measures 47-49-51-53-55-57 cm from the shoulder down – adjust so you finish after the row with the arrow in A.6 or the next to last row in the diagram. Now work an edge as follows: Work 1 row with 1 double crochet in each stitch and increase 1 stitch on the row by working 2 double crochets in one stitch = 67-73-79-85-91-99 stitches. Work from the row with the arrow in A.7 until there is 1 stitch left and work the first stitch in A.7. Repeat the last 2 rows in the diagram until the edge measures 6 cm – adjust so you finish after a row of treble crochets/ relief triple treble crochets. Cut and fasten the strand. The back piece measures approx. 53-55-57-59-61-63 cm from the shoulder down. RIGHT FRONT PIECE: Work 15-15-17-17-19-21 chain stitches – remember CHAIN STITCH, with hook size 5 mm and Air. Turn and work the first row from the right side as follows: 1 double-treble crochet in each chain stitch – remember CROCHET INFORMATION = 15-15-17-17-19-21 double-treble crochets. Then work a row with 1 double crochet in each double-treble crochet. Now work pattern (starting on the row with the arrow) from the right side as follows: Work A.1 over the first 1-1-3-1-3-5 stitches, A.2 over the next 4 stitches, A.8 over the next 10-10-10-12-12-12 stitches (find your size in the diagram). Continue back and forth like this. When row 3 has been worked (counting from the row with the arrow), cut the strand. Work 9-9-9-11-11-11 loose chain stitches (= neck), work row 4 in A.8 and A.2 from the wrong side as before and then A.1 to the end of the row = 27-27-29-31-33-35 stitches. Work pattern as before over the first 5-5-7-5-7-9 stitches, then continue with A.8 and 1 double treble crochet in each of the last 9-9-9-11-11-11 stitches. Work back from the wrong side with 1 double crochet in each stitch. Continue back and forth like this but, when there are 5 stitches left on the row from the right side, work A.2 (adjust so you work the same row in A.2 as at the beginning of the row) and finish with A.1 over the last stitch. When A.8 has been completed in height, work pattern as follows: Work as before over the first 5-5-7-5-7-9 stitches, A.6 over the next 17-17-17-21-21-21 stitches and the rest of the row as before. When the piece measures 17-16-17-18-19-19 cm from the shoulder – adjust so the next row is worked from the right side, increase 2 stitches in the side for the armhole – remember INCREASE TIP. Increase like this every row a total of 2-3-3-3-3-4 times = 31-33-35-37-39-43 stitches. At the end of the next row from the wrong side work 3-4-5-6-7-7 loose chain stitches for the armhole = 34-37-40-43-46-50 stitches. Then work alternately double treble crochets from the right side/double crochets from the wrong side over the new stitches and pattern as before over the other stitches on the row. Continue like this back and forth until the piece measures 47-49-51-53-55-57 cm – adjust so you finish after the row with the arrow in A.6 or the next to last row in the diagram. Work 1 row with 1 double crochet in each stitch and increase 1-0-1-0-1-1 stitch on the row by working 2 double crochets in one stitch = 35-37-41-43-47-51 stitches. Work from the row with the arrow in A.7 until there is 1 stitch left and work the first stitch in A.7. Repeat the last 2 rows in the diagram until the edge measures 6 cm – adjust so you finish after a row of treble crochets/relief triple treble crochets. Cut and fasten the strand. The right front piece measures approx. 53-55-57-59-61-63 cm from the shoulder down. LEFT FRONT PIECE: Work 15-15-17-17-19-21 chain stitches, with hook size 5 mm and Air. Turn and work the first row from the right side as follows: 1 double-treble crochet in each chain stitch = 15-15-17-17-19-21 double-treble crochets. Then work a row with 1 double crochet in each stitch. Now work pattern (starting on the row with the arrow) from the right side as follows A.9 over the first 10-10-10-12-12-12 stitches, A.5 over the next 4 stitches, A.1 over the last 1-1-3-1-3-5 stitches. Continue back and forth like this until row 4 has been worked (count from the row with the arrow); now work 9-9-9-11-11-11 loose chain stitches at the end of the row (= neck) = 27-27-29-31-33-35 stitches. Turn and work back and forth as before; over the new stitches work 1 double treble crochet in each chain stitch. Work 1 row back from the wrong side with 1 double crochet in each stitch. Now work pattern as follows: A.1 over the first stitch, A.5 over the next 4 stitches and pattern as before to the end of the row. When A.9 has been completed in height, work pattern as before over the first 5 stitches, A.6 over the next 17-17-17-21-21-21 stitches and pattern as before over the last 5-5-7-5-7-9 stitches. When the piece measures 17-16-17-18-19-19 cm from the shoulder – adjust so the next row is worked from the right side, increase 2 stitches in the side for the armhole. Increase like this every row a total of 2-3-3-3-3-4 times = 31-33-35-37-39-43 stitches. At the end of the next row from the right side work 3-4-5-6-7-7 loose chain stitches for the armhole = 34-37-40-43-46-50 stitches. Then work alternately double treble crochets from the right side/double crochets from the wrong side over the new stitches and pattern as before over the other stitches on the row. Continue like this back and forth until the piece measures 47-49-51-53-55-57 cm – adjust so you finish after the row with the arrow in A.6 or the next to last row in the diagram. Work 1 row with 1 double crochet in each stitch and increase 1-0-1-0-1-1 stitch on the row by working 2 double crochets in one stitch = 35-37-41-43-47-51 stitches. Work from the row with the arrow in A.7 until there is 1 stitch left and work the first stitch in A.7. Repeat the last 2 rows in the diagram until the edge measures 6 cm – adjust so you finish after a row of treble crochets/relief triple treble crochets. Cut and fasten the strand. The left front piece measures approx. 53-55-57-59-61-63 cm from the shoulder down. ASSEMBLY: Sew the shoulder seams in each and every stitch, making sure the seam is not tight. Crochet the side seams through both layers from the wrong side as follows: Fasten the strand with 1 double crochet under the sleeve, * work 2 chain stitches, skip 1 cm, 1 double crochet *, work from *-* down the whole seam and finish with 1 double crochet. SLEEVE: The sleeve is worked back and forth, top down. Work 24-24-24-25-25-27 chain stitches with hook size 5 mm and Air. Turn and work from the row with the arrow in A.1, AT THE SAME TIME increase for the sleeve cap, every row on each side as follows: Increase 2 stitches 3-1-2-1-0-0 times and 1 stitch 3-7-6-8-10-11 times = 42-42-44-45-45-49 stitches. At the end of the next 2 rows work 3-4-5-6-7-7 new chain stitches for the armhole = 48-50-54-57-59-63 stitches. The new stitches are worked in A.1. Insert a marker. THE PIECE IS NOW MEASURED FROM HERE. Continue A.1 back and forth until the piece measures 2 cm – adjust so the next row is with double crochets, and begin to decrease on each side – read DECREASE TIP. Decrease like this on each row of double crochets 6-6-8-8-9-10 times = 36-38-38-41-41-43 stitches. Continue working until the sleeve measures 39-38-38-37-35-34 cm – adjust so the next row is with double crochets. Now work an edge as follows: Work 1 row with 1 double crochet in each stitch and increase 1-1-1-0-0-0 stitch on the row = 37-39-39-41-41-43 stitches. Work from the row with the arrow in A.7 until there is 1 stitch left and work the first stitch in A.7. Repeat the last 2 rows in the diagram until the edge measures 6 cm – adjust so you finish after a row of treble crochets/relief triple treble crochets. Now crochet the sleeve seams through both layers from the wrong side as follows: * Work 1 double crochet, 2 chain stitches, skip 1 cm *, work from *-* as far as the 3-4-5-6-7-7 chain stitches cast on under the sleeve on both sides, finish with 1 double crochet. Work the other sleeve in the same way. Sew the sleeves to the body. BANDS: Right band: ROW 1: Start at the top of the neck and work from the wrong side with hook size 5 mm and Air as follows: Fasten the strand with 1 double crochet in the top corner of the neck, * work 2 double crochets around the double treble crochet, 1 double crochet in the next double crochet, 3 double crochets around the next double treble crochet, 1 double crochet in the next double crochet *, work from *-* down the right front piece = approx. 64 to 78 stitches. ROW 2: Work 1 row with 1 treble crochet in each stitch. ROW 3: Work 1 double crochet in each treble crochet. Cut and fasten the strand. Left band: Work as the right band but start at the bottom of the left front piece. NECK: ROW 1: Start in the outermost stitch on the left band and work from the wrong side as follows: Fasten the strand with 1 double crochet, * work 2 chain stitches, skip 1½ cm, 1 double crochet *, work from *-* around the whole neck = approx. 35 to 39 chain-spaces. ROW 2: Work 3 chain stitches, 2 treble crochets around each chain-space, finish with 1 treble crochet in the last double crochet on the row. ROW 3: Work 1 double crochet in each stitch. Cut and fasten the strand. ASSEMBLY: Sew the buttons onto the left band. Sew the first button in the transition between the neck and the band; the other 5-5-5-6-6-6 buttons with approx. 8½-9-9-8-8-8½ cm between each one. The buttons are buttoned between 2 treble crochets on the right band. |
|||||||||||||||||||||||||||||||
Diagram explanations |
|||||||||||||||||||||||||||||||
|
|||||||||||||||||||||||||||||||

|
|||||||||||||||||||||||||||||||
|
|||||||||||||||||||||||||||||||

|
|||||||||||||||||||||||||||||||
|
|||||||||||||||||||||||||||||||
|
|||||||||||||||||||||||||||||||
|
Have you made this or any other of our designs? Tag your pictures in social media with #dropsdesign so we can see them! Do you need help with this pattern?You'll find tutorial videos, a Comments/Questions area and more by visiting the pattern on garnstudio.com. © 1982-2024 DROPS Design A/S. We reserve all rights. This document, including all its sub-sections, has copyrights. Read more about what you can do with our patterns at the bottom of each pattern on our site. |
|||||||||||||||||||||||||||||||


With over 40 years in knitting and crochet design, DROPS Design offers one of the most extensive collections of free patterns on the internet - translated to 17 languages. As of today we count 304 catalogues and 11422 patterns - 11422 of which are translated into English (UK/cm).
We work hard to bring you the best knitting and crochet have to offer, inspiration and advice as well as great quality yarns at incredible prices! Would you like to use our patterns for other than personal use? You can read what you are allowed to do in the Copyright text at the bottom of all our patterns. Happy crafting!
Comments / Questions (13)
Vielleicht habe ich meine Feage nicht richtig gestellt: wie setzen sich die 28 Maschen zusammen? Zuvor hebe ich A1 mit 3, dann A2 mit 4 und dann A3 mit 15 Maschen gehäkelt. Zusammen sind das aber nur 22. Und dann?
09.10.2023 - 05:56DROPS Design answered:
Liebe Heike, die Anleitung wurde etwas anders formuliert und ist nun hoffentlich besser verständlich: "Im Muster und mit Doppelstäbchen/festen Maschen wie zuvor über die ersten 22-22-24-26-28-30 Maschen"..., d.h. Sie häkeln A.1, A.2 und A.3 wie gehabt und die restlichen 6 Maschen als Doppelstäbchen bzw. feste Maschen. Gutes Gelingen nun!
09.10.2023 - 21:22Hallo, ich habe jetzt die 2 Reihen nach Luftmaschenanschlag für den Hals gehäkelt und die 2 Reihen danach. Nun verstehe ich, welches Muster ich über 28 Maschen häkeln soll.
03.10.2023 - 21:34DROPS Design answered:
Liebe Frau Zeiß, die ersten und letzten 28 Maschen werden genauso wiezuvor gehäkelt, bis die Diagramme fertig in der Höhe sind. Viel Spaß beim häkeln!
04.10.2023 - 08:00I had some trouble with the large size. my arm holes were much larger than my sleeve holes so when I sewed them on the body has too much material for the arm attachment.
22.02.2023 - 05:40DROPS Design answered:
Dear Colleen, the sleeve should match the armhole, ie you will work the part before the marker along the whole armhole (the first chain stitches cast on then the new chain stitches increased on each side ) - using pins to place the sleeve before sewing it to the armhole can help. Happy assembly!
22.02.2023 - 08:59Is het mogelijk om bij de vragen en opmerkingen in andere talen een vertaaloptieknopje toe te passen? Het is dat ik Duits kan lezen anders had ik waarschijnlijk dezelfde vraag moeten stellen over waar precies te meten op het achterpand op 17 cm (vanaf de hals of schouder). Nu weet ik dat het vanaf de schouder is, maar als het er in het Zweeds had gestaan had ik het niet geweten. Alvast bedankt!
30.07.2021 - 08:41DROPS Design answered:
Dag Monica,
Helaas is er geen (automatische) vertaalmogelijkheid, aangezien brei- en haaktermen vaak niet goed vertaald worden met google translate, maar het is geen enkel probleem om dezelfde vraag nogmaals in een andere taal te stellen. Fijn dat je er nu zelf uit bent gekomen.
02.08.2021 - 21:14Hallo liebes Drops-Team. Ich habe eine schnelle Frage zur Anleitung. Und zwar, ob beim Rückenteil die 17 cm Arbeitslänge (Beginn der Zunahmen der Armausschnitte) ab dem Halsausschnitt oder ab der Schulternaht gemessen werden soll? Lieben Dank im Voraus, Sarah
15.04.2021 - 16:45DROPS Design answered:
Liebe Frau Hoss, diese 17 cm werden vom Schulter gemessen. Viel Spaß beim häkeln!
16.04.2021 - 14:02Vraag: Wanneer komen die mooie Lente/zomer collectie online?
17.02.2021 - 19:19DROPS Design answered:
Dag Loes,
We zijn druk bezig met vertalen en controleren en in de loop van de komende maanden komen alle patronen online. hier vind je een overzicht van alle patronen van de DROPS Lente & Zomer collectie, waarvan je kunt zien dat er ook al een aantal gepubliceerd zijn.
21.02.2021 - 10:56Ik mis de schematische tekening van A7. Graag uw reactie. Mvg Gerda
03.02.2021 - 11:29DROPS Design answered:
Dag Gerda,
A.7 staat een beetje verstopt :), namelijk onder de mouw bij de matentekening onderaan het patroon.
06.02.2021 - 11:28Hej, jag får inte ihop maskornas antal på bakstycket men hoppas att min syster kan hjälpa mig med det. Min egentliga fråga gäller ärmen. Jag hittar inte mönster A7?
09.01.2021 - 16:57DROPS Design answered:
Hej Isabella. Diagram A.7 hittar du längst ner, till höger om måttskissen. Mvh DROPS Design
12.01.2021 - 13:34Har I et billede af, hvordan ryggen ser ud? Jeg er kommet der til hvor jeg har sat Venstre skulder på, hæklet mønster den ene vej og fastmasker den anden vej, men forstå ikke hvordan jeg skal hækle mønster over 26 masker? (Str L)
03.01.2021 - 14:19DROPS Design answered:
Hej Malene, du har 60 masker i L Nu hækles der mønster således: Hækl mønster som før over de første 26 masker, hækl A.2 over de næste 4 masker og A.5 over de næste 4 masker (sørg for at A.2 og A.5 starter på samme række som i diagrammerne i hver side af bagstykket), hækl mønster som før over de sidste 26 masker. Du fortsætter altså med samme mønster som du har hæklet på skulderstykkerne tidligere. God fornøjelse!
14.01.2021 - 13:38Jeg forstår desværre ikke om hvornår det er at jeg skal sætte venstre skulder på igen? Er det efter man har lavet de 20 løse luftmasker? Hvis jeg gør det, og laver fastmasker i de 18 masker på den venstre skulder, så kommer diagrammet ikke til at passe, når jeg hækler den næste række.
22.12.2020 - 23:32DROPS Design answered:
Hej Kirstine, jo sørg for at du er kommet lige så langt som på venstre skulder fra retsiden. Du starter nu fra vrangen, hækler 2.række i diagrammet på højre skulder, hækler luftmaskerne imellem stykkerne og hækler videre med 2.række (rækken efter den med pil) på venstre skulder. God fornøjesle!
07.01.2021 - 11:20