DROPS Puna
DROPS Puna
100% Alpaca
from 6.45 CAD /50g
Get the yarn to make this pattern from 45.15CAD.

The yarn cost is calculated from the pattern’s smallest size and the yarn’s cheapest product type. Looking for an even better price? You might find it on the DROPS Deals!

DROPS SS24

Mayan Moon Shine

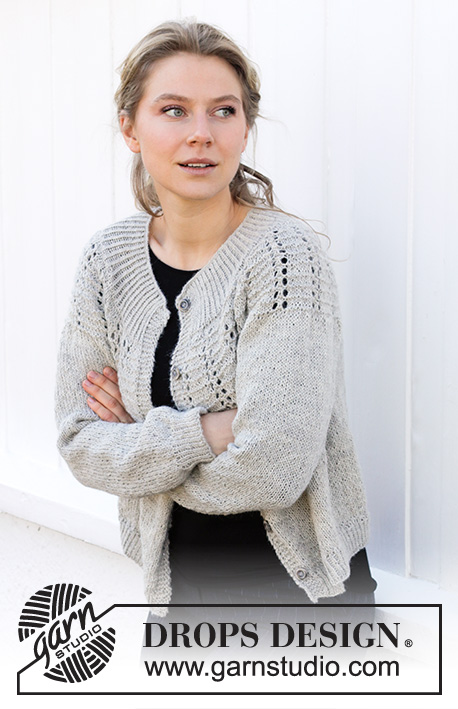
Knitted jacket in DROPS Puna. The piece is worked top down with round yoke, textured pattern and lace pattern. Sizes S - XXXL.

DROPS 217-33
DROPS Design: Pattern no pu-049
Yarn group B
-------------------------------------------------------

SIZES:
S - M - L - XL - XXL - XXXL
Finished measurements:
Chest measurements: 92-100-108-118-130-142 cm = 36¼"-39⅜"-42½"-46½"-51¼"-55¾"
Full length: 52-54-56-58-60-62 cm = 20½"-21¼"-22"-22¾"-23⅝"-24⅜"

All measurements in charts are in cm.
MATERIALS:
DROPS PUNA from Garnstudio (belongs to yarn group B)
350-400-450-450-500-550 g color 07, light grey

KNITTING GAUGE:
20 stitches in width and 26 rows in height with stockinette stitch = 10 x 10 cm = 4" x 4".

NEEDLES:
DROPS DOUBLE POINTED NEEDLES SIZE 4.5 MM = US 7.
DROPS CIRCULAR NEEDLE SIZE 4.5 MM = US 7: Length 40 cm = 16" and 80 cm = 32" for stockinette stitch.
DROPS CIRCULAR NEEDLE SIZE 4 MM = US 6; Length 80 cm = 32" for textured pattern.
DROPS DOUBLE POINTED NEEDLES SIZE 3 MM = US 2,5.
DROPS CIRCULAR NEEDLE SIZE 3 MM = US 2,5: Length 60 cm = 24" and 80 cm = 32" for rib.
Needle size is only a guide. If you get too many stitches on 10 cm = 4", change to a larger needle size. If you get too few stitches on 10 cm = 4", change to a smaller needle size.

DROPS BUTTONS, Mocha NO 623: 6-6 6-7-7-7 items.

-------------------------------------------------------

Alternative Yarn – See how to change yarns here
Yarn Groups A to F – Use the same pattern and change the yarn here
Yarn usage using an alternative yarn – Use our yarn converter here

-------------------------------------------------------

DROPS Puna
DROPS Puna
100% Alpaca
from 6.45 CAD /50g
Get the yarn to make this pattern from 45.15CAD.

The yarn cost is calculated from the pattern’s smallest size and the yarn’s cheapest product type. Looking for an even better price? You might find it on the DROPS Deals!

Pattern instructions

NOTE: This pattern is written in American English. All measurements in charts are in cm. For conversion from inches to cm - click here. There are different terms for crocheting in American and British English. If this pattern includes crochet, click for "crochet terms" here. For this pattern in British English, please click here.
-------------------------------------------------------

EXPLANATIONS FOR THE PATTERN:

-------------------------------------------------------

RIDGE/GARTER STITCH (worked back and forth):
Knit all rows.
1 ridge in height = Knit 2 rows.

PATTERN:
See diagrams A.1 and A.2 (choose diagram for your size – applies to A.2). The diagrams show all rows in the pattern from the right side.

INCREASE TIP (evenly spaced):
To work out how to increase evenly, count the total number of stitches on the needle (e.g. 241 stitches) minus bands (e.g. 10 stitches) and divide the remaining stitches by the number of increases to be made (e.g. 24) = 9.6.
In this example, increase by making 1 yarn over after alternately each 9th and 10th stitch. Do not increase on bands. On the next row work the yarn overs twisted to avoid holes.

DECREASE TIP (for sleeves):
Decrease 1 stitch on either side of the marker thread as follows: Work until there are 3 stitches left before the marker thread, knit 2 together, knit 2 (marker thread sits between these 2 stitches), slip 1 stitch as if to knit, knit 1 and pass the slipped stitch over the knitted stitch.

BUTTONHOLES:
Work buttonholes on the right band (when the garment is worn). Work from the right side when there are 3 stitches left on the row as follows: Make 1 yarn over, knit 2 together and knit 1. On the next row (wrong side), knit the yarn over to leave a hole.
The first buttonhole is worked when the rib on the neck measures approx. 1½-2 cm = ½"-¾". Then work the other 5-5-6-6-6-6 buttonholes with approx. 8-8½-9-8-8-8½ cm = 3⅛"-3¼"-3½"-3⅛"-3⅛"-3¼" between each one.

BINDING-OFF TIP:
To avoid the bind-off edge being tight you can bind off with a larger size needle. If the edge is still tight, make 1 yarn over after approx. each 4th stitch at the same time as binding off; the yarn overs are bind off as normal stitches.

-------------------------------------------------------

START THE PIECE HERE:

-------------------------------------------------------

JACKET – SHORT OVERVIEW OF THE PIECE:
The neck and yoke are worked back and forth with circular needle from mid front and top down. The yoke is divided for body and sleeves and the body continued back and forth. The sleeves are worked in the round with short circular needle/double pointed needles, top down.

NECK:
Cast on 135-141-147-153-159-165 stitches (including 5 band stitches on each side towards mid front) with circular needle size 3 mm = US 2,5 and Puna. Purl 1 row (= wrong side).
Then work rib as follows:
ROW 1 (right side): 5 band stitches in GARTER STITCH – read description above, * knit 1 twisted, purl 1 *, work from *-* until there are 6 stitches left on the row, knit 1 twisted and finish with 5 band stitches in garter stitch.
ROW 2 (wrong side): 5 band stitches in garter stitch * purl 1 twisted, knit 1 *, work from *-* until there are 6 stitches left on the row, purl 1 twisted and finish with 5 band stitches in garter stitch.
Repeat rows 1 and 2 until the rib measures 8 cm = 3⅛" – remember the BUTTONHOLES on the right band – read description above. When the rib is finished, knit 1 row from the right side, AT THE SAME TIME increase 1 stitch by making 1 yarn over = 136-142-148-154-160-166 stitches. Purl 1 row from the wrong side (purl yarn overs twisted and work edge stitches in garter stitch as before). Change to circular needle size 4 mm = US 6.

YOKE:
Work pattern as follows: 5 band stitches in garter stitch, * A.1 over the next 3 stitches, A.2 (= 3 stitches on the first row) *, work from *-* 21-22-23-24-25-26 times in width and finish with 5 band stitches in garter stitch.
Continue back and forth like this. REMEMBER THE KNITTING GAUGE! When A.2 have been completed in height, there are 241-252-286-322-335-348 stitches on the needle.
Continue the pattern (without further increases in A.2) until the yoke measures 17-19-20-22-24-26 cm = 6¾"-7½"-8"-8¾"-9½"-10¼" from the cast-on edge – adjust so you finish on a row like the last row in A.2.
Change to circular needle size 4.5 mm = US 7. Continue with stockinette stitch with 5 band stitches in garter stitch on each side. AT THE SAME TIME on the first row from the right side increase 25-31-26-26-31-41 stitches evenly spaced – read INCREASE TIP = 266-283-312-348-366-389 stitches. When the piece measures 19-21-22-24-26-28 cm = 7½"-8¼"-8¾"-9½"-10¼"-11" increase 24-31-26-26-32-41 stitches = 290-314-338-374-398-430 stitches. Continue working until the yoke measures 20-22-23-25-27-29 cm = 8"-8¾"-9"-9¾"-10⅝"-11⅜" from the cast-on edge.
Now divide the piece for body and sleeves, on the next row from the wrong side, as follows:
5 band stitches in garter stitch, purl 41-45-48-53-58-64 stitches (= right front piece), place the next 58-62-68-76-78-82 stitches on 1 thread for the sleeve and cast on 10-10-12-12-14-14 new stitches on the needle (= in side under sleeve), purl 82-90-96-106-116-128 stitches (= back piece), place the next 58-62-68-76-78-82 stitches on 1 thread for the sleeve and cast on 10-10-12-12-14-14 new stitches on the needle (= in side under sleeve), purl 41-45-48-53-58-64 stitches and work 5 band stitches in garter stitch (= left front piece). Body and sleeves are finished separately. THE PIECE IS NOW MEASURED FROM HERE!

BODY:
= 194-210-226-246-270-294 stitches. Work stockinette stitch with 5 band stitches in garter stitch on each side. When the piece measures 24-24-25-25-25-25 cm = 9½"-9½"-9¾"-9¾"-9¾"-9¾" from the division, increase 37-41-43-47-53-57 stitches evenly spaced = 231-251-269-293-323-351 stitches. Change to circular needle size 3 mm = US 2,5 and work rib as follows:
ROW 1 (right side): 5 band stitches in garter stitch, * knit 1 twisted, purl 1 *, work from *-* until there are 6 stitches left on the row, knit 1 twisted and finish with 5 band stitches in garter stitch.
ROW 2 (wrong side): 5 band stitches in garter stitch * purl 1 twisted, knit 1 *, work from *-* until there are 6 stitches left on the row, purl 1 twisted and finish with 5 band stitches in garter stitch.
Repeat rows 1 and 2 until the rib measures 4 cm = 1½".
Bind off with knit over knit and purl over purl – read BINDING-OFF TIP.
The jacket measures approx. 52-54-56-58-60-62 cm = 20½"-21¼"-22"-22¾"-23⅝"-24⅜" from the shoulder down.

SLEEVE:
Place the 58-62-68-76-78-82 stitches from the thread on the one side of the piece on double pointed needles/short circular needle size 4.5 mm = US 7 and knit up 1 stitch in each of the 10-10-12-12-14-14 stitches cast on under the sleeve = 68-72-80-88-92-96 stitches. Insert a marker thread in the middle of the new stitches under the sleeve (= 5-5-6-6-7-7 new stitches on each side of marker thread). Allow the marker thread to follow your work onwards; it will be used when decreasing under the sleeve. Work stockinette stitch in the round.
When the piece measures 4-4-4-4-4-3 cm = 1½"-1½"-1½"-1½"-1½"-1⅛" from the division, decrease under the sleeve – read DECREASE TIP. Decrease like this every 3-3-2-1½-1½-1 cm = 1⅛"-1⅛"-¾"-½"-½"-⅜" a total of 11-12-15-18-19-20 times = 46-48-50-52-54-56 stitches. When the sleeve measures 40-39-38-37-36-34 cm = 15¾"-15¼"-15"-14½"-14¼"-13⅜" (shorter measurements in larger sizes due to longer yoke), increase 6-6-8-8-10-10 stitches evenly spaced = 52-54-58-60-64-66 stitches. Change to double pointed needles size 3 mm = US 2,5 and work rib (= knit 1 twisted, purl 1) for 5 cm = 2". Bind off with knit over knit and purl over purl – remember BINDING-OFF TIP. The sleeve measures approx. 45-44-43-42-41-39 cm = 17¾"-17¼"-17"-16½"-16⅛"-15¼". Work the other sleeve in the same way.

ASSEMBLY:
Sew the buttons onto the left band.

This pattern has been corrected.

Updated online: 22.09.2020
Correction: Number of stitches in NECK.

Diagram

symbols = knit from right side, purl from wrong side
symbols = knit from wrong side
symbols = between 2 stitches make 1 yarn over. On the next row (wrong side) knit the yarn over – leaves a hole
symbols = slip 1 stitch as if to knit, knit 2 together, pass the slipped stitch over the knitted together stitches
symbols = between 2 stitches make 1 yarn over. On the next row (wrong side) purl the yarn over twisted to avoid a hole
diagram
diagram

Each of our patterns has specific tutorial videos to help you.

Do you have a question? See a list of frequently asked questions (FAQ)

Knitting tension is what determines the final measurements of your work, and is usually measured per 10 x 10 cm. It is provided like so: number of stitches in width x number of rows in height - eg: 19 stitches x 26 rows = 10 x 10 cm.

The knitting tension is very individual; some people knit/crochet loosely while others work tightly. You adjust the knitting tension with the needle size, which is why the suggested needle size only serve as a guide! You need to adjust this (up or down) to ensure that YOUR knitting tension matches the knitting tension provided in the pattern. If you work with a different knitting tension than provided you will have a different yarn consumption, and your work will have different measurements than what the pattern suggests.

The knitting tension also determines which yarns can replace each other. As long as you achieve the same knitting tension you can replace one yarn with another.

See DROPS lesson: How to measure your tension/gauge

See DROPS video: How to make a gauge tension swatch

The required amount of yarn is provided in grams, eg: 450 g. To calculate how many balls you’ll need you first need to know how many grams are in 1 ball (25g, 50g or 100g). This information is available if you click on the individual yarn quality on our pages. Divide the amount required with the amount of each ball. For example, if each ball is 50g (the most common amount), the calculation will be as follows: 450 / 50 = 9 balls.

The important thing when changing from one yarn to another is that the knitting/crochet tension remains the same. This is so that the measurements of the finished piece will be the same as on the sketch provided. It is easier to achieve the same knitting tension using yarns from the same yarn group. It is also possible to work with multiple strands of a thinner yarn to achieve the knitting tension of a thicker one. Please try our yarn converter. We recommend you to always work a test swatch.

Please NOTE: when changing yarn the garment might have a different look and feel to the garment in the photo, due to individual properties and qualities of each yarn.

See DROPS lesson: Can I use a different yarn than the one mentioned in the pattern?

All our yarns are categorised into yarn groups (from A to F) according to thickness and knitting tension – group A contains the thinnest yarns and group F the thickest. This makes it easier for you to find alternative yarns to our patterns, should you wish to switch yarn. All yarns within the same group have a similar knitting tension and can easily replace each other. However, different yarn qualities have different structures and properties which will give the finished work a unique look and feel.

Click here for an overview of the yarns in each yarn group

At the top of all our patterns you’ll find a link to our yarn converter, which is a helpful tool should you wish to use a different yarn than suggested. By filling in the yarn quality you wish to replace, the amount (in your size) and number of strands, the converter will present good alternative yarns with the same knitting tension. Additionally it will tell you how much you’ll require in the new qualities and whether you’ll need to work with multiple strands. Most skeins are 50g (some are 25g or 100g).

If the pattern is worked with multiple colours, every colour will have to be converted separately. Similarly, if the pattern is worked with several strands of different yarns (for example 1 strand Alpaca and 1 strand Kid-Silk) you will have to find alternatives for each, individually.

Click here to see our yarn converter

Since different yarns have different qualities and textures we have chosen to keep the original yarn in our patterns. However, you can easily find options among our available qualities by using our yarn converter, or simply pick a yarn from the same yarn group.

It is possible that some retailers still have discontinued yarns in stock, or that someone has a few skeins at home that they would like to find patterns for.

The yarn converter will provide both alternative yarn as well as required amount in the new quality.

If you think it's hard to decide what size to make, it can be a good idea to measure a garment you own already and like the size of. Then you can pick the size by comparing those measures with the ones available in the pattern's size chart.

You'll find the size chart at the bottom of the pattern.

See DROPS lesson: How to read size chart

The needle size provided in the pattern serves only as a guide, the important thing is to follow the knitting tension. And since knitting tension is very individual, you will have to adjust the needle size to ensure that YOUR tension is the same as in the pattern – maybe you’ll have to adjust 1, or even 2 needle sizes, up or down to achieve the correct tension. For this, we recommend that you work test swatches.

Should you work with a different knitting tension than the one provided, the measurements of the finished garment might deviate from the measurement sketch.

See DROPS lesson: How to measure your tension/gauge

See DROPS video: How to make a gauge tension swatch

Working a garment top-down provides more flexibility and room for personal adjustment. For example it is easier to try the garment on while working, as well as making adjustments to length of yoke and shoulder caps.

The instructions are carefully explaining every step, in the correct order. Diagrams are adjusted to the knitting direction and are worked as usual.

The diagram depicts all rows/rounds, and every stitch seen from the right side. It is read from bottom to top, from right to left. 1 square = 1 stitch.

When working back and forth, every other row is worked from the right side and every other row is worked from the wrong side. When working from the wrong side, the diagram will have to be worked reversed: from left to right, knit stitches are purled, purl stitches are knit etc.

When working in the round every round is worked from the right side and the diagram are worked from right to left on all rounds.

See DROPS lesson: How to read knitting diagrams

The diagram depicts all rows/rounds, and every stitch seen from the right side. It is worked from bottom to top, from right to left.

When working back and forth every other row is worked from the right side: from right to left and every other row is worked from the wrong side: from left to right.

When working in the round, every row in the diagram are worked from the right side, from right to left.

When working a circular diagram you start in the middle and work your way outwards, counter clockwise, row by row.

The rows usually start with a given number of chain stitches (equivalent to the height of the following stitch), this will either be depicted in the diagram or explained in the pattern.

See DROPS lesson: How to read crochet diagrams

Instructions for working several diagrams after each other on the same row/round, will often be written like so: “work A.1, A.2, A.3 a total of 0-0-2-3-4 times". This means you work A.1 once, then A.2 is worked once, and A.3 is repeated (in width) the number of times provided for your size – in this case like so: S = 0 times, M = 0 times, L=2 times, XL= 3 times and XXL = 4 times.

The diagrams are worked as usual: begin with the first row in A.1, then work the first row in A.2 etc.

See DROPS lesson: How to read knitting diagrams

See DROPS lesson: How to read crochet diagrams

The total width of the garment (from wrist-to-wrist) will be larger in the larger sizes, despite the actual sleeves being shorter. The larger sizes have longer sleeve caps and wider shoulders, so there will be a good fit in all sizes.

The measurement sketch/schematic drawing provides information regarding the full length of the garment. If it’s a jumper or a jacket the length is measured from the highest point on the shoulder (usually closest to the neckline), and straight down to the bottom of the garment. It is NOT measured from the tip of shoulder. Similarly, the length of yoke is measured from the highest point on the shoulder and down to where yoke is split into body and sleeves.

See DROPS lesson: How to read a schematic drawing

Diagrams are often repeated on the round or in height. 1 repeat is the diagram the way it appears in the pattern. If it says to work 5 repeats of A.1 in the round, then you work A.1 a total of 5 times after/next to each other in the round. If it says to work 2 repeats of A.1 vertically/in height you work the entire diagram once, then begin again at the start and work the entire diagram one more time.

Chain stitches are slightly narrower than other stitches and to avoid working the cast-on edge too tight, we simply chain more stitches to begin with. The stitch count will be adjusted on the following row to fit the pattern and measurement sketch.

The rib edge is more elastic and will contract slightly compared to, for example, stocking stitch. By increasing before the rib edge, you avoid a visible difference in width between the rib edge and the rest of the body.

It’s very easy to cast off too tightly, and by making yarn overs while casting off (and simultaneously casting these off) you avoid a too tight cast off edge.

See DROPS video: How to bind off with yarn overs (yo)

To achieve an even increase (or decrease) you can increase on, for example: every 3rd and 4th row alternately, like so: work 2 rows and increase on the 3rd row, work 3 rows and increase on the 4th. Repeat this until the increase is complete.

See DROPS lesson: Increase or decrease 1 st on every 3rd and 4th row alternately

Should you prefer to work in the round instead of back and forth, you may of course adjust the pattern. You’ll need to add steeks mid-front (usually 5 stitches), and follow the instructions. When you would normally turn and work from the wrong side, simply work across the steek and continue in the round. At the end you’ll cut the piece open, pick up stitches to work bands, and cover the cut edges.

See DROPS video: How to knit steeks and cut open

Should you prefer to work back and forth instead of in the round, you may of course adjust the pattern so you work the pieces separately and then assemble them at the end. Divide the stitches for the body in 2, add 1 edge stitch in each side (for sewing) and work the front and back pieces separately.

See DROPS lesson: Can I adapt a pattern for circular needles into straight needles?

Pattern repeats can vary slightly in the different sizes, in order to get the correct proportions. If you’re not working the exact same size as the garment in the photo, yours might deviate slightly. This has been carefully developed and adjusted so that the complete impression of the garment is the same in all sizes.

Make sure to follow instructions and diagrams for your size!

If you have found a pattern you like which is available in women’s size it’s not very difficult to convert it to men’s size. The biggest difference will be the length of sleeves and body. Start working on the women size that you think would fit across the chest. The additional length will be worked right before you cast off for the armhole/sleeve cap. If the pattern is worked top-down you can add the length right after the armhole or before the first decrease on sleeve.

Regarding additional yarn amount, this will depend on how much length you add, but it is better with a skein too many than too few.

All yarns will have excess fibres (from production) that might come off as lint or shedding. Brushed yarns (ie hairier yarns) have more of these loose, excess fibres, causing more shedding.

Shedding also depends on what is worn under or over the garment, and whether this pulls at the yarn fibres. It’s therefore not possible to guarantee that there will be no shedding

Below are some tips on how to get the best result when working with hairier yarns:

1. When the garment is finished (before you wash it) shake it vigorously so the looser hairs come off. NOTE: do NOT use a lint roller, brush or any method that pulls at the yarn.

2. Place the garment in a plastic bag and put it in your freezer - the temperature will cause the fibres to become less attached to each other, and excess fibres will come off easier.

3. Leave in the freezer for a few hours before taking it out and shaking it again.

4. Wash the garment according to the instructions on the yarn label.

Pilling is a natural process that happens to even the most exclusive of fibers. It's a natural sign of wear and tear that is hard to avoid, and that is most visible in high friction areas of your garment like a sweater's arms and cuffs.

You can make your garment look as new by removing the pilling, using a fabric comb or a pill/lint remover.

Still can't find the answer you need? Then scroll down and leave your question so one of our experts can try to help you. This will be done normally within 5 to 10 working days.
In the meantime, you can read the questions and answers that others have left to this pattern or join the DROPS Workshop on Facebook to get help from fellow knitters/crocheters!

You might also like...

Post a comment to pattern DROPS 217-33

We would love to hear what you have to say about this pattern!

If you want to leave a question, please make sure you select the correct category in the form below, to speed up the answering process. Required fields are marked *.

Comments / Questions (23)

country flag Eva Larsen wrote:

Fejl i opskrift. Jeg strikker str. L Der er mønster A. 2, som skal strikkes 23 gange, men der er masker til 25 gange, så der bliver for mange masker, når bærestykket er færdigt

13.03.2024 - 06:58

country flag Marie Engström wrote:

Mönsterstickningen på oket blir inte lika på båda sidor. Man börjar med A.1 och slutar varvet med A.2. Det innebär att hålmönstret hamnar en bit in på ena sidan. Inte snyggt. Borde man inte sluta med A.1?

10.08.2023 - 10:31

DROPS Design answered:

Hej Marie, jo det bör man. Vi skall göra en rättelse. Tack för info!

16.08.2023 - 10:38

country flag Mary wrote:

Hi, I am knitting Mayan Moon Shine. I am up to the yoke but do not understand the instruction after the 5 plain stitches for the band ie 'A.1 over the next 3 stitches. A.2 (=3 stitches on the first row). Can you explain it to me in a different way. I just don't get it. Thankyou

22.07.2023 - 11:51

DROPS Design answered:

Dear Mary, it means that you need to work row 1 of the charts A.1 and A.2 (remember that A.2 is different for each size). So you work 5 stitches for the band, the 3 stitches of A.1 and the 3 stitches of A.2 and continue working the row alternating between both charts. Here you can find more information on how to read knitting charts: https://www.garnstudio.com/lesson.php?id=68&cid=19. Happy knitting!

23.07.2023 - 19:31

country flag Hanneke Geervliet wrote:

Klopt het dat het patroon aan de rechter- en linkerkant naast de voorbies niet symmetrisch is? De rechterkant is A2, de linkerkant A1. Ik brei het vest in maat S.

21.03.2023 - 22:30

DROPS Design answered:

Dag Hanneke,

Het klopt inderdaad dat het patroon niet symmetrisch is; je begint met A.1 en eindigt met A.2

22.03.2023 - 20:19

country flag Pia wrote:

Strikker str M\r\nHar strikket 2 p mønster\r\nSkal nu til 3. p …. Passer med maskes tal og i venstre side vil hulmønsteret ligge fint op af ret kanten …..\r\nMen i venstre side ender mønsteret med 4 ret, så her vil hulmønstret ende et lille stykke før tet kanten …. Skal det ikke være ens i begge sider?\r\nForstår ikke hvad jeg gør forkert😌

01.06.2022 - 17:12

country flag Hanneke Broekman wrote:

Hallo, Graag zou ik de stekenverhouding op naald 4 en 3 ook weten. Mijn proeflapjes kloppen nl niet altijd. Klopt het dat naald 4 21 steken op 10 cm heeft en naald 3 23 steken? Ik kom nl uit op 24 steken op naald 3... Wel 21 steken op naald 4.

14.12.2021 - 17:14

DROPS Design answered:

Dag Hanneke,

De stekenverhouding is per persoon anders, dus ik kan voor jou niet zeggen wat de stekenverhouding op naald 4 en 3 zal zijn. Dit is gewoon een kwestie van ook op die naalden een proeflapje maken. Zelf heb ik ook altijd dunnere naalden nodig om de stekenverhouding van het patroon te krijgen.

15.12.2021 - 17:18

country flag Elke wrote:

Hallo liebes Drops Team Leider erschließt sich auch mir die Maschenprobe nicht. Mit welcher Nadelstärke haben sie die Maschenprobe gestrickt? Es sind 3 Nadelstärken angegeben jedoch fehlt mir die Angabe mit welcher von den Nadelstärken IHRE Maschenprobe gestrickt wurde. Lg Elke

30.11.2021 - 07:33

DROPS Design answered:

Liebe Elke, die Maschenprobe (= 20 M x 26 Reihen) werden hier mit den grösseren Nadeln = 4,5 gestrickt. Viel Spaß beim stricken!

30.11.2021 - 08:38

country flag Jeg Forstår Ikke A1 Og A2 wrote:

Jeg forstår ikke A1 og A2? Strikkes det først A1 over 3 også resten A2?

16.05.2021 - 07:29

DROPS Design answered:

Hej, Efter de 5 kantmasker, strikker du skiftevis A.1 og A.2 hele vejen rundt og afslutter med 5 kantmasker i den anden side. Allerede på første pind i A.2 tager du 1 masker ud mellem 2. og 3. maske også hele pinden rundt. God fornøjelse!

17.05.2021 - 13:18

country flag Isabelle Lettre wrote:

Bonjour, je ne comprend pas cette portion du patron. (A1 au-dessus des 3 mailles suivantes, A.2 (= 3 mailles au 1er rang) Est-ce que je dois tricoter les 5 maille de la boutonnière après tricoter 3 mailles et commencer A.1? Je ne comprend pas le terme au-dessus des 3 maille suivante. Merci de me répondre

06.03.2021 - 23:52

DROPS Design answered:

Bonjour Mme Lettre, vous commencez par tricoter les 5 mailles de la bordure du devant, puis répétez les diagrammes ainsi: *A.1 = 3 mailles, puis A.2 = 3 mailles au 1er rang (vous allez augmenter dans A.2 5, 6 ou 7 mailles (cf taille) comme le montre le diagramme*, répétez ainsi ces 5 mailles au 1er rang (= au 1er rang de A.2 vous augmentez ainsi: 2 m end, 1 jeté, 1 m end). Terminez le rang par les 5 m de bordure devant. Bon tricot!

08.03.2021 - 08:27

country flag Lespinasse wrote:

Bonjour, j'ai commencé ce gilet, la patte de boutonnage au point mousse resserre le tricot, est-ce qu'à la fin ça ira ? D'habitude je fais les pattes à la fin en relevant les mailles, je n'ai jamais fait la patte au point mousse en même temps que le devant Merci pour vos conseils, très bonne journée

08.02.2021 - 12:16

DROPS Design answered:

Bonjour Mme Lespinasse, si vous vous rendez compte que la bordure devant a tendance a resserrer l'ouvrage en hauteur, vous pouvez faire des rangs raccourcis à intervalles réguliers sur les mailles de bordure des devants de chaque côté. Un blocage peut également suffire. N'hésitez pas à essayer sur un échantillon avant de vous décider. Bon tricot!

08.02.2021 - 15:01