DROPS Sky
DROPS Sky
74% Alpaca, 18% Polyamide, 8% Wool
from 5.40 € /50g
Get the yarn to make this pattern from 32.40€.

The yarn cost is calculated from the pattern’s smallest size and the yarn’s cheapest product type. Looking for an even better price? You might find it on the DROPS Deals!

DROPS SS24

Tree Hive

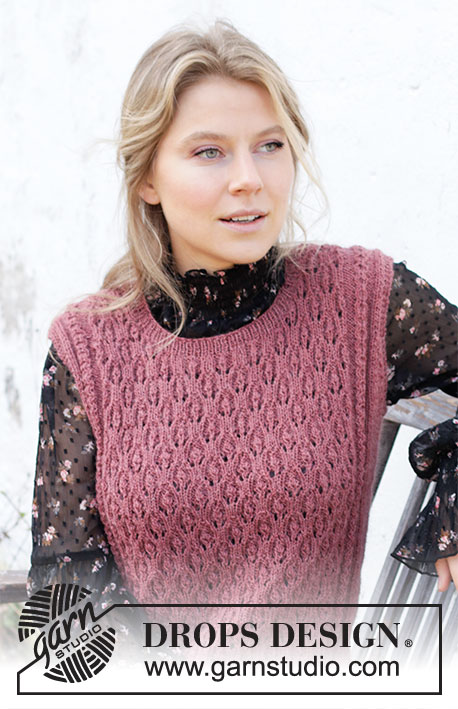
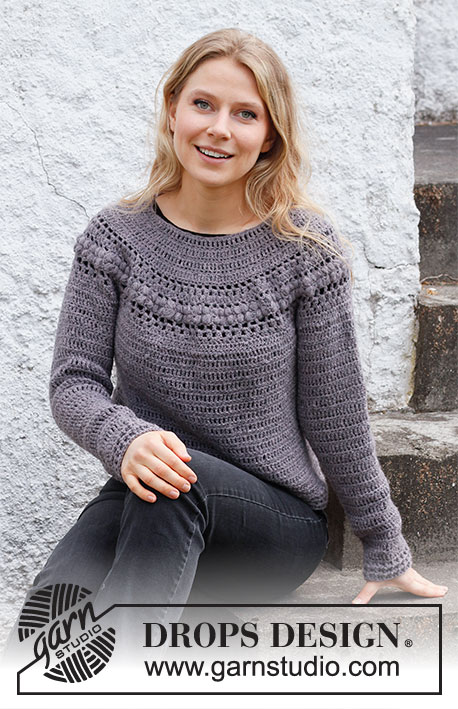
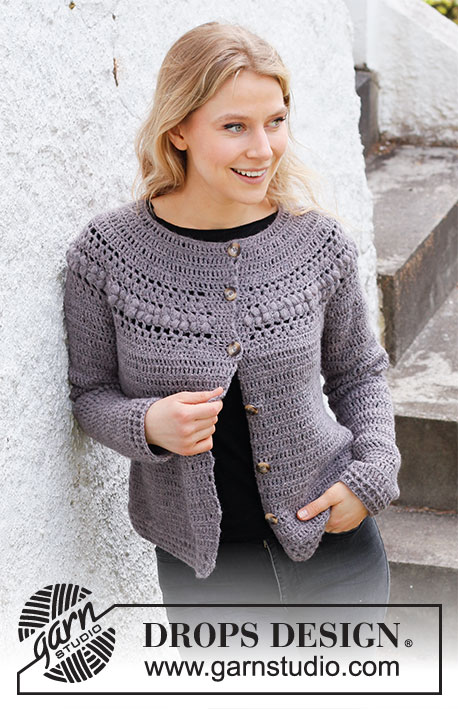
Crocheted jacket in DROPS Sky. Piece is crocheted top down with round yoke , puff stitches and relief treble crochets. Size: S - XXXL

DROPS 218-19
DROPS design: Pattern sk-102
Yarn group B
-------------------------------------------------------

SIZE:
S - M - L - XL - XXL - XXXL

MATERIALS:
DROPS SKY from Garnstudio (belongs to yarn group B)
300-350-350-400-450-500 g colour 08, lavender
-------------------------------------------------------

CROCHET TENSION:
16 treble crochets in width and 8 rows vertically = 10 x 10 cm.

CROCHET HOOK:
DROPS CROCHET HOOK SIZE 4.5 mm.
Hook size is only a suggestion! If you have too many stitches on 10 cm switch to larger hook. If you have too few stitches on 10 cm switch to smaller hook.

DROPS BUTTON, Marble NR 629: 6-6-7-7-7-7 pieces

-------------------------------------------------------

Alternative Yarn – See how to change yarns here
Yarn Groups A to F – Use the same pattern and change the yarn here
Yarn usage using an alternative yarn – Use our yarn converter here

-------------------------------------------------------

DROPS Sky
DROPS Sky
74% Alpaca, 18% Polyamide, 8% Wool
from 5.40 € /50g
Get the yarn to make this pattern from 32.40€.

The yarn cost is calculated from the pattern’s smallest size and the yarn’s cheapest product type. Looking for an even better price? You might find it on the DROPS Deals!

Pattern instructions

-------------------------------------------------------

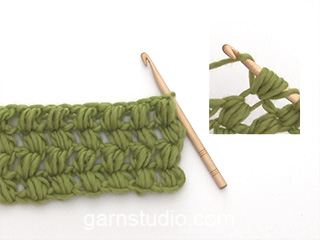
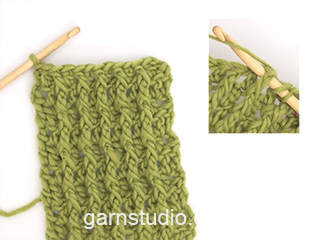
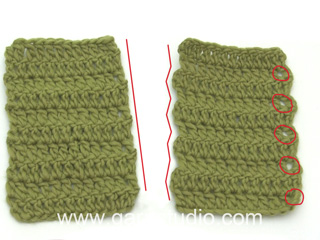
EXPLANATION FOR THE PATTERN:

-------------------------------------------------------

CROCHET INFO:
Replace first treble crochet on row with 3 chain stitches. Replace first double crochet on row with 1 chain stitch.

CHAIN STITCH:
If you work at the end of crochet hook the chain stitch will often be too tight
1 chain stitch should be just as long as 1 double crochet/treble crochet/double treble crochet is wide.

PATTERN:
See diagrams A.1, A.2 and A.3.

1 PUFF STITCH:
Work as follows in same chain stitch (it is important to work in the stitch and not around it): * Make 1 yarn over, insert hook through chain stitch, make 1 yarn over and pull through chain stitch, pull both yarn overs the same length (to avoid small and dense puff stitches it is important to pull the yarn overs long, i.e. Approx. 2 cm) *, work from *-* 5 times in total, make a yarn over and pull yarn through all loops on hook.

INCREASE TIP-1 (evenly):
To calculate how to increase evenly, use the total number of stitches on row (e.g. 88 stitches), minus bands (e.g. 10), and divide the remaining stitches by number of increases to be done (e.g. 42) = 1.9.
In this example increase in approx. every other stitch, increase by working 2 double treble crochets in 1 double crochet, or 3 treble crochets around a chain stitch (instead of 2). NOTE! Do not increase over stitches in bands.

INCREASE TIP-2 (applies to sides of body):
Increase 1 stitch by working 2 stitches in same stitch.
Increase on each side of marker as follows:
Work until 2 stitches remain before marker thread, increase 1 stitch in next stitch, work 2 stitches (marker thread is in the middle of these 2 stitches), increase 1 stitch in next stitch (= 2 stitches increased at the marker thread and 4 stitches increased in total on row).

WORK 2 DOUBLE CROCHETS TOGETHER:
* Insert the hook through the next stitch, pick up the strand *, work from *-* a total of 2 times, make 1 yarn over and pull it through all 3 loops on the hook (= 1 stitch decreased).

RELIEF TREBLE CROCHET:
Work 1 treble crochet around 1 treble crochet on previous row (i.e. do not work in loops but around treble crochet) as follows: 1 yarn over (the same way as working 1 regular treble crochet), lead hook around next treble crochet on previous row (i.e. in from right side and out on left side), get the yarn, work the rest of treble crochet as usual.

-------------------------------------------------------

START THE PIECE HERE:

-------------------------------------------------------

JACKET - SHORT OVERVIEW OF THE PIECE:
Work yoke back and forth from mid front, top down. Now divide yoke for body and sleeves. Work body back and forth, top down. Work sleeves back and forth, top down (work sleeves back and forth to get the same texture as on body).

YOKE:
Work 89-89-95-101-107-107 CHAIN STITCHES - read explanation above, on hook size 4.5 mm with 1 strand Sky.
Work first row as follows from wrong side: Work 1 double crochet in 2nd chain stitch from hook, work 1 double crochet in every chain stitch the rest of row = 88-88-94-100-106-106 double crochets on row.

Work next row as follows from right side:
Work A.1 over the first 5 stitches, work A.2 until 11 stitches remain on row (= 12-12-13-14-15-15 repetitions of 6 stitches), and finish with A.3 over last 11 stitches. Continue pattern back and forth like this. REMEMBER THE CROCHET TENSION! AT THE SAME TIME on every row marked with arrow, increase stitches evenly as explained below - read INCREASE TIP-1:
Arrow-1: Increase 42-48-42-48-48-48 double treble crochets evenly = 130-136-136-148-154-154 stitches (there is now room for 19-20-20-22-23-23 repetitions of A.2 in width).
Arrow-2: Increase 36-42-42-48-48-48 double treble crochets evenly = 166-178-178-196-202-202 stitches (there is now room for 25-27-27-30-31-31 repetitions of A.2 in width).
Arrow-3: Increase 36-42-42-42-36-42 treble crochets evenly = 202-220-220-238-238-244 stitches (there is now room for 31-34-34-37-37-38 repetitions of A.2 in width).
Arrow-4: Increase 28-26-30-42-36-42 treble crochets evenly = 230-246-250-280-274-286 stitches.

When A.1 to A.3 have been worked, work A.1 to A.3 x, AT THE SAME TIME increase evenly every time row with double treble crochets is worked, increase 0-0-12-13-11-13 double treble crochets evenly 0-0-2-2-4-4 times = 230-246-274-306-318-338 stitches. Continue with A.1 to A.3 x until piece measures 20-23-25-28-30-33 cm, finish with a row with double treble crochets.

Now divide yoke for body and sleeves, i.e. work next row as follows – read CROCHET INFO:
Work 1 double crochet in each of the first 37-40-44-48-51-55 stitches (= front piece), work 6-6-6-6-8-10 loose chain stitches (= in the side under sleeve), skip the next 46-48-54-62-62-64 stitches (= sleeve), work 1 double crochet in each of the next 64-70-78-86-92-100 stitches (= back piece), work 6-6-6-6-8-10 loose chain stitches (= in the side under sleeve), skip the next 46-48-54-62-62-64 stitches (= sleeve), and work 1 double crochet in each of the remaining 37-40-44-48-51-55 stitches (= front piece). Finish body and sleeves separately. NOW MEASURE THE PIECE FROM HERE!

BODY:
= 150-162-178-194-210-230 stitches (including the 6-6-6-6-8-10 chain stitches under each sleeve). Insert 1 marker thread 40-43-47-51-55-60 stitches in from each side (= 70-76-84-92-100-110 stitches between marker threads on back piece). Move marker threads upwards when working. Use them later when increasing in the sides.
Continue back and forth with A.1 to A.3x as before. When body measures 4 cm from division, increase 2 stitches in each side - read INCREASE TIP-2. Increase like this every 9 cm 3 times in total in each side = 162-174-190-206-222-242 stitches. Work until body measures 28-27-27-26-26-25 cm from division, but finish after 1 row with double treble crochets. Then work as follows: * 1 treble crochet, 1 RELIEF TREBLE CROCHET - see explanation above *, repeat from *-*. Work treble crochet in treble crochet and relief treble crochet in relief treble crochet until piece measures 32-31-31-30-30-29 cm. Fasten off. Jacket measures approx. 56-58-60-62-64-66 cm from shoulder and down.

SLEEVE:
Work sleeves back and forth from mid under sleeve (to get the same texture on body and sleeves).
Begin from wrong side, in the middle of the 6-6-6-6-8-10 stitches under sleeve, and work 1 double treble crochet in each of the 3-3-3-3-4-5 stitches from the middle and out, work 1 double treble crochet in each of the 46-48-54-62-62-64 stitches that were skipped, and finish with 1 double treble crochet in each of the last 3-3-3-3-4-5 stitches mid under sleeve = 52-54-60-68-70-74 stitches, turn piece.
Continue back and forth with A.1 to A.3x as before. When piece measures 3 cm from division, decrease 1 stitch in each side as follows: WORK 2 DOUBLE CROCHETS TOGETHER – read description above, work until there are 2 stitches left on round, work 2 double crochets together. Decrease like this every 7-6½-4-2½-2½-2 cm 6-6-8-12-12-13 times in total in each side= 40-42-44-44-46-48 stitches. Continue until piece measures 41-39-37-35-34-32 cm, finish after 1 round with double treble crochets.
NOTE! Shorter measurements in the larger sizes because of wider neck and longer yoke. Then work as follows: * 1 treble crochet, 1 RELIEF TREBLE CROCHET - see explanation above *, repeat from *-* the entire row. Work treble crochet in treble crochet and relief treble crochet in relief treble crochet until piece measures 45-43-41-39-38-36 cm. Fasten off. Work the other sleeve the same way.

ASSEMBLY:
Sew underarm seams – sew in outer loops of edge stitch. Place buttons evenly on left front piece and fasten, button between 2 treble crochets in band on right front piece.

Diagram

symbols = 1 chain stitch
symbols = 1 double crochet
symbols = 3 chain stitches
symbols = 4 chain stitches
symbols = 1 treble crochet in stitch
symbols = 1 double treble crochet in stitch
symbols = 1 treble crochet around chain stitch
symbols = 2 TREBLE CROCHETS TOGETHER AROUND CHAIN STITCH: Work 1 treble crochets around chain stitch but wait with last yarn over and pull through, work 1 treble crochet around the same chain stitch and pull last yarn over through all 3 loops on hook
symbols = skip 1 chain stitch/1 treble crochet, work 1 treble crochet in next treble crochet, 1 chain stitch, work 1 PUFF STITCH - read explanation in pattern - in chain stitch skipped (puff stitch should cross over treble crochet on right side of piece)
symbols = skip 1 puff stitch + 1 chain stitch, work 1 treble crochet in next treble crochet, 1 chain stitch, work 1 puff stitch in chain stitch skipped (puff stitch should cross over treble crochet on wrong side of piece)
symbols = increase row
diagram
diagram
Do you have a question? See a list of frequently asked questions (FAQ)

Knitting tension is what determines the final measurements of your work, and is usually measured per 10 x 10 cm. It is provided like so: number of stitches in width x number of rows in height - eg: 19 stitches x 26 rows = 10 x 10 cm.

The knitting tension is very individual; some people knit/crochet loosely while others work tightly. You adjust the knitting tension with the needle size, which is why the suggested needle size is only meant as a guide! You need to adjust this (up or down) to ensure that YOUR knitting tension matches the knitting tension provided in the pattern. If you work with a different knitting tension than provided you will have a different yarn consumption, and your work will have different measurements than what the pattern suggests.

The knitting tension also determines which yarns can replace each other. As long as you achieve the same knitting tension you can replace one yarn with another.

See DROPS lesson: How to measure your tension/gauge

See DROPS video: How to make a gauge tension swatch

The required amount of yarn is provided in grams, eg: 450 g. To calculate how many balls you’ll need you first need to know how many grams are in 1 ball (25g, 50g or 100g). This information is available if you click on the individual yarn quality on our pages. Divide the amount required with the amount of each ball. For example, if each ball is 50g (the most common amount), the calculation will be as follows: 450 / 50 = 9 balls.

The important thing when changing from one yarn to another is that the knitting/crochet tension remains the same. This is so that the measurements of the finished piece will be the same as on the sketch provided. It is easier to achieve the same knitting tension using yarns from the same yarn group. It is also possible to work with multiple strands of a thinner yarn to achieve the knitting tension of a thicker one. Please try our yarn converter. We recommend you to always work a test swatch.

Please NOTE: when changing yarn the garment might have a different look and feel to the garment in the photo, due to individual properties and qualities of each yarn.

See DROPS lesson: Can I use a different yarn than the one mentioned in the pattern?

All our yarns are categorised into yarn groups (from A to F) according to thickness and knitting tension – group A contains the thinnest yarns and group F the thickest. This makes it easier for you to find alternative yarns to our patterns, should you wish to switch yarn. All yarns within the same group have a similar knitting tension and can easily replace each other. However, different yarn qualities have different structures and properties which will give the finished work a unique look and feel.

Click here for an overview of the yarns in each yarn group

At the top of all our patterns you’ll find a link to our yarn calculator, which is a helpful tool should you wish to use a different yarn than suggested. By filling in the yarn quality you wish to replace, the amount (in your size) and number of strands, the calculator will present good alternative yarns with the same knitting tension. Additionally it will tell you how much you’ll require in the new qualities and whether you’ll need to work with multiple strands. Most skeins are 50g (some are 25g or 100g).

If the pattern is worked with multiple colours, every colour will have to be calculated separately. Similarly, if the pattern is worked with several strands of different yarns (for example 1 strand Alpaca and 1 strand Kid-Silk) you will have to find alternatives for each, individually.

Click here to see our yarn calculator

Since different yarns have different qualities and textures we have chosen to keep the original yarn in our patterns. However, you can easily find options among our available qualities by using our yarn calculator, or simply pick a yarn from the same yarn group.

It is possible that some retailers still have discontinued yarns in stock, or that someone has a few skeins at home that they would like to find patterns for.

The yarn calculator will provide both alternative yarn as well as required amount in the new quality.

If you think it's hard to decide what size to make, it can be a good idea to measure a garment you own already and like the size of. Then you can pick the size by comparing those measures with the ones available in the pattern's size chart.

You'll find the size chart at the bottom of the pattern.

See DROPS lesson: How to read size chart

The needle size provided in the pattern serves only as a guide, the important thing is to follow the knitting tension. And since knitting tension is very individual, you will have to adjust the needle size to ensure that YOUR tension is the same as in the pattern – maybe you’ll have to adjust 1, or even 2 needle sizes, up or down to achieve the correct tension. For this, we recommend that you work test swatches.

Should you work with a different knitting tension than the one provided, the measurements of the finished garment might deviate from the measurement sketch.

See DROPS lesson: How to measure your tension/gauge

See DROPS video: How to make a tension/gauge swatch

Working a garment top-down provides more flexibility and room for personal adjustment. For example it is easier to try the garment on while working, as well as making adjustments to length of yoke and shoulder caps.

The instructions are carefully explaining every step, in the correct order. Diagrams are adjusted to the knitting direction and are worked as usual.

The diagram depicts all rows/rounds, and every stitch seen from the right side. It is read from bottom to top, from right to left. 1 square = 1 stitch.

When working back and forth, every other row is worked from the right side and every other row is worked from the wrong side. When working from the wrong side, the diagram will have to be worked reversed: from left to right, knit stitches are purled, purl stitches are knit etc.

When working in the round every round is worked from the right side and the diagram are worked from right to left on all rounds.

See DROPS lesson: How to read knitting diagrams

The diagram depicts all rows/rounds, and every stitch seen from the right side. It is worked from bottom to top, from right to left.

When working back and forth every other row is worked from the right side: from right to left and every other row is worked from the wrong side: from left to right.

When working in the round, every row in the diagram are worked from the right side, from right to left.

When working a circular diagram you start in the middle and work your way outwards, counter clockwise, row by row.

The rows usually start with a given number of chain stitches (equivalent to the height of the following stitch), this will either be depicted in the diagram or explained in the pattern.

See DROPS lesson: How to read crochet diagrams

Instructions for working several diagrams after each other on the same row/round, will often be written like so: “work A.1, A.2, A.3 a total of 0-0-2-3-4 times". This means you work A.1 once, then A.2 is worked once, and A.3 is repeated (in width) the number of times provided for your size – in this case like so: S = 0 times, M = 0 times, L=2 times, XL= 3 times and XXL = 4 times.

The diagrams are worked as usual: begin with the first row in A.1, then work the first row in A.2 etc.

See DROPS lesson: How to read knitting diagrams

See DROPS lesson: How to read crochet diagrams

The total width of the garment (from wrist-to-wrist) will be larger in the larger sizes, despite the actual sleeves being shorter. The larger sizes have longer sleeve caps and wider shoulders, so there will be a good fit in all sizes.

The measurement sketch/schematic drawing provides information regarding the full length of the garment. If it’s a jumper or a jacket the length is measured from the highest point on the shoulder closest to the neckline, and straight down to the bottom of the garment. It is NOT measured from the tip of shoulder. Similarly, the length of yoke is measured from the highest point on the shoulder and down to where yoke is split into body and sleeves.

On a jacket measures are never taken along bands, unless specifically stated. Always measure inside band stitches when measuring the length.

See DROPS lesson: How to read a schematic drawing

Diagrams are often repeated on the round or in height. 1 repeat is the diagram the way it appears in the pattern. If it says to work 5 repeats of A.1 in the round, then you work A.1 a total of 5 times after/next to each other in the round. If it says to work 2 repeats of A.1 vertically/in height you work the entire diagram once, then begin again at the start and work the entire diagram one more time.

Chain stitches are slightly narrower than other stitches and to avoid working the cast-on edge too tight, we simply chain more stitches to begin with. The stitch count will be adjusted on the following row to fit the pattern and measurement sketch.

The rib edge is more elastic and will contract slightly compared to, for example, stocking stitch. By increasing before the rib edge, you avoid a visible difference in width between the rib edge and the rest of the body.

It’s very easy to cast off too tightly, and by making yarn overs while casting off (and simultaneously casting these off) you avoid a too tight cast off edge.

See DROPS video: How to bind off with yarn overs (yo)

To achieve an even increase (or decrease) you can increase on, for example: every 3rd and 4th row alternately, like so: work 2 rows and increase on the 3rd row, work 3 rows and increase on the 4th. Repeat this until the increase is complete.

See DROPS lesson: Increase or decrease 1 st on every 3rd and 4th row alternately

Should you prefer to work in the round instead of back and forth, you may of course adjust the pattern. You’ll need to add steeks mid-front (usually 5 stitches), and follow the instructions. When you would normally turn and work from the wrong side, simply work across the steek and continue in the round. At the end you’ll cut the piece open, pick up stitches to work bands, and cover the cut edges.

See DROPS video: How to knit steeks and cut open

Should you prefer to work back and forth instead of in the round, you may of course adjust the pattern so you work the pieces separately and then assemble them at the end. Divide the stitches for the body in 2, add 1 edge stitch in each side (for sewing) and work the front and back pieces separately.

See DROPS lesson: Can I adapt a pattern for circular needles into straight needles?

Pattern repeats can vary slightly in the different sizes, in order to get the correct proportions. If you’re not working the exact same size as the garment in the photo, yours might deviate slightly. This has been carefully developed and adjusted so that the complete impression of the garment is the same in all sizes.

Make sure to follow instructions and diagrams for your size!

If you have found a pattern you like which is available in women’s size it’s not very difficult to convert it to men’s size. The biggest difference will be the length of sleeves and body. Start working on the women size that you think would fit across the chest. The additional length will be worked right before you cast off for the armhole/sleeve cap. If the pattern is worked top-down you can add the length right after the armhole or before the first decrease on sleeve.

Regarding additional yarn amount, this will depend on how much length you add, but it is better with a skein too many than too few.

All yarns will have excess fibres (from production) that might come off as lint or shedding. Brushed yarns (ie hairier yarns) have more of these loose, excess fibres, causing more shedding.

Shedding also depends on what is worn under or over the garment, and whether this pulls at the yarn fibres. It’s therefore not possible to guarantee that there will be no shedding

Below are some tips on how to get the best result when working with hairier yarns:

1. When the garment is finished (before you wash it) shake it vigorously so the looser hairs come off. NOTE: do NOT use a lint roller, brush or any method that pulls at the yarn.

2. Place the garment in a plastic bag and put it in your freezer - the temperature will cause the fibres to become less attached to each other, and excess fibres will come off easier.

3. Leave in the freezer for a few hours before taking it out and shaking it again.

4. Wash the garment according to the instructions on the yarn label.

Pilling is a natural process that happens to even the most exclusive of fibers. It's a natural sign of wear and tear that is hard to avoid, and that is most visible in high friction areas of your garment like a sweater's arms and cuffs.

You can make your garment look as new by removing the pilling, using a fabric comb or a pill/lint remover.

Still can't find the answer you need? Then scroll down and leave your question so one of our experts can try to help you. This will be done normally within 5 to 10 working days.
In the meantime, you can read the questions and answers that others have left to this pattern or join the DROPS Workshop on Facebook to get help from fellow knitters/crocheters!

You might also like...

Post a comment to pattern DROPS 218-19

We would love to hear what you have to say about this pattern!

If you want to leave a question, please make sure you select the correct category in the form below, to speed up the answering process. Required fields are marked *.

Comments / Questions (4)

country flag Lilian Nafula wrote:

Arrow-3: Increase 36-42-42-42-36-42 double crochets evenly = 202-220-220-238-238-244 stitches (there is now room for 31-34-34-37-37-38 repetitions of A.2 in width). Don't get the last part in brackets and Arrow 3 am guessing is Row 3.

25.03.2022 - 02:04

DROPS Design answered:

Dear Lilian, Arrow-3 is the arrow with number 3 in the right side of the A.1 diagram. The part in brackets means that after the increases, in the next row you will be able to work A.2 the number of times indicated, depending on the size. Happy crochetting!

26.03.2022 - 19:47

country flag Annemarie wrote:

Vol enthousiasme ben ik begonnen aan dit vestje. Ik loop vast bij de kussensteken; het lukt mij niet om kussensteken voorlangs een stokje te krijgen en dus een soort terug te gaan in de rij zodat het stokje schuin gaat. Ik heb nu een aanpassing gedaan met kussensteek -losse, stokje, losse en dan weer kussensteek. Dat komt qua steken prima uit maar lijkt niet zo op het origineel. De kussensteken an sich lukken prima, en het staat ook wel oké, maar het oogt minder dicht dan op het voorbeeld.

01.10.2021 - 16:41

DROPS Design answered:

Dag Annemarie,

Heb je de video bekeken over de kussensteek? Misschien moet je de lussen wat minder hoog ophalen, zodat de kussensteek wat strakker wordt

02.10.2021 - 10:25

country flag Tina Böhm wrote:

Hallo, Ich verstehe nicht wie ich nun mit den Rumpfteil häkeln soll. Wie lang sollen die Markierungsfaden sein?

25.09.2021 - 14:28

DROPS Design answered:

Liebe Frau Böhm, dieses Video zeigt, wie man einen Markierungsfaden benutzt, wenn ich so Markierungsfäden benutze sind meine ca 20-30 cm, ob es Ihnen helfen kann. Sie können auch Maschenmarkierer benutzen. Viel Spaß beim häkeln!

27.09.2021 - 08:03

country flag Lucia Belli wrote:

Non riesco a capire quando devo iniziare a lavorare il dietro e il dvanti separatamente

04.11.2020 - 16:01

DROPS Design answered:

Buongiorno Lucia, non si lavorano il davanti e il dietro in modo separato. Segua semplicemente le istruzioni. Buon lavoro!

04.11.2020 - 19:07