
Popular categories
Looking for a yarn?


|
||||
Lucky Clover Jacket |
||||
 |
 |
|||
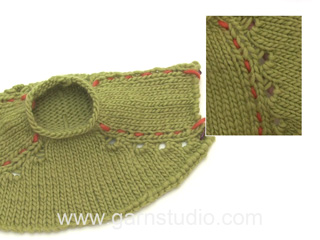
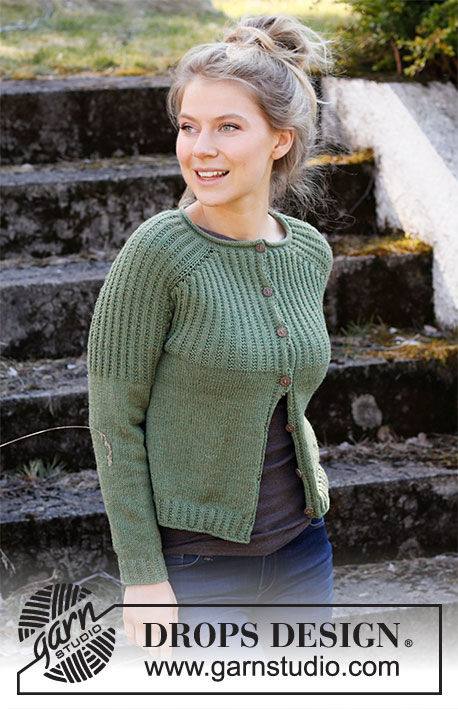
Knitted jacket in DROPS BabyMerino. The piece is worked top down, with saddle shoulders and textured pattern. Sizes S - XXXL.
DROPS 215-10 |
||||
|
------------------------------------------------------- EXPLANATIONS FOR THE PATTERN: ------------------------------------------------------- RIDGE/GARTER STITCH (worked back and forth): Knit all rows. 1 ridge in height = Knit 2 rows. RIDGE/GARTER STITCH (worked in the round): 1 ridge in height = 2 rounds; Knit 1 round and purl 1 round. INCREASE TIP-1 (evenly spaced): To work out how to increase evenly, count the total number of stitches on the needle (e.g. 122 stitches) minus bands (e.g. 12 stitches) and divide the remaining stitches by the number of increases to be made (e.g. 24) = 4.58. In this example, increase by making 1 yarn over after alternately each 4th and 5th stitch. Do not increase on bands. On the next row work the yarn overs twisted to avoid holes. INCREASE TIP-2: All increases are worked from the right side! INCREASE 4 STITCHES IN MARKER-STITCHES 1 AND 3: Work 5 stitches in the purled stitch and move the marker as follows: * Purl the stitch, but do not slip it from the needle, make 1 yarn over the right needle *, work from *-* 2 times and purl the stitch 1 more time, move the marker to the last stitch worked (= 5 stitches worked in the same stitch). INCREASE 4 STITCHES IN MARKER-STITCHES 2 AND 4: Work 5 stitches in the purled stitch and move the marker as follows: Purl the stitch, move the marker to this stitch, * but do not slip it from the needle, make 1 yarn over the right needle, purl 1 stitch in the same stitch *, work from *-* 2 times (= 5 stitches worked in the same stitch). On the next row, work the increased stitches into pattern with 2 stocking stitches and 2 garter stitches, and knit the marker-stitch from wrong side (= purl stitch from right side). The next increase is in the purled stitch (marker-stitch). Increase stitches for the front/back pieces. The number of shoulder stitches remains the same. INCREASE TIP-3 (for sides of body): All increases are worked from the right side! Work until there are 2 stitches left before the marker thread, 1 yarn over, knit 4 (marker thread sits in the middle of these stitches), 1 yarn over. On the next row work the yarn overs twisted, to avoid holes. Then work the new stitches in stocking stitch. DECREASE TIP (for sleeves): Decrease 1 stitch on either side of the marker thread as follows: Work until there are 3 stitches left before the marker thread, knit 2 together, knit 2 (marker thread sits between these 2 stitches), slip 1 stitch as if to knit, knit 1 and pass the slipped stitch over the knitted stitch. CASTING-OFF TIP: To avoid the cast-off edge being tight you can cast off with a larger size needle. If the edge is still tight, make 1 yarn over after approx. each 4th stitch at the same time as casting off; the yarn overs are cast off as normal stitches. BUTTONHOLES: Work buttonholes on right band (when garment is worn). Work from the right side when there are 4 stitches left on row as follows: Make 1 yarn over, knit 2 together and 2 garter stitches. On the next row (wrong side) purl the yarn over to leave a hole. The first buttonhole is worked when the piece measures 1½-2 cm from the cast-on edge. Then the other 6 buttonholes are worked with approx. 7½-8-8-8½-8½-9 cm between each one. ------------------------------------------------------- START THE PIECE HERE: ------------------------------------------------------- JACKET – SHORT OVERVIEW OF THE PIECE: The neck and yoke are worked back and forth with circular needle from mid front and top down. The yoke is divided for body and sleeves and the body continued back and forth. The sleeves are worked in the round with double pointed needles, top down. NECK: Cast on 122-126-132-136-146-156 stitches (including 6 band-stitches on each side) with circular needle size 2.5 mm and BabyMerino. Purl 1 row from the wrong side. The next row is worked as follows from the right side: Work 2 stitches in GARTER STITCH – read description above, knit 2, work 2 stitches in garter stitch (= band-stitches), work stocking stitch until there are 6 stitches left and work 2 stitches in garter stitch, knit 2 and 2 stitches in garter stitch. Remember BUTTONHOLES – read description above, on the right band. When the piece measures 2 cm, increase 24-24-18-22-24-22 stitches evenly spaced on the next row from the right side - read INCREASE TIP-1 = 146-150-150-158-170-178 stitches. Work 1 row from the wrong side with stocking stitch over stocking stitch and garter stitch over garter stitch. Change to circular needle size 3 mm. Insert 1 marker after the band at the beginning of the row; the yoke is measured from this marker! YOKE: Now work pattern, insert 4 markers (in stitches) and 4 marker threads (between stitches) as follows from the right side: LEFT FRONT PIECE: Work 2 garter stitches, 2 stocking stitches and 2 garter stitches (= band), * 2 stocking stitches, 2 garter stitches *, work from *-* over 16-16-16-16-20-20 stitches, purl 1 (insert marker 1 in this stitch; you will increase in this stitch later). LEFT SHOULDER/SLEEVE: Work 1 stocking stitch, insert 1 marker thread (i.e. between 2 knitted stitches), 1 yarn over, 1 stocking stitch, * 2 garter stitches, 2 stocking stitches *, work from *-* over 28-28-28-32-32-36 stitches, 2 garter stitches, 1 stocking stitch, insert 1 marker thread (i.e. between 2 knitted stitches), 1 yarn over, 1 stocking stitch. BACK PIECE: Purl 1 (insert marker 2 in this stitch; you will increase in this stitch later), * 2 garter stitches, 2 stocking stitches *, work from *-* over 28-32-32-32-36-36 stitches, 2 garter stitches, purl 1 (insert marker 3 in this stitch; you will increase in this stitch later). RIGHT SHOULDER/SLEEVE: Work 1 stocking stitch, insert 1 marker thread (i.e. between 2 knitted stitches), 1 yarn over, 1 stocking stitch, * 2 garter stitches, 2 stocking stitches *, work from *-* over 28-28-28-32-32-36 stitches, 2 garter stitches, 1 stocking stitch, insert 1 marker thread (.e. between 2 knitted stitches), 1 yarn over, 1 stocking stitch. RIGHT FRONT PIECE: Purl 1 (insert marker 4 in this stitch; you will increase in this stitch later), * 2 garter stitches, 2 stocking stitches *, work from *-* over 16-16-16-16-20-20 stitches and finish with 2 garter stitches, 2 stocking stitches and 2 garter stitches (band). On the next row, slip the yarn overs at each marker thread off the needle; this is so the stitches before and after the increases for the saddle shoulders are not tight. Make 1 yarn over at each marker thread (between 2 knitted stitches) on each row from the right side and slip the yarn overs off the needle on each row from the wrong side (number of stitches remains the same). Do this until the yoke is finished. Continue with stocking stitch over stocking stitch, purl over purl (seen from right side) and garter stitch over garter stitch. On the next row from the right side, increase 4 stitches in each marker-stitch (i.e. purled stitches from right side) – read INCREASE TIP-2 (= a total of 16 stitches increased). REMEMBER THE KNITTING TENSION! Increase like this every 2nd row a total of 0-0-3-3-4-5 times, then every 4th row a total of 6-9-9-10-11-12 times, every 6th row a total of 4-3-3-3-3-3 times and every 8th row 1 time (you have increased 11-13-16-17-19-21 times in total) = 322-358-406-430-474-514 stitches. Continue with the pattern until the piece measures 20-22-24-25-26-28 cm. Now divide the piece for body and sleeves on the next row from the right side as follows: Work 6 band stitches as before, knit 43-49-56-58-66-74 (= left front piece), place the next 68-74-84-92-98-102 stitches on a thread for the sleeve, cast on 8 new stitches under the sleeve, knit 88-100-114-118-134-150 (= back piece), place the next 68-74-84-92-98-102 stitches on a thread for the sleeve, cast on 8 new stitches under the sleeve, knit 43-49-56-58-66-74 and finish with 6 band stitches as before (= right front piece). BODY: = 202-226-254-262-294-326 stitches. Insert 1 marker thread in the middle of the 8 stitches cast on under each sleeve. There are 96-108-122-126-142-158 stitches between marker threads on the back piece; allow the threads to follow your work onwards, they will be used when increasing in the sides. Continue with stocking stitch and 6 band stitches in pattern as before on each side. When the piece measures 5 cm from the division, increase 1 stitch on each side of both marker threads – read INCREASE TIP-3 (= 4 stitches increased). Increase like this every 2½-3-5-2-2½-3 cm a total of 7-6-4-8-7-6 times = 230-250-270-294-322-350 stitches. When the piece measures 25 cm from the division, change to circular needle size 2.5 mm and work rib (= 2 garter stitches/ knit 2) over all stitches. Cast off with knit when the rib measures 4 cm – read CASTING-OFF TIP. The jacket measures approx. 54-56-58-60-61-64 cm, from the shoulder down. SLEEVE: Place the 68-74-84-92-98-102 stitches from the thread on the one side of the piece on double pointed needles size 3 mm and knit up 1 stitch in each of the 8 stitches cast on under the sleeve = 76-82-92-100-106-110 stitches. Insert a marker thread in the middle of the 8 stitches under the sleeve. You will later decrease on each side of this marker thread. Work pattern; (GARTER STITCH in the round – read description above) over garter stitch, purl over purl and stocking stitch over stocking stitch. The new stitches under the sleeve are worked into the pattern (i.e. 2 stocking stitches, 2 garter stitches). The stitches which do not fit into this pattern, are worked in stocking stitch. When the sleeve measures 5 cm from the division continue with stocking stitch over all stitches. On the first round of this stocking stitch, decrease 2 stitches under the sleeve – read DECREASE TIP. Decrease like this every cm a total of 5-5-5-6-6-7 times, then every 4-3½-2-1½-1½-1½ cm a total of 7-8-12-14-16-16 times = 52-56-58-60-62-64 stitches. When the sleeve measures 41-40-38-38-38-37 cm, increase 0-0-2-0-2-0 stitches evenly spaced = 52-56-60-60-64-64 stitches. Change to double pointed needles size 2.5 mm and work rib (knit 2, 2 garter stitches) for 4 cm. Cast off with knit. Work the other sleeve in the same way. ASSEMBLY: Sew the buttons onto the left band. |
||||
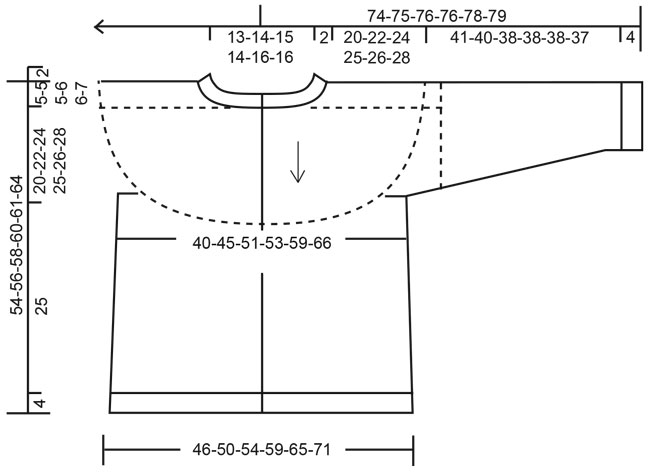
Diagram explanations |
||||
|
||||
|
||||
|
Have you made this or any other of our designs? Tag your pictures in social media with #dropsdesign so we can see them! Do you need help with this pattern?You'll find tutorial videos, a Comments/Questions area and more by visiting the pattern on garnstudio.com. © 1982-2024 DROPS Design A/S. We reserve all rights. This document, including all its sub-sections, has copyrights. Read more about what you can do with our patterns at the bottom of each pattern on our site. |
||||


With over 40 years in knitting and crochet design, DROPS Design offers one of the most extensive collections of free patterns on the internet - translated to 17 languages. As of today we count 304 catalogues and 11422 patterns - 11422 of which are translated into English (UK/cm).
We work hard to bring you the best knitting and crochet have to offer, inspiration and advice as well as great quality yarns at incredible prices! Would you like to use our patterns for other than personal use? You can read what you are allowed to do in the Copyright text at the bottom of all our patterns. Happy crafting!
Comments / Questions (7)
Tricoter 2 mailles point mousse, 2 mailles jersey et 2 mailles point mousse (= bordure devant), * 2 mailles jersey, 2 mailles point mousse *, répéter de *-* au-dessus des 16-16-16-16-20-20 mailles suivantes, 1 maille envers : est ce bien:sur L'ENDROIT, 6 mailles à l'endroit pour la bordure, puis *2 m endroit 2m endroit" répéter... 1 m envers. et sur l'ENVERS ce sera 2m endroit, 2m envers, 2m endroit pour la bordure, puis *2m envers, 2m endroit* répéter... et 1m envers? merci
07.08.2023 - 07:07DROPS Design answered:
Bonjour Élisabeth, les mailles de bordure de devant se tricotent à l'endroit sur l'endroit, mais sur l'envers, vous allez les tricoter ainsi: (2 m end, 2 m env, 2 m end) , et les mailles restantes entre les 6 mailles de bordure devant de chaque côté se tricotent en jersey, autrement dit, à l'endroit tricotez toutes les mailles à l'endroit, sur l'envers tricotez: (2 m end, 2 m env, 2 m end), tricotez à l'envers jusqu'à ce qu'il reste 6 m et terminez par (2 m end, 2 m env, 2 m end). Bon tricot!
07.08.2023 - 11:14Hi, the increases for the yoke say "Increase like this every 2nd row a total of 3 times, then every 4th row a total of 9 times, every 6th row a total of 3 times and every 8th row 1 time". Is this counting wrong side rows as well or does this mean "every 2nd right side row" and so on?
19.03.2022 - 17:10DROPS Design answered:
Dear Mia, every 2nd row means every row on the RS (so you increase in the RS row, you don't in the WS row, you increase again in the RS row, e.t.c). Happy knitting!
20.03.2022 - 19:30Could you please share what are the finished body measurements for this cardigan? I can't seem to find that information in any pattern or a size reference in your website as to what S/M/L/etc. actually mean in cm. Thank you.
30.12.2021 - 10:46DROPS Design answered:
Hi Mel, you will find the schematic drawing for each garment below the patterns. It will have all the measurement for each size we have in this pattern. If you follow the pattern and keep the tension/gauge the garment will have the same size as the schematic drawing. Happy knitting!
30.12.2021 - 13:54Hallo, die Halsblende wird doch - wie beim dazu passenden Pullover - glatt rechts gestrickt, damit die Blende sich dann einrollt - wie man gut am Foto erkennen kann. Da sind die Textpassagen in der Reihenfolge durcheinander geraten. Nach 2 cm würde man erst aufteilen für das Muster. Ich wollte gerade mit der Jacke beginnen, da habe ich das bemerkt...
24.12.2020 - 15:38In hinreihen bei Glatt rechts wird doch die hinreihe rechts u d die rückreihe Links gestrickt, oder?! Wie werden denn die markierten linksmaschen gestrickt.? Das war meine Frage. Werden sie in hin und rückreihe links gestrickt?
07.09.2020 - 13:26DROPS Design answered:
Liebe Jutta, Entschuldigung für das Misverständnis, diese linke Masche (mit Markierer) wird rechts bei den Rückreihen gestrickt, Anleitung wird bald korrigiert, danke für den Hinweis! Viel Spaß beim stricken!
08.09.2020 - 15:32Hallo, in der Anleitung steht, dass die markierte Masche links gestrickt werden soll. Sie schreiben jetzt: rechts Stricken. Bedeutet es kraus rechts oder glatt rechts? Und warum steht in der Anleitung: linke Maschen immer links Stricken?auch da die Frage: in hin u d rückreihe Links oder Glatt links.?
07.09.2020 - 12:08DROPS Design answered:
Liebe Jutta, entschuldigung, ich meinte und dachte links habe aber leider rechts geschrieben, mein Fehler, dh die markierete Masche wird immer links gestrickt. Ich verstehe vielleicht Ihre 2. Frage nicht richtig, die Jacke wird hin und zurück gestrickt, Muster wird bei den Hinreihen: 2 M glatt re, 2 Maschen kraus rechts (= 4 Maschen rechts) - bei den Hinriehen werden die glatt rechte Maschen links gestrickt und die kraus rechte Maschen rechts gestrickt. Viel Spaß beim stricken!
07.09.2020 - 13:21Hallo, mit 5 Zunahmen aus einer linksmasche komme ich nicht klar. Gibt dann in der rückreihe ein Loch. Leider gibt es dazu kein Video und ich kann euch nirgends finden, wie diese linksmasche in der rückreihe gestrickt wird.
06.09.2020 - 21:10DROPS Design answered:
Liebe Jutta, dieses Video zeigt wie man 2 Maschen in 1 Masche zunimmt, hier werden Sie genauso stricken, bis Sie aber 5 anstatt 3 Maschen auf der rechten Nadel haben. Die markierte Masche soll immer rechts gestrickt werden, die anderen werden im Muster (= 2 M glatt rechts, 2 M kraus rechts). En Video kommt bald. Viel Spaß beim stricken!
07.09.2020 - 09:44