DROPS Merino Extra Fine
100% Wool
from 3.50 £ /50g
Get the yarn to make this pattern from 7.00£.

The yarn cost is calculated from the pattern’s smallest size and the yarn’s cheapest product type. Looking for an even better price? You might find it on the DROPS Deals!

DROPS SS24

Tiny Kicks

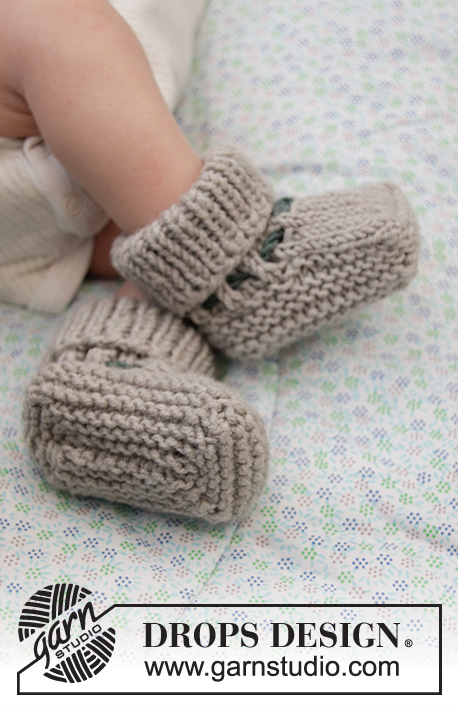
Knitted slippers with rib and garter stitch for baby in DROPS Merino Extra Fine. Size 0 - 4 years

DROPS Baby 33-24
DROPS design: Pattern me-070-by
Yarn group B
----------------------------------------------------------

SIZE:
0/1 - 1/3 - 6/9 - 12/18 months (2 - 3/4) years
To fit foot length: 9-10-11-12 (14-16) cm

MATERIALS:
DROPS MERINO EXTRA FINE from Garnstudio (belongs to yarn group B)
50-50-50-100 (100-100 ) g colour 08, light beige
50-50-50-50 (50-50 ) g colour no 37, misty forest

KNITTING TENSION:
21 stitches in width and 28 rows vertically in stocking stitch = 10 x 10 cm.

NEEDLES:
DROPS CIRCULAR NEEDLE SIZE 4 mm : Length 40 cm for stocking stitch and garter stitch.
DROPS CIRCULAR NEEDLE SIZE 3 mm : Length 40 cm for rib
Needle size is only a suggestion! If you have too many stitches on 10 cm switch to a larger needle size. If you have too few stitches on 10 cm switch to a smaller needle size.

-------------------------------------------------------

Alternative Yarn – See how to change yarns here
Yarn Groups A to F – Use the same pattern and change the yarn here
Yarn usage using an alternative yarn – Use our yarn converter here

-------------------------------------------------------

DROPS Merino Extra Fine
100% Wool
from 3.50 £ /50g
Get the yarn to make this pattern from 7.00£.

The yarn cost is calculated from the pattern’s smallest size and the yarn’s cheapest product type. Looking for an even better price? You might find it on the DROPS Deals!

Pattern instructions

NOTE: This pattern is written in British English. All measurements in charts are in cm. For conversion from cm to inches - click here. There are different terms for crocheting in British and American English. If this pattern includes crochet, click for "crochet terms" here. For this pattern in American English, please click here.
EXPLANATION FOR THE PATTERN:

----------------------------------------------------------

GARTER STITCH (back and forth):
1 ridge = knit 2 rows.

DECREASE TIP (evenly):
To calculate how to decrease evenly, use the total number of stitches on row (e.g. 36 stitches) and divide stitches by number of decreases to be done (e.g. 8) = 4.5. 
In this example decrease by knitting alternately approx. every 3rd and 4th stitch and every 4th and 5th stitch together.

----------------------------------------------------------

START THE PIECE HERE:

----------------------------------------------------------

SLIPPER - SHORT OVERVIEW OF THE PIECE:
Worked back and forth on circular needles from mid back, and sewn together when finished.

FOLDING EDGE:
Cast on 36-40-42-44 (48-52) stitches on circular needle size 3 mm with Merino Extra Fine. Work rib (= knit 1 / 1 purl) for 6-6-7-7 (8-8) cm - adjust so that next row is worked from wrong side. Purl 1 row from wrong side while AT THE SAME TIME decreasing 8-10-10-10 (10-10) stitches evenly - read DECREASE TIP = 28-30-32-34 (38-42) stitches. Switch to circular needle size 4 mm. On next row work eyelet holes as follows from right side: Knit 1, * knit 2 together, 1 yarn over *, repeat from *-* and finish with knit 1. Purl 1 row from wrong side.

FOOT:
Slip the outermost 11-11-12-12 (13-14) stitches in each side on 1 stitch holder = 6-8-8-10 (12-14) stitches remain on needle (= mid on top of foot). Work in stocking stitch with 1 edge stitch in garter stitch for 3-4-4-5 (6-7) cm. REMEMBER THE KNITTING TENSION! Cut the yarn.
Work next row as follows from right side: Work the 11-11-12-12 (13-14) stitches from stitch holder in first side of piece, pick up 6-8-8-10 (12-14) stitches along the side of middle piece, work 6-8-8-10 (12-14) stitches, pick up 6-8-8-10 (12-14) stitches along the other side of middle piece and work the 11-11-12-12 (13-14) stitches from the last stitch holder = 40-46-48-54 (62-70) stitches. Knit 1 row from wrong side. Insert 1 marker on each side of the middle 6-8-8-10 (12-14) stitches at the front. Then work in garter stitch back and forth AT THE SAME TIME on 1st row increase 1 stitch inside the 2 markers so that there are 8-10-10-12 (14-16) stitches mid front = 42-48-50-56 (64-72) stitches on needle. When 2½-3-3½-4 (5-6) cm have been worked from markers at the front, continue like this:
ROW 1 (= right side): Knit 3, slip 1 stitch knitwise, knit 2 together, pass slipped stitch over, knit 10-12-13-15 (18-24) stitches, knit 3 together, knit 4-6-6-8 (10-12), slip 1 stitch knitwise, knit 2 together, pass slipped stitch over, knit until 6 stitches remain on row, knit 3 together and finish with knit 3 (= 8 stitches decreased, 34-40-42-48 (56-64) stitches on needle).
ROW 2 (= wrong side): Knit all stitches.
ROW 3 (= right side): Knit 2, slip 1 stitch knitwise, knit 2 together, pass slipped stitch over, knit 8-10-11-13 (16-19) stitches, knit 3 together, knit 2-4-4-6 (8-10), slip 1 stitch knitwise, knit 2 together, pass slipped stitch over, knit until 5 stitches remain on row, knit 3 together and finish with knit 2 (= 8 stitches decreased, 26-32-34-40 (48-56) stitches on needle).
ROW 4 (= wrong side): Knit all stitches.
ROW 5 (= right side): Knit 1, slip 1 stitch knitwise, knit 2 together, pass slipped stitch over, knit 6-8-9-11 (14-17) stitches, knit 3 together, knit 0-2-2-4 (6-8), slip 1 stitch knitwise, knit 2 together, pass slipped stitch over, knit until 4 stitches remain on row, knit 3 together and finish with knit 1 (= 8 stitches decreased, 18-24-26-32 (40-48) stitches on needle).
ROW 6 (= wrong side): Knit all stitches.
Stop here in size 0/1 + 1/3 + 6/9 months.

SIZE 12/18 months + 2 years + 3/4 years:
ROW 7 (= right side): slip 1 stitch knitwise, knit 2 together, pass slipped stitch over, knit 9 (12-15) stitches, knit 3 together, knit 2 (4-6), slip 1 stitch knitwise, knit 2 together, pass slipped stitch over, knit until 3 stitches remain on row, knit 3 together (= 8 stitches decreased, 24 (32-40) stitches on needle).
ROW 8 (= wrong side): Knit all stitches.

ALL SIZES:
Knit 2 rows.

ASSEMBLY:
Distribute stitches on 2 needles (= mid under foot), place double and sew together alongside with grafting/kitchener stitches.
Sew slipper together mid back and up along leg - sew in front loop of outermost stitch

TIES:
Cut 2 lengths of misty forest of approx. 1 meter, twine them tightly together, fold them double and they will twine again, tie a knot in each end. Thread tie up and down through the eyelet holes on slipper. Make 1 tie for each slipper.

Each of our patterns has specific tutorial videos to help you.

Do you have a question? See a list of frequently asked questions (FAQ)

Knitting tension is what determines the final measurements of your work, and is usually measured per 10 x 10 cm. It is provided like so: number of stitches in width x number of rows in height - eg: 19 stitches x 26 rows = 10 x 10 cm.

The knitting tension is very individual; some people knit/crochet loosely while others work tightly. You adjust the knitting tension with the needle size, which is why the suggested needle size is only meant as a guide! You need to adjust this (up or down) to ensure that YOUR knitting tension matches the knitting tension provided in the pattern. If you work with a different knitting tension than provided you will have a different yarn consumption, and your work will have different measurements than what the pattern suggests.

The knitting tension also determines which yarns can replace each other. As long as you achieve the same knitting tension you can replace one yarn with another.

See DROPS lesson: How to measure your tension/gauge

See DROPS video: How to make a gauge tension swatch

The required amount of yarn is provided in grams, eg: 450 g. To calculate how many balls you’ll need you first need to know how many grams are in 1 ball (25g, 50g or 100g). This information is available if you click on the individual yarn quality on our pages. Divide the amount required with the amount of each ball. For example, if each ball is 50g (the most common amount), the calculation will be as follows: 450 / 50 = 9 balls.

The important thing when changing from one yarn to another is that the knitting/crochet tension remains the same. This is so that the measurements of the finished piece will be the same as on the sketch provided. It is easier to achieve the same knitting tension using yarns from the same yarn group. It is also possible to work with multiple strands of a thinner yarn to achieve the knitting tension of a thicker one. Please try our yarn converter. We recommend you to always work a test swatch.

Please NOTE: when changing yarn the garment might have a different look and feel to the garment in the photo, due to individual properties and qualities of each yarn.

See DROPS lesson: Can I use a different yarn than the one mentioned in the pattern?

All our yarns are categorised into yarn groups (from A to F) according to thickness and knitting tension – group A contains the thinnest yarns and group F the thickest. This makes it easier for you to find alternative yarns to our patterns, should you wish to switch yarn. All yarns within the same group have a similar knitting tension and can easily replace each other. However, different yarn qualities have different structures and properties which will give the finished work a unique look and feel.

Click here for an overview of the yarns in each yarn group

At the top of all our patterns you’ll find a link to our yarn calculator, which is a helpful tool should you wish to use a different yarn than suggested. By filling in the yarn quality you wish to replace, the amount (in your size) and number of strands, the calculator will present good alternative yarns with the same knitting tension. Additionally it will tell you how much you’ll require in the new qualities and whether you’ll need to work with multiple strands. Most skeins are 50g (some are 25g or 100g).

If the pattern is worked with multiple colours, every colour will have to be calculated separately. Similarly, if the pattern is worked with several strands of different yarns (for example 1 strand Alpaca and 1 strand Kid-Silk) you will have to find alternatives for each, individually.

Click here to see our yarn calculator

Since different yarns have different qualities and textures we have chosen to keep the original yarn in our patterns. However, you can easily find options among our available qualities by using our yarn calculator, or simply pick a yarn from the same yarn group.

It is possible that some retailers still have discontinued yarns in stock, or that someone has a few skeins at home that they would like to find patterns for.

The yarn calculator will provide both alternative yarn as well as required amount in the new quality.

If you think it's hard to decide what size to make, it can be a good idea to measure a garment you own already and like the size of. Then you can pick the size by comparing those measures with the ones available in the pattern's size chart.

You'll find the size chart at the bottom of the pattern.

See DROPS lesson: How to read size chart

The needle size provided in the pattern serves only as a guide, the important thing is to follow the knitting tension. And since knitting tension is very individual, you will have to adjust the needle size to ensure that YOUR tension is the same as in the pattern – maybe you’ll have to adjust 1, or even 2 needle sizes, up or down to achieve the correct tension. For this, we recommend that you work test swatches.

Should you work with a different knitting tension than the one provided, the measurements of the finished garment might deviate from the measurement sketch.

See DROPS lesson: How to measure your tension/gauge

See DROPS video: How to make a tension/gauge swatch

Working a garment top-down provides more flexibility and room for personal adjustment. For example it is easier to try the garment on while working, as well as making adjustments to length of yoke and shoulder caps.

The instructions are carefully explaining every step, in the correct order. Diagrams are adjusted to the knitting direction and are worked as usual.

The diagram depicts all rows/rounds, and every stitch seen from the right side. It is read from bottom to top, from right to left. 1 square = 1 stitch.

When working back and forth, every other row is worked from the right side and every other row is worked from the wrong side. When working from the wrong side, the diagram will have to be worked reversed: from left to right, knit stitches are purled, purl stitches are knit etc.

When working in the round every round is worked from the right side and the diagram are worked from right to left on all rounds.

See DROPS lesson: How to read knitting diagrams

The diagram depicts all rows/rounds, and every stitch seen from the right side. It is worked from bottom to top, from right to left.

When working back and forth every other row is worked from the right side: from right to left and every other row is worked from the wrong side: from left to right.

When working in the round, every row in the diagram are worked from the right side, from right to left.

When working a circular diagram you start in the middle and work your way outwards, counter clockwise, row by row.

The rows usually start with a given number of chain stitches (equivalent to the height of the following stitch), this will either be depicted in the diagram or explained in the pattern.

See DROPS lesson: How to read crochet diagrams

Instructions for working several diagrams after each other on the same row/round, will often be written like so: “work A.1, A.2, A.3 a total of 0-0-2-3-4 times". This means you work A.1 once, then A.2 is worked once, and A.3 is repeated (in width) the number of times provided for your size – in this case like so: S = 0 times, M = 0 times, L=2 times, XL= 3 times and XXL = 4 times.

The diagrams are worked as usual: begin with the first row in A.1, then work the first row in A.2 etc.

See DROPS lesson: How to read knitting diagrams

See DROPS lesson: How to read crochet diagrams

The total width of the garment (from wrist-to-wrist) will be larger in the larger sizes, despite the actual sleeves being shorter. The larger sizes have longer sleeve caps and wider shoulders, so there will be a good fit in all sizes.

The measurement sketch/schematic drawing provides information regarding the full length of the garment. If it’s a jumper or a jacket the length is measured from the highest point on the shoulder closest to the neckline, and straight down to the bottom of the garment. It is NOT measured from the tip of shoulder. Similarly, the length of yoke is measured from the highest point on the shoulder and down to where yoke is split into body and sleeves.

On a jacket measures are never taken along bands, unless specifically stated. Always measure inside band stitches when measuring the length.

See DROPS lesson: How to read a schematic drawing

Diagrams are often repeated on the round or in height. 1 repeat is the diagram the way it appears in the pattern. If it says to work 5 repeats of A.1 in the round, then you work A.1 a total of 5 times after/next to each other in the round. If it says to work 2 repeats of A.1 vertically/in height you work the entire diagram once, then begin again at the start and work the entire diagram one more time.

Chain stitches are slightly narrower than other stitches and to avoid working the cast-on edge too tight, we simply chain more stitches to begin with. The stitch count will be adjusted on the following row to fit the pattern and measurement sketch.

The rib edge is more elastic and will contract slightly compared to, for example, stocking stitch. By increasing before the rib edge, you avoid a visible difference in width between the rib edge and the rest of the body.

It’s very easy to cast off too tightly, and by making yarn overs while casting off (and simultaneously casting these off) you avoid a too tight cast off edge.

See DROPS video: How to bind off with yarn overs (yo)

To achieve an even increase (or decrease) you can increase on, for example: every 3rd and 4th row alternately, like so: work 2 rows and increase on the 3rd row, work 3 rows and increase on the 4th. Repeat this until the increase is complete.

See DROPS lesson: Increase or decrease 1 st on every 3rd and 4th row alternately

Should you prefer to work in the round instead of back and forth, you may of course adjust the pattern. You’ll need to add steeks mid-front (usually 5 stitches), and follow the instructions. When you would normally turn and work from the wrong side, simply work across the steek and continue in the round. At the end you’ll cut the piece open, pick up stitches to work bands, and cover the cut edges.

See DROPS video: How to knit steeks and cut open

Should you prefer to work back and forth instead of in the round, you may of course adjust the pattern so you work the pieces separately and then assemble them at the end. Divide the stitches for the body in 2, add 1 edge stitch in each side (for sewing) and work the front and back pieces separately.

See DROPS lesson: Can I adapt a pattern for circular needles into straight needles?

Pattern repeats can vary slightly in the different sizes, in order to get the correct proportions. If you’re not working the exact same size as the garment in the photo, yours might deviate slightly. This has been carefully developed and adjusted so that the complete impression of the garment is the same in all sizes.

Make sure to follow instructions and diagrams for your size!

If you have found a pattern you like which is available in women’s size it’s not very difficult to convert it to men’s size. The biggest difference will be the length of sleeves and body. Start working on the women size that you think would fit across the chest. The additional length will be worked right before you cast off for the armhole/sleeve cap. If the pattern is worked top-down you can add the length right after the armhole or before the first decrease on sleeve.

Regarding additional yarn amount, this will depend on how much length you add, but it is better with a skein too many than too few.

All yarns will have excess fibres (from production) that might come off as lint or shedding. Brushed yarns (ie hairier yarns) have more of these loose, excess fibres, causing more shedding.

Shedding also depends on what is worn under or over the garment, and whether this pulls at the yarn fibres. It’s therefore not possible to guarantee that there will be no shedding

Below are some tips on how to get the best result when working with hairier yarns:

1. When the garment is finished (before you wash it) shake it vigorously so the looser hairs come off. NOTE: do NOT use a lint roller, brush or any method that pulls at the yarn.

2. Place the garment in a plastic bag and put it in your freezer - the temperature will cause the fibres to become less attached to each other, and excess fibres will come off easier.

3. Leave in the freezer for a few hours before taking it out and shaking it again.

4. Wash the garment according to the instructions on the yarn label.

Pilling is a natural process that happens to even the most exclusive of fibers. It's a natural sign of wear and tear that is hard to avoid, and that is most visible in high friction areas of your garment like a sweater's arms and cuffs.

You can make your garment look as new by removing the pilling, using a fabric comb or a pill/lint remover.

Still can't find the answer you need? Then scroll down and leave your question so one of our experts can try to help you. This will be done normally within 5 to 10 working days.
In the meantime, you can read the questions and answers that others have left to this pattern or join the DROPS Workshop on Facebook to get help from fellow knitters/crocheters!

You might also like...

Post a comment to pattern DROPS Baby 33-24

We would love to hear what you have to say about this pattern!

If you want to leave a question, please make sure you select the correct category in the form below, to speed up the answering process. Required fields are marked *.

Comments / Questions (22)

country flag Silvia wrote:

Tg 0 Bongiorno non capisco una cosa: Quando inizio il piede mi trovo con 11m+6m parte centrale+11m. Ma nel ferro successivo mi dice che le maglie in realtà sono 11+6 centrali + 6 centrali(dell'altro lato?) + 11. Da dove sono sono saltate fuori quelle 6 maglie centrali in più? Non capisco... Grazie

01.12.2021 - 17:24

DROPS Design answered:

Buonasera Silvia, deve lavorare 11 maglie, riprendere 6 maglie lungo il lato, lavorare le 6 maglie centrali, riprendere 6 maglie lungo l'altro lato e lavorare le ultime 11 maglie. Buon lavoro!

12.12.2021 - 20:49

country flag Sarah wrote:

Hallo, Wenn ich zu Beginn des Fußes die Maschen stilllege, ist mein Arbeitsfaden an Anfang der stillgelegten Maschen. Wie stricke ich dann die mittleren Maschen der Ferse? Wenn ich jedoch die ersten Maschen bis zur Mitte stricke, hätte ich ja auf einer stillgelegten Seite eine Reihe mehr gestrickt als auf der anderen. Danke schön und LG Sarah

29.09.2021 - 15:26

DROPS Design answered:

Liebe Sarah, Sie können die ersten Maschen zuerst stricken, dann diese Maschen stilllegen, so brauchen Sie nicht, den Faden abzuschneiden, oder schneiden Sie den Faden um die mitttleren Maschen zu stricken. Es gibt keine Ferse wie beim Socken, wenn Sie dem mittleren Teil (= Obefuß) gestrickt haben, wird der Faden abgeschnitten, dann wird es von Anfang der Reihe wie zuvor gestrickt: die stillgelegten Maschen + Maschen auffassen + Fuß + Maschen auffassen + stillgelegten Maschen - am Enden gibt es eine Naht an der hinteren Mitte + unter beim Fuß (= die abgekettene Maschen werden zusammen genäht). Viel Spaß beim stricken!

30.09.2021 - 09:34

country flag Anna Elise Bruus wrote:

Hej :) Jeg er næsten nybegynder og er nået til det sted, hvor man skal sætte de 11 yderste masker på hver side af pinden på tråde, så der er 6 masker tilbage i midten. Nu skal jeg så strikke maskerne i midten, men min snor sidder jo ved den yderste af en af de 11 masker på den ene snor. Hvad gør jeg nu? Tager jeg en ny garnnøgle i brug til midten og lader snoren fra før blive hvor den er, eller? På forhånd tak :) Mvh. Anna

24.08.2021 - 14:44

DROPS Design answered:

Hei Anna. Du kan la tråden være og start på et nytt nøste eller start med den andre trådenden i sammen nøste. Strikk over de 6 midt maskene til ferdig mål og denne tråden klipper du. Så starter du der den andre tråden er (de 11 maskene du satte på en tråd). mvh DROPS design

27.08.2021 - 10:20

country flag Nupur wrote:

I have done the kitchener graft at the sole area, and now I am wondering how to sew the areas from the ankle to the heel, because a mattress stitch will make it cinch together when it meets the kitchener, because there is an extra row of knitting where the kitchener is. Thank you!

22.06.2021 - 17:10

DROPS Design answered:

Dear Nupur, it is best to sew it puting the edges next to each other and sew into the outer loop of the edge stitch, so the seam lies flat. Happy Stitching!

23.06.2021 - 01:46

country flag Deborah Loffredo wrote:

Buongiorno ,devo fare le diminuzione e il mio risultato viene 4,4 non capisco ogni quanto farle.Faccio un altra domanda, quando metto in attesa le maglie e lavoro a maglia rasata,il vivagno a legaccio va fatto da entrambi i lati.grazie mille

27.04.2021 - 11:00

DROPS Design answered:

Buonasera Deborah, per le diminuzioni può lavorare insieme a diritto ogni 4° e 5° maglia. Per la maglia di vivagno, può lavorarla a ogni lato. Buon lavoro!

30.04.2021 - 20:38

country flag Keriman Koçer wrote:

Hello, About the assembly part; should we sew from the back side or the front side? I couldn't get it from the pictures. Thanks in advance.

03.04.2021 - 15:46

DROPS Design answered:

Dear Keriman, it is best to sew up the back with kitchener stitch, that kind of replicates the knitting stitch, and does not really matter from which side you are sewing up the piece. Happy Crafting!

03.04.2021 - 19:54

country flag Keriman Koçer wrote:

Hello, I'm guessing we will cut the yarn at the end of folding edge part, before we slip stitches to holder. Is that right? Thank you in advance.

01.04.2021 - 18:35

DROPS Design answered:

Dear Keriman, you can cut the yarn, slip the stitches on the two sides, then reattach and knit the middle part, or you can knit the first 11-11-12-12 (13-14) stitch, put these stitches on the holder, knit until you have 11-11-12-12 (13-14) stitch left from the row, put these last 11-11-12-12 (13-14) stitches on a stitchmarker, turn the piece and knit back. I realize that you will have one more row on one side, but with this thin yarn it is only a few mm, índ you will not need to cut the yarn. Both method will work just fine, it is up to you to decide. Happy Knitting!

01.04.2021 - 22:02

country flag Rejeanne wrote:

Pourriez-vous m'expliquer comment vous relever les mailles de côté pour le chausson modèle 33-24? Merci!

04.03.2021 - 20:57

DROPS Design answered:

Bonjour Rejeanne, cette vidéo montre comment relever les mailles d'un côté de l'ouvrage, procédez ainsi de chaque côté de la partie du dessus du pied. Bon tricot!

05.03.2021 - 07:35

country flag Catherine wrote:

Could it be possible that the decreases of knitting 3 together are at the corners of mid front instead of what is described in the pattern ? It is not asymmetrical if the existing pattern is followed. Thank you for your anticipation.

04.11.2020 - 10:25

DROPS Design answered:

Dear Catherine, rows are starting on mid back, you will incrased at the beg of the row/end of the row first inside 3 then 2 and 1 stitch - and on each side of the middle 8-16 sts (see size): 1 of these st + the 2 sts before the marker when dec before the marker and 1 of these st + the next 2 st after the marker when dec after the marker. Hope this will help. Happy knitting!

04.11.2020 - 11:31

country flag Frances wrote:

The reason I asked for an alternate yarn is that the cost of shipping from your country to Australia is prohibitive. Thank you

03.11.2020 - 02:11