DROPS Merino Extra Fine
100% Wool
from 3.75 € /50g
Get the yarn to make this pattern from 7.50€.

The yarn cost is calculated from the pattern’s smallest size and the yarn’s cheapest product type. Looking for an even better price? You might find it on the DROPS Deals!

DROPS SS24

Ready to Play Romper

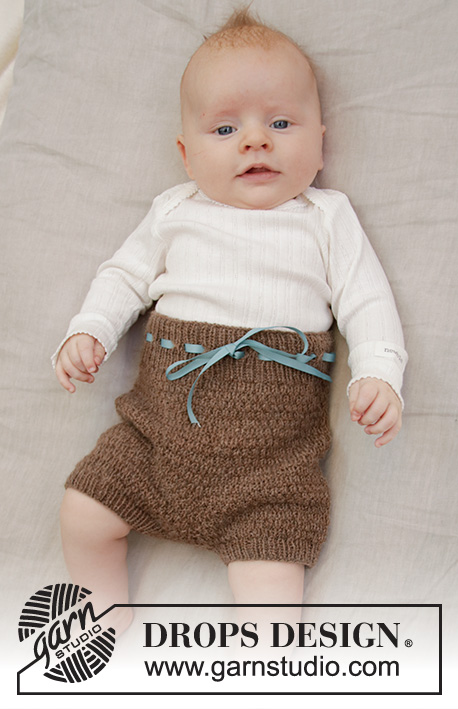
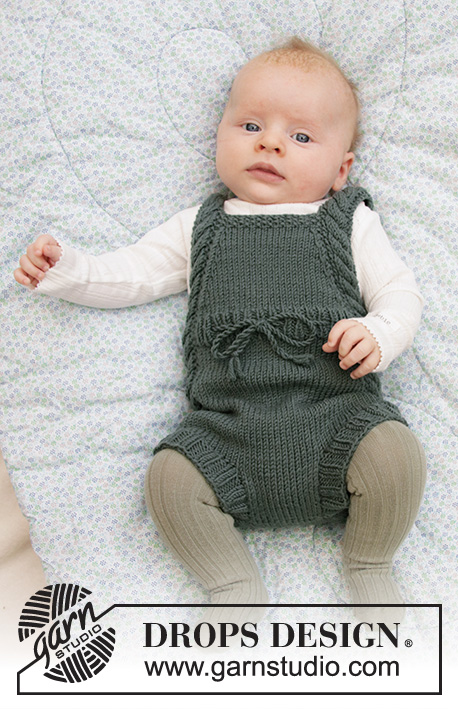
Knitted play suit for baby with cables and moss stitch in DROPS Merino Extra Fine. Size 1 - 24 months.

DROPS Baby 33-21
DROPS design: Pattern me-065-by
Yarn group B
----------------------------------------------------------

SIZE:
Size: 1/3 - 6/9 - 12/18 - 24 months
Size in cm: 56/62 - 68/74 - 80/86 - 92

MATERIALS:
DROPS MERINO EXTRA FINE from Garnstudio (belongs to yarn group B)
100-150-150-200 g colour 37, misty forest

KNITTING TENSION:
22 stitches in width and 30 rows vertically in stocking stitch = 10 x 10 cm.

NEEDLES:
DROPS CIRCULAR NEEDLE SIZE 3.5 mm, length 40 cm for stocking stitch.
DROPS CIRCULAR NEEDLE SIZE 3 mm, length 40 cm for rib.
DROPS CABLE NEEDLE - for cables.
Needle size is only a suggestion! If you have too many stitches on 10 cm switch to a larger needle size. If you have too few stitches on 10 cm switch to a smaller needle size.

DROPS MOTHER-OF-PEARL BUTTON ARCHED (white), NO 521: 2 pieces for all sizes

-------------------------------------------------------

Alternative Yarn – See how to change yarns here
Yarn Groups A to F – Use the same pattern and change the yarn here
Yarn usage using an alternative yarn – Use our yarn converter here

-------------------------------------------------------

DROPS Merino Extra Fine
100% Wool
from 3.75 € /50g
Get the yarn to make this pattern from 7.50€.

The yarn cost is calculated from the pattern’s smallest size and the yarn’s cheapest product type. Looking for an even better price? You might find it on the DROPS Deals!

Pattern instructions

----------------------------------------------------------

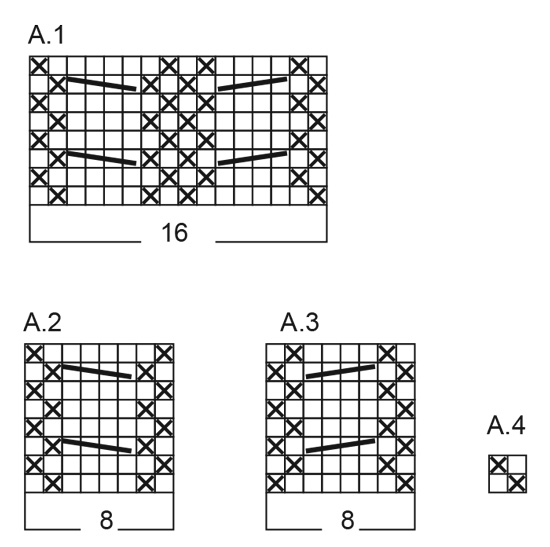
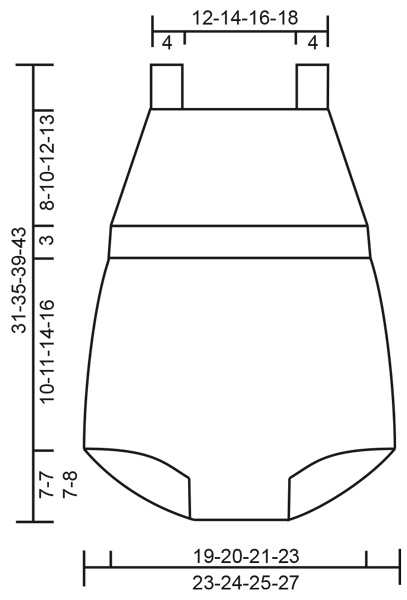
EXPLANATION FOR THE PATTERN:

----------------------------------------------------------

GARTER STITCH (worked in the round):
1 ridge = 2 rounds. Knit 1 round and purl 1 round.

GARTER STITCH (back and forth):
1 ridge = knit 2 rows.

PATTERN:
See diagrams A.1 to A.4

DECREASE TIP:
Work until 2 stitches remain before A.1, decrease as follows: Knit 2 together, work stitches in A.1, slip 1 stitch knitwise, knit 1, pass slipped stitch over.

----------------------------------------------------------

START THE PIECE HERE:

----------------------------------------------------------

PLAY SUIT – SHORT OVERVIEW OF THE PIECE:
Piece is worked back and forth in 2 parts, bottom up to after leg opening. Then work piece in the round before dividing at the waist, and finishing front piece back and forth on needle.

BACK PIECE:
Cast on 14-16-18-20 stitches on circular needle size 3.5 mm with Merino Extra Fine and work in stocking stitch back and forth. AT THE SAME TIME cast on 2 new stitches at the end of every row 9-9-9-10 times in total in each side = 50-52-54-60 stitches on needle and piece measures approx. 6-6-6-7 cm. Put piece aside and work the front piece.

FRONT PIECE:
Cast on 14-16-18-20 stitches on circular needle size 3.5 mm with Merino Extra Fine and work in stocking stitch back and forth for 5-5-5-6 cm.
SIZE 1/3 months - 6/9 months - 12/18 months: Now cast on 6 new stitches at the end of every row 3 times in total each side.
SIZE 24 months: Cast on 6 new stitches in each side at the end of every row 2 times, then 8 new stitches in each side 1 time = 50-52-54-60 stitches on needle and piece measures approx. 7-7-7-8 cm.

BODY:
Slip stitches from front and back piece on to same circular needle = 100-104-108-120 stitches on needle. Insert 1 marker in each side (= 50-52-54-60 stitches between markers) - NOW MEASURE PIECE FROM HERE. Continue to work - beginning of the round should be 8 stitches before first marker thread. Work A.1 (= 16 stitches), stocking stitch over the next 34-36-38-44 stitches in stocking stitch, A.1 (= 16 stitches), stocking stitch over the next 34-36-38-44 stitches in stocking stitch. Marker threads are in the middle of A.1 in each side.

Continue this pattern in the round. When piece measures 2-3-5-7 cm, decrease 1 stitch on each side of both A.1 - READ DECREASE TIP (= 4 stitches decreased). Repeat decrease every 2 cm 4 times in total = 84-88-92-104 stitches on needle. When piece measures 10-11-14-16 cm from markers (piece measures approx. 17-18-21-24 cm from cast-on edge) work an elevation at the back as follows: work knit over knit and A.1 over A.1 as before over the first 58-60-62-68 stitches, i.e. until after the second repetition of A.1 (= front piece), knit until 5 stitches remain before A.1 at the beginning of round, turn and purl back until 5 stitches remain before A.1 in the other side, turn piece. Knit until 10 stitches remain before A.1, turn piece and purl until 10 stitches remain before A.1 in the other side. Turn piece and knit until the middle of the first A.1.

Switch to circular needle size 3 mm and work 1 round as before over all stitches, AT THE SAME TIME increase 1 stitch between every A.1 = 86-90-94-106 stitches – NOTE: To avoid holes at every turn pick up loop between 2 stitches and knit twisted together with next stitch on needle. Work next round as follows: Continue with A.2 over the first 8 stitches (= make sure to begin on same row that should have been worked in A.1), work rib purl 1/knit 1 over the next 27-29-31-37 stitches, work A.3 over the next 8 stitches (= make sure to begin on same row that should have been worked in A.1), work rib purl 1/knit 1 over the next 43-45-47-53 stitches. When piece measures 1 ½ cm, work a row eyelet holes as follows: Work as before over the first 8 stitches, purl 1, * knit 1, purl 1, 1 yarn over, knit 2 together*, repeat from *-* over the next 24-28-28-36 stitches, work 10-8-10-8 stitches as before, purl 1, * knit 1, purl 1, 1 yarn over, knit 2 together*, repeat from *-* over the next 40-44-44-52 stitches, work 2-0-2-0 stitches as before. Then continue pattern and rib as before, until 1 round remains before rib measures 3 cm. Work next round as follows: Work over the first 43-45-47-53 stitches (= front piece), LOOSELY cast off the next 43-45-47-53 stitches with knit over knit and purl over purl (= back piece).

FRONT PIECE:
Insert 1 marker, NOW MEASURE PIECE FROM HERE!
Switch to circular needle size 3.5 mm and work first row from right side as follows: Continue A.2 over the first 8 stitches on needle, 27-29-31-37 stitches in stocking stitch, A.3 over the last 8 stitches on needle. Continue like this back and forth. AT THE SAME TIME when piece measures 1-0-0-1 cm, decrease 1 stitch in each side - READ DECREASE TIP. Repeat decrease every 2nd-4th-6th-6th needle 7-7-6-6 times in total = 29-31-35-41 stitches remain on needle. When piece measures 7-9-11-12 cm from marker - adjust so that next row is from right side), work 6 rows with A.4 over stitches between A.2 and A.3 in each side. Work next row as follows from right side: work 8 stitches (= A.2) and slip these stitches on 1 stitch holder for shoulder strap, cast off the next 13-15-19-25 stitches and work the last 8 stitches (= A.3, shoulder strap).

SHOULDER STRAP:
Continue in A.3 back and forth until shoulder strap measures approx. 18 to 24 cm (or desired length). Cast off. Continue in A.2 back and forth until the other shoulder strap measures approx. 18 to 24 cm (or desired length). Cast off.

ASSEMBLY:

RIB EDGE:
Pick up from right side approx. 50 to 58 stitches along one opening for leg on circular needle size 3 mm with Merino Extra Fine. Purl 1 row from wrong side AT THE SAME TIME increase evenly to 58-62-66-70 stitches. Then work rib = knit 2/purl 2 back and forth with 1 edge stitch in garter stitch in each side. When edge measures 2-4 cm, loosely cast off with knit over knit and purl over purl.
Repeat along the other leg.

Sew opening between legs inside 1 edge stitch - i.e. sew together one rib edge, then sew seam between leg openings and finally the other rib edge.

Fasten a button at the bottom on each shoulder strap. Use holes in eyelet row on rib to button.

TIE:
Cut 2 lengths Merino Extra Fine yarn of approx. 3 metres. Twine the strands tog until they resist, fold the string double so that it twines again. Make a knot at each end. Begin mid front and thread tie up and down through eyelet row on rib in waist.

This pattern has been corrected.

Updated online: 15.09.2020
Correction:
BODY:
... When piece measures 1 ½ cm, work a row eyelet holes as follows: Work as before over the first 8 stitches, purl 1, * knit 1, purl 1, 1 yarn over, knit 2 together*, repeat from *-* over the next 24-28-28-36 stitches, work 10-8-10-8 stitches as before, purl 1, * knit 1, purl 1, 1 yarn over, knit 2 together*, repeat from *-* over the next 40-44-44-52 stitches, work 2-0-2-0 stitches as before.
Updated online: 05.10.2020
Correction: Under BODY there have been corrections in explanation on how to work an elevation at the back.

Diagram

symbols = knit from the right side, purl from the wrong side
symbols = purl from the right side, knit from the wrong side
symbols = slip 2 stitches on cable needle behind piece, knit 2, knit 2 from cable needle
symbols = slip 2 stitches on cable needle in front of piece, knit 2, knit 2 from cable needle
diagram
diagram

Each of our patterns has specific tutorial videos to help you.

Do you have a question? See a list of frequently asked questions (FAQ)

Knitting tension is what determines the final measurements of your work, and is usually measured per 10 x 10 cm. It is provided like so: number of stitches in width x number of rows in height - eg: 19 stitches x 26 rows = 10 x 10 cm.

The knitting tension is very individual; some people knit/crochet loosely while others work tightly. You adjust the knitting tension with the needle size, which is why the suggested needle size is only meant as a guide! You need to adjust this (up or down) to ensure that YOUR knitting tension matches the knitting tension provided in the pattern. If you work with a different knitting tension than provided you will have a different yarn consumption, and your work will have different measurements than what the pattern suggests.

The knitting tension also determines which yarns can replace each other. As long as you achieve the same knitting tension you can replace one yarn with another.

See DROPS lesson: How to measure your tension/gauge

See DROPS video: How to make a gauge tension swatch

The required amount of yarn is provided in grams, eg: 450 g. To calculate how many balls you’ll need you first need to know how many grams are in 1 ball (25g, 50g or 100g). This information is available if you click on the individual yarn quality on our pages. Divide the amount required with the amount of each ball. For example, if each ball is 50g (the most common amount), the calculation will be as follows: 450 / 50 = 9 balls.

The important thing when changing from one yarn to another is that the knitting/crochet tension remains the same. This is so that the measurements of the finished piece will be the same as on the sketch provided. It is easier to achieve the same knitting tension using yarns from the same yarn group. It is also possible to work with multiple strands of a thinner yarn to achieve the knitting tension of a thicker one. Please try our yarn converter. We recommend you to always work a test swatch.

Please NOTE: when changing yarn the garment might have a different look and feel to the garment in the photo, due to individual properties and qualities of each yarn.

See DROPS lesson: Can I use a different yarn than the one mentioned in the pattern?

All our yarns are categorised into yarn groups (from A to F) according to thickness and knitting tension – group A contains the thinnest yarns and group F the thickest. This makes it easier for you to find alternative yarns to our patterns, should you wish to switch yarn. All yarns within the same group have a similar knitting tension and can easily replace each other. However, different yarn qualities have different structures and properties which will give the finished work a unique look and feel.

Click here for an overview of the yarns in each yarn group

At the top of all our patterns you’ll find a link to our yarn calculator, which is a helpful tool should you wish to use a different yarn than suggested. By filling in the yarn quality you wish to replace, the amount (in your size) and number of strands, the calculator will present good alternative yarns with the same knitting tension. Additionally it will tell you how much you’ll require in the new qualities and whether you’ll need to work with multiple strands. Most skeins are 50g (some are 25g or 100g).

If the pattern is worked with multiple colours, every colour will have to be calculated separately. Similarly, if the pattern is worked with several strands of different yarns (for example 1 strand Alpaca and 1 strand Kid-Silk) you will have to find alternatives for each, individually.

Click here to see our yarn calculator

Since different yarns have different qualities and textures we have chosen to keep the original yarn in our patterns. However, you can easily find options among our available qualities by using our yarn calculator, or simply pick a yarn from the same yarn group.

It is possible that some retailers still have discontinued yarns in stock, or that someone has a few skeins at home that they would like to find patterns for.

The yarn calculator will provide both alternative yarn as well as required amount in the new quality.

If you think it's hard to decide what size to make, it can be a good idea to measure a garment you own already and like the size of. Then you can pick the size by comparing those measures with the ones available in the pattern's size chart.

You'll find the size chart at the bottom of the pattern.

See DROPS lesson: How to read size chart

The needle size provided in the pattern serves only as a guide, the important thing is to follow the knitting tension. And since knitting tension is very individual, you will have to adjust the needle size to ensure that YOUR tension is the same as in the pattern – maybe you’ll have to adjust 1, or even 2 needle sizes, up or down to achieve the correct tension. For this, we recommend that you work test swatches.

Should you work with a different knitting tension than the one provided, the measurements of the finished garment might deviate from the measurement sketch.

See DROPS lesson: How to measure your tension/gauge

See DROPS video: How to make a tension/gauge swatch

Working a garment top-down provides more flexibility and room for personal adjustment. For example it is easier to try the garment on while working, as well as making adjustments to length of yoke and shoulder caps.

The instructions are carefully explaining every step, in the correct order. Diagrams are adjusted to the knitting direction and are worked as usual.

The diagram depicts all rows/rounds, and every stitch seen from the right side. It is read from bottom to top, from right to left. 1 square = 1 stitch.

When working back and forth, every other row is worked from the right side and every other row is worked from the wrong side. When working from the wrong side, the diagram will have to be worked reversed: from left to right, knit stitches are purled, purl stitches are knit etc.

When working in the round every round is worked from the right side and the diagram are worked from right to left on all rounds.

See DROPS lesson: How to read knitting diagrams

The diagram depicts all rows/rounds, and every stitch seen from the right side. It is worked from bottom to top, from right to left.

When working back and forth every other row is worked from the right side: from right to left and every other row is worked from the wrong side: from left to right.

When working in the round, every row in the diagram are worked from the right side, from right to left.

When working a circular diagram you start in the middle and work your way outwards, counter clockwise, row by row.

The rows usually start with a given number of chain stitches (equivalent to the height of the following stitch), this will either be depicted in the diagram or explained in the pattern.

See DROPS lesson: How to read crochet diagrams

Instructions for working several diagrams after each other on the same row/round, will often be written like so: “work A.1, A.2, A.3 a total of 0-0-2-3-4 times". This means you work A.1 once, then A.2 is worked once, and A.3 is repeated (in width) the number of times provided for your size – in this case like so: S = 0 times, M = 0 times, L=2 times, XL= 3 times and XXL = 4 times.

The diagrams are worked as usual: begin with the first row in A.1, then work the first row in A.2 etc.

See DROPS lesson: How to read knitting diagrams

See DROPS lesson: How to read crochet diagrams

The total width of the garment (from wrist-to-wrist) will be larger in the larger sizes, despite the actual sleeves being shorter. The larger sizes have longer sleeve caps and wider shoulders, so there will be a good fit in all sizes.

The measurement sketch/schematic drawing provides information regarding the full length of the garment. If it’s a jumper or a jacket the length is measured from the highest point on the shoulder closest to the neckline, and straight down to the bottom of the garment. It is NOT measured from the tip of shoulder. Similarly, the length of yoke is measured from the highest point on the shoulder and down to where yoke is split into body and sleeves.

On a jacket measures are never taken along bands, unless specifically stated. Always measure inside band stitches when measuring the length.

See DROPS lesson: How to read a schematic drawing

Diagrams are often repeated on the round or in height. 1 repeat is the diagram the way it appears in the pattern. If it says to work 5 repeats of A.1 in the round, then you work A.1 a total of 5 times after/next to each other in the round. If it says to work 2 repeats of A.1 vertically/in height you work the entire diagram once, then begin again at the start and work the entire diagram one more time.

Chain stitches are slightly narrower than other stitches and to avoid working the cast-on edge too tight, we simply chain more stitches to begin with. The stitch count will be adjusted on the following row to fit the pattern and measurement sketch.

The rib edge is more elastic and will contract slightly compared to, for example, stocking stitch. By increasing before the rib edge, you avoid a visible difference in width between the rib edge and the rest of the body.

It’s very easy to cast off too tightly, and by making yarn overs while casting off (and simultaneously casting these off) you avoid a too tight cast off edge.

See DROPS video: How to bind off with yarn overs (yo)

To achieve an even increase (or decrease) you can increase on, for example: every 3rd and 4th row alternately, like so: work 2 rows and increase on the 3rd row, work 3 rows and increase on the 4th. Repeat this until the increase is complete.

See DROPS lesson: Increase or decrease 1 st on every 3rd and 4th row alternately

Should you prefer to work in the round instead of back and forth, you may of course adjust the pattern. You’ll need to add steeks mid-front (usually 5 stitches), and follow the instructions. When you would normally turn and work from the wrong side, simply work across the steek and continue in the round. At the end you’ll cut the piece open, pick up stitches to work bands, and cover the cut edges.

See DROPS video: How to knit steeks and cut open

Should you prefer to work back and forth instead of in the round, you may of course adjust the pattern so you work the pieces separately and then assemble them at the end. Divide the stitches for the body in 2, add 1 edge stitch in each side (for sewing) and work the front and back pieces separately.

See DROPS lesson: Can I adapt a pattern for circular needles into straight needles?

Pattern repeats can vary slightly in the different sizes, in order to get the correct proportions. If you’re not working the exact same size as the garment in the photo, yours might deviate slightly. This has been carefully developed and adjusted so that the complete impression of the garment is the same in all sizes.

Make sure to follow instructions and diagrams for your size!

If you have found a pattern you like which is available in women’s size it’s not very difficult to convert it to men’s size. The biggest difference will be the length of sleeves and body. Start working on the women size that you think would fit across the chest. The additional length will be worked right before you cast off for the armhole/sleeve cap. If the pattern is worked top-down you can add the length right after the armhole or before the first decrease on sleeve.

Regarding additional yarn amount, this will depend on how much length you add, but it is better with a skein too many than too few.

All yarns will have excess fibres (from production) that might come off as lint or shedding. Brushed yarns (ie hairier yarns) have more of these loose, excess fibres, causing more shedding.

Shedding also depends on what is worn under or over the garment, and whether this pulls at the yarn fibres. It’s therefore not possible to guarantee that there will be no shedding

Below are some tips on how to get the best result when working with hairier yarns:

1. When the garment is finished (before you wash it) shake it vigorously so the looser hairs come off. NOTE: do NOT use a lint roller, brush or any method that pulls at the yarn.

2. Place the garment in a plastic bag and put it in your freezer - the temperature will cause the fibres to become less attached to each other, and excess fibres will come off easier.

3. Leave in the freezer for a few hours before taking it out and shaking it again.

4. Wash the garment according to the instructions on the yarn label.

Pilling is a natural process that happens to even the most exclusive of fibers. It's a natural sign of wear and tear that is hard to avoid, and that is most visible in high friction areas of your garment like a sweater's arms and cuffs.

You can make your garment look as new by removing the pilling, using a fabric comb or a pill/lint remover.

Still can't find the answer you need? Then scroll down and leave your question so one of our experts can try to help you. This will be done normally within 5 to 10 working days.
In the meantime, you can read the questions and answers that others have left to this pattern or join the DROPS Workshop on Facebook to get help from fellow knitters/crocheters!

You might also like...

Ready to Play Romper

Dina, Sweden

Ready to Play Romper

Pauline Bouteiller, United States

Ready to Play Romper

Michelle Van Doorn, Netherlands

Ready to Play Romper

Knitbybee, Norway

Ready to Play Romper

Amma Knitwear, Netherlands

Ready to Play Romper

Anagocha, Spain

Ready to Play Romper

Katharina B, Norway

Ready to Play Romper

Strikkenerden, Norway

Post a comment to pattern DROPS Baby 33-21

We would love to hear what you have to say about this pattern!

If you want to leave a question, please make sure you select the correct category in the form below, to speed up the answering process. Required fields are marked *.

Comments / Questions (45)

country flag Sofie Andersen wrote:

Hei. Jeg forstår ikke bol avsnitt 3: skift til pinne nr 3.. Samtidig som det økes 1 m mellom hver A.1=86 masker. Skjønner ikke hvordan eller hvorfor? Omgangen starter nå midt mellom A.1 sto det i forje avsnitt etter forhøyning bak, der jeg brukte german short rows som metode. Fortsett med A.2 over de første 8 maskene, strikk vrbord over de neste 27 maskene. Jeg har 26 m mellom mønsterraporten. Har fulgt oppskriften rett fram til dette. Hva skal jeg gjøre?

27.02.2024 - 23:30

DROPS Design answered:

Hei Sofie. Du strikker A.1 i hver side og glattstrikk mellom A.1 (foran og bak). Bytt til rundpinne 3 og strikk 1 omgang der du øker 1 maske mellom hver A.1, altså øk 1 maske foran (der det strikkes glattstrikk) og 1 maske bak (der det strikkes glattstrikk). Du har nå det maskeantallet det trengs for at vrangborden går opp/stemme med 1 rett/1 vrang. Fortsett med A.2 over de første 8 maskene, strikk vrbord over de neste 27 maskene (du har nå 27 masker siden det er økt med 1 maske). mvh DROPS Design

04.03.2024 - 13:05

country flag Stephanie wrote:

Bonjour comment faire pour réaliser ce modèle en aig droite?merci

07.02.2024 - 17:44

DROPS Design answered:

Bonjour Stéphanie, cette leçon vous donnera quelques pistes pour adapter un modèle sur aiguilles droites. Bon tricot!

08.02.2024 - 08:30

country flag Frida wrote:

Under fram och bakstycke: När jag på bakstycket vänt arbetet den andra gången 10 maskor innan A1 ska jag sticka rätstickning till nästa mitten av nästa A1. Struntar jag då i att följa mönstret i A1 för att sticka rätstickning istället? " Sticka ett varv som förut" Vad syftar detta till? Hur stickar jag ett "varv som förut"? VILKET varv?

19.07.2023 - 23:02

DROPS Design answered:

Hei Frida. Du strikker A.1 hele veien. Hvor i avsnittet tenker du på når du skriver:" Sticka ett varv som förut" ? Det står skrevet 3 steder. Det betyr iallefall at du skal strikke som tidligere, f.eks A.1 strikkes over A.1 eller vrangbord over vrangbord. mvh DROPS Design

26.07.2023 - 14:07

country flag Ludivine wrote:

Bonjour, je suis bloqué au niveau " continuer avec l'aiguille circulaire 3 ..... Tricoter le tour suivant ainsi " Je ne comprend pas comment tricoter le tour suivant, car j'ai tricoté A.2 sur les 8 premières mailles de A.1 puis j'ai 37 mailles entre les deux A.1, or c'est écrit tricoter 29 mailles suivantes, puis 8 puis 45 mailles. Pouvez vous m'expliquer beaucoup mieux, cela est pour la taille 6/9 mois. Merci d'avance.

29.06.2023 - 11:23

DROPS Design answered:

Bonjour Ludivine, en taille 6/9 mois, vous devez bien avoir 28 mailles entre les torsades; vous aviez 36 mailles au début de la partie DOS & DEVANT, mais vous avez diminué 4 fois 1 m de chaque côté de chaque A.1 = 88 m au total soit 28 m jersey entre les torsades; vous augmentez ensuite 1 m entre chaque A.1 = 29 m jersey entre les torsades. Vous avez bien 45 mailles pour chaque partie, vous continuez 1 torsade de chaque côté devant et tricotez les autres mailles en côtes - peut-être que la 4ème photo peut vous aider à visualiser? Bon tricot!

29.06.2023 - 13:07

country flag IM wrote:

There is an error on the second page. If you look at the schematic the instructions under “BACK PIECE” match the schematic for the front and the instructions for the “FRONT PIECE” match the back. Please correct this as I’ve had to unpick twice as a result of this error.

17.05.2023 - 14:44

DROPS Design answered:

Dear Im, explanations are right, the first piece worked is the bottom of back piece where you increase from beg on each side to give width to the pice, and then you work the front piece, working first 5-6 cm (see size) before starting incraesing (that's for the piece sewn to back piece between legs). Happy knitting!

17.05.2023 - 15:58

country flag Maria wrote:

Suomenkielinen ohje on virheellinen, englanninkielisestä sain oikeat ohjeet takana olevan korotuksen tekemiseen. Toisellakin suomenkielisellä kommentoijalla on ollut ongelmia samassa kohdassa. Neulotaan siis käsittääkseni takana A1 mallikertojen välissä. 15s ei voi jättää neulomatta kuten suomenkielisessä ohjeessa neuvotaan ja tätä kohtaa englanninkielisessä ohjeessa ei olekaan ollenkaan.

14.05.2022 - 16:24

country flag Leila wrote:

Leider habe ich trotz eig guter abbildung u guter unten stehender Beschreibung Zopfmusters zu sehr stur auf die Anleitung geachtet und nun bis zur Hälfte des Werks alles glatt rechts gestrickt, da nirgendwo ein Hinweis war, die unten stehenden zopfmusterdiagramme zu beachten. Also sprich bei \". Die Markierungsfäden sitzen nun an beiden Seiten des Rumpfteils jeweils mittig in A.1. In diesem Weise in Runden weiterstricken\" wäre es gut, darauf hinzuweisen, an das Zopfmuster zu denken o.Ä

28.04.2022 - 21:36

country flag Josie wrote:

Merci d'avoir répondu à ma demande En fin de compte, est-ce qu'il faut tricoter en rond ? Merci beaucoup

28.04.2022 - 11:09

DROPS Design answered:

Bonjour Josie, la partie DOS & DEVANT se tricote effectivement en rond. Bon tricot!

28.04.2022 - 12:01

country flag Josie wrote:

Bonjour madame, complètement perdue à partir du moment où j'ai mis le dev et le dos sur l'aiguille. J'ai regardé la correction, j'ai lu les commentaires différents mais c'est toujours le flou. Quand je commence mon tour, j'ai fais 8 m puis marqueur puis 1menv, *1m end,1m env, 1 jeté et 2 m ens end* au dessus des 28 m.puis 10m puis 1menv. Et je recommence 1mend,1 env 1 jeté et 2 m ens end sur les 44 suiv, il reste 2 m. Et bien moi il reste 10 m .... au secours SVP

27.04.2022 - 12:26

DROPS Design answered:

Bonjour Josie, le tour du dos/devant commence 8 mailles avant le début des rangs précédents (la torsade A.1 se trouve ainsi à cheval entre le dos et le devant, soit les 8 premières de A.1 à la fin de la partie précédente + les 8 dernières mailles de A.1 au début de la partie suivante (pas de diminution), vous tricotez ensuite en jersey jusqu'à ce qu'il reste 8 mailles avant la fin de votre partie et tricotez de nouveau A.1 à cheval entre le dos et le devant: 8 mailles sur la fin de cette partie + 8 m sur le début de l'autre partie et vous terminez votre tour en jersey. Ceci peut-il vous aider?

27.04.2022 - 15:21

country flag Julia wrote:

Korotuksesta kysyisin. Neulotaanko korotusta takakappaleen 28 silmukalla, jotka jäävät A.1 mallikertojen väliin. Kun pääsen korotuksessa siihen asti, että pitäisi jättää 15s neulomatta, ensimmäisellä kerralla voin neuloa vain 3s ja työtä kääntäessä en voi neuloa yhtään kun jäljellä on vain 13s. Pitäisikö neuloa myös A.1 mallikertojen silmukoilla vai kuinka teen? Teen ohjeesta 6/9kk kokoa.

13.03.2022 - 07:49