DROPS Baby Merino
DROPS Baby Merino
100% Wool
from 3.75 € /50g
Get the yarn to make this pattern from 7.50€.

The yarn cost is calculated from the pattern’s smallest size and the yarn’s cheapest product type. Looking for an even better price? You might find it on the DROPS Deals!

DROPS SS24

Baby Business

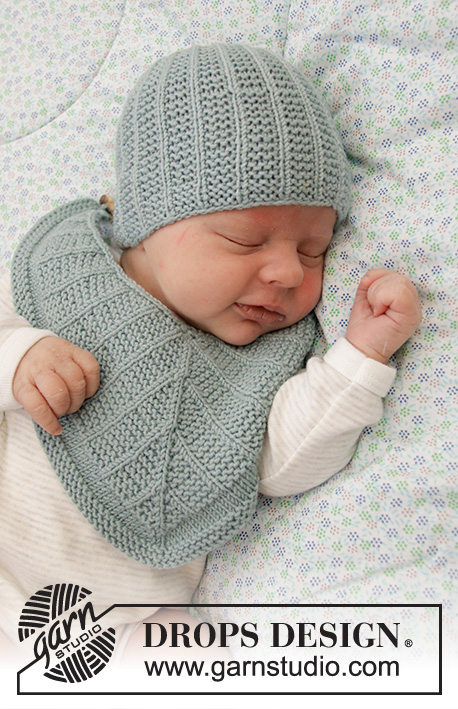
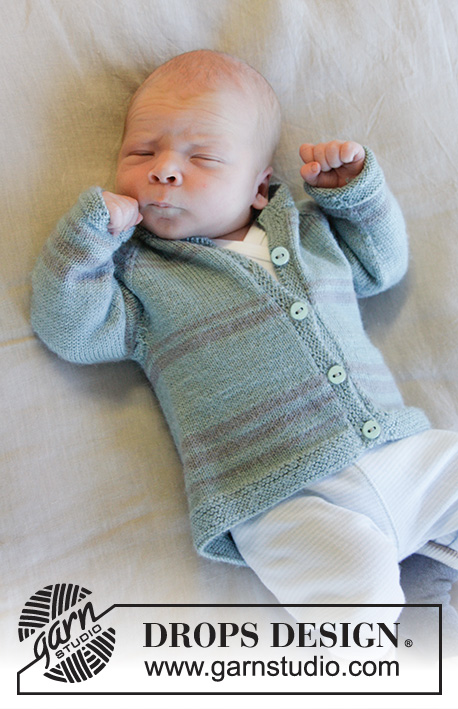
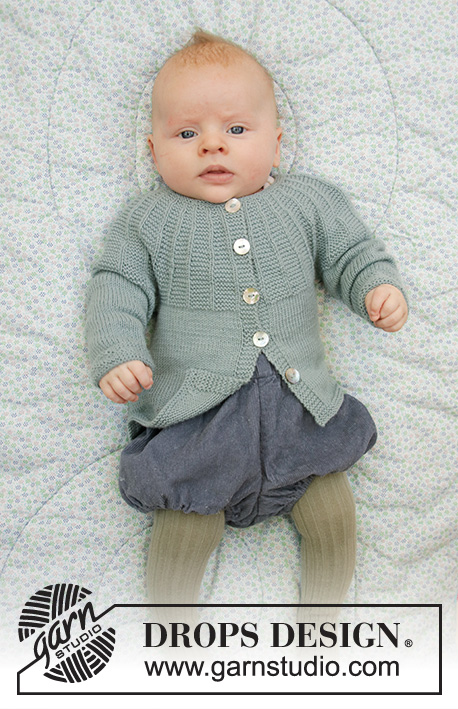
Jacket for babies, with round yoke and textured pattern, worked top down in DROPS BabyMerino. Sizes: Premature to 2 years.

DROPS Baby 33-19
DROPS Design: Pattern no bm-093-by
Yarn group A
----------------------------------------------------------

SIZES: (<0) 0/1 - 1/3 - 6/9 - 12/18 months (2) years
The size is equivalent to the baby’s height in cm:
(40/44) 48/52 - 56/62 - 68/74 - 80/86 (92)

MATERIALS: 
DROPS BABY MERINO from Garnstudio (belongs to yarn group A)
(100) 100-100-150-150 (150) g colour 43, light sea green

KNITTING TENSION:
24 stitches in width and 32 rows in height with stocking stitch = 10 x 10 cm.

NEEDLES:
DROPS DOUBLE POINTED NEEDLES SIZE 3 MM.
DROPS CIRCULAR NEEDLE SIZE 3 MM: Length 60 cm for stocking stitch.
DROPS DOUBLE POINTED NEEDLES SIZE 2.5 MM.
DROPS CIRCULAR NEEDLE SIZE 2.5 MM: Length 60 cm for garter stitch edges.
Needle size is only a guide. If you get too many stitches on 10 cm, change to a larger needle size. If you get too few stitches on 10 cm, change to a smaller needle size.

DROPS MOTHER OF PEARL BUTTONS, Arched (white) NO 515: 5 items in all sizes.

-------------------------------------------------------

Alternative Yarn – See how to change yarns here
Yarn Groups A to F – Use the same pattern and change the yarn here
Yarn usage using an alternative yarn – Use our yarn converter here

-------------------------------------------------------

DROPS Baby Merino
DROPS Baby Merino
100% Wool
from 3.75 € /50g
Get the yarn to make this pattern from 7.50€.

The yarn cost is calculated from the pattern’s smallest size and the yarn’s cheapest product type. Looking for an even better price? You might find it on the DROPS Deals!

Pattern instructions

NOTE: This pattern is written in British English. All measurements in charts are in cm. For conversion from cm to inches - click here. There are different terms for crocheting in British and American English. If this pattern includes crochet, click for "crochet terms" here. For this pattern in American English, please click here.
-------------------------------------------------------

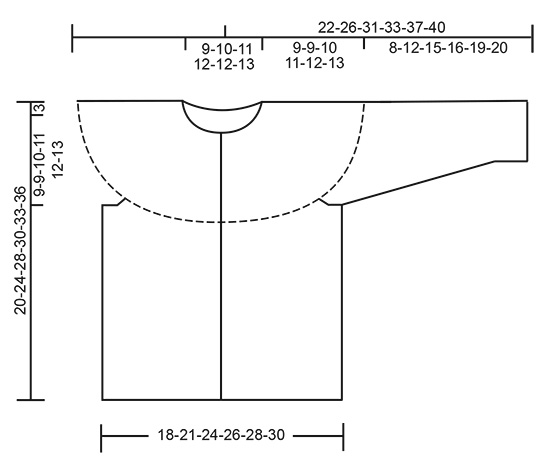
EXPLANATIONS FOR THE PATTERN:

-------------------------------------------------------

RIDGE/GARTER STITCH (worked back and forth):
Knit all rows.
1 ridge in height = Knit 2 rows.

INCREASE TIP-1 (evenly spaced):
To work out how to increase evenly, count the total number of stitches on the needle (e.g. 68 stitches) minus bands (e.g. 10 stitches) and divide the remaining stitches by the number of increases to be made (e.g. 12) = 4.8. 
In this example, increase by making 1 yarn over after approx. each 5th stitch. Do not increase on the bands. On the next row work the yarn overs twisted to avoid holes.

INCREASE TIP-2:
Increase 1 stitch by making 1 yarn over; on the next row knit the yarn over twisted to avoid a hole. The first time you increase make 1 yarn over at the beginning of the garter stitch section. The next time you increase, make 1 yarn over at the end of the garter stitch section. Continue increasing alternately at the beginning and end of the garter stitch section.

DECREASE TIP (for mid under sleeve):
Start 3 stitches before the marker thread, knit 2 together, knit 2 (marker thread sits between these 2 stitches), slip 1 stitch as if to knit, knit 1 and pass the slipped stitch over the knitted stitch (= 2 stitches decreased).

BUTTONHOLE:
Work buttonholes on the right band (when the garment is worn). Work from the right side when there are 3 stitches left on the row as follows: Make 1 yarn over, knit 2 together and knit 1. On the next row (wrong side), knit the yarn over to leave a hole.
The first buttonhole is worked on the first row from the right side after the neck. The other 4 buttonholes are worked with approx. (3) 4-4½-5-5½-(6) cm between each buttonhole.

-------------------------------------------------------

START THE PIECE HERE:

-------------------------------------------------------

JACKET – SHORT OVERVIEW OF THE PIECE:
The yoke and body are worked back and forth with circular needle, from mid front, top down. The sleeves are worked in the round with double pointed needles, top down.

NECK:
Cast on (68) 72-78-82-84 (86) stitches (including 5 band stitches on each side) with circular needle size 2.5 mm and Baby Merino. Work 2 RIDGES – see description above. Knit 1 row from the right side where you increase (12) 17-17-19-20 (21) stitches evenly spaced – read INCREASE TIP-1 and work BUTTONHOLES on the right band – see description above = (80) 89-95-101-104 (107) stitches. Knit 1 row from the wrong side. Change to circular needle size 3 mm and work the yoke as described below.

YOKE:
The first row is worked as follows from the right side: 5 band stitches in garter stitch, 1 stitch in stocking stitch, * 2 stitches in garter stitch, 1 stitch in stocking stitch *, work from *-* over the next 69-78-84-90-93-96 stitches (= 23-26-28-30-31-32 times) and finish with 5 band stitches in garter stitch. Continue this pattern, AT THE SAME TIME when the piece measures 2 cm increase 1 stitch in each garter stitch section (not over the bands); increase like this every (3) 3-3½ -3-3- (3½) cm a total of (3) 3-3-4-4 (4) times - read INCREASE TIP-2 = (149) 167-179-221-228 (235) stitches. The increased stitches are worked in garter stitch. Continue until the piece measures (9) 9-10-11-12 (13) cm. Work 1 row from the right side with pattern as before, AT THE SAME TIME adjust the number of stitches to (158) 182-198-214-226 (238) stitches. Work 1 row from the wrong side with pattern as before.

The next row is worked with stocking stitch and 5 band stitches in garter stitch on each side as follows: Work (25) 28-31-33-35 (37) stitches (= front piece), place the next (34) 40-42-46-48 (50) stitches on 1 thread for the sleeve, cast on (4) 4-6-6-8 (8) new stitches on the needle (= in side under sleeve), work (40) 46-52-56-60 (64) stitches (= back piece), place the next (34) 40-42-46-48 (50) stitches on 1 thread for the sleeve, cast on (4) 4-6-6-8 (8) new stitches on the needle (= in side under sleeve) and work the remaining (25) 28-31-33-35 (37) stitches (= front piece). Continue with the body as described below. THE PIECE IS NOW MEASURED FROM HERE!

BODY:
= (98) 110-126-134-146 (154) stitches. Continue back and forth with stocking stitch and 5 band stitches in garter stitch on each side towards mid front. When the piece measures (7) 11-14-15-17 (19) cm from the division, change to circular needle size 2.5 mm. Work 3 ridges back and forth over all stitches. Change back to circular needle size 3 mm and loosely cast off from the right side. The jacket measures approx. (20) 24-28-30-33 (36) cm from the shoulder down.

SLEEVE:
Place the (34) 40-42-46-48 (50) stitches from the thread on the one side of the piece on double pointed needles size 3 mm and knit up 1 stitch in each of the (4) 4-6-6-8 (8) stitches cast on under the sleeve = (38) 44-48-52-56 (58) stitches. Insert a marker thread in the middle of the (4) 4-6-6-8 (8) stitches under the sleeve. Allow the marker to follow your work onwards. Work stocking stitch in the round. When the piece measures 2 cm from the division, decrease 2 stitches mid under sleeve – read DECREASE TIP. Decrease like this every (3) 2-2-1½-1½ (1½) cm a total of (2) 4-6-7-9 (9) times = (34) 36-36-38-38 (40) stitches. Continue working until the sleeve measures (7) 11-14-15-18 (19) cm from the division. Change to double pointed needles size 2.5 mm. Work 3 RIDGES in the round – see description above. Change back to double pointed needles size 3 mm and cast off loosely with knit. The sleeve measures approx. (8) 12-15-16-19 (20) cm from the division. Work the other sleeve in the same way.

ASSEMBLY:
Sew buttons onto the left band.

Diagram

diagram measurements

Each of our patterns has specific tutorial videos to help you.

Do you have a question? See a list of frequently asked questions (FAQ)

Knitting tension is what determines the final measurements of your work, and is usually measured per 10 x 10 cm. It is provided like so: number of stitches in width x number of rows in height - eg: 19 stitches x 26 rows = 10 x 10 cm.

The knitting tension is very individual; some people knit/crochet loosely while others work tightly. You adjust the knitting tension with the needle size, which is why the suggested needle size is only meant as a guide! You need to adjust this (up or down) to ensure that YOUR knitting tension matches the knitting tension provided in the pattern. If you work with a different knitting tension than provided you will have a different yarn consumption, and your work will have different measurements than what the pattern suggests.

The knitting tension also determines which yarns can replace each other. As long as you achieve the same knitting tension you can replace one yarn with another.

See DROPS lesson: How to measure your tension/gauge

See DROPS video: How to make a gauge tension swatch

The required amount of yarn is provided in grams, eg: 450 g. To calculate how many balls you’ll need you first need to know how many grams are in 1 ball (25g, 50g or 100g). This information is available if you click on the individual yarn quality on our pages. Divide the amount required with the amount of each ball. For example, if each ball is 50g (the most common amount), the calculation will be as follows: 450 / 50 = 9 balls.

The important thing when changing from one yarn to another is that the knitting/crochet tension remains the same. This is so that the measurements of the finished piece will be the same as on the sketch provided. It is easier to achieve the same knitting tension using yarns from the same yarn group. It is also possible to work with multiple strands of a thinner yarn to achieve the knitting tension of a thicker one. Please try our yarn converter. We recommend you to always work a test swatch.

Please NOTE: when changing yarn the garment might have a different look and feel to the garment in the photo, due to individual properties and qualities of each yarn.

See DROPS lesson: Can I use a different yarn than the one mentioned in the pattern?

All our yarns are categorised into yarn groups (from A to F) according to thickness and knitting tension – group A contains the thinnest yarns and group F the thickest. This makes it easier for you to find alternative yarns to our patterns, should you wish to switch yarn. All yarns within the same group have a similar knitting tension and can easily replace each other. However, different yarn qualities have different structures and properties which will give the finished work a unique look and feel.

Click here for an overview of the yarns in each yarn group

At the top of all our patterns you’ll find a link to our yarn calculator, which is a helpful tool should you wish to use a different yarn than suggested. By filling in the yarn quality you wish to replace, the amount (in your size) and number of strands, the calculator will present good alternative yarns with the same knitting tension. Additionally it will tell you how much you’ll require in the new qualities and whether you’ll need to work with multiple strands. Most skeins are 50g (some are 25g or 100g).

If the pattern is worked with multiple colours, every colour will have to be calculated separately. Similarly, if the pattern is worked with several strands of different yarns (for example 1 strand Alpaca and 1 strand Kid-Silk) you will have to find alternatives for each, individually.

Click here to see our yarn calculator

Since different yarns have different qualities and textures we have chosen to keep the original yarn in our patterns. However, you can easily find options among our available qualities by using our yarn calculator, or simply pick a yarn from the same yarn group.

It is possible that some retailers still have discontinued yarns in stock, or that someone has a few skeins at home that they would like to find patterns for.

The yarn calculator will provide both alternative yarn as well as required amount in the new quality.

If you think it's hard to decide what size to make, it can be a good idea to measure a garment you own already and like the size of. Then you can pick the size by comparing those measures with the ones available in the pattern's size chart.

You'll find the size chart at the bottom of the pattern.

See DROPS lesson: How to read size chart

The needle size provided in the pattern serves only as a guide, the important thing is to follow the knitting tension. And since knitting tension is very individual, you will have to adjust the needle size to ensure that YOUR tension is the same as in the pattern – maybe you’ll have to adjust 1, or even 2 needle sizes, up or down to achieve the correct tension. For this, we recommend that you work test swatches.

Should you work with a different knitting tension than the one provided, the measurements of the finished garment might deviate from the measurement sketch.

See DROPS lesson: How to measure your tension/gauge

See DROPS video: How to make a tension/gauge swatch

Working a garment top-down provides more flexibility and room for personal adjustment. For example it is easier to try the garment on while working, as well as making adjustments to length of yoke and shoulder caps.

The instructions are carefully explaining every step, in the correct order. Diagrams are adjusted to the knitting direction and are worked as usual.

The diagram depicts all rows/rounds, and every stitch seen from the right side. It is read from bottom to top, from right to left. 1 square = 1 stitch.

When working back and forth, every other row is worked from the right side and every other row is worked from the wrong side. When working from the wrong side, the diagram will have to be worked reversed: from left to right, knit stitches are purled, purl stitches are knit etc.

When working in the round every round is worked from the right side and the diagram are worked from right to left on all rounds.

See DROPS lesson: How to read knitting diagrams

The diagram depicts all rows/rounds, and every stitch seen from the right side. It is worked from bottom to top, from right to left.

When working back and forth every other row is worked from the right side: from right to left and every other row is worked from the wrong side: from left to right.

When working in the round, every row in the diagram are worked from the right side, from right to left.

When working a circular diagram you start in the middle and work your way outwards, counter clockwise, row by row.

The rows usually start with a given number of chain stitches (equivalent to the height of the following stitch), this will either be depicted in the diagram or explained in the pattern.

See DROPS lesson: How to read crochet diagrams

Instructions for working several diagrams after each other on the same row/round, will often be written like so: “work A.1, A.2, A.3 a total of 0-0-2-3-4 times". This means you work A.1 once, then A.2 is worked once, and A.3 is repeated (in width) the number of times provided for your size – in this case like so: S = 0 times, M = 0 times, L=2 times, XL= 3 times and XXL = 4 times.

The diagrams are worked as usual: begin with the first row in A.1, then work the first row in A.2 etc.

See DROPS lesson: How to read knitting diagrams

See DROPS lesson: How to read crochet diagrams

The total width of the garment (from wrist-to-wrist) will be larger in the larger sizes, despite the actual sleeves being shorter. The larger sizes have longer sleeve caps and wider shoulders, so there will be a good fit in all sizes.

The measurement sketch/schematic drawing provides information regarding the full length of the garment. If it’s a jumper or a jacket the length is measured from the highest point on the shoulder closest to the neckline, and straight down to the bottom of the garment. It is NOT measured from the tip of shoulder. Similarly, the length of yoke is measured from the highest point on the shoulder and down to where yoke is split into body and sleeves.

On a jacket measures are never taken along bands, unless specifically stated. Always measure inside band stitches when measuring the length.

See DROPS lesson: How to read a schematic drawing

Diagrams are often repeated on the round or in height. 1 repeat is the diagram the way it appears in the pattern. If it says to work 5 repeats of A.1 in the round, then you work A.1 a total of 5 times after/next to each other in the round. If it says to work 2 repeats of A.1 vertically/in height you work the entire diagram once, then begin again at the start and work the entire diagram one more time.

Chain stitches are slightly narrower than other stitches and to avoid working the cast-on edge too tight, we simply chain more stitches to begin with. The stitch count will be adjusted on the following row to fit the pattern and measurement sketch.

The rib edge is more elastic and will contract slightly compared to, for example, stocking stitch. By increasing before the rib edge, you avoid a visible difference in width between the rib edge and the rest of the body.

It’s very easy to cast off too tightly, and by making yarn overs while casting off (and simultaneously casting these off) you avoid a too tight cast off edge.

See DROPS video: How to bind off with yarn overs (yo)

To achieve an even increase (or decrease) you can increase on, for example: every 3rd and 4th row alternately, like so: work 2 rows and increase on the 3rd row, work 3 rows and increase on the 4th. Repeat this until the increase is complete.

See DROPS lesson: Increase or decrease 1 st on every 3rd and 4th row alternately

Should you prefer to work in the round instead of back and forth, you may of course adjust the pattern. You’ll need to add steeks mid-front (usually 5 stitches), and follow the instructions. When you would normally turn and work from the wrong side, simply work across the steek and continue in the round. At the end you’ll cut the piece open, pick up stitches to work bands, and cover the cut edges.

See DROPS video: How to knit steeks and cut open

Should you prefer to work back and forth instead of in the round, you may of course adjust the pattern so you work the pieces separately and then assemble them at the end. Divide the stitches for the body in 2, add 1 edge stitch in each side (for sewing) and work the front and back pieces separately.

See DROPS lesson: Can I adapt a pattern for circular needles into straight needles?

Pattern repeats can vary slightly in the different sizes, in order to get the correct proportions. If you’re not working the exact same size as the garment in the photo, yours might deviate slightly. This has been carefully developed and adjusted so that the complete impression of the garment is the same in all sizes.

Make sure to follow instructions and diagrams for your size!

If you have found a pattern you like which is available in women’s size it’s not very difficult to convert it to men’s size. The biggest difference will be the length of sleeves and body. Start working on the women size that you think would fit across the chest. The additional length will be worked right before you cast off for the armhole/sleeve cap. If the pattern is worked top-down you can add the length right after the armhole or before the first decrease on sleeve.

Regarding additional yarn amount, this will depend on how much length you add, but it is better with a skein too many than too few.

All yarns will have excess fibres (from production) that might come off as lint or shedding. Brushed yarns (ie hairier yarns) have more of these loose, excess fibres, causing more shedding.

Shedding also depends on what is worn under or over the garment, and whether this pulls at the yarn fibres. It’s therefore not possible to guarantee that there will be no shedding

Below are some tips on how to get the best result when working with hairier yarns:

1. When the garment is finished (before you wash it) shake it vigorously so the looser hairs come off. NOTE: do NOT use a lint roller, brush or any method that pulls at the yarn.

2. Place the garment in a plastic bag and put it in your freezer - the temperature will cause the fibres to become less attached to each other, and excess fibres will come off easier.

3. Leave in the freezer for a few hours before taking it out and shaking it again.

4. Wash the garment according to the instructions on the yarn label.

Pilling is a natural process that happens to even the most exclusive of fibers. It's a natural sign of wear and tear that is hard to avoid, and that is most visible in high friction areas of your garment like a sweater's arms and cuffs.

You can make your garment look as new by removing the pilling, using a fabric comb or a pill/lint remover.

Still can't find the answer you need? Then scroll down and leave your question so one of our experts can try to help you. This will be done normally within 5 to 10 working days.
In the meantime, you can read the questions and answers that others have left to this pattern or join the DROPS Workshop on Facebook to get help from fellow knitters/crocheters!

You might also like...

Baby Business

Elena, Brazil

Baby Business

Franmade, Italy

Baby Business

Franmade, Italy

Baby Business

Cindy, Sweden

b33-19 Baby business

Yuliya, Spain

Post a comment to pattern DROPS Baby 33-19

We would love to hear what you have to say about this pattern!

If you want to leave a question, please make sure you select the correct category in the form below, to speed up the answering process. Required fields are marked *.

Comments / Questions (19)

country flag Christa Clemens wrote:

Bei diesem Modell soll in Größe 6/9 Monate nach den Zunahmen bei der Passe die Maschenzahl angepasst werden, von 221 Maschen auf 214 Maschen. Kann das sein? Bei den anderen Größen erhöht sich die Maschenzahl.

10.01.2024 - 18:54

DROPS Design answered:

Liebe Frau Clemens, ja genau so stimmt es, so erreicht man die gewünschten Maßen. Viel Spaß beim stricken !

11.01.2024 - 07:45

country flag Claudia Bostyn wrote:

Liebes Drops Team Ich stricke die Babyjacke in Größe 3 (also 1-3 Monate). Nach den Zunahmen an der Passe befinden sich in dieser Größe 179 Maschen auf der Nadel, die ich bis zu einer Länge von 9 cm weiter stricken soll. In der vorletzten Reihe der Passe soll man die Maschenzahl so "anpassen", dass sich danach 198 Maschen auf der Nadel befinden. Bedeutet dass, dass ich in der vorletzten Reihe gleichmäßig verteilt 19 Maschen zunehmen muss? Ich würde mich über eine Antwort freuen.

05.09.2023 - 19:00

DROPS Design answered:

Liebe Frau Bostyn, in Größe 3 stricken Sie die 179 Maschen der Passe bis die Arbeit 10 cm misst (9 cm nur in die 2 ersten Größen), dann ja genau soll man regelmäßig verteilt 19 Maschen zunehmen (nicht über die Blenden-Maschen zunehmen) - siehe diese Lektion. Viel Spaß beim stricken!

06.09.2023 - 08:59

country flag Johanna wrote:

Vielen Dank für die tollen Anleitungen. In der Passe heißt es: 2cm stricken, dann zunehmen, dann alle 3,5cm zunehmen. Muss ich also von den 2cm aus 3,5cm stricken (also bei Gr. 56/62 Zunahme bei 2cm, 5,5cm und 9cm), oder von den 2cm aus nur BIS 3,5cm (also Zunahme bei 2cm, 3,5cm und 7cm)?

29.06.2023 - 10:50

DROPS Design answered:

Liebe Johanna, in Gr 56/62 nehmen Sie bei 2 cm, bei 5,5 cm (2 + 3,5 cm) und bei 9,5 cm (5,5 + 3,5) zu. Viel Spaß beim stricken!

29.06.2023 - 12:56

country flag Kerstin Seiffge wrote:

Hallo liebes Team. Ich möchte das Jäckchen in Krausrippe am Rumpf und Armen weiter stricken. Muss ich dazu auch zusätzlich Maschen anschlagen oder reichen die Maschen nach Beendigung der Passe aus? Lg und vielen Dank.

02.12.2022 - 09:43

DROPS Design answered:

Liebe Frau Seiffge, je nach der Größe sollen Sie mal schauen, ob Sie genügend Maschen haben, oder ob Sie einige mehr brauchen, damit das Muster alle Maschen passt. Viel Spaß beim stricken!

02.12.2022 - 11:47

country flag Martina Mailänder wrote:

Besten Dank für die schnelle Antwort :-)

01.12.2022 - 21:50

country flag Martina Mailänder wrote:

Hallo liebes Team, ich habe schon einige Modelle gestrickt und kam beim öfteren Durchlesen auch klar mit den Beschreibungen. Doch hier hänge ich schon am Anfang der Passe: Die Hinreihe: Blende kraus rechts (5M), dann *2 M kraus rechts, 1 M glatt rechts* usw. Das bedeutet für mich, wieder eine Reihe rechts stricken und in der Rückreihe dann kraus rechts und linke Maschen. Oder habe ich da etwas falsch verstanden? Ich bin dankbar für jeden Tipp. Viele Grüße Martina

01.12.2022 - 15:16

DROPS Design answered:

Liebe Frau Mailänder, bei den Rückreihen stricken Sie die 2 Maschen kraus rechts als rechte Maschen und die glatt rechte Maschen stricken Sie links, so haben Sie: bei der Rückreihe: 5 M kraus rechts, 1 M links, 2 M rechts ... Viel Spaß beim stricken!

01.12.2022 - 17:30

country flag Linda Pontard wrote:

Bonjour, quand on fait c'est augmentations [augmenter ainsi (3) 3-3-4-4 (4) fois au total tous les (3) 3-3½ -3-3- (3½) cm - voir AUGMENTATIONS-2 = (149) 167-179-221-228 (235) mailles.] faut'il faire: 1 m.jersey,1 augmentation mousse,2 point mousse,1 augmentation mousse, 1 jersey . ou juste augmenter 1 maille après la maille jersey seulement. je vous remercie pour votre aide . merci

17.08.2022 - 14:52

DROPS Design answered:

Bonjour Mme Pontard, augmentez la 1ère fois ainsi *1 jeté, 2 m point mousse, 1 m jersey* (vous avez ainsi 3 m point mousse, 1 m jersey); la fois suivante augmentez ainsi: *3 m point mousse, 1 jeté, 1 m jersey* (vous avez ainsi, 4 m point mousse, 1 m jersey). Et continuez ainsi en augmentant alternativement au début et à la fin des sections en point mousse. Bon tricot!

18.08.2022 - 08:54

country flag Marie Gidlund wrote:

Är det tänkt att man på rätsidan enbart stickar räta maskor i denna beskrivning: 1 maska slätstickning, * 2 maskor rätstickning, 1 maska slätstickning *, sticka *-* över de nästa 69-78-84-90-93-96 maskorna (= 23-26-28-30-31-32 gånger), avsluta med 5 framkantsmaskor i rätstickning. Sedan på avigsidan gör man slätstickningen avig , alltså var 3:e maska avig? Eller ska det på rätsidan stickas var 3:e maska avig?

27.03.2022 - 12:13

DROPS Design answered:

Hej Marie. Ja det stämmer att du endast stickar räta maskor på rätsidan här. På avigsidan stickar du avigmaskor där det är slätstickning (dvs på var 3:e maska). Detta skapar det mönster du ser på bilden. Mvh DROPS Design

30.03.2022 - 09:23

country flag Kristine wrote:

Fejl i opskrift? Der mangler masker, når opskrift følges til str. 6 mdr. Her skal du afslutte bærestykket med at fjerne 7 masker, så du ender på 214, men når du så følger angivelserne for for- og bagstykke og ærmemasker, så mangler der altså 10 masker til sidste del af forstykket. Har I måske lavet en fejl ift. antal masker, der skal fordeles til de enkelte stykker?

12.03.2022 - 20:21

country flag Inge Sprunck wrote:

Hallo, ich stricke sehr gerne nach Ihren Anleitungen und verändere die Farben oder Größen nach Vorliebe und Bedarf. In die obige Anleitung hat sich aber leider ein Fehler unter " Zunahmetipp 2" eingeschlichen. Es heißt dort: ...abwechselnd am Anfang und am Ende des kraus rechten Bereichs abnehmen." Es muss aber heißen: zunehmen! Vielen Dank für Ihre tollen Anleitungen!

02.03.2022 - 17:42