DROPS Sky
DROPS Sky
74% Alpaca, 18% Polyamide, 8% Wool
from 5.10 £ /50g
DROPS Kid-Silk
DROPS Kid-Silk
75% Mohair, 25% Silk
from 4.60 £ /25g
Get the yarn to make this pattern from 48.50£.

The yarn cost is calculated from the pattern’s smallest size and the yarn’s cheapest product type. Looking for an even better price? You might find it on the DROPS Deals!

DROPS SS24

Breaking Free

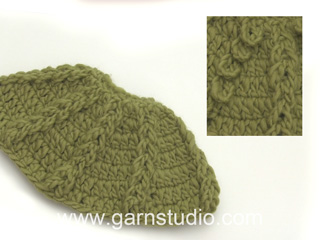
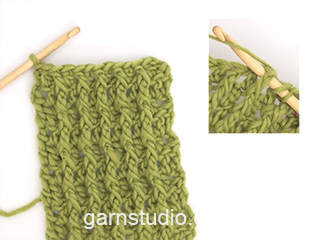
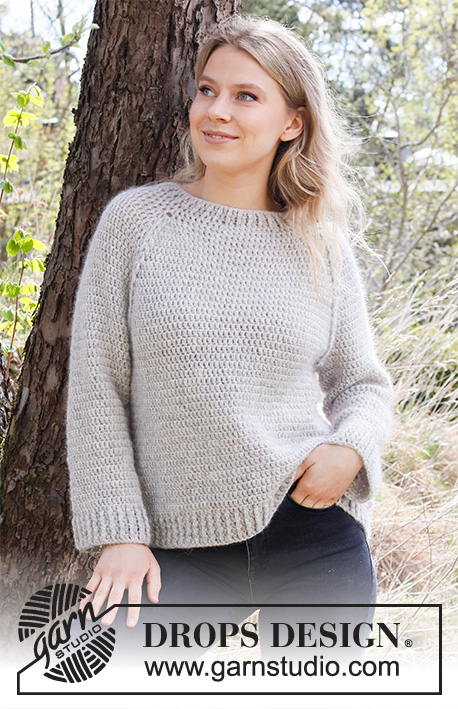
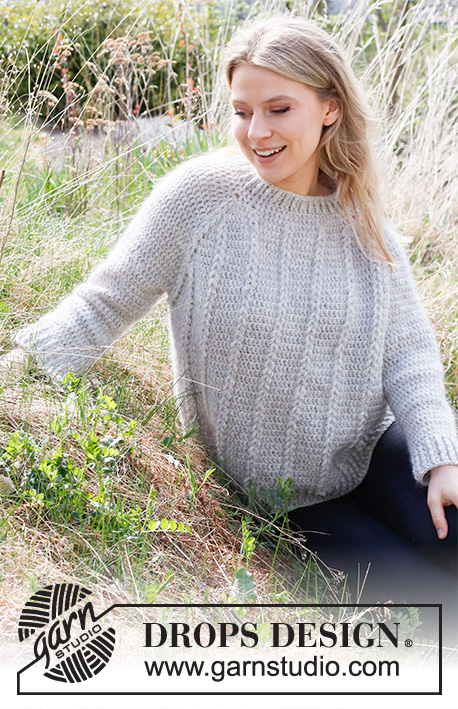
Crocheted jumper in DROPS Sky and DROPS Kid-Silk. The piece is worked top down with raglan and loop cables. Sizes XS - XXL.

DROPS 217-6
DROPS Design: Pattern no sk-107
Yarn group B + A
-------------------------------------------------------

SIZES:
XS - S - M - L - XL - XXL

MATERIALS:
DROPS SKY from Garnstudio (belongs to yarn group B)
250-300-300-350-350-400 g colour 02, pearl grey
and use:
DROPS KID-SILK from Garnstudio (belongs to yarn group A)
125-125-150-150-175-175 g colour 01, off white

CROCHET TENSION:
14.5 treble crochets in width and 8.5 rows in height = 10 x 10 cm.

CROCHET HOOK:
DROPS CROCHET HOOK SIZE 5 MM.
Hook size is only a guide. If you get too many stitches on 10 cm, change to a larger hook size. If you get too few stitches on 10 cm, change to a smaller hook size.

-------------------------------------------------------

Alternative Yarn – See how to change yarns here
Yarn Groups A to F – Use the same pattern and change the yarn here
Yarn usage using an alternative yarn – Use our yarn converter here

-------------------------------------------------------

DROPS Sky
DROPS Sky
74% Alpaca, 18% Polyamide, 8% Wool
from 5.10 £ /50g
DROPS Kid-Silk
DROPS Kid-Silk
75% Mohair, 25% Silk
from 4.60 £ /25g
Get the yarn to make this pattern from 48.50£.

The yarn cost is calculated from the pattern’s smallest size and the yarn’s cheapest product type. Looking for an even better price? You might find it on the DROPS Deals!

Pattern instructions

NOTE: This pattern is written in British English. All measurements in charts are in cm. For conversion from cm to inches - click here. There are different terms for crocheting in British and American English. If this pattern includes crochet, click for "crochet terms" here. For this pattern in American English, please click here.
-------------------------------------------------------

EXPLANATIONS FOR THE PATTERN:

-------------------------------------------------------

CHAIN STITCH:
If you work outermost on the hook the chain stitch will often be too tight; 1 chain stitch should be as long as 1 treble crochet is wide.

CROCHET INFORMATION:
At the beginning of each row/round of treble crochets work 3 chain stitches; these chain stitches replace the first treble crochet, i.e. skip the first treble crochet from the previous row/round. The round ends with 1 slip stitch in the 3rd chain stitch at the beginning of the round.

PATTERN: 
See diagrams A.1 to A.3. Choose diagram for your size (applies to A.2).

INCREASE TIP (evenly spaced):
To work out how to increase evenly, count the total number of stitches on the row (e.g. 66 stitches) and divide by the number of increases to be made (e.g. 8) = 8.2. 
In this example, increase by working 2 treble crochets in approx. each 8th treble crochet.

RAGLAN:
Increase 2 treble crochets by working 3 treble crochets in the first and the last treble crochet in A.3. The increased stitches are worked in treble crochets on the sleeves and in pattern on the front and back pieces as follows: Work the new stitches into A.2. There will always be 7-7-7-8-8-8 treble crochets between the vertical lines of chain-stitch loops (chain-stitch loops are worked into loop cables later). When there are 8-8-8-10-10-10 vertical lines with chain-stitch loops, work the remaining increased stitches in treble crochets.

DECREASE TIP (for sleeves):
Decrease 1 treble crochet on each side of the marker thread as follows:
NOTE! Be aware that the marker thread is placed in transition between rounds, so that the decrease after the marker thread will occur on next round.
Work until there are 4 treble crochets left before the marker thread, * make 1 yarn over, insert the hook through the next stitch, pick up the strand, make 1 yarn over and pull it through the first 2 loops on the hook *, work from *-* a total of 2 times, make 1 yarn over and pull it through all 3 loops on the hook (= 1 stitch decreased), work 4 treble crochets as before (the marker thread sits in the middle of these 4 stitches). Decrease 1 stitch in the same way after the marker thread.

-------------------------------------------------------

START THE PIECE HERE:

-------------------------------------------------------

JUMPER – SHORT OVERVIEW OF THE PIECE:
The neck and yoke are worked in the round, from the side of the back piece and top down. The yoke is divided for the body and sleeves, which are then finished separately.

NECK:
Work 66-66-70-72-76-80 chain stitches – read CHAIN STITCH, with hook size 5 mm and 1 strand Sky + 1 strand Kid-Silk (= 2 strands). Form them into a ring with 1 slip stitch in the first chain stitch. Work 1 treble crochet in each chain stitch – read CROCHET INFORMATION. Then work A.1 in the round. When A.1 has been completed in height, work a round of treble crochets where you increase 8-8-8-12-12-8 treble crochets evenly spaced – read INCREASE TIP = 74-74-78-84-88-88 treble crochets. Insert a marker at the beginning of the round; the yoke is measured from this marker!

YOKE:
REMEMBER THE CROCHET TENSION! Now work pattern as follows:
Work A.2 over the first 21-21-21-24-24-24 stitches (= 3 repeats) – remember CROCHET INFORMATION, work the first 4-4-4-4-4-4 symbols in A.2, i.e. 1 treble crochet + 10 chain stitches + 2 treble crochets (= back piece), work A.3 over the next 2 treble crochets (= raglan), work 1 treble crochet in each of the next 8-8-10-10-12-12 treble crochets (= sleeve), work A.3 over the next 2 treble crochets (= raglan), work 1 treble crochet in the next treble crochet, A.2 over the next 21-21-21-24-24-24 stitches (= 3 repeats), work the first 4-4-4-4-4-4 symbols in A.2, i.e. 1 treble crochet + 10 chain stitches + 2 treble crochets (= front piece), work A.3 over the next 2 treble crochets (= raglan), work 1 treble crochet in each of the next 8-8-10-10-12-12 treble crochets (= sleeve), A.3 over the next 2 treble crochets (= raglan) and 1 treble crochet in the last treble crochet on the round.
Continue this pattern in the round; at the same time, on the next round, begin to increase to RAGLAN – read description above. Increase like this every round 1-2-3-3-4-4 times, every 2nd round 3-3-3-3-4-5 times and then every 3rd round 3-3-3-3-3-3 times = 186-202-222-228-264-280 stitches. Continue working until the yoke measures 20-20-22-23-26-28 cm from the marker on the neck.

Now work the chain-stitch loops in A.3 together to make loop cables as follows:
Insert the hook down the first chain-stitch loop at the top of the neck, from the right side, pull the 2nd chain-stitch loop through the first chain-stitch loop, insert the hook down the 2nd chain-stitch loop and pull the 3rd chain-stitch loop through the 2nd chain-stitch loop. Continue like this until all the chain-stitch loops have been worked together. Repeat on all A.3 sections on the round. You can thread a strand through the last chain-stitch loop if necessary, to prevent the cable from ravelling. The chain-stitch loops on the body are worked together in the same way later.

On the next round, work as follows; the chain-stitch loops in A.2 and A.3 are not counted in the stitch numbers - work 1 double crochet in the last chain-stitch loop in A.3 to prevent the cable from ravelling (then skip this double crochet; it is not counted in the stitch count):
Work pattern as before over the first 39-41-43-46-50-53 stitches, work 6-6-8-8-10-10 loose chain stitches (= in side under sleeve), skip the next 38-42-48-48-58-60 treble crochets (= sleeve), work pattern as before over the next 55-59-63-66-74-80 stitches (= front piece), work 6-6-8-8-10-10 loose chain stitches (= in side under sleeve), skip the next 38-42-48-48-58-60 treble crochets (= sleeve), work pattern as before over the remaining 16-18-20-20-24-27 treble crochets. Cut the strand. Body and sleeves are finished separately.

BODY:
= 124-132-144-150-170-182 treble crochets (+ chain-stitch loops). Insert a marker in the middle of the 6-6-8-8-10-10 stitches cast on under one of the sleeves. Fasten the strand with 1 slip stitch in the chain stitch after the marker and work 3 chain stitches (= 1 treble crochet) – remember CROCHET INFORMATION. Work pattern in the round as before, i.e. work treble crochets and chain-stitch loops as before over the chain-stitch loops on the front and back pieces. Work like this until the body measures 24-26-26-27-26-26 cm from the division.
Now work the chain-stitch loops together in the same way as on the yoke. When all the loops have been cabled together, work the next round as follows:
Work 1 treble crochet in each treble crochet, but at the end of each chain-stitch cable work 1 double crochet to prevent the cables from ravelling.
Now work an edge as follows: Work A.1 the whole round. Repeat the last row in the diagram until the edge measures 5 cm. Cut and fasten the strand. The jumper measures approx. 52-54-56-58-60-62 cm from the shoulder down.


SLEEVE:
Insert a marker thread in the middle of the 6-6-8-8-10-10 chain stitches under the sleeve (= beginning of the round). Allow the thread to follow your work onwards. Fasten the strand with 1 slip stitch in the stitch after the marker thread and work 3 chain stitches (= 1 treble crochet) – remember CROCHET INFORMATION, then work 1 treble crochet in each of the next 2-2-3-3-4-4 chain stitches, 2 treble crochets around the next treble crochet (= in the corner between the chain stitches and the skipped treble crochets), work 1 treble crochet in each of these 38-42-48-48-58-60 treble crochets, 2 treble crochets around the next treble crochet (= in the corner between the chain stitches and the skipped treble crochets), work 1 treble crochet in each of the last 3-3-4-4-5-5 chain stitches = 48-52-60-60-72-74 treble crochets. Continue in the round with 1 treble crochet in each treble crochet. When the sleeve measures 3 cm from the division, start to decrease under the sleeve – read DECREASE TIP. Decrease like this every round 0-0-1-3-10-10 times and then every 2nd round 4-5-7-5-3-3 times = 40-42-44-44-46-48 stitches. Continue working until the sleeve measures 33-34-32-32-29-27cm from the division. Now work an edge as follows: Work A.1 the whole round. When the diagram has been completed in height, repeat the last row in the diagram until the edge measures 5 cm. Cut and fasten the strand. Work the other sleeve in the same way.

This pattern has been corrected.

Updated online: 05.01.2021
Correction:
RAGLAN:
... Work the new stitches into A.2...

Diagram

symbols = start on this round, the previous round has already been worked
symbols = 1 treble crochet in stitch (stitches below line should not be worked, symbols below line indicates stitches from previous round)
symbols = work 10 chain stitches – remember CHAIN STITCH, 1 slip stitch in the first of these 10 chain stitches to make a chain-stitch loop; tighten the strand slightly before continuing.
symbols = work a relief-double treble crochet as follows: Work 1 double treble crochet around 1 treble crochet/relief-double treble crochet from the previous round (do not work in the loops but around the 1 treble crochet/relief-double treble crochet itself).
symbols = treble crochet / double crochet (stitches should not be worked, symbols below line indicates stitches from previous round)
diagram
diagram
Do you have a question? See a list of frequently asked questions (FAQ)

Knitting tension is what determines the final measurements of your work, and is usually measured per 10 x 10 cm. It is provided like so: number of stitches in width x number of rows in height - eg: 19 stitches x 26 rows = 10 x 10 cm.

The knitting tension is very individual; some people knit/crochet loosely while others work tightly. You adjust the knitting tension with the needle size, which is why the suggested needle size is only meant as a guide! You need to adjust this (up or down) to ensure that YOUR knitting tension matches the knitting tension provided in the pattern. If you work with a different knitting tension than provided you will have a different yarn consumption, and your work will have different measurements than what the pattern suggests.

The knitting tension also determines which yarns can replace each other. As long as you achieve the same knitting tension you can replace one yarn with another.

See DROPS lesson: How to measure your tension/gauge

See DROPS video: How to make a gauge tension swatch

The required amount of yarn is provided in grams, eg: 450 g. To calculate how many balls you’ll need you first need to know how many grams are in 1 ball (25g, 50g or 100g). This information is available if you click on the individual yarn quality on our pages. Divide the amount required with the amount of each ball. For example, if each ball is 50g (the most common amount), the calculation will be as follows: 450 / 50 = 9 balls.

The important thing when changing from one yarn to another is that the knitting/crochet tension remains the same. This is so that the measurements of the finished piece will be the same as on the sketch provided. It is easier to achieve the same knitting tension using yarns from the same yarn group. It is also possible to work with multiple strands of a thinner yarn to achieve the knitting tension of a thicker one. Please try our yarn converter. We recommend you to always work a test swatch.

Please NOTE: when changing yarn the garment might have a different look and feel to the garment in the photo, due to individual properties and qualities of each yarn.

See DROPS lesson: Can I use a different yarn than the one mentioned in the pattern?

All our yarns are categorised into yarn groups (from A to F) according to thickness and knitting tension – group A contains the thinnest yarns and group F the thickest. This makes it easier for you to find alternative yarns to our patterns, should you wish to switch yarn. All yarns within the same group have a similar knitting tension and can easily replace each other. However, different yarn qualities have different structures and properties which will give the finished work a unique look and feel.

Click here for an overview of the yarns in each yarn group

At the top of all our patterns you’ll find a link to our yarn calculator, which is a helpful tool should you wish to use a different yarn than suggested. By filling in the yarn quality you wish to replace, the amount (in your size) and number of strands, the calculator will present good alternative yarns with the same knitting tension. Additionally it will tell you how much you’ll require in the new qualities and whether you’ll need to work with multiple strands. Most skeins are 50g (some are 25g or 100g).

If the pattern is worked with multiple colours, every colour will have to be calculated separately. Similarly, if the pattern is worked with several strands of different yarns (for example 1 strand Alpaca and 1 strand Kid-Silk) you will have to find alternatives for each, individually.

Click here to see our yarn calculator

Since different yarns have different qualities and textures we have chosen to keep the original yarn in our patterns. However, you can easily find options among our available qualities by using our yarn calculator, or simply pick a yarn from the same yarn group.

It is possible that some retailers still have discontinued yarns in stock, or that someone has a few skeins at home that they would like to find patterns for.

The yarn calculator will provide both alternative yarn as well as required amount in the new quality.

If you think it's hard to decide what size to make, it can be a good idea to measure a garment you own already and like the size of. Then you can pick the size by comparing those measures with the ones available in the pattern's size chart.

You'll find the size chart at the bottom of the pattern.

See DROPS lesson: How to read size chart

The needle size provided in the pattern serves only as a guide, the important thing is to follow the knitting tension. And since knitting tension is very individual, you will have to adjust the needle size to ensure that YOUR tension is the same as in the pattern – maybe you’ll have to adjust 1, or even 2 needle sizes, up or down to achieve the correct tension. For this, we recommend that you work test swatches.

Should you work with a different knitting tension than the one provided, the measurements of the finished garment might deviate from the measurement sketch.

See DROPS lesson: How to measure your tension/gauge

See DROPS video: How to make a tension/gauge swatch

Working a garment top-down provides more flexibility and room for personal adjustment. For example it is easier to try the garment on while working, as well as making adjustments to length of yoke and shoulder caps.

The instructions are carefully explaining every step, in the correct order. Diagrams are adjusted to the knitting direction and are worked as usual.

The diagram depicts all rows/rounds, and every stitch seen from the right side. It is read from bottom to top, from right to left. 1 square = 1 stitch.

When working back and forth, every other row is worked from the right side and every other row is worked from the wrong side. When working from the wrong side, the diagram will have to be worked reversed: from left to right, knit stitches are purled, purl stitches are knit etc.

When working in the round every round is worked from the right side and the diagram are worked from right to left on all rounds.

See DROPS lesson: How to read knitting diagrams

The diagram depicts all rows/rounds, and every stitch seen from the right side. It is worked from bottom to top, from right to left.

When working back and forth every other row is worked from the right side: from right to left and every other row is worked from the wrong side: from left to right.

When working in the round, every row in the diagram are worked from the right side, from right to left.

When working a circular diagram you start in the middle and work your way outwards, counter clockwise, row by row.

The rows usually start with a given number of chain stitches (equivalent to the height of the following stitch), this will either be depicted in the diagram or explained in the pattern.

See DROPS lesson: How to read crochet diagrams

Instructions for working several diagrams after each other on the same row/round, will often be written like so: “work A.1, A.2, A.3 a total of 0-0-2-3-4 times". This means you work A.1 once, then A.2 is worked once, and A.3 is repeated (in width) the number of times provided for your size – in this case like so: S = 0 times, M = 0 times, L=2 times, XL= 3 times and XXL = 4 times.

The diagrams are worked as usual: begin with the first row in A.1, then work the first row in A.2 etc.

See DROPS lesson: How to read knitting diagrams

See DROPS lesson: How to read crochet diagrams

The total width of the garment (from wrist-to-wrist) will be larger in the larger sizes, despite the actual sleeves being shorter. The larger sizes have longer sleeve caps and wider shoulders, so there will be a good fit in all sizes.

The measurement sketch/schematic drawing provides information regarding the full length of the garment. If it’s a jumper or a jacket the length is measured from the highest point on the shoulder closest to the neckline, and straight down to the bottom of the garment. It is NOT measured from the tip of shoulder. Similarly, the length of yoke is measured from the highest point on the shoulder and down to where yoke is split into body and sleeves.

On a jacket measures are never taken along bands, unless specifically stated. Always measure inside band stitches when measuring the length.

See DROPS lesson: How to read a schematic drawing

Diagrams are often repeated on the round or in height. 1 repeat is the diagram the way it appears in the pattern. If it says to work 5 repeats of A.1 in the round, then you work A.1 a total of 5 times after/next to each other in the round. If it says to work 2 repeats of A.1 vertically/in height you work the entire diagram once, then begin again at the start and work the entire diagram one more time.

Chain stitches are slightly narrower than other stitches and to avoid working the cast-on edge too tight, we simply chain more stitches to begin with. The stitch count will be adjusted on the following row to fit the pattern and measurement sketch.

The rib edge is more elastic and will contract slightly compared to, for example, stocking stitch. By increasing before the rib edge, you avoid a visible difference in width between the rib edge and the rest of the body.

It’s very easy to cast off too tightly, and by making yarn overs while casting off (and simultaneously casting these off) you avoid a too tight cast off edge.

See DROPS video: How to bind off with yarn overs (yo)

To achieve an even increase (or decrease) you can increase on, for example: every 3rd and 4th row alternately, like so: work 2 rows and increase on the 3rd row, work 3 rows and increase on the 4th. Repeat this until the increase is complete.

See DROPS lesson: Increase or decrease 1 st on every 3rd and 4th row alternately

Should you prefer to work in the round instead of back and forth, you may of course adjust the pattern. You’ll need to add steeks mid-front (usually 5 stitches), and follow the instructions. When you would normally turn and work from the wrong side, simply work across the steek and continue in the round. At the end you’ll cut the piece open, pick up stitches to work bands, and cover the cut edges.

See DROPS video: How to knit steeks and cut open

Should you prefer to work back and forth instead of in the round, you may of course adjust the pattern so you work the pieces separately and then assemble them at the end. Divide the stitches for the body in 2, add 1 edge stitch in each side (for sewing) and work the front and back pieces separately.

See DROPS lesson: Can I adapt a pattern for circular needles into straight needles?

Pattern repeats can vary slightly in the different sizes, in order to get the correct proportions. If you’re not working the exact same size as the garment in the photo, yours might deviate slightly. This has been carefully developed and adjusted so that the complete impression of the garment is the same in all sizes.

Make sure to follow instructions and diagrams for your size!

If you have found a pattern you like which is available in women’s size it’s not very difficult to convert it to men’s size. The biggest difference will be the length of sleeves and body. Start working on the women size that you think would fit across the chest. The additional length will be worked right before you cast off for the armhole/sleeve cap. If the pattern is worked top-down you can add the length right after the armhole or before the first decrease on sleeve.

Regarding additional yarn amount, this will depend on how much length you add, but it is better with a skein too many than too few.

All yarns will have excess fibres (from production) that might come off as lint or shedding. Brushed yarns (ie hairier yarns) have more of these loose, excess fibres, causing more shedding.

Shedding also depends on what is worn under or over the garment, and whether this pulls at the yarn fibres. It’s therefore not possible to guarantee that there will be no shedding

Below are some tips on how to get the best result when working with hairier yarns:

1. When the garment is finished (before you wash it) shake it vigorously so the looser hairs come off. NOTE: do NOT use a lint roller, brush or any method that pulls at the yarn.

2. Place the garment in a plastic bag and put it in your freezer - the temperature will cause the fibres to become less attached to each other, and excess fibres will come off easier.

3. Leave in the freezer for a few hours before taking it out and shaking it again.

4. Wash the garment according to the instructions on the yarn label.

Pilling is a natural process that happens to even the most exclusive of fibers. It's a natural sign of wear and tear that is hard to avoid, and that is most visible in high friction areas of your garment like a sweater's arms and cuffs.

You can make your garment look as new by removing the pilling, using a fabric comb or a pill/lint remover.

Still can't find the answer you need? Then scroll down and leave your question so one of our experts can try to help you. This will be done normally within 5 to 10 working days.
In the meantime, you can read the questions and answers that others have left to this pattern or join the DROPS Workshop on Facebook to get help from fellow knitters/crocheters!

You might also like...

Post a comment to pattern DROPS 217-6

We would love to hear what you have to say about this pattern!

If you want to leave a question, please make sure you select the correct category in the form below, to speed up the answering process. Required fields are marked *.

Comments / Questions (24)

country flag Evelyn wrote:

Hallo, der Pullover verzieht sich bei mir in die Häkelrichtung, kann man dagegen etwas tun? Vielen Dank

09.12.2023 - 01:25

DROPS Design answered:

Liebe Evelyn, Sie können mal in Hin- und Rückreihen häkeln, am Ende jeder Reihe mit 1 Wettmache enden (wie in Runden) aber dann wenden und abwechslungsweise bei der Vorderseite und bei der Innenseite häkeln. Viel Spaß beim häkeln!

11.12.2023 - 07:44

country flag Amelie wrote:

Hallo, ich versuche gerade diesen Pullover in Größe M zu häkeln. Allerdings brauche ich 80 Maschen an der Blende, damit ich es über meinen Kopf ziehen kann. Wie kann ich nun vorgehen, dass ich eine passende Blende habe, aber nicht gleichzeitig einen viel zu großen restlichen Pullover? Muss ich an einer Stelle Maschen abnehmen oder an anderer weniger/keine zunehmen? Aber wenn ja, wo? Vielen Dank im Voraus und liebe Grüße.

18.10.2023 - 22:22

DROPS Design answered:

Liebe Amelie, damit die fertigen Maßnahmen für Ihre Größe stimmen die in der Maßskizze soll Ihre Maschenprobe stimmen, dh Sie sollen 14,5 Stäbchen x 8,5 Reihe = 10 x 10 cm haben. Hier lesen Sie mehr über die Maschenprobe - sollte sie verschieden sein, dann sollen Sie die ganze Anleitung nach Ihrer eigenen Maschenprobe neu umrechnen. Viel Spaß beim häkeln!

19.10.2023 - 08:10

country flag Marie wrote:

Bonjour, ce chandail a des coutures. Donc, la différence avec un modèle Raglan c'est juste que c'est plus vite à faire. Ou bien, il y a d'autres différences? Je n'ai pas encore décider et comme 1er modèle je pensais que le Raglan est plus facile, est-ce bien le cas?, merci. Marie

08.11.2021 - 16:32

DROPS Design answered:

Bonjour Marie, ce modèle n'a aucune couture à faire, il se crochète de haut en bas en divisant l'ouvrage pour les manches à la fin de l'empiècement pour terminer chaque partie (bas du pull puis manches) séparément. Vous pouvez demander l'avis d'autres crocheteuses dans notre DROPS Workshop. Bon crochet!

09.11.2021 - 11:57

country flag Mette 2 wrote:

Hej igen Jeg har haft skrevet og fået svar, men jeg synes fortsat ikke at jeg forstår opskriften. Hvis jeg øger med 7x16 som I skriver, svarer det jo til 7 runder hvor jeg tager 16 masker ud på hver runde - det passer med raglan. Men så øger jeg fortsat ikke med de andre udtagninger. Jeg synes jo regnestykket vil se sådan ud (i str. S): 74 + (16+2)+(16+3)+(16+3)+(16+2)+(16+3)+(16+3)+(16+2)= 204, men det passer ikke med de 202 ??

16.09.2021 - 12:12

DROPS Design answered:

Hej Mette. Det är kun maskorna till raglan du ska öka som vi förklarade i tidigare svar. Mvh DROPS Design

22.09.2021 - 09:01

country flag Mette wrote:

Kan I uddybe maskeantallet på hver runde ved bærestykket, når der udtages til raglan? Jeg hækler str S og jeg kan kun få maskeantallet til at passe, hvis jeg tager ud til raglan UDEN at tage 2-3-3 masker ud yderligere?!

07.09.2021 - 23:11

DROPS Design answered:

Hei Mette. Vi har dessverre ikke muligheten til å tilføye maskeantallet etter hver økning i alle størrelser i oppskriften. I str. S har du 74 masker og du øker med 16 masker hver gang det økes til raglan. I str S økes det 1 gang på hver omgang, deretter på hver 2. omgang 3 ganger, og så på hver 3. omgang 3 ganger. Altså du har økt på 7 omganger (1+3+3) og på hver økeomgang øker du med 16 masker = 7x16= 112 økte masker + de 74 maskene du hadde i begynnelsen = 186 masker. mvh DROPS design

15.09.2021 - 13:53

country flag Anne Lise Ernst wrote:

Opskrift drops 217-6 Raglan : der står: Tag 2 stgm ud ved at hækle 3 stgm i den første og sidste stgm i A 3. . ? så er der jo taget 4 stgm ud ? Mvh. Anne Lise

21.08.2021 - 11:03

DROPS Design answered:

Hei Anne Lise. Jeg skjønner tankegangen din, men her er det ment at det skal økes med 2 masker i hver maske det økes. Altså når du hekler A.3 økes det med 2 masker i den første masken og det økes med 2 masker i den siste masken. mvh DROPS design

27.08.2021 - 09:47

country flag Dagmar wrote:

Hallo guten Tag, ich komme bei der Anleitung nicht weiter. Hier steht: 1Stb in jede der 3-3 nächsten fM,dann 2 Stb in die nächste Masche. Bitte was heißt 3-3? Vielen Dank für die Antwort

11.06.2021 - 21:37

DROPS Design answered:

Liebe Dagmar, jedes "3" steht für eine Größe, bei der Ärmeln beginnen Sie die Runde in die Luftmasche nach der Markierungsfaden und häkeln Sie 3 Lm, dann 3 Stb (= in 3. + 4. Größe = je 1 Stb in die nächsten 3 Lm), und enden Sie die Runde mit je 1 Stb in die letzten 4 Luftmaschen der Runde. Kann das Ihnen weiterhelfen?

14.06.2021 - 07:58

country flag Dina wrote:

Kan ik deze trui ook met haaknaald drie en halfhaken

25.03.2021 - 15:51

DROPS Design answered:

Dag Dina,

Bij de stekenverhouding staat aangegeven hoeveel steken je moet hebben op 10 x 10 cm. Hierop moet je de dikte van de haaknaald aanpassen. Maak eerst een proeflapje met de aangegeven naalddikte in het patroon. Als je te weinig steken hebt op 10 cm, neem dan een kleinere haaknaald, als je te veel hebt een grotere. Maak opnieuw een proeflapje tot je de juiste stekenverhouding hebt.

26.03.2021 - 15:42

country flag Dina wrote:

Kan ik deze trui ook met driehalf haken

25.03.2021 - 15:48

country flag Julie wrote:

Kan man mon finde opskriften skrevet ‘normalt’ og ikke i diagram?:)

18.02.2021 - 06:58

DROPS Design answered:

Hej Julie, vi laver diagrammer til alle vores opskrifter med mønster. Men der findes også altid en video som viser hvordan man gør. Se nederst i opskriften :)

18.02.2021 - 08:34